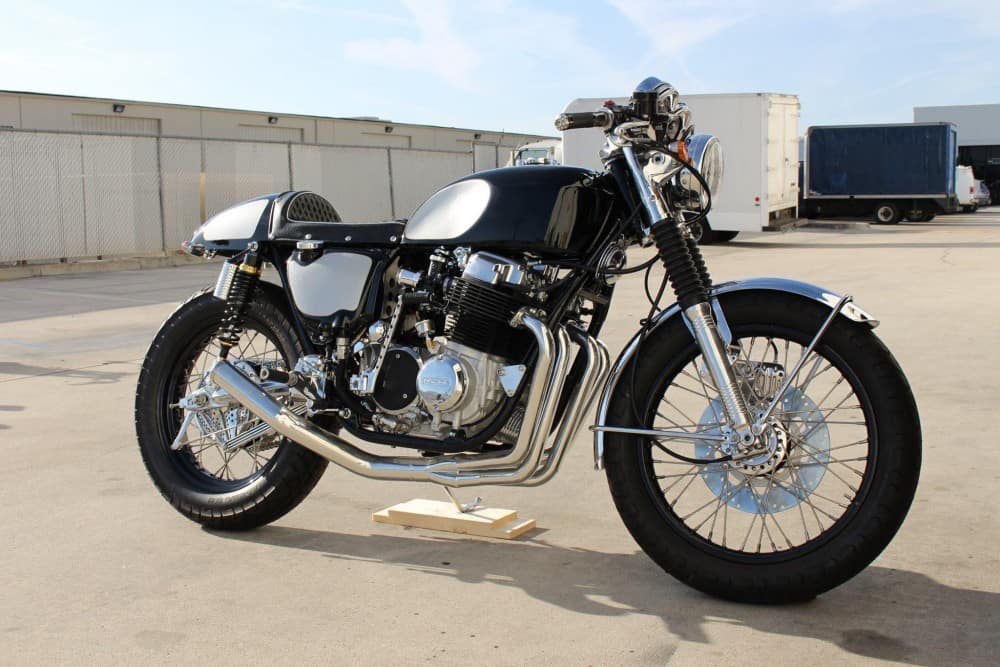
A New Year is almost upon us, what does it bring to the people in the two wheeled world?

Sitting in my office, looking at the fog bank rolling in across the front of the window, reminds me of years gone by when I was back in England, I had an old garage that was built in the 1960’s, the doors were missing and I shared the area with 9 other garages, closed in by a wall and agate, the Fog would roll in just like today and I continued to work on one of my projects, be it a 2 or 4 wheeled model and just shrug the weather off.  Today the Fog is surrounding me but I have been fortunate to have an office now and as I type this, the New Concrete slab that has just been poured for my new workshop, is hardening and hopefully in a months time, the steel Barn can be constructed and give me a new chapter in my life of Building and manufacturing parts for Motorcycles and Hot Rods.

This Covid Virus has really turned the globe on its head and many times I have heard news of friends and family catching this awful strain, I too submitted to it, even with 2 shots, but, the world is now evolving and in a way, getting used to life with a mask and Social distancing.  I mean, Life has to go on, we have to live, survive and of course put bread on the table.

I see a few companies starting back up, albeit on a smaller scale, but we have to carry on and get back on track, and not look back at the sad and painful year or so that has gone by.  I am getting enquiries on commissioned builds but am not ready to commit to contracts on these until I know where I am with my New Workshop etc. and want to take my time to equip the barn with the tools I need to do what I do.

But, 2022 is just around the next apex and I can see it approaching a bit faster now, I see a way better year ahead for all thank god and look forward to attending some shows and exhibitions etc. to show people New parts, builds and also just Human Communication, something I do miss of course, without communication, I have no input into what people like, want or are hoping to see in our two wheeled family and with the new Year offering hope with Vaccinations and the like, I believe that we can slowly get back into gear and enjoy the hobby that we all love.


I love all Motorcycles and really enjoy chatting to other builders, some of who simply knock my socks off with their own creations that leave my proverbial jaw continually slammed on the ground in amazement of their skills and creativity.

I think that as a builder and manufacturer, we all feed off input and the importunateness of shows and meetings etc. is Vital in the industry that we are in, and looking forward to attending a few shows next year, even if its just to stretch my creativity legs so to speak.  I really do enjoy talking with Customers about their needs and what makes their crank turn and even though I still receive many phone calls and emails, its always great to see the Client in person.

So, here’s to a way better year and look forward to seeing some of you on the tarmac, always great to hear from you all and get an idea of what you are creating at home.

New Year, let’s hope this one is a fruitful one

Well, 2020 can go and bugger right off, what a shitty year for everybody around the world, and we still have some ways to go before we can all meet up anywhere, so I tend to think I shall be here at home and will put my time and energy into making New parts available for you lot that are building at home right now.

I am so lucky that I find creating parts very therapeutic for me and will make the most of this lockdown scenario to see what I can accomplish and make available for you all in this 2021 year that we have just started on.

I am looking forward to seeing how your creations are going and hopefully you can send me some quality photos with a full description of what you have done, as many people ask about readers rides, so looking forward to some emails of your projects.

So I am wishing you ALL a very Happy New year and lets get building and see some very cool machines on the Tarmac for the Summer.


CB550 I am putting together from parts laying about.

Well, here we are and will shortly be beginning a New journey, moving to a bigger place with an acre of land and shall be having a Barn built for my workshop, so I thought I would try and use some of the old parts I have in my storage, to at least get a rolling chassis, so will be easier to move around when the time comes for me to move all my stuff.

This 550 frame was a friend of mines, but he got into a bad accident a few months back and will no longer be riding again, so, rather him getting rid of the frame, he gave it to me with some bits and bobs, and Ii thought now was a good time to at least assemble a few bits that I do have and see where we end up down the road a bit.

I had de-tabbed it and welded a hoop a few years back and then he had the chassis Powder coated and thats how it stayed, so I now have this at home and am now starting to see what I have to get this in some sorting of movable project, and I have a long way to go, as well as dealing with the smoke ash and bad air quality, due to the fires, I shall not be rushing this.

I am going to be putting it together in my spare time and see where we end up, but have an idea roughly of a Brat style bike that might be fun to ride on El Mirage dry lake etc later  on when the SCTA meets start up again.

When you start off with just bare bones, and no Game Plan, who knows where you will go, but, as we may be on the move very soon, I need to clear some of my storage out of parts laying about and at least make this 77-78 Frame Rollable, so I can move it about a little later on.

I managed to locate an old swing arm and fitted that to the chassis, and then I pulled out some TEC shocks that I had in a box and thought that this would be the best project for these as they are Brand new and will set the bike off nicely.

I had some Polished lowers in a Draw and some Hard Chromed upper stanchions all wrapped up in a box in my storage facility, so a good time to put together a good set of front forks, complete with New O-Rings and Upper Nuts etc, finished the look off with some chromed Dust Covers and there you go, a neat front end. I actually use A.T.F. for the oil and then set the pre-Load by adding 4 Stainless Washers in the top above the spring, just like they did at the Race tracks, as I hate the plastic tube spacers, dont trust them at all.

This bike needs everything, so it may take some time to get all together but, for now I am piecing the bike in the garage and its taking shape right now, a 18 Inch rear rim laced to a front polished hub and stainless stee spokes was the order of the day and of course, it would not look as Custom, without a set of Diamond Pattern Tires.

You may also Notice that I have fitted a Pro Moto set of Black 7/8 Handle Bars, with a center brace, just to give it a more Tracker look and to be honest, they feel really good on these tree’s.

Now she has a rear wheel and, even though she sits higher, I really am digging the ride height and stance of this machine, admittedly, she may drop down a tad when the Motor gets plopped in but, I like this concept so far and am having fun piecing this old girl together to begin a new life after many years of laying dormant.

Not sure on the Headlight or the Gas tank right now but, as I have a few parts laying about, I am just using them up for now and can check them later if I find something else.

This does have a nice look and feel to it, it roils so nice with new bearings and the bars give it a Classic pose and something I have high hopes for later on, long way to go and noticed the right foot peg is incorrect, so will need to find a 77 version so the brackets fit the frame right.

You may get bored at looking at these photos but right now I am trying to get a feel of how I want this bike to look and am sure I will be trying a bunch of gas tanks until I get the right one to work.

I polished up the old Rotor and will grab a set of old caliper and brackets from my storage and see what I can mount up on here,then strip and polish to a chrome look.

I tried another gas tank off a 500, still not sure and will keep trying, I will make a seat pan but make sure plenty of padding and i think tuck n Roll but not sure what color just yet, will wait until I know what fuel tank I shall use on this build.

Working on a super cool front bobbed fender, getting there and will be stoked to get that all dialed in, looks pretty dope already but just a few tweaks more.

That where we stand right now, and talking of stands, there is no main stand for this, so I have to come up with a longer kick stand for this bike, as she wont be able to stand upright with out one.


A CB500 Honda with a Tough Attitude

I sometimes have to kick myself to remind me that I have created all these Custom Motorcycles sometimes, its amazing that I still have a fluid creativity when it comes to two wheeled powered machines and the next bike i want to show you is a great stealthy bike that I sometimes wish I had kept.

I dont have the best pics of this machine as I had a shitty camera, but at least I got some pics that you can make out what I did to this old 1972 CB500 Machine. It needed a lot of work and was a non runner and missing a lot of parts but I was sure I could build something fun and affordable with what I had as spare bits and bobs scattered around the garage.

The old girl needed some help and I used what I could with parts I had around my garage, this was many years ago now and I had a few 750 parts in the rafters, so thought I may as well use some of them and see how this goes, but nothing ventured, nothing gained is my saying and it was fun to piece this little 4 banger back together, of course in bigger clothes than it had stock, but thats what I liked about this challenge.

The Motor kicked over, so I cleaned up the carbs and she ran quite well, so I thought that I may as well have some fun on a budget and see what I can create in a short amount of time. The engine was really responsive to be honest and as I had a 48 Tooth CB750 sprocket on the back, I knew she would boogie along as soon as the flag dropped.

I had an old beaten up 1982 CB750F Gas tank that had seen better days, so I cut out the flap and gas tank lock and welded it closed, drilled a 2 inch hole and fitted a Monza Style Aluminum Gas cap and then set about and hand hammered the tank for that old Manx look, I was pleasantly surprised at the outcome of this big old tank.

I Polished the forks and rebuilt the internals, then laced some 750 rims up and drilled the front brake rotor as well as rebuilding and polishing the front brake caliper too.

Braided hoses on the brake made sure this puppy would stop when you grabbed a handful of Anchor, I pressed out the Curved license plate as I wanted the old school British look.

Like I said, a mish mash of parts but cost nothing to put together to be honest and this was almost 20 years ago now too, time sure does fly when you are having some fun with Motorcycle parts.

I used a Harley 16 New rim for the rear and Shod both rims with Bridgestone tires as I like the handling of those boots. The rear seat tail piece is off an old Kawazaki Z1 race bike.

I used the stock shocks and swing arm to save some money and had an old Mac system that I never used and was sat up in the rafters, so I threw that on and it sounded ok with a shortened baffle and rejetted Carbs.

The clubman handle bars and the long tank, gave for a fun lay down cafe feel to it and was a blast to ride, it had a taller rear sprocket, so it got out of the gate real quick.

Even all them years ago, I was using Oil pressure gauges as its a quick way to make sure your heart beat is pumping in the motor, had to make an extension pipe to be able to connect under finned cover.

She sits nice and high for a 500 and boy was it snappy off the line, the first three gears and you were almost at 80 mph, what a fun machine to blap about town on.

Hazy pic but glad I still had some images left of this old 500 Honda and hope you like it too?

I sold it to a guy in Pasadena who then phones me to say a car ran over it and dragged down the road for a few blocks, it no longer exists, big shame as it was a great little Bar hopper Cafe Machine.


Corona Diaries- The year of the Mask

Well, here we are, the weekend is almost upon us, things are still bad when it comes to Covid-19, this is a crazy time for us all, but- We have to live life and try and work the best that we can with what we have these days, and I hear from many Customers of their way to get through some of the lockdown and boredom, by working on their own projects in their Garage, barn, Shed or back yard.

I must admit, working with a mask on is hard, but lucky for me, I dont have people coming to my workshop to ask about parts, most will call, text or email about the issues they have with their ride.

I sure hope we find an antidote for this as I do miss riding with people and having a chinwag in person about pretty much anything two wheel related these days, but I shall continue to write a few blogs as I go along in life and share what I get up to in the garage.

I receive many orders in the day time and night, I think people sometimes believe that I work 24-7, and if I could, then I would, but I need my rest too, but, I do try my best at getting your parts to you as fast as I can but- due to this Virus, many places that I use are either closed or part time, so that holds me up in ceramic coating or steel supply etc.

So, if you can bare with me until this gets a little more manageable, I will en-devour to get your parts out of the door in a somewhat timely manner.

Be safe out there and hopefully we can get this Virus beat and all go riding like we love to, so- stay safe, stay positive and stay in the garage Wrenching.

Thank you so much for supporting me in this tough times we are experiencing in life.

Peace and Grease

Carpy


Sunday and I am busy in garage

Well, no day of rest for me today as many people need parts for their rides, so I have been burning the proverbial candle at both ends, as I know what its like when you start on a project, you want to try and get as much completed as possible whilst you are still all fired up about the idea right?

So today not much of a Blog but a little tv show I was featured that you may or may not have seen, just thought I would share it.

Right, I got to get back into it as I am making Kick stands this afternoon.

Built a set of Custom forks for a Customer, thought I would share.

Many people have sent me their forks over the years to rebuild, polish or just hop up a bit as they get tired after 40 years of taking punishment from all road surfaces over time.

As the photo shows above, this is the old set that I am going to be working with, I strip these down, clean up and then what I do is machine some cool looking ribs into the stanchions to have that Custom look and then magnaflux it to make sure all is ok.  Once that is done I polish the lowers and then get brand new fork tubes made for the uppers.

I like to use as much Genuine HONDA parts as I possibly can and these will look so clean when everything is put back together and then you fit to your inline four machine.

As you may be able to see, I have New Hard Chromes fork tubes fitted and I have just put the OEM Honda Fork seal in place, here is the trick that I use to fit these seals, also- Remember, make sure the lettering faces upwards not down.

I use a piece of UPVC tubing that I bought from Home depot for about $2.00, this slides down the tubing and sits snug on the seal, but it fits inside the aluminum stanchion perfectly.

I simply tap the Plastic tubing with a Rubber Mallet until the seal bottoms out on the shoulder and there you go, no press needed and no damage at all, I have been doing this method for over 20 years now and never ever have I had a fork that has leaked by using this tubing.

I use some Harbor Freight Circlip pliers to snap the Original 2 hole clip back into the recess inside the fork leg, you will feel it seat when you let the pressure off the pliers.

I use as much genuine Factory parts where ever possible, and in this case I use New old stock Dampner Bolt and Copper crush washer, just to make sure all is new and fits as it is supposed to.

I use genuine Honda Dust caps to make sure all the crap stays away from the forks, then- Just to add some super cool Custom finishing, I like the way these complete that Custom styling on the front end.

See what I mean? Its a nice Custom finished look that really does not cost a lot of money and it is chrome, no plastic crap.

I have always used ATF for forks, the old Pro Racers mechanics used it and I still do today, I also used stainless washers on top of the springs to set the pre-load.

That’s is how much I pour into rebuilt forks and people ask me “How do you know how much to pour in”?

This is one of my Bibles that I use on things like fluids, point gap, timing and the like, always served me well.

I also make sure that ALL the threaded holes are chased through with a tap, this makes sure that the refit goes smoothly and you dont scratch the lovely polishing I have done.

I make sure that I hand polish the lower clamps and use stainless nuts and lock washers, this set up is really a thing of beauty and I am so stoked when I complete a set for a customer, a lot of work and time, but boy is it worth it and changes the look of the front end.

A great looking set of Lowers that will turn heads where ever you go, not a five minute job and not made in China either, all done from right here in California.

These are now ready to ship out to the Customer, so he can easily fit them in to his triple tree’s.

Just take a look at them, what a cool set up these are and all New hardware, Hope that you enjoyed this blog about that what I do with the good old inline fours.

Let me know if I can help you with your Honda, I have been doing it here in California for 20 years and never tire of it, it is a passion of mine that I hope shows in my work?

Thanks for taking your time to read my Blog and hope it may of inspired you to work on your machine?

The Vesco Honda SOHC 1974 CB750K Custom Built Brat Bike

Well, this was a super fun build that I did and it is not often that I purchase an old snotter and then, after building it, sell it back to the owner I purchased it from, but this was how it was, I saw that there was a SOHC 750 in a garage in the City of orange for sale and made arrangements to drive down and take a look at it.  once I got there and the garage door was lifted, I could see this sorry arsed looking inline four that was parked up, leaking a little oil and looking worse for wear.

I mean, it had everything there to make it look cool, but- it had not run for many many years and the young lad who owned it said he tried a few ties to get the bike to run but he lost interest and its been sat in the garage just collecting dust, so- we stood and kicked the tires for a while and eventually came up with a figure, shook hands and it took the three of us to push the old girl into the back of my van, but at last I had this old 750 in the Transit and had already worked out what I wanted to do with this 500 pounder machine.

The old girl is in my van and getting ready to drive home, I looked at the title and noticed his last name was Vesco- Your not related the the famous Don Vesco are you? I inquired.

Yes, he was my Grandfather, That is so cool as Don Vesco held many Land Speed records and had tons of 750 Honda’s back in the day, so I was super stoked to be able to own something with Vesco’s name to it, so, I drove home with a smile and half an hour later I pulled the old girl out and took a look at what I have to play with..

The Old girl was tired but, this is not my first 750 and as I have been creating Custom Motorcycles out of these here in the USA for over 20 years, I was quite eager to see what I had to work with but knew I had my work cut out if I was going to make a Custom creation out of this 1974 Honda.

Motor needs some love and had no idea if it would even turn over but I love these inline four engines and was going to see what it took to at least get to run and see where I can do with a full build on this 500 pounder.

The carburetors had seen rain, wind and snow by the look of it and the slides were stuck solid and as I have have rebuilt many of these rack of four set ups, I wasn’t too worried and thought I would strip the bike to where I need it to be and see where I am at.


I wanted to try and get this running, so I pilled carbs off and cleaned them up, fitted new jets etc and fitted new intake manifolds , as well as putting an old set of handlebars on as the clips on’s didnt fit right, I also hooped the frame as it was cut already and thought I would add my own style seat and see if I can at least fire it up, I had a 4 into 1 exhaust that I make that was in the rafters, so pulled the old rusty Kerker off and fitted mine, added an oil Pressure gauge so I can see where we are at if the old girl fires up.

The rims were too rusty, and was lucky to have an Original set of Lester wheels in storage that I could use on this bike, so fitted them and added some new Bridgestone tires and fitted one of my drilled brake rotors to the front end too. This bike went together really quickly and in the space of a week I was ready to fire this puppy up and see if it would even be able to move under its own power, I had spare parts in my garage or in my storage so it was a zero cost other than the tires to put this Honda together.

With rebuilt carbs and my 4 into 1 system cut down to a more aggressive loo, I was eager to see if this will fire up, it had compression and spark so I kicked her in the guts and she fired up right away with a nice brak from my exhaust system, I knew this would be a fun bike.

I made the handlebars and the seat too and this was probably the most comfortable bike I have ever ridden, I was so suprised how much fun this bike was and it had linear power too.

Well, I was happy at the way this bike was looking but the gas tank looked horrible just black and wanted a cool Custom 70’s flake look set of tins on this bike now.


So, I thought I would use the original tank that was on the bike, but wanted to get rid of the factory gas tank fuel cap and make a custom set up, just to be different.

I cut the old neck off and then ground it all down to make sure this was flat to the tank, I made sure there was no gas left in this tank before but it had been empty for about 7 years lol.

I make a gas cap kit now and this is how I did the conversion on this tank, as you can see, I fit the weld in Gas Cap Bung into the opening on the top of the petrol tank.

It sits in the original location really well, I simply ground all around the gas tank to make sure I have a good ground and then simply tig weld the bung in place, for a neat smooth Custom look.

All welded and to be honest, I do not need to grind the welds as I shall be doing a little body work on this to smooth everything out, so this will be covered up anyway.

I used a Harley screw in Gas cap and this really gave it a custom but Classic look, I was really happy at the end result of this and glad that I went this route on the bike.

Now that looks a lot better with the Custom 70’s style paint and am happy I went this route in the end, the 750 looks pretty tough like this.

This bike turned out great and even though I wasn’t finished with it, I wanted to get a few miles on this bike before I finally completed the other bits that I wanted to do. As you can see, the Vesco bike is on the Dry Lake at El Mirage where Don Vesco himself races bikes and broke records and the day this was fired up, Team Vesco did over 400 mph at Bonneville, so I thought this was fitting that i was at a SCTA meet in El Mirage with my Girlfriend Jennifer.

This has a great stance and is so comfortable to ride, the drive train works smoothly and my aggressive 4 into 1 barks like a scolded dog, I fitted an Led headlight that is 5-3/4 inches with internel led turn signals to make it all legal for the road. She sure looks swell out there in the Desert.

I like the meaty Bridgestone tires that were shoe horned onto the Lester Rims, those rims came of a CR750 Race bike and I had them in storage for almost 20 years.

I love it out here at El Mirage dry lake, if you can get a chance to get here for the SCTA racing, you should, I loved taking the Honda out here and I think it felt at home to be honest.

So there she is, the Vesco Honda Four, a brute of a bike and it looks pretty tough out there in the So Cal desert, I am so glad I went ahead and built this machine.

Now it was time to take the bike back home to Las Mirada but what a great time we had out on the dry lake, watching the Hot Rods and Motorcycles race on the Lake bed.

My Girl Jennifer takes the reins as I help a broken down Motorcyclist on the race track at El Mirage SCTA event.

So, I now get ready to put the Vesco bike in my Van and take it back home to my garage and figure out what I am going to do with this Motorcycle.

So, I sit the bike on the drive way and I am think of what else I might do to it, and I have to write a few emails to customers etc, it was when I got on the computer I see I got a message that I had been invited to the OG Bike Build show in LA and its in about 4 weeks, heck! I could maybe strip this bike and redo it to how I want to and show the bike, of which is a tall order but heck, why not eh?

So, even though it is a tall order, I had to come to the decision to take this bike and strip it to the bare frame and begin a cool build for the OG show, I shall still keep the Gas tank and side covers the same and the Handle bars etc but the rest will get some rework.

The strip down begins, I want this to be a trick frame when I am done and now is the time to take the bull by the horns and remove everything from this 500 pounder and make this a head turner.

I am taping the frame where I will be cutting and making quick release Custom Pieces that make engine removal and cylinder head removal way easier as the stock frame is so difficult to remove the motor when in the cradle.

Top frame removed and I shall be fitting my New  Steel tubing Frame kit that I now offer on my website for the 69-78 CB750 Chassis.

Heave ho and away we go, I have removed so many engines on my own over the years, there are many ways people do it, some lay the frame down etc, but I like the old school brute strength of removing the 230 pound behemoth, I always go this way and then put the motor on a milk crate as its about the same height as the lower frame rails, I am always knackered afterwards though.


Well she is out at long last, time for a cuppa and an Ibuprofen lol- But seriously, the Motor is out and now the hard work begins, you too will notice how dirty and grimy a frame becomes after being used for 40 years and this thing has more oil on it than the Tin mans Elbows.

I Have welded the New removable top Rails in the chassis, now time to cut the right Lower side of the frame, so I can make a removable side for the 750 Four.

As ypu can see, the top rails and side rails are now in place, looks bloody awesome and not seen this EVER done before, I wanted to really push the boat out in the short amount of build time that i have on the Vesco Honda, I bet people wont even notice it when I am done.

Make sure all the weld area’s are clean and my Kit that I sell will work great for all of your machines from 1969-1978 and glad I have made these kits to be honest.

See, all nice and shiny, and soon to be ready to media blast all the paint on, prep and paint for a Custom Color and this time I think I shall go with a metalflake Silver, to keep with the Custom 70’s paint style.

All media blasted, she is now ready for the start of paint, this will take some time as i want the thick flakes but this will look great in the Sun against the Gold of the tank etc.

The race is on, and as you can see, I have the Silver Flake paint on the Chassis and I went ahead and chromed the rear swing arm, just for that added Custom look.

I have to rebuild some front forks, I went ahead and machined the fins in the lowers and polished them, then I needed to add new seals to the old girl for new life.

I use a piece of Plastic tubing and gently tap the tubing onto the seal and this easily presses the fork seal into the stanchion with no damage at all, so easy to do like this.

Custom look and even have chrome topper caps on the Original black covers, just to give it some nice bling and look a little different from the rest out there.

New tubes, springs and I set the pre-load using 4 stainless washers, as I dont like using that Plastic shit that many fork places offer, washers is the old school way and I also use Automatic Transmission Fluid instead of gear oil, another old school way.

Time to work on a custom rear brake Hub Assembly and I shall strip these, clean it drill the holes for aeration and cooling the hub and then polish it and fit new brake shoes and actuator arm to it.

All done and am happy at the look I was after, a nice custom touch that I do and offer this service to many people and is available on the website.

Front brake rotor gets the same treatment, I do all this at home and use my old drill press to make all the holes and then countersink both sides, for me, its therapeutic to be honest and boy does it look good when finished.

Now I just need to clean it up, paint the center and I shall be ready to mount on the Original 1977 Lester mag wheel, now for the cool pics below.

You can see the Custom paint nicely, all seems to flow really nicely and am super stoked I got the job done in time and it runs like a top, this sure is a stunning Custom bike and am proud to have completed such a creation, I just went for it and there you go, I have never built a bike twice but it was well worth all the hard graft.

Rebuilt and polished Caliper, Rotor is polished and painted and braided brake lines too, I did all I could think of on this machine, it really is a head turner.

Vintage style metalflake Candy paint with fish fad aways, captures the spirit of the build and hope that you like the direction I took on this SOHC bike.

Custom master cylinder, new switches, hand made and triple chromed handlebars really do set this build apart from many but- I hope I have inspired you to have a go at your machine now?

I wanted something a little different on the exhaust set up and thats why I thought I would go with a stainless steel 4 into 2 into 1 performance set up and boy does it sound sweet.

I did so many tricks to this bike, I machines some upper fork covers to match the lowers and this time I went with a Custom headlight that is so different than the others that you see, it is pleasing to the eye and I just cannot stop looking at this bike.

You can see the detail and the quick release chassis rail too, hope you like what I achieved in such a short amount of time?

Custom drilled levers, hand made front fender and a machined bucket out of 6061 Alloy to house the GPS speedometer, all flows together on this 74 CB750 Honda.

The Devil is in the detail they say, I did as much as I could in the short amount of weeks I had, but so stoked the way she turned out in the end, well worth the hard work.

Riders view, thats a GPS speedometer and I had to hand make the housing , this really is so cool to look at from any angle, so many tricks on this ride.

Re-charged shocks with Custom machines finned covers and 2 inch allot risers,make this Brat bike sit to the height I needed to sit my fat ass on top of.

Oh yeah- I even painted a Vintage Skid lid to match the paint scheme of the bike and think it worked out pretty good.

The stainless exhaust systems has a deep bellow that gets your attention, and this breathes so well it gives you Linear power all the way through the band.

This has been a fun adventure, not sure I could warrant another build so fast but this was a fun challenge and the cool thing is that the original owner that I puchased it from loved it so much, he bought it back off me.

So many cool little Custom touches I did on this bike, I would have to take a long hard look to remember what I actually did.

Sitting in the parking lot in Downtown LA, I got many cool remarks about the Vesco Honda and so glad that I made it in time to show people what this bike is about.

Hard to top this build but, I love creating them and hope I can continue having fun with this old 750 Honda bikes of the Nineteen Seventies.

Just goes to show that with a little imagination, there is a lot that you can accomplish on something, I was certain I would get this completed for the show too.

Plenty of eye candy and color, hope that you like what I have managed to create.? The good old SOHC Honda Four.

Took me some time to figure out the finned aesthetics etc  but the long process worked out really well and all seems to flow very well on this Custom Build.

This bike does look really well in the sunshine too, all the nuts and bolts are stainless steel too so no rust ever.

The Vesco Honda sits pretty level and you will be surprised how comfortable this Motorcycle is, I sure miss it already. LOL.

A tough bike, super strong Motor and sits well, this will last many many miles and hope to see it again one day.

Thanks for taking your time to read about this Vesco Honda build, I hope you have enjoyed what I have created?

Sat in my driveway before I took it to the Original owner in the City Of Orange.

Well I guess its onto another build, hard to top this one though.

At the OG show in LA where the Vesco Honda made its Debut and many people gave me the thumbs up.


Wishing you all a Very merry Christmas from Southern California

Well, here we are, almost the big day, this year flew past and to be honest, I am looking forward to a fresh start in 2020, had a tough year with life in general, as my Girls mom passed away, things have been quite stressful in life generally and even though I have been busy, it is always good to start a New Year off and with a Bang.

I am super happy with All my Customers, thank you all for supporting me and using my parts to get your machine back together, especially all the Custom builders, as I have seen a real turn in the Motorcycle industry, and the reason for that is because of you lot.

It is you that have taken many months to design and create your unique ride, our “Sub Culture”  has been recognized by the big guns in the motorcycle industry and even Ducati and Harley have a Cafe Racer, as well as Kawasaki, who would of thought that?  I am super stoked to see peoples machines hitting the tarmac for the first time, I am hoping to maybe feature some of your builds if you can send me a detailed build list, where you are from and some great back ground shots of your masterpiece sitting in the middle of the photo.

It is an exciting time for us all in the Custom world and many more people have taken notice and you see lots more cool machines on the road thanks to you lot and i want to take this oppertunity to wish each and everyone of you a very Merry Christmas, this next year will be a fun one, I can feel it in my bones.

Thank you so much for thinking of me when you come to need parts or apparel and look forward to seeing some of your Motorcycles in 2020.

MERRY CHRISTMAS TO YOU ALL.


Playing about in the garage with an old snotty frame

Well, I need to clean some of my old storage out and thought I would have a bit of a play about today, being its Sunday , and see if I can at least come up with some sort of rolling frame.


So a few bits and bobs were put together to see where this may go, not sure what style or Caff or Brat style but just having a dig around out of my old parts to see where we end up.

I had about 3 hours to spare today and wanted to try and at least collate some parts that have been getting in the way in storage and this would be a fun project to start on today in the garage.

So, a fun afternoon just playing with an old neglected frame that had been butchered up many many years ago and to save it from the junk yard, I took it off a friends hands and thought that I could at least do something with it and save another inline four from the scrap pile.

Well its all about there, not sure if I like it or not, the Alloy 5 Gallon hand Made gas tank is fun but not sure on the seat and I do not like the handlebars at all, but thats all I had kicking around the garage, either needs Clip on’s or a set of Ace Bars.

Not sure on the smaller LED headlight right now but I had these old parts laying about here in my garage, so its a mock up and I am sure this bike will go through a few guises until I am happy with the look and the style that I want to try and create.

Up in my Rafters, I had a coupe of old Dresda swing arms, this one is a NOS CB750 version, so I thought I may as well use the thenig and am happy that I have, of course I shall run a wider rim later too as I want to fill that void up.

I had some old Tarrozzi rear sets brackets so if I go the Caff route, then the ends of the brackets of the frame will get nipped off and sealed up with weld for a clean look.

The whole point of me mocking the bike up , is to see if there is any parts that I really like and may help the bikes lines flow nicely, I am not sure on this old CR750 seat, its ok but I am just not feeling it to be honest, so I may put this one back in the storage and think again.


The 5 Gallon Manx tank is cool but I am not feeling it on this frame at all right now, mainly because I am not a fan of the handlebars I fitted, but as its a Sunday and I am using parts from the garage, it will do for a while but am sure this will change its look as time goes on here.

But I have it all mocked up and I may go with my Custom gauges, just for that Classic look and will refurbish the left speedo to match the Skull and cross bones tachometer.

Just want to show that I do use old knackered parts and I can change the look and style right here in the garage, as this build goes along you will see some progress shots but I need to have a rolling frame that I am happy with, before I tear it all apart and start to the tiresome hours of welding, grinding, sanding and refurbishing, until i am happy with the way it is looking.

it looks ok but just not turning my crank, so i think I will try another petrol tank as some times that alone can change the lines and flow of a bike, so i have an old k3 gas tank I can plop on and see what that looks like compared to this Manx Alloy version.

Well, I do like the Original tanks of the K series, but not sure I like the seat at all now, thats all part of the mock up, just keep going unto you are happy with the look that you are after, this may take some time, but its all worth it in the end, you just cant rush this stuff.

Well, the Handlebars are now doing my head in and as the light is starting to go I may pull the plug for this afternoon and re-charge myself once more and see where we go on this old girl.

The main objective today was just to piece together a bunch of old parts that have been collecting dust in my storage and around the garage, so at least I have made some progress to some extent.

I am glad that I used the Dresda swing arm and hope to be banging out my own version of these again, but stay tuned to how this old K model is going as i hope to make a cool, head turning machine that will belt along the highways and byways of Southern California, stay tuned……………………………..