Honda CB750 Super Sport Classic Cafe

I recently came across some old CD’s that I had tucked away in a drawer, glad I took some pics of some of the motorcycles that I have created, they say if you put them on the internet, it’s there forever, but that’s incorrect as I had quite a few bikes on there and cannot find them anywhere, so I was stoked to at least find a couple I had created and thought that I would share with you.

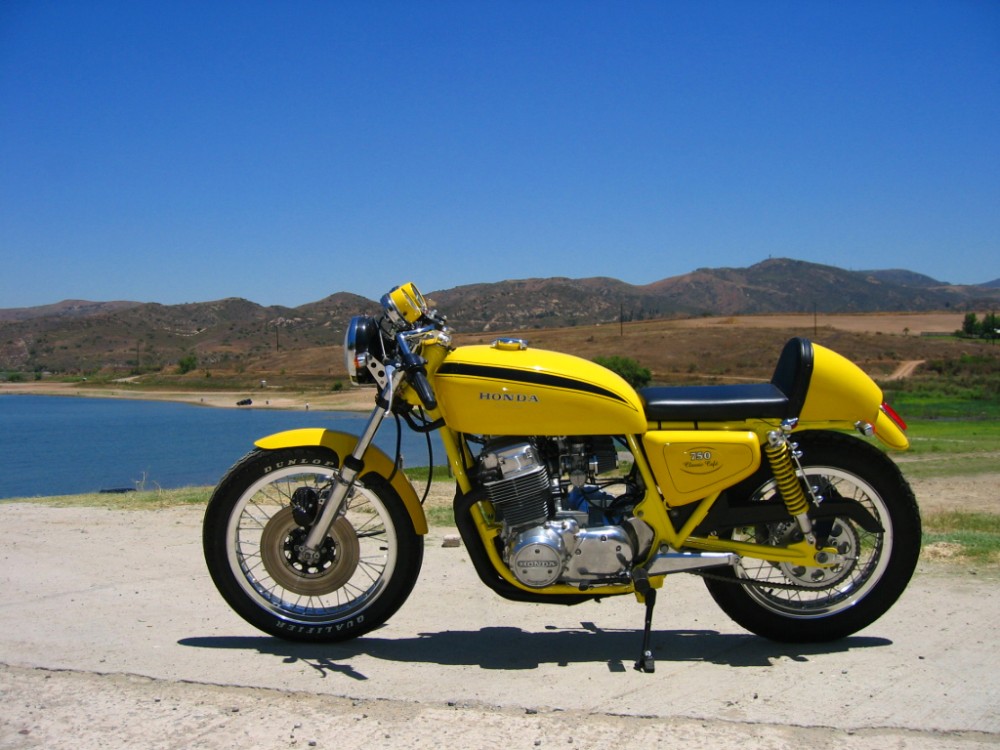
The bike started out as a stock 1978 machine that had seen better days and been neglected for a few decades, this was a good platform to use as I knew the Motor would at least kick over but not fire, so, with that in mind I set about pulling the bike apart and going a little out there with the color, the reasoning for this? Well I loved the old Yellow on the 400 -4 Super Sports ad thought I would go with that color ad it would stand out in the California Sun.

Taking apart in my old garage, where space was not infinite.

The Bike belonged to a Customer and he wanted me to go way out there and make this a head turning machine, if I remember correctly he was a Rocket Scientist, so I had to come up with something that would Blast Off!!!

Everything apart and now its time to see what to do, I started with the frame first, as that needed to be cleaned up then stripped before I could get it ready for any sort of paint.

Happy with this now, I have to media blast the frame to remove old paint and of course any rust etc, file any bad welds and spot weld back to good again, then it will be time to take to Powder coater and get some Sunrise Yellow on this to make a big statement in chassis color.

As you can see, this really is a bold statement- I really wanted this to turn a few heads for my Client and he has let me go ahead with what I ever i feel this machine may need to give it a wow factor, remember, this was about 2006.

Motor stripped and rebuilt with New cam Chains, belt slider and clutch etc, this will be like a New Machine when all back together, but- A long way to go as yet.

Like a Jewel now and ready to go back in the frame when I have completed it to a rolling chassis.

So, the Motor is now all painted and polished and awaits me to lift this 230 pounds of aluminum and throw it into the Duplex Cradle frame of the SOHC, but I still have to get that frame rolling, what I need to do is finish the chassis so its a roller, then I can get this lump back in the place it originally was placed in 1978.

OLYMPUS DIGITAL CAMERA

I rebuilt the rear shocks with all new stainless steel hardware as I don’t want this to rust like it had done previously, and will take my time getting this together on my own.

I went another route this time as the 1978 Forks were in really bad shape, so I used a 1976 CB750F front fork set up, polished the lowers and fitted new tubes and completely revamped these with Progressive springs etc, this is a nice set up and very clean compared to what was on there.

Frame is back together, using an old 1976 front wheel to make it a roller as I shall be building new wheels for this bike, I also put pipe insulation on the frame so I don’t scratch the paint when I am fitting the motor.

She is now a rolling chassis, with this I got the bike off the bench and onto the floor then into the driveway, I used a 1976 rear wheel to fit in the back until I have made new rims up, but now is the time to see if I can fit this engine and that’s the last of the heavy lifting.

The Motor is now in, with the help from my trusty cat, I also fitted vintage speed equipment parts on the bike for that added bling, as well as new switches on the Ace bars and GT grips for that Nostalgic look and feel.

Fuel tank was a different matter, this time I wanted to fit an earlier K series fuel tank, so used 2 gas tank and sectioned them as I wanted a 5″ stretch for a long road race style petrol tank of back in the day, took a long time but sure looked great when completed.

It took quite a few weeks to get it right and I had another supersport frame I could use for a mock up so I didnt scratch the paint on the chassis.

Once that was all sorted I had to do the body work right here at home still as I worked in my garage all the time, lucky my neighbors are out all day so can bang, grind and sand with no interruptions at all.

Final fit of the gas tank and i like the stretch, not too much but just enough and an extra 2 gallons capacity is always good right?


I do not like 1977-1978 carbs and wanted to fit earlier versions, I only had old snotty ones in boxes that I had picked up at swap meets and yard sales, so a full rebuild was needed to get these to how I wanted them.

All cleaned up and synchronized and looking forward to fitting these to the motor and way easier and faster to tune than the flat tops.

I polished the original wheel hubs and used stainless spokes and attached them to CB750 Automatic rims as they are aluminum, bunged on some classic tread rubber and these look like they were from the factory.

This time I went with my CR style seat base and added a rear fender, fitted a Yoshimura exhaust of mine to give this machine more bark.

The bike is sitting well on those Automatic rims and glad that I made the choice to change to that as I have never like the 4 spoke set up that came on the 77 and 78 models, the Comstars as they were called were tin looking and I think, very weak.

Making parts fit that were not available for this bike always takes time and of course many failures, but I persisted and got the bike to where I wanted it so everything flowed.

I had an original Dunstall front fender that used to be hanging on the wall, I wanted to use it as it was from back home and very fitting it looks to.

I used the old Honda Super Sport gas tank decals from an old 400-4 as thats the color I chose for it and very cool it looks too, the bike was a hoot to ride with tons of low end torque.

It was a learning curve and I enjoyed the challenge on this bike, this was many years ago and I would change a few things now but this was a fun creation that was fun to ride.

You cannot lose sight of this in a parking lot, the color is loud and proud and the Customer loved it, a great stance to the bike too with that big long tank too its just smooth.

It may not be your style but I was super stoked to have a go at changing the sad tired original bike and give it a brand new life as well as a brand new look too.

I just wanted to share a few pics of this bike as I had lost them many moons ago and glad that I could load them up on my website for you to have a look at.

Thanks for taking your time to read my Blog on this Super Sport, of course I still make and sell parts and build Motorcycles, I always will as its a passion still for me.

The KC Special CB750 Honda inline Four

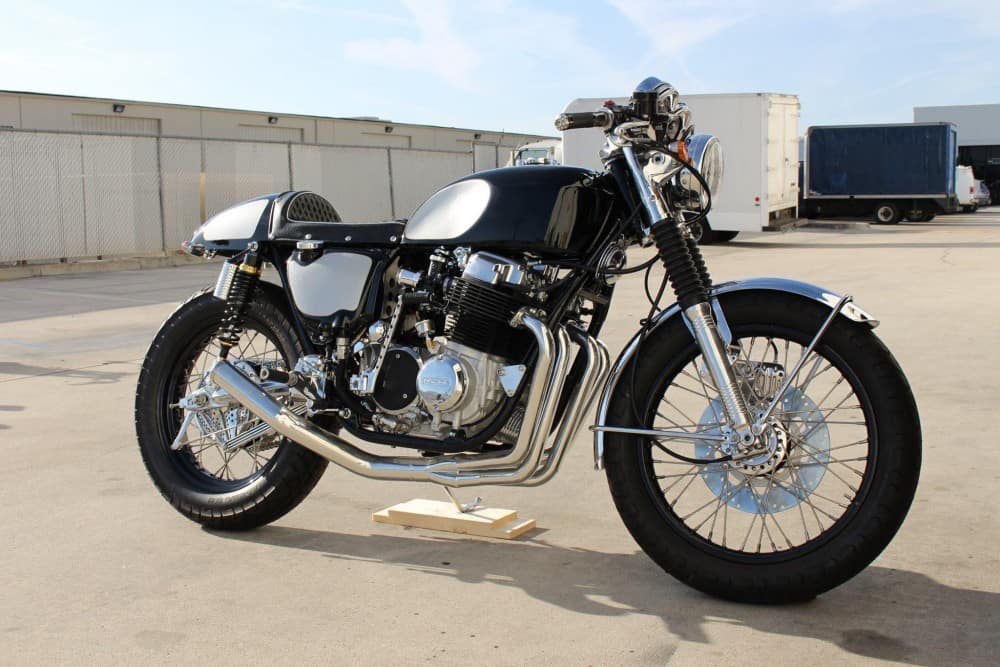
I have always loved creating My style of machine for Customers and this one is no exception, the KC Special turned out to be a great looking ride and the Owner Keith Conrad ( Hence K.C.) lives in Milwaukee and asked if I could revamp his old 1975 CB750 into a Silver and Black Cafe bike, I said sure thing and the deal was done, a build sheet was agreed upon and Keith sent the bike out to me.

I took the bike apart, right down to the frame, as I do all my builds, then I set about cleaning the frame up some what and smoothing some of the old factory welds, as Honda welds are quite rough back then as i guess they were hand welded and not automated as they are today.

As you can see, I took my time as I wanted the frame to really look nice in a Gloss Black on this build, I wanted it better than factory, so I took a long time to make sure that this Chassis came out nice, as i mostly powder coat my frames, unless I am using Candy Paint or Metalflake etc. Above you can see how Glossy the main frame rails are.

I took the stock gas tank and using my Egg Hammer, I pounded the sides to create Knee inserts, so you can tuck your legs in tighter to the bike and get a little more stream lined, just as they did back in the day for racing etc, this is no easy task and you will see how much it takes to do when you have a go your self, but worth the look in the end thats for certain.

The Paint scheme is High Gloss Black with Metalflake Silver panels and racing stripes and I really needed to make sure that this flowed well, and am happy with the result.

Plenty of Detail too, I hand machined out of 6061, a Custom Finned Oil Tank Dip Stick cap, this really did look trick, compared to the stock version.

Its like the saying says, the devil is in the detail and there is plenty to look at on this CB750 Cafe Bike and am stoked how the bike turned out in the end, worth all the hard graft.

The seat is one of my own that I manufacture, called “The Rocket 4” its a sleek sturdy and well rounded seat base that I produce and has the same curve as the gas tank, that way the body work then flows and give the machine the Status Quo.

Keeping in the theme of Old School styling, the seat upholstery was hand machined and small 1 inch Diamonds in white stitching with Silver piping and vintage snaps was completed to really make this stand out from the crowd.

I used an LED Custom Tail light that I offer on my website and this is bright as Einstein, and I think is a nice addition to the back of the Rocket Four seat unit, also the silver flake racing stripes really stand out nicely.

I machined some covers for the rear piggy back shocks as well as making some risers for the lower, to increase the ride height by 2 inches, out of 7071 Military spec Aluminum.

I also Chromed the rear swing-arm and hand made then Chromed a Custom Chain Guard to show the Gold 530 X-Ring chain off, I also polished the Hubs of the rims and painted the centers black to give a nice offset.

The Motor was rebuilt, as well as the carbs and synchronized etc, my Custom Oil lines were added in Black for a nice offset too, I fitted an oil Pressure gauge to keep the rider informed as to what is going on below.

As you can see, there is plenty going on here, I took a lot of time on the front sprocket cover and I even polished the rear set brackets for a more Custom look too.

Rebuilt and polished Carbs with hand machines velocity stacks from Steel Dragon really help the look of this bike and give it that Nostalgia look and it runs really hard too, there is something about hitting 6 grand on a 750, then you know you are starting to pull like a steam train.

People ask me about my gauges that I create on these inline four machines, and this one is no exception, unless I am restoring a bike, I don’t really care for the Honda’s Gauge faces as they are Green or Blue, not my favorite color of choice to be honest, wished they would of gone Black with White numerals like the Classic British machines, but oh well, so what I do is take the gauges apart and then I fit my Custom faces thats an overlay I print out, then repaint the needle and add chrome cups to embellish the bodys and give it a little more Custom look.

I have always liked to do this and it really does personalize your gauges, this time I went with the Cafe Racer Font and crossed Flags of which I think suit this Motorcycle to a Tee.

You may also notice that I have fitted a 2 inch handle Bar riser, to give a more comfortable riding position and easier strain on the wrists too, then fitted my Relocation bracket on top of the handle bar clamps to clean the top end of the bike up, with a BIG oil pressure Display light to match the Needle ends.

This is one tasty ride, the 4 into one system of mine is Ceramic Coated Silver, its a great look, almost a brushed polished Aluminum look to it, and she barks like a scolded dog when you get on the loud button, you will also noticed I machines a Finned Stabilizer Bar at the rear of the bike and did my usual drilling on the brake hub to let brake dust and heat escape under hard braking.

A lot of time and energy went into creating this machine and the owner really digs it, it is just how he wanted it and am glad that i was able to oblige with his demands.

The Customer wanted Gloss Black Rims with stainless spokes and he really did like the way these turned out on the bike and the attention to detail that I am known for on these inline fours.

I always fit an Oil pressure Gauge, as I do not trust the Honda Pressure switch thats behind the Barrels, so these run great and give true pressure as soon as you fir the bike up, as it is connected to the oil galley plug.

As you can see, New Levers, new Control switches, new Handle Bars, polished triple tree, New cables, New master cylinder and stainless nuts and bolts through out this motorcycle.

A great but solid Motorcycle, with aggression when you want it, reliability for everyday riding, and an awesome stance to give it that moving look standing still, sure does sit well in my stable.

I really did enjoy putting this bike together and felt good to know that I had done all and more than the Customer had asked me about, its one fine steed and I enjoyed slinging my leg over it.

I wanted to share it with you guys and Gals and hope you like what I have created too?

Maybe if you are in Milwaukee area, you might come across the KC Special? if you do, take a snap and send it to me, love to see it again.


A HONDA CB750K I Aptly Named The NUT BASHER

I forget to add pics of Motorcycles that I have built over the years and some times I kick my self for not posting anything, but today I will overcome my forgetfulness and add some photos of a fun creation I built using parts that I had around the shop.


I wanted to build something that was a cool reference to Cafe Racer styled Motorcycles back in the day but, of course using a later motorcycle but, still early enough to be classes a classic and I started off with a 1971 CB750 Honda four that was just basically a frame, I had a bunch of boxes with parts in them and over time, I started to put a few things together.

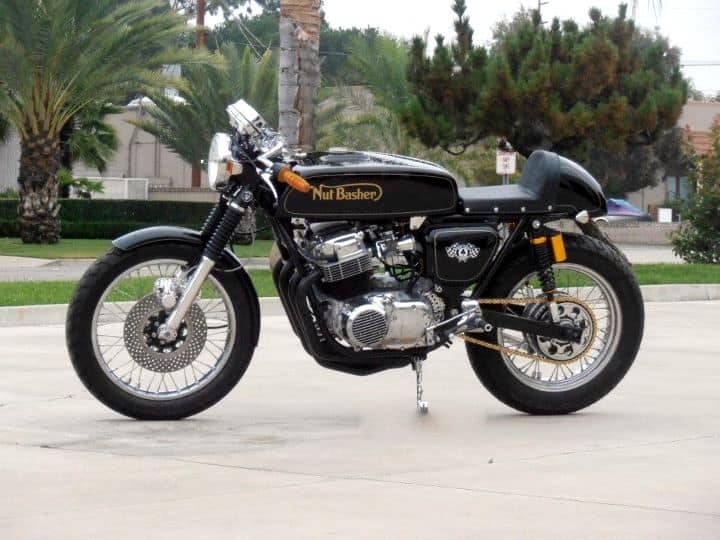
I had an old Fiberglass Racing Gas tank that I thought would be just the job, I fitted it to the frame and sat on the bike, immediately crushing my nuts, that’s when the Penny dropped and I thought what an apt name for the bike and thought if I did it in the style of the Norton Logo, this would look pretty Classic.

I chose to go the traditional deep Black Color and then pin line around it in Gold, as that would really give it the 1950’s era British Motorcycle look that went along with Norton, BSA, Triumph and Matchless, as well as the Vincent of course.


Now the Gas tank has a Ton Of clear sprayed on it, I had to test fit it to the frame, as I had powder coated the frame Gloss Black and Built the Motor to an 836cc and wedged her back in the chassis, the bike was looking really good and I was happy about this, but now I had to come up with a Classic styled seat unit for the Nut Basher, so I went the whole hog and built one from scratch.

I tried all sorts of ideas until something clicked, but had to thing of a cool way of mounting a tail light and I wanted to have the light incorporated into the seat hump.  I chose to French the rear Led tail light into the cowl, and although it took a full day, it came out really well indeed and was super stoked that I had gone this route on the NutBasher Machine.

It sat on the frame just right and I attached snaps to the sides of the until so I could pull the cover off and get to any documents I need, or remove the seat if I ever needed to quickly, I also made sure there was a ton of clear coat applied just incase I scratched it and could buff it out on final fit etc.

I was super happy with the way the seat unit fitted and the tail light assembly was Classic looking but in fact was an Led stop light that was as bright as Einstein.

I wanted to put a lot of detail into this creation as I knew it would turn many heads where ever it ended up, this Fuel tank held 5.5 Gallons and that made for some great riding, without worrying about running out of squirt, but it sure was bloody heavy once the tank was filled up to the top.

She was a Long and thin Motorcycle that screamed out Nostalgia, it ran hard as nails and breathed really well as it has a hand made 4 into 1 Racing exhaust that was built in less than 3 hours by a Indy Racing mechanic, this would really exit the gases well and have never heard something so mean in all my life.

This was created by a top Indy exhaust builder and designer and he didnt even need the bike to make it, just an upside down engine, it was so cool to see him knock this out.

A sheer work of art and it fitted like a glove too, this was made in Inconel and a one off like this, nobody in the world will have one like this. The material is as I said Inconel  that refers to a family of trademarked high strength austenitic nickel-chromium-iron alloys that have exceptional anti-corrosion and heat-resistance properties. … Burns Stainless recommends Inconel 625 alloy for exhaust systems due to its excellent strength, corrosion resistance and fabricability. And it sure stood up to my fire breathing 836 motor no problems at all.

This is such a nice system, shame to coat it Black but I want the bike to have a lot of Black parts on it, so ceramic coated it will get and I am sure it will look great.

This Motorcycle will not just look fast, it will haul so much arse, it will leave people scratching their heads as it goes by, and the roar from the exhaust will stay with them for a lifetime I should think.

Another thing that I do and nobody ever did back then was, make my own gauge faces, I have created many over the years and this Ton Up machine needed a great set of gauge faces to give the top end of the bike some class too.  So I went with a Roaring Tiger, Synonymous with the 1950’s Triumphs and colorful to say the least.

These are really easy to apply and give your tired old gauges a brand new lease of life, also very unique and personal to your bike, something that I have been very proud of.

I even repaint the needles and add a longer Red line to the end, so you can clearly see where the needle is pointing at speed, also if you look, I have readjusted the configuration of the gauge faces and they digits start at a different position than the stock factory versions.

Not sure that you will notice but, I also changed the 100 to the word TON, which of course means the magic 100 MPH and a milestone in Café Racers back in the day to reach that Golden triple digit. I also added my own Oil Light warning  display of which has a High Beam and Neutral light, just to keep you informed as to what’s going on up top.

The Motor was totally rebuilt, the head was Ported and polished and has an 836 Yoshi kit inside the jugs, this pulled like a steam train and of course, stainless Allen head bolts throughout the whole engine. I also drilled the starter Motor cover and fitted bronze mesh for a cool Look.

Rear Hub got my Custom drilling and Polishing detail, as well as rear brake arm, I sure loved creating this Motorcycle and always enjoy doing my own thing to it.

I machined my own Motor mount to follow the fins of the engine and on ALL motors, I have always run an Alcohol filled Oil Pressure gauge, to give me a true reading of actual engine oil pressure, through the oil galley.

Cerakoted exhaust system looks great against the Silver and Polished Aluminum of the inline four engine, I used Italian rear sets to give this bike a wee bit more aggressive stance when you are sat upon it. I sell many pairs of these and dead easy to fit, they function so well and smooth, I try and use these on the majority of my creations.

All clean and new, this bike ran so well, it was like a new wrist watch to be honest and sure do miss this Beast of a Motorcycle, but enjoyed every minute building it.

Rear sets look pretty darn cool, I drilled and polished the sprocket cover too, for that Racy look and give it a little more Bling, personal choice but I have fun doing that.

The Grips you may find to be from somewhere else, and you would be right, I used Original 1970’s Schwinn Bicycle grips, put them in Boiling water and then pushed them onto the handlebars, they fitted snug as a bug when they cooled down and look great and flow with the piggy back shock reservoir’s.


A tall drink of water for sure, running on 18 inch rims and Bridgestone tires, a Combination I have used many many times, these have great grip in all weather but of course, have a nice Classic tread pattern too.

I have always been a fan of how this bike has sat, she looks ready to race off down the road from any angle, I also made sure that the front fender sat tightly to the tire.

I also removed the fender stays to clean the look up at front and I think that it works well, I hand drilled the front rotor and you can see much polishing of Aluminum was done to give this bike some class.

There really is a lot of detail that you will not notice at first but hope you like what I have done, we are all different and have many styles we like, but I get a lot of emails about this build and thought that it was time that I shared it with you lot.

I should of made a mold of the gas tank as I really liked that shape, even with the Chin Divot at the front of the tank, that goes back to the early TT days and stream lining.

Everything redone, even machines the Oil Filter Housing to give it some fins, a thoroughly pleasing to the eye motorbike that I am quite proud of creating.

Thanks for looking at The Nut Basher, I hope you liked what I have done to this old inline Four Honda and I continue to build and make parts for these 500 pounders.

Thank you for reading about this bike, if I can help you with Parts, Service or just if you are stuck, you can email or text me. carpy@carpyscaferacers.com carpysgarage@aol.com or TEXT 714-598-8392

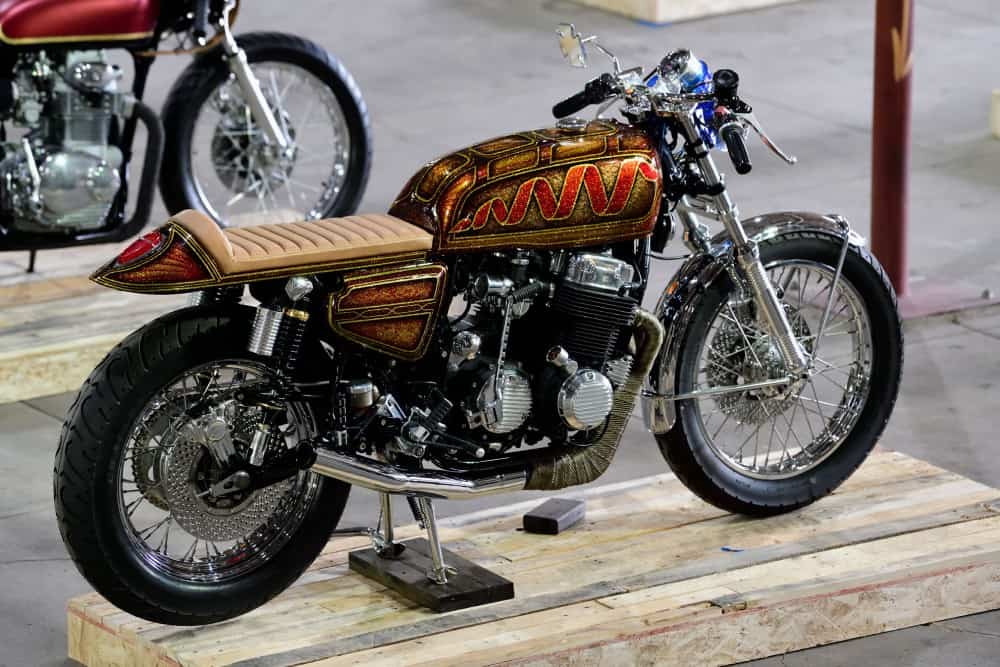
The Aztec HONDA CB750

Sometimes you come across an old photo of something you built and have forgotten about, and today was that time, I completely forgot about building this machine, no idea where it went in the world but it sure was fun building this bike out of parts that I had laying around the garage in boxes and parts under the table.

This bike pulled pretty hard out of the gate, I wanted a Custom look and set about using many old parts and recycling them to gibe a unique Custom look to this inline four.

Rebuilt the carbs and added BSA Velocity stacks for that Classic Finned look, as I had some Original Racemasters Finned covers for the Valve cover and start cover etc.,.

I hand hammered the knee inserts into the side of the old Gas tank, then I hand masked and painted some Aztec Gold Candy Painted Scallops for a Real Custom finish and clear coated over the top.

I used an old 70’s set of Schwinn Bicycle grips that I heated up in hot water and fitted on bars, and stoked the way they looked. Custom gauges too and Polished control switches.

I used an old set of Invader steel wheels and Painted the Aztec Gold and fitted a set of Bridgestone tires, Polished front forks, cut down stock fender and fitted CB1100 rear shocks and my hand made Dunstall seat.  I even used old VW pea shooter tail pipes to add to some NOS headers I had in a box. Fun machine and hope its still on the road somewhere?


The Nickle Pickle CB550 Brat Bike

Many people ask me if I have a favorite build, and to be honest- They are All my Favorites and I cannot really separate one from all the creations that I have completed over the years, as they all make me smile when I see them, many of them I have not seen for 10-15 years and then it will pop up on the internet with a New owner and the bike still looks as cool as it did, the day it rolled out of my workshop.

So, the bike you see here is a great looking tough machine, this is called the ” Nickle Pickle ” it sure is a head turning machine and many have been created in this style since it hit the tarmac a number of years ago.

The 550 is a nice compact bike right from the factory but it has so much more potential in other guises, and this one as you see here is now quite Muscular and sits very well upon the driveway.

This Baby inline Four is nothing to be scoffed at to be honest, as it handles like a dream, believe it or not, the trail and rake have been changed but the geometry is now so good, I can ride this around the block with no hands if I so chose to and it would track perfectly. I know that this build may not be your Cup of Tea, but not everyone drinks Tea and hope that you can find something cool on my wqebsite that may get you out of your chair and into the shed, garage or shop and start to turn a wrench on your own 2 wheeled steed.

A tough little Rice Burner and fires up first Kick every time, as the Motor is rebuilt and runs hard all day, carbs are completely rebuilt, synchronized and flow really smoothly. The throttle response is snappy indeed and a pure joy to actually ride- I was super impressed with the whole feel to this Brat style machine that has become quite popular globally now, so this was something that I often look back on with a huge smile.

The 4 into 1 Yoshi style exhaust system is of course one of mine and it has plenty of power, all through the curve, it barks very well in deed and has a nice over run crackle that I love so much, it fits tight into the Cylinder head and does not require a stabilizer bracket on the muffler, the lines are clean and the flow of my system follows the bikes chassis so well, it almost disappears.

I took all the paint off the stock tank, the tank was pretty clean and not dented, so I removed the paint with some good old Jasco stripper, I used the best part of a gallon to get 40 years of old paint and grime off the thing, then once that was done I washed it with lacquer thinner, then acetone and then set about hand sanding the tank with a sponge and some wet n dry. it took many hours, but as you can see, the tank does indeed look like it was Nickle plated.  The steel came up really good when I buffed it ands then it was clear coated over to keep that Old School look.


I sell so many of these 4 into 1 systems, over 1500 units so far and still going strongly all over the globe, I also offer Cerakote Ceramic Coating in Black, Silver, Burnt Bronze and a Titanium Color for everybody’s tastes etc. But I also offer a Stainless Steel version, not cheap as materials have jumped up over the years but a good look too.

Yes, I did use the Firestone tires and they held up pretty good all around where we are and in town etc, But, I will tell you on California Freeways, they will track on any of the lines in the road, I guess the price that you have to pay for coolness. Personally, I prefer the Coker Diamond treaded tires but its all what ever you like and can budget for.

The “Open” frame look is a cool style and a minimalistic approach paid off I believe,, yes, if I had more time there would be a few other cool touches I would of added but money restraints can always crop up and I think this came out really well for the cash that was invested.

Yes, I do sell the Rims you see on this bike but I powder coated these black and they are 2 rear rims, spoked to rebuilt hubs, rims are 2.15X18 and 40 spoke and really look the part.


A CB500 Honda with a Tough Attitude

I sometimes have to kick myself to remind me that I have created all these Custom Motorcycles sometimes, its amazing that I still have a fluid creativity when it comes to two wheeled powered machines and the next bike i want to show you is a great stealthy bike that I sometimes wish I had kept.

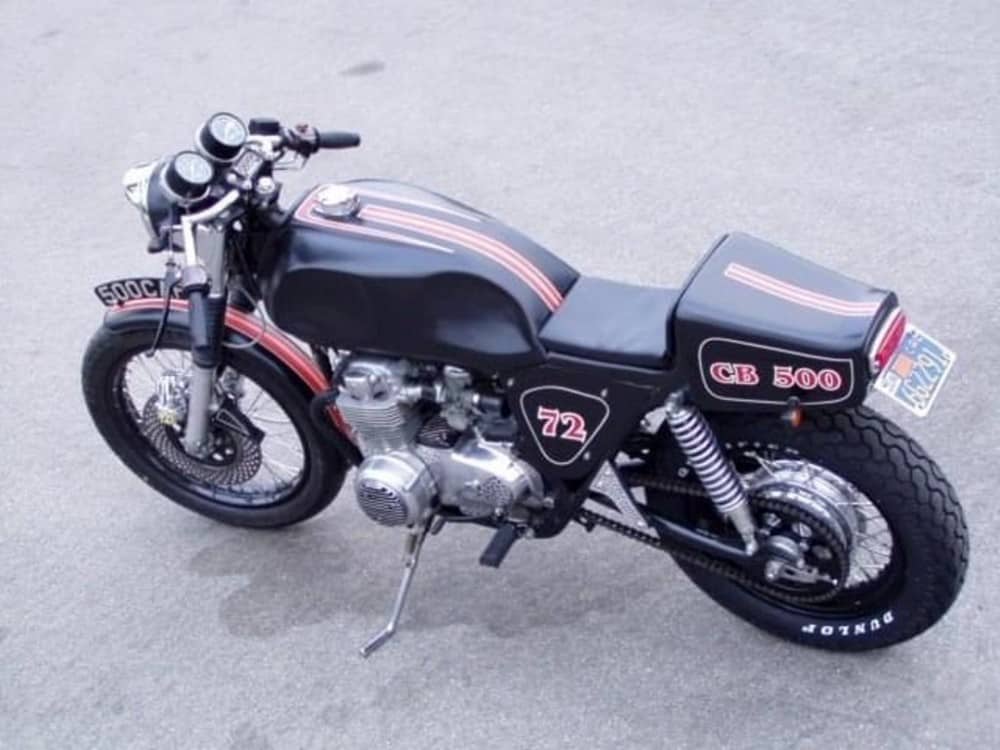
I dont have the best pics of this machine as I had a shitty camera, but at least I got some pics that you can make out what I did to this old 1972 CB500 Machine. It needed a lot of work and was a non runner and missing a lot of parts but I was sure I could build something fun and affordable with what I had as spare bits and bobs scattered around the garage.

The old girl needed some help and I used what I could with parts I had around my garage, this was many years ago now and I had a few 750 parts in the rafters, so thought I may as well use some of them and see how this goes, but nothing ventured, nothing gained is my saying and it was fun to piece this little 4 banger back together, of course in bigger clothes than it had stock, but thats what I liked about this challenge.

The Motor kicked over, so I cleaned up the carbs and she ran quite well, so I thought that I may as well have some fun on a budget and see what I can create in a short amount of time. The engine was really responsive to be honest and as I had a 48 Tooth CB750 sprocket on the back, I knew she would boogie along as soon as the flag dropped.

I had an old beaten up 1982 CB750F Gas tank that had seen better days, so I cut out the flap and gas tank lock and welded it closed, drilled a 2 inch hole and fitted a Monza Style Aluminum Gas cap and then set about and hand hammered the tank for that old Manx look, I was pleasantly surprised at the outcome of this big old tank.

I Polished the forks and rebuilt the internals, then laced some 750 rims up and drilled the front brake rotor as well as rebuilding and polishing the front brake caliper too.

Braided hoses on the brake made sure this puppy would stop when you grabbed a handful of Anchor, I pressed out the Curved license plate as I wanted the old school British look.

Like I said, a mish mash of parts but cost nothing to put together to be honest and this was almost 20 years ago now too, time sure does fly when you are having some fun with Motorcycle parts.

I used a Harley 16 New rim for the rear and Shod both rims with Bridgestone tires as I like the handling of those boots. The rear seat tail piece is off an old Kawazaki Z1 race bike.

I used the stock shocks and swing arm to save some money and had an old Mac system that I never used and was sat up in the rafters, so I threw that on and it sounded ok with a shortened baffle and rejetted Carbs.

The clubman handle bars and the long tank, gave for a fun lay down cafe feel to it and was a blast to ride, it had a taller rear sprocket, so it got out of the gate real quick.

Even all them years ago, I was using Oil pressure gauges as its a quick way to make sure your heart beat is pumping in the motor, had to make an extension pipe to be able to connect under finned cover.

She sits nice and high for a 500 and boy was it snappy off the line, the first three gears and you were almost at 80 mph, what a fun machine to blap about town on.

Hazy pic but glad I still had some images left of this old 500 Honda and hope you like it too?

I sold it to a guy in Pasadena who then phones me to say a car ran over it and dragged down the road for a few blocks, it no longer exists, big shame as it was a great little Bar hopper Cafe Machine.


1978 Honda CB750F Super Sport Snotter- Revamped

Well, here we go with a Customers bike that has been sat outside by a river for about 8 years, the Customers asked if I could help him out and well, you know me, I said OK.

The say that a Picture paints a thousand words, well, this aint no oil painting and there is not enough words in the the English Language that came to mind when they dropped the bike off at my place.

There it was, 500 pounds of old cold, rusty and Muddy Honda, looking to have a new lease of life, some how I think I have scrapped the bottom of the Barrel, then another rolls in, but I am a man of my word and help out I shall indeed.

This was a complete mess, I mean it had been rained on from every corner of the bike, then wind blew the tarp off and rotted everything that was rubber or plastic, then to rub salt in the proverbial wound, it got wet again and covered in mud.

The bike has had a tough hard life, there was Oil everywhere, of which probably saved a lot of the bike from rusting to be honest, but everywhere I looked, this Motorcycle needed help, it was a sad state to see and I knew that I could some how get this running again, the only issue was the poor chap was on a limited budget, and I know how that feels, been there many times.

But there is a point where I must stop and say No, but the Leo in me tells me to have a go and help this bloke out, so, with a shaky handshake and sweat coming off my brow from pushing the thing up the driveway, I sat there and took in the whole sorry life that this inline four must of endured to get into the condition it is now in.

1a

Even the handlebar grips were so thrashed from the elements that half of the grip glues itself to my hand, not even lacquer thinner would remove that tar like substance from my fingers and was marked for life I think, but this is just the start of something that I really should of said, no thanks mate I cannot help you. Story of my life with things I guess but I have always pushed the envelope and this needed a Caterpillar truck to move it. The rear chain was rustier than the Titanic’s Crapper door, I shall be changing this Big 630 chain and sprocket system to a 530 set up.

5


The tires were torn up, and would hold air for about 2 hours then go as flat as a pancake, my Compressor got plenty of overtime keeping these things up for sure, but the amount of dirt, grime and Spiders nests was just unbelievable. I really have my work cut out here and as everything is knackered, I have to clean stuff before I start replacing parts etc.

2

I was never a fan of the Comstar rims to be honest but this bike has some sentimental value to him and I will do the best that I can, to bring this old bird back up to speed once more.

4

Not only was the seat all torn up, the foam had hardened and was starting to fall apart as soon as I moved anything, and as the Customer wants a Hoop welded to frame and a flat seat set up, this thing can get 86’d into the bin.

7

As you may know, the 77 and 78 Models had these Keyhole carbs, and when they have been left for such a long time, these buggers are so hard to get back to running nicely again, they have an accelerator pump that plays up all the time, the choke is on a cable and up on top of the triple tree and the sun dried the knob, of which it breaks as soon as you touch it, lastly, this bloody things are a royal pain to work on.  Just to change the jest, you have to remove the rack from the bike, as the float bowls do not have clips on like the earlier SOHC models.  So what I do is if these carbs are goosed, I inform the customer they would be way better off if I fitted earlier carbs, as you can change the jest with the carbs still on the bike and, it has a choke lever on the left sode of the carb body and way easy to use.

8

The sprocket cover tells a tale right there, covered in oil and road grime, as well as spiders webs, this is going to be scary when I remove the 2 Phillips screws in a minute, so stand back!!!!!!!!!!!!

22

Holy Moly, just look at this, the bloody sprocket doesn’t even have a securing Bolt and washer on it, there is nothing to keep this sprocket from literally, falling of the drive shaft, now the 77 and 78 sprocket set ups are different, the earlier versions have a little clip with two holes for bolts that sit in the recess in the drive shaft. Where am I going to find a CB750F Bolt and washer ????

23


I looked in my parts drawers in the garage and bugger me, will you look at that, still in the sealed packet and, I had even written in sharpie CB750F Sprocket, what were the chances?

25

Think its a fair assumption that this chain is Royaly Fecked, so I shall be glad to cut this 630 version off, but there is so much Oil and grime all over this bike, things are going to be messy for a while.

12


There seems to be oil all over this bike, and I mean everywhere, I need to see whats occurring here as thats an insane amount of Oil deposit and the guy said the bike used to run before he parked it, I checked the tach hole in the Valve cover but thats OK, the Valve cover seems OK as well as the  Cylinder head, which I think could be one of the oil lines, but what a mess this is going to make, just to take that apart.

26

That looks like the issue, Oh yeah- I will just put electrical tape around the leaking oil line, that will fix it-Not! So I now have to make a new oil line, but at least I have found out where the majority of excess oil must of been leaking from to get all over the bike like that.

29

All fixed and I cleaned the other hose up and oil tank and I feel a lot better about putting this back on the Super Sport once more and hopefully no more issues in that department.

19

Well, its at this point you think to yourself. “Why am I doing this”?  But its a challenge, the customer is on a low budget and this motorcycle is of sentimental value, so a no brainer but there are so many things wrong and not working on this bike, this will take me some time to get dialed in.

20

Time to remove the carbs and boots and clean the frame up, I shall then fit New intake manifolds from a 1975 CB750K model, rebuild some early Carbs and fit new cables too.

36

I cleaned and painted up the motor with High Temp Wrinkle from PPG I get made up in cans, and that helped big time. I then fitted the earlier intake manifolds and, using a flat edge, made sure that the intakes were all even and flat, this makes fitting carbs back on the bike so much easier than trying to force a rack on when the intakes are off slightly.

37

I have always used New Stainless Steel, Rolled edged Hose clamps, as these will not dig in and cut your hoses with traditional clamps and of course, being stainless, they will not rust or corrode.

41

Well, I pulled an old set of inline four 1975 CB750K Round tops out of my pile and these need to be gone through but when they are completed, and then synchronized, these run like a top.

104

All clean and ready to go straight on the bike and, these will fire right up no worries at all, these are cleaner than a cats arse and will make a huge change in this motorcycles life.

46

These are now all in place and have fitted New Genuine Honda Boot covers over the linkages to keep crap out, many do not do this, but I want these to stand out as they look and function so well, plus you can change main jets is minutes with the carbs still on the motor.

30

I try and use as much of the original parts as I can, but these coils were losing voltage and not repairable, unfortunately these are not cheap to replace, I had no choice but to use Brand New ones but, so glad that I did, these new ones I will be fitting will last many years.

31

All bolted in, this bike will have a new life for sure, but it just goes to show by leaving a bike for 6 years with no cover and let mother nature belt the hell out of it, is not a very good idea at all.

39

The old cables were all torn up anyway, but, on the earlier carbs you must use the earlier cables, but thats a good thing as you know everything is new and will function real nice.

40

New cables going in, now we are starting to make some very good progress, make sure that you use WD40 and lube these cables as they will keep these operating smoothly.

49

The aluminum hangers were oily and needed a bit of a revamp, so I removed these and began to clean them up, think I shall polish these to make a difference on the bike.

50

Now that is way better and I feel a lot better putting something clean back on, this motorcycle will sure look different and for the better.

52

New cables through out, the clutch cable was actually seized up, so a new one was purchased, I always use New adjusters too .

57

The points cover looked like it had been in a bad way for a long time , but- it wasnt too banged up to be honest, so, using my special Formula High grade restoration Polish, I jumped into action as I love polishing old stuff, it took me about 90 minutes but it was well worth it and looks as good as new now.

58

Now that is a lot better and used New stainless Allen head bolts to give this Points cover a New lease of life, it sure looks great on the motor now.

59

The Clutch cover was in the same shape as the Points cover, so, back to the polisher, some more secret sauce and a polishing mop and then I will refit to the engine.

60

Now this looks a whole lot better once polished to a super high luster I used Allen head bolts which are all New, as is the clutch cable too, so a smooth clutch at long last.

44

Look how bad the muffler is, its had bad gas welding, then an old screw held this together, sort of, I will keep the stock header and will make a new up-swept tail pipe for this bike.

47

Getting to it with a piece of 2.5 tubing, as I want this to look cool and sound pretty strong too, this will be a fun part of the process on the Super Sport Bike.

63

There is the tail pipe, complete with a Removable baffle, this is way better than what was on there, the old muffler even had a mouse nest in it, so glad to change this set up.

64

Next up, the Customer wants a flat frame with a hoop, so what I am going to do is cut the rear frame horns off about the middle of where the old cross brace is.

66

I have cut the frame rails off to where the customer wanted, this will then have my frame inserts put in and I will cut one of my special frame hoops to fit to the bike and give it a new look.

67


Now- I use a de-burrer to remove any inner tubing, I want to make sure that the inside is hollow and smooth so the inserts will slide in tightly, that way there will be no issues.

68

The inserts are in and they are really snug, I go in about an inch and half both sides, it is double walled on this part of the frame, so the hogging out does take a while and may annoy your neighbors if you have to use an air compressor and a die grinder to open this up.

69

As you can see, I have laid the hoop on top of the frame, this way I can figure out how much I want the hoop to be placed at, I then mark the hoop by the end of the chassis, as this is where it will butt up against so you can then weld it.

70


Once you make the cut, you simply cut the other side, take any burrs off the inside and then you are ready to attach this to your bikes frame and this will change the look of you machine right away.

72

As you can see, I fit the hoop into the inserts and then I simply just tap the end of the hoop with a Rubber mallet, until the ends are almost touching the frame, as I want just a tiny gap to allow for good penetration of the Mig welder to secure this to the frame.

So the little Video above shows you how I first attach the hoop to the frame, I then mig weld the ends all around and you can drill into the frame and insert and spot weld there too if you want a more secure weld too.

78

I have Mig welded this in place and am happy with the end result, next up is I have to make a seat base for this, you do see some on the market already made but many times you want to make the length of your frame to your dimension, so- I always make mine for each frame and its pretty easy.

83

Use what you have around you to make a template, I had a packing box handy, so traced the outline of the frame and cut it out, a little trim and I am ready to now make a seat base.

84

I may have gone a little over the top on thickness as this is 18 gauge but I had a sheet in the garage and may as well use it, its strong as Hercules but obviously the down fall is its harder to cut and shape, but this will work fine and be a great sturdy base for the seat I am going to make.

85

There you go, its done, now to check on the frame, grind any adjustments that need doing and drill some holes for the bolts to be able to fix to the frame, as I shall upholster over the bolts so the studs are the only thing sticking out underneath.

86

There you go, I am happy with that now, simply need to use high density memory foam and choose the material and stitching and that will be upholstered and look so different.

96

Still a long way to go on this Super Sport but- It is finally taking shape and looking way better than it did when it was dragged into my place looking very sorry for itself.

88

The Gauges were shot, one of the needle drives was not working and I wanted to clean this area up quite a bit, so came to the conclusion that this can look a lot better with all this clutter removed and different bars fitted too, as well as removing the upper triple tree and polishing it to a chrome like luster.

89

The stock fork ears have to go and the turn signal housing as they were rusted out and looked pretty ugly, customer wanted a Brat style bike and these tend to be removed, I shall also add one of my custom headlights that have internal LED turn signals inside the light, so there is nothing protruding.

91

Removed the handle bars and gauges, as well as the ignition switch as the plastic connector and dried and crumbled up, due to being sat out in the California Sun for 8 years.

92

Now, that is a lot better, as you can see, I removed the old paint from the triple tree and polished it, I also removed the stock fork ears and fitted some Custom alloy versions in Black.

93

New ignition switch also added as the stock one was worn out and now all new once more and of course, functioning too.

94

Had to make up a new pig tail for the lights as the old harness had dried out, but this will work great and, reduce the amount of wiring thats inside the headlight.

99

As ypu can see, what a transformation, my LED turn signal headlight set up is the way to go, Halogen bulb and the LED signals actually do light up Amber, a neat custom touch.

100

Starting to get some where, still have to foam and upholster seat, as well as pulling front wheel out and fitting new tire and sorting the brakes out and these are all seized up.

105

I removed the rear wheel, I need to clean all this up and thought that i would take a photo and, below I have done a quick video on my phone, to show you how I undo stubborn nuts or bolts when they have been on many years and have seized up and you cant for the life of you get them undone with just your wrench.

I try and show videos where I can, as many of you ask me on the phone everyday, so thats why I do things like this and hope that it helps some of you out that may be out in the sticks and nowhere to ask.

Hell yeah, this is slowly getting better everytime I work on the bike, the Customer came and visited and loves the way the machine is now looking, but I tell ya, it has even tested my patience on more than one occasion, just take a step back and do something else, but- as you can see, I have now upholstered the seat, and did it in the Nostalgic Diamond stitch and added silver trim to break the seat up.

I kicked the front a little to try and hide the arch in the stock gas tank, usually I weld up that area, but this customer is on a budget so this was a good way of over coming this issue, I used High Density memory foam and I tell ya, it is super comfortable.

The seat will be Bolted down so it sits nice and tight onto the frame, I still have to smooth the chassis and paint Gloss Black, but also as you will notice, I have fitted an LED strip at the back, this will function as a Running and Stop light in Bright RED.

The Turn Signals are Chrome and LED too, so this will be sure to get a drivers attention and inform them as to what they are doing ahead of them.

The New 2.5 Gauges that I sell on my website were just the thing needed to tidy the top of this machine up, I vapor blasted the master cylinder but its beyond repair, so shall be fitting a New version tomorrow.

The old 630 was totally rusted and, falling apart, so opted to change this set up for a 530 chain and sprockets, this was so messy, I was glad to change all this and have it look at least a little cleaner, thats why I prefer to usually strip the bike to the frame and do it right, but sometimes that is just not in the Customers budget, so do the best I can for them.

Looks so much better and I am glad I went this route, plus the Customer was over the moon with the look, so a double whammy there. Now onto the Exhaust system.


As you can see above, the exhaust is so so but underneath its a mess, the rear muffler was so badly welded, they needed to fit a screw into it to keep them together, so i thought that it was time to set up the good old Heat wrap, I like that Hot Rod look and so does the Customer.

There you go, all wrapped and ready to go back on the Motorcycle, remember to replace your Copper crush Gaskets too when you re-fit an exhaust system.

Looks so much neater now and I like the way that the Honda is slowly taking shape, I mean, a few weeks ago this was in a terrible state from all angles, so right now I am quite stoked.

Right, now onto the rear brake Caliper, as it is seized up beyond belief, what I normally do is remove the caliper and stick a towel in a bucket and simply put an airline into the caliper and leave the bleeder in, that usually pushes the piston out pretty fast, hence having a bucket as there is 150 PSI from the airline going into that small cavity.  But this time the Piston refused to exit, so that tells me there is a small rust ring around the piston.So what I do in this situation is go back to old school ways of getting things resolved.

So, now I have the piston out, using an old set of handlebars and a master cylinder to bleed it out, I can now get onto rebuilding the caliper, the O-Ring seal usually gets nasty and this one had too, but the Piston was rusted in and lucky for me I had a New Piston and rebuild kit at the ready. Below, Old and New, always replaces seals, especially in Brakes.

I use a pick to pull the Seal out, and then I was glad I had a New piston as the original one I removed from the Caliper Body was seized in and pitted up quite badly.

So, before I fit the Piston, I need to clean up the old caliper, as it has a lot of Oxidization in the body, as the carcass is a cast aluminum, so what I do is use a Rubber wheel to clean the body up, I sell these kits on the website, whats coo is that it does not hurt the caliper at all , although it will remove the oxidization pretty easily.

This is what I do t clean the body up, been doing this over 18 years here and always makes the brakes work really well and smoothly, I sell the kit on my website.

So, thats now clean, all blown out with an airline, a little brake fluid in the Caliper body to make sure all is smooth, Seal is in and Piston slides right inside nicely.

So, all rebuilt and ready to fit back onto the Super Sport, Bleed through and hopefully we shall have a brake now as before- this was seized solid from years of inactivity and parked outside for 8 years.

The rear brake is now a success and functions very well on the pedal, a lot of work but worth it in the end, as this brake caliper was seized up solid, am happy now.

I also didn’t like the strip light set up that I fitted to the frame, so removed that and fitted an LED stop – tail light and fitted the License plate to it and looks so much better I think.

I removed the Red LED turn signals as they were not functioning bright enough, so replaced them with some Classic Alloy 12 volt Bulb versions and tested, worked really well.

The front fender was a mess, but I wanted to still use as the front end needs bracing, so I though what I would do was cut it down and remove 11 inches off each end to make wheel look bigger.


I then elongated the mounting holes in the brace, that way the fender will hug the tire, not touch it , but give that appearance that it was.

The Customer will paint it Black when he gets the Gas tank and side covers painted, but this sits nice and tight and stiffens the front forks up and stops crap flying in your face.

Next up is to clean the rear frame up and paint it Black, tidy the wiring, fill the gas tank, add new fuel line and see how this bike runs.

OK, I have managed to do all that and can now take this for a shake down run around the Block, the petcock bloody leaks, so have ordered a new one and will change that when it arrives.

Did a good run around the block and wanted to make sure that all is well, I knew that the headers would smoke for a few rides until they have cured, so no worries there, but the top end of this old Super Sport is rattly as hell and all adjusted, these can stay like that for a long time and thats how it is going to stay for a while.

OK, so now the Customer changed his mind about a few things, so I have changed the rear tail light and made a License plate mount to sit off the bottom of the shock and used a Ford Model A LED rear Tail light.

The Bike now runs, all the gears work, Turn Signals function as does the rear Brake light and Running light, I have put a lot of time into getting this thing running again.

Virtually a different Motorcycle now, it runs well, albeit the top end rattles like some old nails in a can but they will go on like that for a long time and the customer can do that later, it pulls hard to be honest and the exhaust of mine is just Killer sounding.

I am not going to paint it, I sealed the gas tank but he can paint it as the Customer is on a budget, so when he takes it next week, he can get a painter to do their thing to her.

So there you go, pretty much done, this bike had not run in 8 years, all the brakes were seized and needed so much cleaning before I could even work on it, it is amazing it runs to be honest.

The Customer can add mirrors if he so wishes, thats just cosmetics, but at least I got this to run and drive, many would of given up and, I wouldnt of blamed them, but I continued and won through.

I am going to play with My Hot Rod thats in the back ground and look forward to this leaving my garage during the week, thanks for watching this build, hope you liked what I have done?

The Harlequin Honda 1975 CB750F Super Sport

Well, here we are with the Harlequin Honda that I have created, its been a long build as originally the Motorcycle was bought down from Washington on November 4th 2015, Edwin Cooper was not well, he had Cancer and wanted to try and revamp his trusty old Steed that he had had for many years, he wanted me to do something cool with it and loaded this Motorcycle up in the back of his pick up and came down with his daughter and dropped the bike off.

I helped him unload the 1975 CB750 F Super Sport, it was heavy, the brakes were sticking and it really did need some love, but- thats what I do and was more than willing to bring this motorcycle back to life and breathe fire once more.

This would prove to be quite a challenging creation, as there was a lot of time and weather that had passed over this machine, I have been there many times but I am amazed at how many Motorcycles that I have built that were all in this condition, some a lot worse too.

He had started to Cafe the bike out a little, many moons ago, hence the Shortened Headlight ears and the Italian Tarozzi rear sets and an old 2 Four seat that dates back to the Mid 1970’s.

Have a look and you can see that there is a lot of stock parts still on the bike, like the chain guard Gas tank gauges etc and of course the old wiring, and that had seen better days for sure, the weather can totally destroy a wiring harness in just a few seasons, especially if the temperature gets hot then col, it dries the wires out and makes them fragile.

This also has an Old Yoshimura 4 into 1 system on it, seen better days but nice to see none the less, that is now fitted onto a AHRMA race bike and gets used all the time.

As you can see, the Birds nest wiring will need to be completely stripped out, soon as I see toggle tops and electrical tape, I know that it needs to be removed right away, else it will be a headache that you do not need.

You can see where Mother nature has taken a firm grip of this Motor, Oxidization is a mean Culprit by the look of it, the Plug caps were so weather beaten, as I tried to remove it, the cap cracked and fell into many pieces.

I wonder what sort of critters over the years had chosen this 1975 inline Four as its home? Nothing really surprises me these days but intrigue always does and if this bike could talk, well, I think we may have a fun movie in the making.

The Carbs were locked up, seemed to have dirt and grit from everywhere and a little wasp nest in the Carb body itself, Mother Nature really took a hold of this one.

I loved the 1960’s Hot Rod Stewart Warner Mechanical Oil pressure Gauge, I am also a Hot Rodder, so this made me smile when I clapped eyes on it, poor motor has a lot of oxidisation on it though and will take time to remove and clean all that up.

We have a multitude of issues here, the rear brake caliper is seized up, piston is stuck and seals are shot, Rear rim is toast, the same goes for the rear shocks too, the swing arm looks like it has come from the bottom of the Baltic Sea, this will be a down to the frame build for sure.

Low miles too but the weather makes it look a lot worse to be honest, nothing that cannot be fixed though and this Super Sport will see a Brand New life and Look forward to sharing the photos when she is completed.

Front Brake caliper is also seized up, the front forks need rebuilding, Rotor needs to be skimmed and New rim built.

Unfortunately the rims had rusted right through, so all that I shall use is the front hub, Rotor and Caliper body and will refurbish all that I possibly can to this grand Old steed.

All the wire harness was Rock hard from being baked in the Sun, the rectifier and the regulator will be discarded, and I shall be using a New Harness, along with a solid state rectifier module, as I use them on ALL the builds that I create, cant trust 40 year old electrical anyway.

I know that this will have a different look by the time I have finished, not sure how just yet but- It will look pretty cool none the less and of course, Function well too.

So there she sits, before getting transformed into a cool Custom Machine and I am looking forward to tearing into this to transform into some cool eye candy.

So it is time to push this 500 pounder, into the garage and start to take this motorcycle apart and figure out what I am going to do to this 1975 CB750F HONDA.

And so we begin, this will be a long Journey with some hiccups along the way , but I know that it will look a lot different by the time this comes back out.

I started to go the route he wanted, to go with his motorcycle, then all of a sudden from out of the blue, I had an awful phone call informing me that he had just been in a Motorcycle accident on his Harley and did not make it, I was gobsmacked, and, the family were too, they didn’t want another Motorcycle in the family and I understood that, so they gave me the bike and said do something cool with it.

Above, I hand bent Raw steel and then Rolled the rear, welded it and then began to do a little more to this seat base as I want it to be able to take a passenger, as all you see are single short seats these days.

So the transformation began, slowly and I am happy at the end result, I named it the Harlequin as it has so many Colors and my Favorite Candy Bar is TWIX, so you can see that too right?

A lot of flake and detail but wanted that old school Low Rider flake that was about when I was a teenager back in the UK in the 1970s, when the Sun hits the Gallon of Clear coat, you will discover why metal-flake was so popular back in the day, a Kaleidoscope of Candy colors pleases the Cornea.

I have created over 50 Custom HONDA based Motorcycles since moving here in 2000 and every time I start a creation, I have to sit and ponder for quite some time, I am glad that I had no deadline, so the pressure was off and as and when I thought of something cool, I would just do a little bit to the bike and then back to work on other customers parts etc.

I fitted My Sidewinder exhaust system to this build but wanted to try my other sets ups as well, just to get the look and later, hear the different tones of my exhaust systems and decide which one I will like, this is ceramic coated but think I may end up using DEI Titanium Wrap on the header and maybe triple coating the tail pipe in Chrome, we shall see. Below is the Hot Rod tail pipe that fits to the Sidewinder header, a crisp and Velvet bark and as you can hear, very responsive to the throttle.

I have sold many Hot Rod, Side Winder and Razor systems through out the world, all made right here in California, none of that made in china crap.

I fitted a small 5-3/4 Chrome headlight to my Custom Fork Ears, and wanted to create a different look to the front end, so I went with a Biltwell Bubble Visor from their Helmet catalog and this worked out great as a mini nose fairing, even threading the clutch cable through the Plexi Glass.

I wanted to mix Old School with New and decided on using a GPS speedometer but with that old school Smiths looking gauge face and needle that still sweeps, this worked out so well.

Here is the old bucket I used and Tig welded to my custom bracket, just needs polishing and I shall also be fitting small LED Amber display lights for the turn signals to plug into.


I used a old Bucket and welded a bracket I water jet cut and it seemed to go right in and the great thing with this is that it has just a power wire and an anttena wire, you are all set to go, even has a LED red back light too.

This was the right look that i wanted and am glad that I chose to go this particular route, gives the machine just a little more character and style.

Here is the Harlequin outside out Home, so cool to see it in the sunlight and I am super stoked at the way the bike turned out in the end, a long but rewarding Project that really does turn a few heads.

Plenty of eye candy to look at on the bike, the Paint alone is super cool, and as the saying goes, “The Devil is in the Detail”

I am proud of this Build and being a steel tank and seat, this is a sturdy machine that is no light weight for sure, it stands tall too, many do not do that.

The Harlequin sports my Custom 4 into 1 Exhaust system, The Side Winder, I Ceramic coated the header, then wrapped DEI Titanium Heat wrap onto it, to give that Hot Rod styling, then I triple chromed the rear tail pipe and it sits nice and snug and close to the bike, this turned out so well and a system that I offer on the website for all SOHC Models.

A fun machine that was a real joy to create and will be on the show circuit around Southern California this year, hope you can come and check it out some time, be glad to see you.

I removed the old Super Sport Gas Tank Flap that used to hide an old tin cap, I then welded a Harley Bung and fitted a Custom Gas cap, looks so much smoother now.

I also did a few other changes to the bike by machining the forks and making a Brace bar out of 6061 T6, and of course a 1971 Rectangle fog light to show the European Spirit here.

So many New parts, this is like a Brand new Motorcycle now and the more you look, the more you see a little more custom touches throughout the ride.

Photo Credit: #RahoulGhose

This is a cool shot at the Outliers guild show in Down Town LA last week, stoked to see it on Display with other cool machines from around the state.

Photo Credit #RahoulGhose

Here she is sitting loud and of course proud to be representing, at the OG show in LA, a very cool event and I really enjoyed it.

A classic look of the Custom years back in the 1970’s when I was a Teenager, this came out so well and super stoked at the response I received at the Outlier Guild show.

The 1939 Ford Lincoln Mercury tear drop LED tail light set off well in the frenched pocket I created, I also had made the steel cowl and seat base.

Photo Credit #RahoulGhose

It has been an amazing year and to get the Harlequin completed is another notch in the post of creativity, I strive to do the best I can and hope that you liked the build?

Like I said, I had a great response for the bike and even the band that was playing loved it. Band- WOOLY BANDITS- Singer- Christa Collins.

Thanks you for everyone that came up and spoke to me, I was super stoked, this is a great creative family and super glad that I was a part of it, I look forward to attending more.

In Memory Of Edwin Cooper, I am sure he is smiling from above.

Below is  a list of of things done to the Harlequin.

  1. Machined and Polished Front Forks.
  2. Machined Aluminum Fork Brace.
  3. Polished Hubs.
  4. 19X40X1.85 Chrome Front Rim.
  5. 18X3.5×40 Chrome Rear Rim.
  6. Stainless Steel Spokes.
  7. Hand Drilled Rotors.
  8. Custom Piggy Back 14 Inch Shocks.
  9. Polished and Rebuilt Rear Caliper.
  10. Braided Steel Brake lines.
  11. New Chromed front Fender.
  12. 5 3/4 Chrome Headlight.
  13. Biltwell Helmet Visor.
  14. Custom filled and smoothed S.S. Gas tank with Harley Cap.
  15. Hand made Steel Seat with leather Tuck n Roll.
  16. Metalflake paint.
  17. Hand Made Clubman Bars 7/8.
  18. Biltwell Grips.
  19. Rebuilt Motor with Polished Covers and Wrinkle Paint.
  20. Restored Carburetors and synchronized.
  21. Drilled and Chromed Kick starter.
  22. Wrapped Sidewinder 4 into 1 exhaust with Chrome tail pipe.
  23. GPS Speedometer.
  24. New master Cylinder.
  25. New levers.
  26. Tarozzi Rear Sets.
  27. New Challenger tires and Tubes.
  28. 1939 LED Tear Drop Tail Light.
  29. LED RED rear Turn Signals.
  30. LED display lights.
  31. Polished upper triple tree.
  32. Powder Coated frame.
  33. Lithium 12 Volt EarthX Battery.
  34. New side covers.
  35. Chromed Center stand.
  36. Chromed Side Stand.
  37. 530 X Ring CXhain.
  38. New wire Harness.
  39. New handlebar switches.
  40. Oil Pressure Gauge.
  41. Battery Tender.


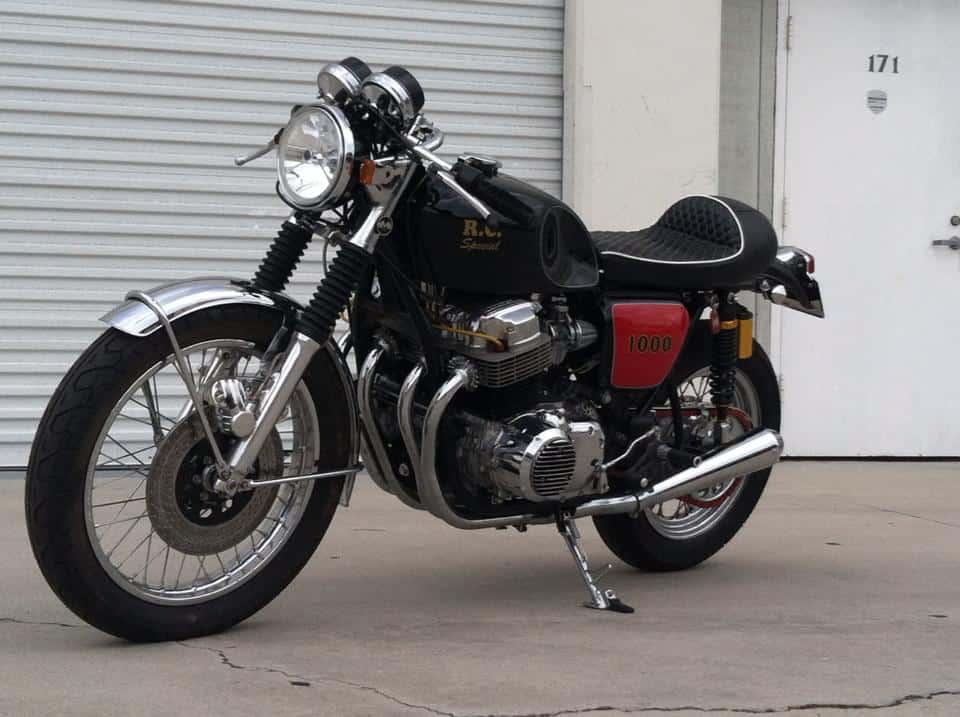
CAFE RACER 1970 CB1000 RUSS COLLINS SPECIAL

This is the Old Russ Collins Bike I created from parts.

Below is a Video but hard to hear as the old Powder coating shop behind us is loud as hell, but it was a tight motor and loved to ride it, hard to hear but this is the only video I have of it.

This machine was just a frame sat in the garage at home and boxes of old parts, and I wasn’t sure how i was going to go about this build but, as I had a russ collins Magneto I thought, what the heck I will be a traditional Cafe bike for fun.

This bike has so much work but for me it is fun and I enjoy every bike I create, sure, people say why not restore but heck, its not a sand-cast and plenty of these later K models around, I had a bucket load of parts and wanted to put something together and here it is at long last.

I started with a stock 1970 KO frame that had been sitting for many years in the back yard with 15 other CB750 Honda’s that I had acquired from an old guy out in the desert some years ago.


Then I started to get a few parts together and the light bulb came on and that was it, lets build a great looking Caff bike with a 1000cc Russ Collins Motor, what a Hot Rod that would be.

Motor was really good and came out of a running bike, compression was 185 all the way through so no point on a full rebuild, just a freshen up on gaskets and get her running.


New Chrome rims and used stainless spokes to Polished hubs I did, along with the frame being powder coated, the swing arm was too, New bridgestone Spitfires give the bike a more traditional look and really hold the road well.

Original 1970’s finned speed equip covers adorn this motorcycle and gives it the unique richness that shines from afar, I chromed the cases this time andwent throught the Whole bike with Allen headed stainless bolts.

I machined a Custom Finned Engine Bracket up to flow with the rest of the finned speed equipment that is on this bike..

This has an Original never used and out of the BOX, Paul Dunstall header set up from 1974 and this is the genuine article too. I have the trick Tri-Bar set up at the front to show you which way you are heading. Brand New OEM Fender, and I polished the fork lowers, fitted new uppers and resealed, also added the old school OEM Ribbed Gators too.

CI made my own seat, of which I made a mold from an old steel seat and then fitted the steel plates to allow for the stock Hinges to be used, then refoamed and Diamond stitched the seat for the old cafe racer look with the proverbial hump on the back, but also I made a Bobbed rear fender and fitted a old style Lucas Tail light, all of which I sell on my website www.carpyscaferacers.com and have sold many too.

I hammered and painted the tank- New side covers and new paint and has the 1000 logo on the side covers to show them what she really is. I loved the whole concept and with New petcock and Gas cap, this really looks factory to many, until they see the numbers on the side cover.

I used a set of TEC rear piggy back shocks that are 14 inches eye to eye and the rear tire is a Bridgestone Spitfire 130/90 to give it that beefy look and handles so well.

Oh yes, it has a Brand New Guilerri style diamond stitched seat base and that is a new base and foam too and I believe enhances the look of this machine.

Also- Lots of polished Aluminum, like the valve cover and caps, the clutch cover and stator and gear shift cover too.  With Braided oil hoses as well. I even chromed the kick stand, but look at the front Rotor, I drilled that, rebuilt the Caliper and polished that to a Chrome look and the front rim is new with stainless spokes and a bigger front tire to fill that fender out nicely.

Brand New Non maintenance  battery, Solid state rectifier, makes sure this fires up and of course with the original RC Magneto, this has so much spark, I fitted iridium spark plugs too. You will also notice that I made New oil Lines from Braided steel hose and Drilled and chromed Kick starter for a Custom look.

You want detail? Well she has loads of it, just check out the kick starter I drilled and re-chromed and the clutch cover set up. As well as the Italian Tarrozi rear sets added for a real comfortable ride as these set your feet back about 7 inches from the stock position and perfect for the Clubman handlebars up front.

New cables help this puppy along and I rebuilt the Carbs, bench synchronized them and then once running synchronized with a Mercury stick and it purrs now.

I have hours and hours and hours into this machine, I even chromed the kick stand as it looked to dull before.

Oh yeah- Do you like my Oil tank Dip stick? I machined this from a solid piece of 6061 T6 Aluminum to dress the cap up as thats always missed on builds so wanted to cover all the bases.

This is a really cool head turning machine, as where ever you loom there is cool stuff. like polished rear brake hub, with new brake shoes and actuator. Yes new brake shoes as well.

Yes, these New tires, on the back there is what I use most of the time, the Bridgestone 130x90x16 and at the front I use a 110x90x19. Custom RED X-Ring Chain, flows with the red on the gas tank and side covers etc and this bike sits so well, them Original Dunstall exhausts are a real piece of History as they were still in the original box when I had them as they were sat in my loft for many years.

Such a period looking Caff from back home and I remember as a kid, and I am glad that I went this route, its truly a fun machine and with 1000cc it does not hang about and is really Torquey.

I love the way the bike sits, it is a good, tough looking machine and with Brand new wire harness and handlebar switches, this is reliable as hell, I am very proud of this machine and it styling.

It has a New rear brake rod, spring and adjuster to make sure this thing stops at the rear, and a New 530 Chain and new sprockets 48 rear,17 tooth front.

The RC Special is a one off and I loved doing the build, I also made up stainless braided Brake hoses for the front brake and added a 14mm Master cylinder too.

The front brake caliper is rebuilt and polished to a chrome finish and I fitted a Brand New $400 genuine HONDA front fender.

To help this bad boy stop at the front end, I fitted a New BREMBO master cylinder to the Clubman bars.

Other col parts that you will notice, unlike many others out there is that I have used genuine NOS handlebar controls, over $220 each side.

The carbs are all rebuilt with new throttle cables and custom air filters.

The New headlight has a New bucket and insides too. And a 65 watt halogen Bulb to make sure you are seen on the road at night.

This has a cool display set up with the ignition relocated at the top of the tree, I wanted to move the ignition switch away from the motor as these get hot.

Also I polished the top triple tree to look like chrome, the steering has all new bearings and brand new chrome Honda steering Nut and washer.

All the bolts are Stainless Allen heads and this has had so many hours of work done to it. A new Clutch cable and Custom Adjuster.

This is clean and under the seat will be a brand new battery, the frame is powder coated and you can see how great she looks from these photo’s.

This has a new solid State rectifier and a battery tender too.

Also the shocks are brand new TEC models and I made custom lowers to lift the rear end a little higher by 50mm.

The bike just is cool to look at and with a RC1000 Motor it really does turn heads FAST!

This has Original New Old stock Superior Waffle GT grips from 1974 and were still in Original packaging on the shelf for years and years.

I may put some more little touches to her before someone buys her but I do hope it does get a great home.

Thanks for looking at this machine, it has now gone to a New owner and sure hope they ride the hell out of it,

I doubt I will locate another Russ Collins Built Motor any more and so glad I happened across the engine over 10 years ago,

2 of my Classic machines that I have built from just old bits and pieces that were literally in the garage and all in boxes or on shelves, love what I do and hope you do too, thanks so much for looking. If you want a bike built, serviced or just parts, drop me a line carpy@carpyscaferacers.com or you can call or even text me on 714-598-8392 as I am always happy to help, been building over 17 years here in California.

The Rice Boiler – 1974 Honda CB750K

OK, for a long time I had been planning this build and now it is here and I am so stoked the way that the machine turned out.

I used a snotty old bike to create this head spinning machine and had already built it in my mind hundreds of time, so thus was really a piece of cake for me.

I had an old set of Henry Abe 7 Star rims back in the UK, these are at least 3 decades old and had them sent over the water from back home and wanted to take them apart and fit new front and rear bearings, as well as paint the stars and polish the outers.

Once I chose New rubber for it ( Bridgestones ) I then made sure I had the rear brake set up drilled and polished, as I want the bike to stand out in many places.

I had a S.S. tank and cut all the top flap out and welded that in with a flat plate, then fitted a Stainless Steel polished Monza style racing Gas cap in it.

I then used one of opur own designed “Razorback” seat bases, As I really do love the lines of thaat seat base and knew this would really flow and give that yesteryear look.

I bead blasted the old frame and then powder coated a high gloss full flow Black on it and love the look, almost an enamel look to it and very inert to many fuels and substances.

If you look, you can see our New battery boxes we now make and offer on our website, this is the ww2 style battery box made from 6061 Aluminum and has cool rivets in.


I removed the old Oil tank and we washed that about 7 times and then cleaned out with some simple green, then stripped the paint, had it copper-ed, then chromed and buffed. you can see i was also setting up the rear sets and polished the brackets to give a Chrome finish.

I designed this color scheme by drawing this out on graph paper and used water colors and came out with this design, the reason that I came out to this conclusion is simple.   My old man always ran down anything to do with Japanese machines, and as I was a teenager in the 1970’s,  Japanese bikes were predominant in all parts of the globe and the old man just looked down on them and called them “Rice Boilers” 

So That’s why I named this bike “Rice Boiler”

She was fun to build and I am so stoked at the reaction it gets from people when they first see the bike.

I had a few people just stand there and just keep looking at it, as this bike did not start off like this.


I really enjoy the putting everything together part as you see such a transformation.


The Racing number 74 is really just the year of the bike but I wanted this to remind me of days gone passed when I used to hitch hike to Clubman Racing at Snetterton track and getting a lift on one of these bikes.

There are so many things that I have done to this bike, I should of named it the Magician as it is loaded with tricks. the lower forks are polished to a Chrome finish and all rebuilt, etc., and we hand-drill these rotors at the shop, then surface grind and polish them, looks cool eh?

I hand-hammered the gas tank as I do on all my bikes and wanted to use the Rising Sun as the filler, and boy does it pop!

The finned covers are early 70’s ones I have kept for this particular bike build, I must of had them 12 yeas in my tool box and so glad i got to get them on the Motor .

The red is very bold and I chose an Aztec style gold for the pin line, the whole paint scheme was completed using House of Kolor and I chose a Candy Rootbeer Brown as that was a cool Candy Color that Honda had back in 1971 and wanted to try and get that old School feel to it.

I actually incorporated  the neutral light into the head stock nut and think that it will be a cool addition to this ride and make use of the new lights we sell.

New Old Stock handlebar controls were a must, we used one of our polished throttle embellishers and some very cool flake handlebar grips, as well as new alloy levers, etc.

You can see how many brand new or rechromed parts I have fitted to this machine, by just glancing at the photos on this page.

The Ggold flake on the grips really do make the colors blend with the gold of the bike and the shocks.

I wanted to have the race number on there, as well as incorporate the year of manufacture, and it came out really well.

 I fitted new old stock fork ears and made our front fork badges t0 fit the sides where the original ugly reflectors sat and it cheered the machine up.

Yes- that is our very own Boxed Swingarm that we drilled and powder coated and really does suit this machine well, as well as helps the cornering as it stops all the rear end stepping out, this is a copy of my Original Dresda swingarm.

Our Stainless Steel Yoshimura-style 4-into-1 exhaust is a very cool sounding and looking set up and is a must with the style of machine that I create, by does it hang well.

You can see the work it took to make the tank look great, also the GPS speedometer is a cool look, but the bracket and the bucket we had to make and polish, it all worked out fine in the end and even though this was not a cheap option, I think its the cherry on the cake.

The headlight is from an old Desoto truck and then changed a little, it looks great with the Candy Rootbeer brown on it and the bezel was re-chromed.

Pretty Much everything is new on the build and am so happy to have gotten this machine done to the way I originally imagined, it screams out to you that this is an old cafe racer from back in the 70’s and I hope you like looking at her!

I tend to use Bridgestones as my personal choice of rubber on the rims I use, as I have always had them and stuck with what I know.

I spent a lot of time getting this bike right and many, many hours taking things off that didn’t work that you will never see, but thats how it goes with bike building and at the end of the day I have a really cool looking classic that is bound to turn a head or two.

I took the old broken and cracked fins off the original oil filter housing and machined and polished it and this is how she comes out. I do this to a lot of my creations, it adds a unique look.

Fitted our Finned Aluminum Ton Up Stabilizer Bar and the whole rear end is new, Brake Spring, Rod and Adjuster, no expense spared on this build.

A fun machine that is something that was made from old snot, rust and cold steel, also so nice to be able to recycle this and get it changed into another form.

I have already had a lot of interest in this machine and will let it go for the right price – this is a unique motorcycle with many, many new parts and one off pieces.

Within two days of finishing this motorcycle, I got it featured in Japan’s Lightning magazine, what a honor that was.

This bike did take a long while to complete, but I changed quite a few things on this until I was happy with the end result. Sometimes that is what happens with custom bike builds- I like this, and some of you may not. But to me, this is a cool machine that just screams out the bikes of the 70’s when I was a teenager in the United Kingdom.


I drilled the brake hub, the rotor and (of course) the front sprocket cover, as that’s my signature style I like to do, but I also had a very cool license plate frame that I have had for donkey’s years and was so stoked to have the opportunity to use it on this bike.

If this does not say cafe racer, then I don’t know what does – it’s an original piece that I am happy I didn’t discard over the years.

The tank took me some time to hammer and weld, but I wanted to incorporate the Rising Sun in the knee inserts and I am glad I did as it really does add a great concept to the bike.

Quite a few coats of Candy Root Beer brown were applied over the Aztec Gold and the end result is exactly the color that I envisioned.

No stickers, this is all real paint you see and I think you will agree, this really does stand out from many that just have decals.

A good stance for this tarmac eating machine.

I used rear sets which gives the bike a well-balanced feel, as the stock pegs are too far forward.

Our Boxed Swingarm and one off Chromed Chain Guard is a good component that i wanted to use on this bike. the Boxed Swingarm was made at the shop using 2X1 steel and it looks and works really well.

All the cases are hand-polished, the starter is rebuilt and the carbs are like new now. This bike runs smooth as we synchronize them using a Mercury stick.

The carbs have to be right on this machines, if you do not sync them they will pop and backfire, something you don’t want to have happening.

The front brake caliper was stripped and polished and our machined stainless steel piston fitted. We also have new side stands to stop the bikes from laying over too much. The originals had a tendency to bend over time. The DeSoto headlight and cool Chromed Diamond Signals, tell people what is going on in front of them.

Stainless Steel Flip-top Monza-style Gas Cap we sell was used on my tank, as well as our own ‘Ton Up’ Fork Badges.

New cables throughout (throttle, tachometer, speedometer and clutch cables) and new adjuster and stainless bolts all over the machine make this a long lasting ride.

I used a Ford big block connecting rod to use as an exhaust hanger. Once it was the right size and fitting, we chromed it and added this nice custom touch to the build.

I didn’t like the stock oil tank dipstick, so we machined a col finned cap for it and boy does it look trick, we shall be making more now to offer to you lot.

See how that cap makes everything flow that has fins on it, I really am happy how this came out, we used 6061 T6 Aluminum and then polished it.

The bucket below we made from a solid piece of  7075  and it came out so nice, tig welded the base and polished it, the bucket attaches by 3 small Allen head screws that sit at the front of the plate.


I wanted to combine new and old components to clean the top of the steering area up and it does look really tidy and clean now.

This was a fun build and I hope that you liked looking at the good Old ” Rice Boiler ” I can hear my Grumpy old man moaning about it right now!

I have already been featured in Japans’ leading Lifestyle magazine and have just had an Italian magazine come over to shoot it and hopefully a brit mag the month after, so I must be doing something right! Interested parties, please contact us for details.