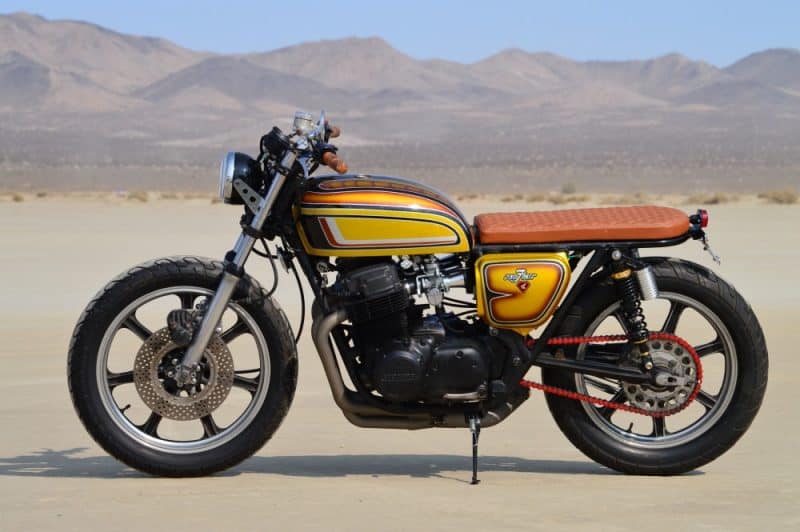
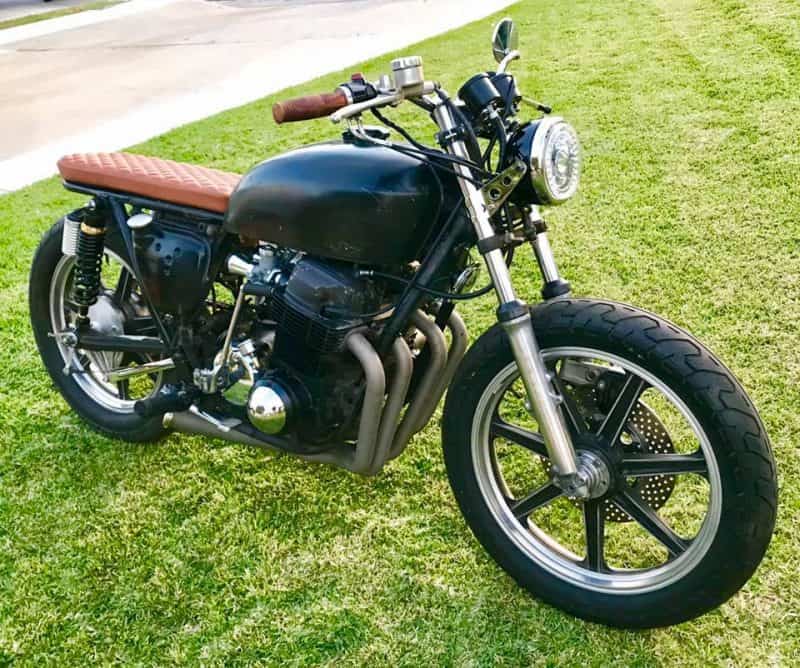
The VESCO HONDA CB750 Brat Bike

Well, many of you have followed the Blog on this machine, right now I am just enjoying the build as its running pretty darn good, so will keep it as a runaround until such time as if it either sells, or I get some time and I can strip bare and make a full custom project from this Motorcycle. But it sure was a great find, I purchased the bike though a contact and headed just a few miles down the road to the city of Orange here in Southern California to check this 1974 CB750K Honda out that had  been in storage for many Many years and had not even run since the mid 1980’s.

I have purchased so many CB750’s in the past but, its always great when you have the unknown ahead of you, most of the times they are so badly damaged or neglected, that you need to take a foot pump with you and a Mallet, as the tires are usually flat and the front brake will always stick due to some corrosion inside the caliper and the Rubber mallet will release the piston so you can push the bike into your van or trailer.

Found out that the family’s last name was Vesco, I inquired not related to Don are you? “Yup sure am” he tells me about it and this bike is actually his lads and he ran out of time, money, patience and enthusiasm on this machine and has been sat a long while. And now it was time to make some room in the garage, so it has to go, I made an offer and after a little bit of haggling a price was agreed upon and there it was, this old snotter that had a hard life but for the last 30 odd years had sat used and abused in all sorts of places, and now it was coing home to my shop to see what I could do to at least resurrect this vintage piece of tin.

It sure was hard work loading it ion the van as everything was corroded or semi seized up, but managed to get her up and into my van and then we were on the way to its new abode- my place.

Back home in 20 minutes and took the bike out and placed on a wheel chock so I could have a look at what we got, it had good potential but many people go in head strong and then kind of lose their drive in completing their dream and I purchase many machine in this guise and much worse too.

Brakes were seized and it took sometime to be able to get the bike onto the driveway on my own, the kick stand would not function as it was too long and kept getting in the way, I knew I had my work cut out but needed to know if I could get this old girl to run, as I didn’t want to strip this right away, always best to see how the motor is first before you dive in. You can see the plug caps have electrical tape over them, a warning sign that this had issues back in the day right away.


The carburetors had seen better days, not only were the bodies of this rack of four corroded, the slides had stuck inside, so another issue to sort out, but it did have compression when I kicked it over and thats a great thing to know.

Old Mac exhaust wouldn’t of ran well as the underneath of the header was squashed flat, must of hit a speed bump years ago and no way would it run that well with a restricted collector.


I wanted to just have fun with this bike, as I said, not sure how I was going to go until I got her running, but to get to that stage there was a few things that I thought would be cool so I could at least ride it once I figured all the issues out on this honda, and as you have probably experienced, there were many issues, but, whilst I had her in my shop, i wanted to change the seat set up and make a fun Brat style machine just because, well I can.

OK, so I made a steel seat base and tried another gas tank too, as I needed to clean the inside of the other one as I always do when I get tanks that has sat for many years, I had to change out the wire harness and the handle bars and controls and glad that I did as the old ones were so badly corroded, they would of caused a fire for sure. And then with a New set of intake manifolds and rebuilt carburetors this machine w\was almost ready for a fire up.

Below is a little iphone video I did on Face book, not sure how the motor would go but I had compression and now spark, so, with gas, this should in theory fire up.

So, as you can see, I had the bike on my work table and I used an old lawn mower tank as an iv to feel the motor, I was pretty sure she would at least back fire but as I re-jetted it and cleaned bowls out, I was certain that with new coils, battery and plugs and of course New oil and filter, that this puppy would run, and was pretty stoked with the end result.

Carbs redone and all clean with new intakes and my stainless steel clamps too, fitted some spun aluminum Velocity stacks with gauze for that old style look and re-jetted once more.

To make sure all is well, I need to be physically able to take this bike for a little ride, as no idea how the clutch is, the gears etc and the general running of this bike, I fitted another headlight and then whilst I was there at my storage, I removed some Old Lester wheels I had, I had taken them off a Vintage CR750 AHRMA race bike and simply stored them, tires were a little hard but thought what the hell, lets bung them on as the wheels on this bike anyway were toast.

I also had to make some sort of tail light assembly up as riding up the road, I still want people to see that I am braking etc, so put this set up together and it works really well being LED.

As you can see, I fitted the Lester rims, 19 inch front and 18 back, I also upholstered the seat in a soft brown leather with Diamond stitching and its sure comfortable I was surprised, the gas tank needs some work but I shall address that no worries, I also cut my 4 into 1 down that I ceramic coated titanium color, as I wanted an aggressive look to it and think that this does come across quite well.

As the sun goes down I managed to fire this up and it felt good to hear the bike run and run quite strong, I fitted a 530 O-Ring red chain that I had and it looks pretty tough, as you can see, I made one of my side stands and now the bike sits up nicely, so many dont or need bits of wood under them.

I also fitted an oil pressure gauge kit to make sure that I had good pressure, and it did, it fired up to about 70 pounds, so am more than happy about that, exhaust looks really cool.

OK, now it is time to address that gas tank and it needs some love, i think I shall go all out 1970’s Candy Custom style on this one as it needs some color for sure, but I noticed it had pin holes, so- went back to the original tank that came with the bike and decided to cut off the neck and weld in a Harley Bung instead.

So, the best thing I do is use a sawzall and cut the neck as far down as I can first as this needs to be flush on the tank for the bung to weld in nice and smooth.

As you can see, it takes some time and of course, I made sure that there was no residual gases exiting from the tank, be careful and make sure you wash your tank out before emmiting any sparks near this thing. LOL

So, with the neck sanded smooth to the tank, I used a Harley gas tank bung, I sell this kit on my website, and wanted to use it for this build to be a little different as the original locks always break on the Honda and knew that this would like quite trick once finished.

This is perfect for the Honda Gas tank and there is enough room to be able to TIG weld the bung in place with no distortion to the surrounding areas of the filler neck.

Now all Tig welded and cooled down, this is ready to attach the screw in gas cap, I did this a long time ago on the Cobalt Special Honda I built, so was eager to see how this looked.

Well, that looks so much better than the stock configuration and once painted will really set off the gas tank from the others out there and a neat Custom touch to this machine.

With New rear shocks and a comfortable seat, this is taking shape as a cool little Muscle style Brat bike that will turn heads where ever it sits and the paint will make you need Sunglasses.

Here we are at El Mirage at a SCTA sanctioned meet, last races of the year – so wanted to attend and take a few photos of this Vesco Honda and I am so glad that I did.

There is still a lot more to do to this but right now it just needs to get a few miles under its belt, I always say the first 100 miles will tell you how the bike will perform, so a ways to go as I only have 14 miles on it so far but of course shall do many more on it.

Don’t want to take this apart yet anyway, i mean its fun right now, no show bike but easily could be if I took her down to the frame and started from scratch, but right now I want to have fun with it and what better place than El Mirage Dry lake.

She sits real well and is a blast to ride, she got plenty of looks as you cannot miss the paint job, no matter how fast you drive.

So I am happy with the way she is and looks to be honest and I love riding the bike around to be honest as it sits so well and not too low as many are these days.

Jennifer my Girlfriend loves it too, she has a triumph of her own and loves all Motorcycles, love seeing Girls with bikes too and we go out riding a lot together to be honest.

Final look at El Mirage before we head home, it is only 100 miles from our house so always fun to come out here and view world speed time trials record attempts

Gas Cap sets off the tank nicely and the paint job is so reminiscent of them Customs days of the 1970’s back home and around the world, I think its a nice balance in color.

Fish Gills and shadowing are becoming a lost art but this really came out well, using house Of Kolor Candy paints and Pearl bases with light flake added.

The bike sits well, I like the smaller headlight, they have L.E.D’s inside it for turn signals, so keeps everything neat and out of the way, the Lester Rims gives it that Old School period right away.


Added 2.5 inch mechanical Gauges to tidy top end out, of course my Hand Made and chromed Euro Bars really make this comfortable for your shoulders and Cole Foster grips soak up any Vibration that you may have.

I think the Man above digs it too, No thunderbolts when I stopped outside his place, Phew!

I really enjoy riding the bike around my Town, the roads are smooth and its a joy to blap about on and even though I want to do way more to it, I need to sit back and have fun riding it for a little while as it was and still is a super fun project.

Slowly clocking the miles up but amazing that this runs and hasnt since the mid 1980’s, and its a joy to jump on and take for a spin around town.

I used a Biltwell Mirror for legal reasons and it works pretty well to be honest, Id love to paint the frame later but not right now, The motor runs strong, the gear transition is really smooth.

Eventually the Motor will be painted and tricked out but as I am having so much fun on this, I will wait until later, unless someone buys it of course.

Thank you for following me and purchasing My parts for your projects, it means a lot, this is my Passion and life, so I really do appreciate all your business.

So, until next time I work on this, I will leave you with a list of things I changed, just in case you are curious as to what I did on this machine through the build up.

This was the Very First ride after it had not run since the mid 1980’s, so stoked to be able to experience great moments like this, unless you are a bike builder, you really wont understand the Euphoria that you feel when you click into first gear and ride off down the road.

Peace and Grease to you all.


Carpy


  1. Lester Rims 19″ front 18″ Rear.
  2. Drilled Front Rotor
  3. Euro Bars I made 7/8
  4. Cole Foster grips
  5. New Handlebar Controls
  6. New Throttle Cables
  7. New Clutch Cable
  8. New Speedo Cable
  9. New Tach Cable
  10. New Wire Harness
  11. New Coils and Caps
  12. New Iridium Spark Plugs
  13. New Battery
  14. New Red 530 Chain.
  15. New Custom Side Stand.
  16. Custom Gas Cap Kit.
  17. New Side Covers.
  18. New 2.5 Mini Gauges.
  19. New 4 into 1 exhaust Shortened and Ceramic Coated Titanium
  20. Rear Frame Hoop
  21. Rear LED tail Light assembly
  22. New Finned Piggyback Shocks.
  23. Rebuilt Carbs.
  24. New intake Manifolds
  25. Stainless Hose Clamps
  26. Braided overflow pipes.
  27. Custom 5 3/4 headlight with internal LED signals.
  28. New Horn.
  29. New Flat seat in Leather with Diamond Design.
  30. New Brake and clutch levers.
  31. New Biltwell Mirror
  32. New Chrome Fork Ears.
  33. New Oil Pressure Gauge kit.
  34. Chromed Rear Stabilizer bar.
  35. New Foot pegs and Rubber.
  36. New Custom Weld in Gas Cap Bung and Screw in Cap.
  37. Custom Candy Flake Paint.


HAPPY THANKSGIVING FROM MY FAMILY TO YOURS

Well, its that time of year, the house is filled with wonderful smells, no not Castrol R fumes but of course Turkey, stuffing, deviled eggs, spuds and Pie of course.

Just wanted to wish everyone a very happy thanksgiving and hope that you get to spend sometime with family or friends.


Wanted to show you what I picked up, this old 1950 Sears Roebuck 8 HP motor that has been sat in an old barn in Jarrupa Valley for 40 years and not run.

I cannot leave anything alone and this is something I really do not need but I love Vintage Motors and even steam powered stuff, so could not turn this opportunity to have this engine running.

So, checking oil. and gas, adding some oil to gas just to make sure all is lubricated, then making a pull cord up, I sat this on a Motorcycle stand and then pulled the cord, took three pulls and the bugger started right up.

I was so overwhelmed to be honest, I mean, nothing today that has been built and then left for 40 years would ever start, love this stuff, but, the thing vibrates a fair bit and I noticed as it was running, the motor was about to hop off the bike stand I had it perched on. Instantly I grabbed it to re position, and Wham ‘O!  I got a huge electric shock as I touched the HT lead, ha ha, woke me up for sure.

No idea what I shall do with it, its in my storage now but maybe put it in a little bike frame, just something i saw and purchased from an old farmer, he had it in a vintage tractor many many moons ago, its a 1950 Model and is so cool, just wanted to share on Thanksgiving, hope it made you smile.?


1972 SOHC Vesco Honda for sale $5000

Well, I start this bike up every couple of days and smile, it sure is a fun bike that I out together from parts I had in storage, some rare, and of course, I purchased the bike of the famous Vesco family, grandson Larry – who is who I got it from and what a great Motorcycle family they are.

Anyway- this bike is available for anyone, its not a show bike but with some work and TLC it can easily be, if I strip it, paint frame, chrome and put back together, then thats $15K, so your choice, right now it is available at $5000.

Has a ton of cool parts and will add a little list again later. But the Lester Rims I reemoved from a CR750 Race bike, these are getting rare to locate and can spend big dollars for a set for your machine these days.

Has my Custom 4 into 1 Exhaust system with a cool aggressive kick out that is Baffled and barks like a hungry dog, this is a Hot Rod Muscle machine that has a lot of character.

It sits nicely and has Custom rear shocks to soak up the bumps via SRC and they sure do, sits on an old set of Bridgestone tires and is comfortable to ride to be honest.

The seat is made by me and has memory foam and then covered in soft leather and then Diamond stitched with twine and it really is a soft seat seat up compared to many who get it wrong.

This bike cackles nicely with my Custom 4 into 1 System, and I was glad that I made that choice, the pipe is ceramic coated in a titanium and I shortened the tail pipe to give it an aggressive stance, then added the Nickel plated Baffle in the end of it, it kicks out just right for this Custom Machine.

I start this bike when ever I go in the garage and love the cackle of this pipe and the overall rumble that the bike makes, its the perfect height for me to ride too as she has a 19 inch front and 18 inch rear.

I have a title and this is available as is for $5000 right now, but , if I do more work, then obviously the price goes up, Lights work, starter works, Horn even works too, brake lights too, all gears are super smooth and a fun ride.

I may add a front fender if I continue to work on this bike as it will look cool with a tight front bobbed fender I think and of course, stop any crap hitting you in the melon when riding.

What a Blast this is, not too many times I have jumped on a bike and smile every time, but this one is just a great alrounder and enjoy its smooth linear power delivery to be honest.

let me know if you are interested. 714-598-8392 and have a great Thanksgiving tomorrow as I know I shall.

Thank you for taking your time to have a look at my recent build, share it around with friends who may be interested as its a great deal for sure.

This is when I first fired it up last week, had not run since the mid 1980’s, a great feeling.

Norton Reveals Two New Motorcycles.

Well, it is has been a while since I have heard anything much about Norton as of late, the Commando range didn’t really seem to take off, but the price range I am sure was a massive factor when it came to that, its all about price tagging and making classic Iconic names affordable these days. but all that is now about to change and not one but Two new Motorcycles are now coining out to the tarmac and I for one am happy about that.

Stuart Garner the ceo and Owner of Norton Motorcycles has busted his own nut to get these 2 cool machines ready for the public to see,  the New 650 parallel twin machine is something I am eager to take a look at, seems to have derived from the v4 1200cc machine.

But, the Norton Atlas Ranger is a great looking Dual Purpose motorcycle that looks pretty darn rugged to be honest. With a longer swing arm and footpegs wide enough to help you stand up and tap the tank with your knee’s, this scrambler is very cool. I see that they have kept the price quite competitive, opening at 10,000 pounds with the Scrambler at 12,00 but relatively cheap for Norton, they are so much into these 650 machines, that they have just now started to build a factory out the back of the place just for them 2 models, so it shows the commitment that Norton has and I believe this will be quite a competitive motorcycle in the UK as well as over here in the USA.

Wicked bits of kit to look at and I for want would like to at least have the opportunity to sling my leg over these great machines.

The Atlas looks superb and if I had a hat on right now, I would tip it towards Stuart garner, great concept fella and sure hope to see some of these on the So Cal Roads next year.

Thanks for reading my Blog today and hope this made you smile as much as I did when I heard about these motorcycles coming out.

My New Triumph Scrambler 900

Well, for some time now I have wanted a Triumph 900 Scrambler, many times I have looked and pondered more than the French Sculpture in Paris.  But for some reason I never went ahead and bit the bullet so to speak, but after many years of laying on a gas tank, it was time for a change and for a few reasons too.

    1. My girlfriend Jennifer rides a T100 Bonneville and wanted to be on an even par in power and fuel range.
    2. When we last went out Jennifer took in all the sights whilst sat upon her Bonneville, whilst all I saw was either gauges or Apexes of corners coming up etc.So I decided to sell my Thruxton and start to look out for a Scrambler instead. Not long until the Thruxton was Sold, I was already taking a peek at Scramblers, and I first went down to the local Triumph dealer to look at Brand spanking New models. But after having a look, I was not happy with these models as too much cheap arse plastic was put on them, of course the salesman tries to make it sound like a deal but to me it was about as inviting as hemorrhoids.

They said if I wait until April, the New Scrambler will be out, they want 2 arms and 3 legs for that, no thanks, as I want an affordable ride and the gauntlet had been thrown as my local dealer didnt want to help at all this time, so feck them, we shall locate our own.

I looked at many with Jennifer online, lots were clunkers, broke or beaten up or just had a rough life, I was keen on the matt pearl Blue version but most I looked at were Black, we saw one that was not too bad in the pics, the owner said it was great, so we got up super early, drove for 4 hours only to find a bike that had more issues than a homeless drunk with a meth addiction.I took it for a ride, the chain clunked like an ill fitting chastity belt and the fork seals had blown, as well as brake fluid had spillled at some point in its life and took a few layers of paint off the headstock, what a waste of time, so we jumped in the van and drove all the way home.

But at last, Jennifer’s friend she originally went to high School was selling one and just down the road, only to find out I was there in the show room when i originally was looking at bikes and I told him the scrambler was his best bet, so- as he has a ton of bikes and this scrambler had 459 miles on it and of course was pearl matt Blue, a deal was struck and I loaded the bike up into the van and bought it home, well happy.

So there it is, as stock as the proverbial rock, and it will not stay like that for too long as I am always thinking of things to do on my own rides and this is no exception.

I added a stainless Steel Tank Strap and a new set of grips, but I want the Mirrors and seat gone as thats too stock looking for me.

Now thats better, a smaller seat with a Chromed rack to carry stuff, just what I need, I shall re-upholster a little later on though, maybe diamond stitching?

Looks better already and it is a lot of fun riding this Scrambler and I am looking forward to clocking a few miles up on the odometer soon with Jennifer on her Bonneville.

Eventually I shall get ride of the exhaust system for something of mine and makes a little bit of noise and more power, but for now its fine.

So I can get more things to carry with me when I am on a trip etc, I thought that I would add an Ammo Box as a pannier bag and am happy at how this looks, didnt want a huge version as it would offset the bike too much, but this is perfect to what I need and happy I went ahead and fitted this to the bike.

I may make a stencil and paint something on the side, not sure what yet but something to think about and now Ii have somewhere to put my gloves, hat and scarf when we stop.

Eventually I shall  remove the ugly plastic rear tail light assembly but need to think of something cool first but thats next on the list of modifications I need to complete on this machine.

Don’t be fooled by the Scrambler’s retro design because every mechanical detail in it is about as modern as it gets. The tubular steel, twin cradle frame can be clearly seen from a distance, evoking Triumph’s classic style ethos. The exhausts are also prominently shown, extending all the way from the bolted engine under the seat to the rear, just above the 17-inch, 40-spoke wire rear wheel.

The pair of Kayabasa chromed shocks at the back of the bike are also easily detectable, adding to the classic look of the bike while also providing a balanced and effective damping, giving riders the confidence to hit the road with the bike’s suspension credentials. A 19-inch 34-spoke wire wheel sits comfortably at the front, wrapped around block-treaded tires to give it the tool it needs to get outstanding on-road performance in any kind of road surface.

To keep the Scrambler in tip-top shape, Triumph also installed a single front disc brake and a rear equivalent courtesy of Nissin to help provide stopping power that doesn’t jolt you out of your seat.


Design Specifications

Length 2213mm
Width handlebars 860
Height without mirror 1202mm
Seat height 825mm
Wheelbase 1500mm
Rake 27.8º
Trail 105mm
Tank capacity 16l
Wet weight 230 kg
Dry weight 214 kg
Color Options Matt Pacific Blue, Diablo Red Lunar Silver

Frame Specifications

Frame Tubular steel cradle
Swingarm Twin-sided, tubular steel
Front Wheels 36-spoke 19 x 2.5in
Rear Wheels 40-spoke 17 x 3.5in
Front Tyres 100/90-19
Rear Tyres 130/80-17
Front Suspension Kayaba 41mm forks, 120mm travel
Rear Suspension Kayaba chromed spring twin shocks with adjustable preload, 106mm rear wheel travel
Brakes front Single 310mm disc, Nissin 2-piston floating caliper
Brakes rear Single 255mm disc, Nissin 2-piston floating caliper
Instrument display and functions Analogue speedometer with odometer and trip information.


The Triumph Scrambler is powered by a Bonneville-based 865 cc, air-cooled, eight-valve engine that develops 58 horsepower and 50 pound-feet of torque at 4,750 rpm and mated to a five-speed transmission.

Move to the back and you’ll see a pair of twin chromed stainless steel exhaust pipes and heat shields that not only serve their mechanical purposes of meeting noise emission regulations but also pays homage to the 1960s Triumph TR6C Trophy Special.

The engine itself doesn’t have crazy numbers, but it does have enough to give riders all sorts of fun when prowling the road. The Scrambler is capable of covering 0 to 60 mph in 6.2 seconds to go with a top speed of 125 mph. It’s also the most fuel efficient engine in the Triumph range, allowing the Scrambler to cover as much as 72 mpg.

Drivetrain Specifications

Engine type Air-cooled, DOHC, parallel-twin, 270º firing interval
Capacity 865cc
Bore 90mm
Stroke 68mm
Fuel system Multipoint sequential electronic fuel injection with SAI
Exhaust High level stainless steel headers with twin chromed silencers
Final drive X ring chain
Clutch Wet, multi-plate
Gearbox 5-Speed
Oil capacity 4.5L
Max power ec 59BHP @ 6800
Max torque ec 68NM @ 4750
Fuel Consumption urban 56mpg
Fuel Consumption 56mph/90kph 72mpg
Fuel Consumption 75mph/120kph 57mpg

The Vesco Honda at El Mirage

On Saturday, Jennifer and I went out to watch the races at El Mirage dry lake in Southern California, this place has been having speed trials since before ww2 and continues today through the SCTA. (Southern California Timing Association.) So we took the van and the Honda and drove up to the lake bed and set up our ezy up and radio etc and food for the day.

Such a fun day watching cars and motorcycles race the clock, some reaching speeds well over 250 miles an hour, its awesome to spectate as you are so close to the action.

Took some snaps of the Vesco Honda and thought that I would share them today, above you can see the Shorty Turn out that I did for this particular build, the bike is all running now and am happy at the outcome of this machine that had not run since the 1980’s.

This is not a show bike but, it could easily be, as I was thinking of running for 100 miles, then stripping the bike down to the frame and painted the chassis silver and start a cool custom project, but also this is up for sale as she is right now as I do have other builds to continue with for my Customers.

The Bike runs well now and fires right up with either a Kick start or hitting the starter, it has nice low end torque all through the range of gears and is a fun machine to ride.

Sitting Pretty on this famous Dry lake where even Don Vesco himself has raced, the Honda does look at home sat here in the So-Cal Sunshine.

My Custom, Hand made and chromed handle bars – Make this bike so comfortable to ride, no back breaking leaning over the gas tank, a sit up and cruise feel that I enjoyed.

The exhaust system of mine flows so well to help exit the gases from the engine and it has a velvet tone to it as she pulls through the curve.

Old style lights but really are modern LED, that way it looks old school but people will see you with these bright lights, plenty of travel in the suspension on the rear too.

See if you can visit the dry lakes when they have sanctioned races on, its an awesome event to go to and everyone is approachable.

These Lester rims are 19 inch front and 18 rear, I took these off a CR750 Road racer some years ago and have had them in storage for quite a few years and I am so glad that I got to use them, fitted my New side stand as original one had broken off, the bike sits well.

This is a comfortable bike to ride and has loads of potential to be a really cool Custom machine, it has some rare parts on and are only getting harder to locate these days.

It has New Handlebars, Bar Switches, Harness, Battery, Pipe, Shocks, Grips, Cables, Chain- as well as many other new parts, like totally Rebuilt Carbs and New intakes and Throttle Cables etc.

A fun weekend on the lake bed and Jennifer and I had a blast, chatting to Racers and meeting up with folk we haven’t seen in a while, the commeraderie is second to none.

Jennifer taking in some of the racing as she helps move the bike onto the Lake bed.

Time to get some miles on this puppy, but wanted to at least share some photos that I took whilst out at El Mirage, this bike will be up for sale soon, if interested call or text me on- 714-598-8392

Thanks for reading today.


Vesco Honda CB750, finally running and enjoying some miles.

Well, its been a fun journey just to get the bike into the guise that I wanted, its no show bike, but could be with more TLC, not sure where I am going with the bike yet but I gotta tell you, every time I fire a bike up that has not been started since 1983 and click it into gear, there is always that hesitant OMG what if, feeling, but I went through as much as I could and was sure this would be fine.

The mechanical Clunk you always get as you click first gear, I let the clutch out bravely but making sure my finger is covering the brake lever just in case something is not right, I pull out onto the tarmac for the bikes first ever ride in so many years.  Well, 35 years to be exact!

She pulled off very smoothly, transitioning through the gears effortlessly, I was watching the Tach, the speedometer and of course the Oil pressure gauge I had fitted, just to make sure all was functioning OK, and she surely was.

2nd, 3rd, 4th and finally 5th and the power was smooth, no shuddering at all, the Exhaust had its velvet tone barking away as I increased the revs, up to 4000 and sped up to about 60 mph on a straight away, the bike felt great, my New Handlebars were perfect for this stance and the seat actually was comfortable for being flat.

Brakes were fine, just a little adjust to the rear but I think the brake shoes are more than likely shiny, but a few hard stops will sort that out, but I rode around the houses here in La Mirada at a nice constant speed, watching the Rev Counter to see if there was any bounce or fluttering, but all was good.

I do need to replace the fork seals and will do that if I strip the bike and build into a show bike, but- for now, I want to put some miles under her belt and make sure everything is ok for the next 100 miles, so only another 96 to go, but fun ones no doubt.

It was a mighty fine feeling, having this bike run and to run really well, all the hard work paid off and I was smiling all the way around the roads I took as I felt good today, I guise a sense of achievement.

Still, she needs cleaning up but, I can do that later on and of course, the more I do to this Motorcycle, the more I shall want for it, but this Vesco Muscle Bike is a great looking machine and turns heads even now.

Not sure if I need to add a front fender yet, will see, a Bobbed one may look cool and stop crap hitting you in the face at high speed, but this is a great Bar hopper, so may no need one.

Plenty I can do to clean the bikes lines and appearance up but the main thing was to see how she ran and of course handled, and I really do enjoy riding this machine.

Hope you too have enjoyed the build on this old machine, I was not sure how I was going to go with the look, but I think on this particular ride, I made the right choice.

Price? Well I guess if I was forced to let it go, $5000 would be the price right now as she is.


The Vesco Honda now gets a Coat of Paint

Today was a good day, you know what its like when eventually things start to go to plan, albeit around the houses a little but I did get the end result that I was seeking and today I want to share with you how far I got on with the Vesco Honda CB750 Today.

I wired up the tail light assembly, and these can be no easy task at times, especially when the wires are different colors to the Honda version and no instructions of diagrams, I usually test the assembly on a battery before hand, just to save me from blowing fuses, I keep a few handy anyway, as there is nothing more frustrating than connecting something up on your harness, hot the switch and hear the Phhffft of a fuse blowing and a small small or burnt ether as you start to raise your own temperature and let out a few choice words that would make a Sailor Blush!
So, I wired up the rear tail light assembly, all works great now and, being a LED module, this will make sure that you will be seen in any weather condition and thats a good thing, especially having a strong braking tail light.
I fitted a new battery and leads and fuse box too and am happy at the result for now, remember, this is no show bike right now, I want to get her running to be able to asses the Honda to see what I will need to tear down and rebuild into a show bike, but its fun doing this and today was a good day.
The Gas tank looks so much better now, it was a sort of Maroon Oxide when I picked the bike up and I removed the gas cap neck and welded in a Harley bung, so the top would look a little smoother and more Custom to be honest.
But I was unsure as to what color to have on this bike as I dont really have a them for it, but though that I would go with a cool bright design and use smaller metallic/ flake with the old fish scales and shadowing thats so reminiscent of that 70’s back home in the UK and over here in the states.
As you can see, this really does brighten up the bike and I am happy that this is this color for now, doesn’t mean I will stay with this if I chose to build into a Custom machine but right now I am happy with the look and the side covers flow with the gas tank, thats very important to me and the outcome is pretty much how I first envisioned creating this 750 Four and we are almost there to take it for a test ride.
The Lester rims are tall and even though I am 5″11 I am almost on tip toes when I am sat upon this motorcycle, but I have tried to make the stance of the bike as level as possible, I believe I have achieved this look and my own Brand of Handlebars really do set the bike off better, something I am quite proud of to be honest.
The 4 into 1 of mine looks so aggressive with the tail pipe Cut down low and I wanted a short turn and exit to make this Brat bike something of a head turner, but I have still more little things to do and clean up.
The gas tank still needs to be sealed up as I ran gas through it and the bloody carbs blocked up dues to sediment in the gas tank from the flake in the paint, so I have now taken the gas tank to a radiator shop and they are going to seal the inside the tank and I should be good to go then.
The colors came out well and represent days gone by over the 70’s and I am pretty stoked at the outcome, and with a New petcock and throttle cables, this will last quite some time now.
The side covers are great, and I have just received the emblems to put on the covers, the 750 four script and the Diamond emblem below, so that will set the side covers off.
Obviously the bike needs to be taken down to the frame and all gone through later but I want some fun on it now and hopefully by the weekend, this will be ready to take for a run on the road and see how she is.
So, a little more bits and bobs to do but this bike has come a long way in a relatively short amount of time and I am really happy at the result and the guise of the Honda it is in right now.
Lester rims are Original Race ones from a CR750 I removed them from, front is a 1977 and the rear is a 1978, still need to fit new bolts and a speedometer cable tomorrow.
Sure looking forward to test riding this later on this week, its been sat since the mid 1980’s, so this will be quite a fun ride.
I have just received some side cover emblems too and they look really Nostalgic.

Vesco Honda build so far.

Well, I was lucky enough to get a call from a film Producer, they are doing a TV Commercial this weekend and needed a couple of bikes to use, so I let them take my Sportster Cafe and this Vesco Brat, as its not finished yet but pretty much altogether now.

But wanted to share a few photos of how she is right now as its getting closer to be able to ride, that will be quite exiting as it had not run since the 1980’s, I have fired her up a few times now and happy with the idle and the oil pressure, so this week I shall be able to fire her up and take the bike for a quick run around the block and see what happens.

This gas tank needs painting and I have side covers for it now, just need painting etc, thats why you can see all the electrical and the oil tank, but once it is painted and side covers fitted, the bike will look a lot better.

What then? Well not sure, depends on how the bike runs and handles to be honest, but this coming weekend, Jennifer and I will load the bike up and go to EL MIRAGE, to watch the races, meet some friends and to ride this about a bit.  Sure it will get covered in dirt and dust but, if I am to strip and rebuild this into a show bike, thats not going to matter as dirt wipes off right?

The gas tank and side covers later will be painted a Yellow color, just wanted something really different, so we shall see how that goes.

I changed the front headlight from a 7 inch to a more compact 5.75 version, and to be honest, i really like the look of this on the bike, so will be keeping that on there.

I fitted New foot pegs too, as the old ones were so bent out of shape, this will make for a fun ride, the Brat seat has soft Leather and memory foam, so another bonus there to ride on the dry lake.

I also used my Own brand of handle bars, these are the Euro-Tracker Bars I have had hand formed, then triple chromed and I do love the way they lay on the bike and give the whole machine a different look and feel for that matter.

Yes, its not a finished bike, but- you have to get a bike going to see what the issues are before pulling it all apart and throwing all your time, money and hard effort into a project.

I also pulled the old rusty rims off and had a set of Original Lester wheels that came off a CR750 Honda, the front wheel is dated 1978 and the rear is 1977, the front is a 19 inch and rear is an 18 inch set up, these are getting harder to locate these  days and wanted to use them.

I did change out the swing arm as the old one had been chromed back in the day and the elements had gotten to it and it was as rusty as the Titanic’s Crapper, but I am thinking of remaking some Boxed swing arms again and will offer them on my website when available.

I had noticed that the Kick stand on the bike was an old 70’s Chopper one and it did not sit well, you had to push the side stand all the way forward for it to stay, I looked closer and noticed that some of the frame bracket has broken off many years ago and that is why the side stand would not stand upright.

My trusty Miller Mig welder helped me out and I built up a platform again and used one of my own kickstands, and now it sits right, and am happy with the look of it now.

The shocks were pretty knackered on the bike, so i chose some aftermarket SRC piggy backs, they work fine and are Liquid Nitrogen filled and sets the stance where I want it to be honest.

My 4 into 1 I had fitted great but, this time I wanted to cut the tail pipe right back and fit the baffle just before the turn out, for a more aggressive look and I really do like the look of this system and it sounds pretty tough to say the least.

Later on when I strip the bike down, I will clean up the Lester Rims and re-paint them and add some Knobby Tires, but I am in two minds whether to change the front end for a CBR or, stick with the traditional fork set up and just rebuild the fork lowers and add New Upper tubes that will be 2 inches shorter. The front brake works and thats surprising for how many years it has been sat, its functioning but will of course totally rebuild that or fit newer brakes as I am a dealer for Beringer and may fit their set up, but all depends on funds etc.

It is all to easy to let a Custom build get away with you, financially, I have created some awesome machines for customers but, if you start to add a modified engine, you will be into $5000 in a flash just in the engine itself, these bikes are fun and fast enough, you really do not need a big cam and heavy duty head studs but if you want response, just port and polish the head and go no bigger than a 3/4 street cam.

I love the stock ignition system as they are dependable, I am not a fan of electronic ignition systems and points take very little maintenance, if you keep it simple, you disperse any issues with modified stuff, most of the time its a waste of money as many that have bigger displacements have over heating issues  or head gaskets blow and for what? 10 MPH? Just have fun with your bike, a good pipe and jetting is more than enough for many roads here, of course if you are on a race track, thats a different game all together , but just watch your budget on these machines, as it can easily get away from you and you then tally all your receipts up and have a small heart attack when you add it all up at the end of the build.

So for right now, I will run this old bugger around with a painted gas tank and covers but the rest as she is, as I want to put a few miles on her to see how the motor responds to daily life, then- when I am ready I shall pull back off the road and strip the bike and create a cool Brat bike thats fun to ride and easy on the eye.

Of course I offer these for sale, as thats what I am in business to do, its hard to let them go but I have a New Scrambler I use for riding about and it makes it a whole lot easier to let another creation go off into the sunset and then, the fun begins with another creation.

So, its a Sunday and I have taken a couple of photos and blogged on here today, she is looking pretty fun now and YES of course if someone wanted to Purchase this machine from me as is I would probably sell it, as I love create machines from junkers that have not run for years, but I shall still add more bits and pieces to this machine until I am ready to tear it all apart once more.

This Vesco Brat has a really cool ride stance and I am glad I took a chance and grabbed this inline four, its a fun ride and more to come too.

Hope you enjoyed my Blog today and of course I put the build up on my face book too. steve richard carpenter or carpys cafe racers or carpys garage you can look at any of them pages too.

Thanks for reading and have fun with your project.