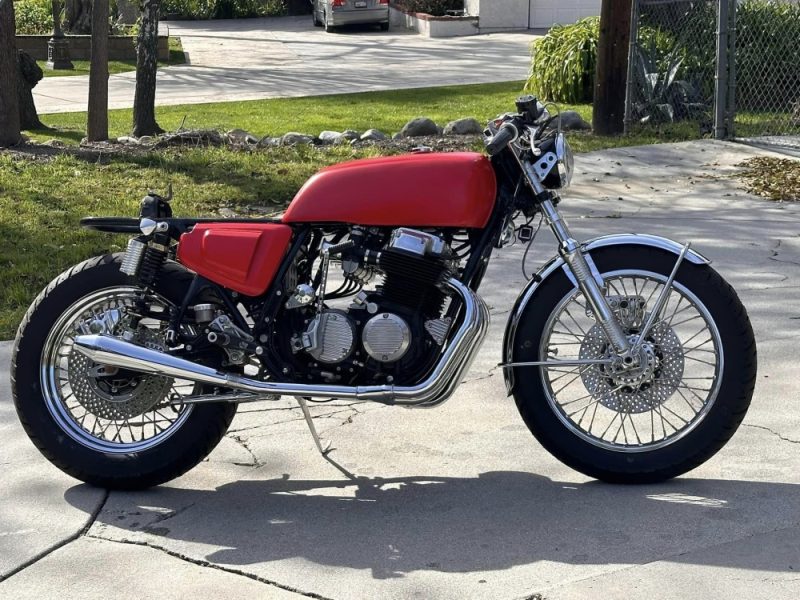
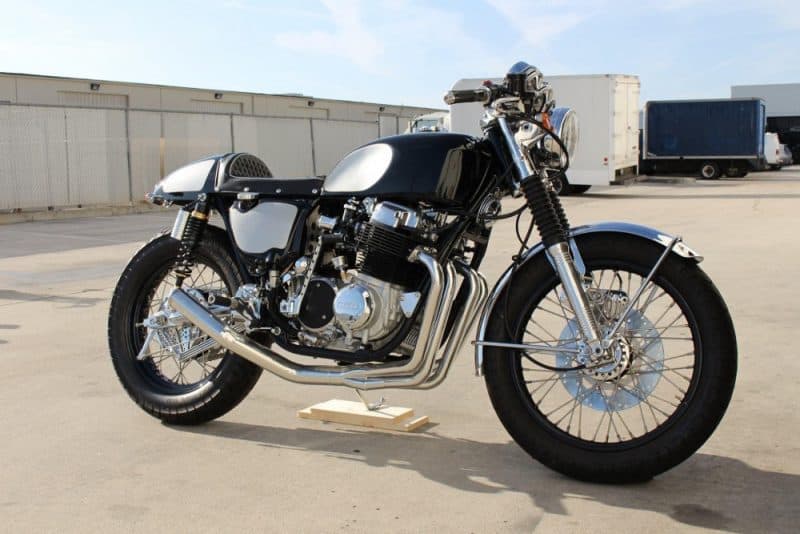
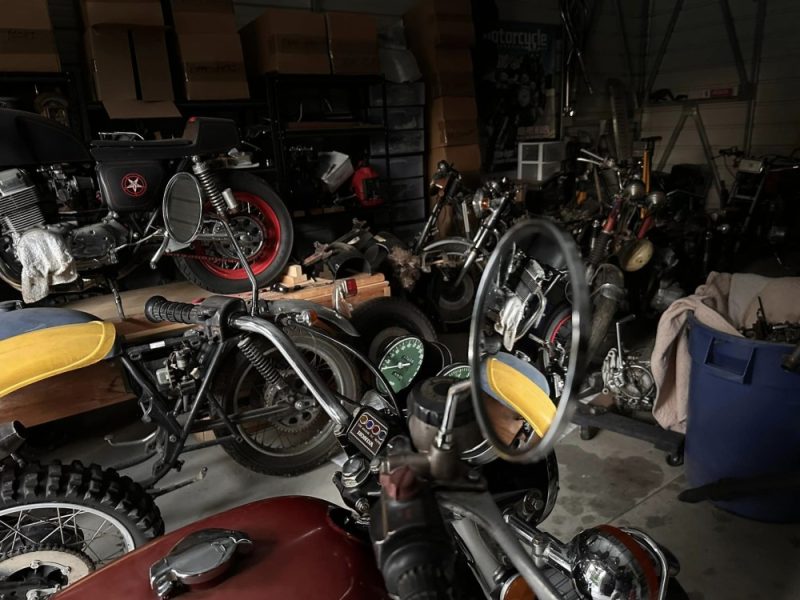
Honda CB750K 1976 getting a little more work completed.

I decided that whilst I have some spare time and a few parts etc I shall get into the K6 a little more and clean her up, as she has sat for so many years in a Back Garden, its only fair I revamp her a little and put her to a more Original style as to be honest, the 1976 CB750K Model was probably the best looking bike of them all and ran well.

So, I thought that I would try and clean up the lower front forks, as the factory clear coat has long gone and and as the sprinklers, hot and cold climates happen, the lower forks and anything aluminum takes a beating.

I jacked the bike up and removed the front wheel, I also made sure I used a pair of jack stands too, just to hold the chassis incase we get an earthquake here in Southern California, as 530 pounds is not so easy to pick up if its laying on the floor.

As you can see, the lower stanchions have seen better days, the pitting is caused after the clear coat gets eaten away by heat and moisture then aluminum will break down slowly in cold temperatures causing oxidization, of which you can see on the left fork lower, but I have refurbished so many of these over the years, I was not worried at all about cleaning these up to a more original look, but it does take a bit of dedication and hard work to achieve that goal, like anything else in life really.

After sanding the forks by hand, I start my process of buffing, using Block  compounds you can buy from shops, to my “Special” Secret Sauce that I have used for decades and slowly improved to get it to the standard that I like, yes its messy but that’s the reward afterwards when you see a shiny piece of art.

Its not a 5 minute process that’s for sure and the more effort you put in, the bigger the reward at the end, this is just its early stage and I increase pressure and change cutting compounds as I go along, remembering that this gets bloody Hot as you increase the pressure on the wheel.

As you can see, that is a good comparison with just a little bit of work, more to do but I am happy how this is going and people ask me how I get the finish on my Polishing, so thought I would share this with you lot today.

Yes, I wore gloves as these get super hot and being aluminum, they hold the heat for a long time, I am really happy how the forks are starting to turn out and am glad that I made the decision to pull the front forks and rebuild them.

So, a bit pf scotch pad, sanding block, then polishing will get you to this stage, I can go more but don’t want it too showy chrome looking and will rebuild these now, the upper tubes are total toast, as you can see below.

The forks at the top are always covered by the headlight ears but Honda did not take into consideration that the metal will sweat in hot and cold condition and of course rain etc can get down the forks and sit there, these forks are typical of the many that I have pulled out of the bikes over the years, so a common problem.

I believe Honda went cheaper on the chroming, using less on the forks as you don’t see it and putting money into the Motor, as I have seen hundreds like this and that’s always been the look when you drop the forks at the top. But I have a Replacement set of aftermarket ones ready to go.

I have always liked Polishing,I was taught at a old 17th century Barn when I worked for Rolls Royce as a kid and it always stuck with me and its so rewarding to turn something ugly into quite the jewel.

I use my circlip pliers to fit the snap ring into the lowers, a real life saver these are as you do not want to risk scratching the chrome by using regular pliers etc.

I try to use Genuine Honda parts where ever I can as the parts are top quality and of course guaranteed to fit perfectly, as many aftermarket parts do not.

I refitted the springs and will fill with oil when the wheel is on but still up in the air, that keeps the pressure off the springs and easier to fill the forks that way and not have the springs flying out towards your eyes if you put the bike on the ground.

So there you go, forks back on and they look so much better than before. I will be fitting New speedometer cable and New Tach and speedo gauges to clean it all up at the front, but she is taking shape and will continue to revamp her as I go along.  I will be fitting Brand New 4 into 4 exhausts to the New Honda spigots that you see in the cylinder head, also New footpegs and New kick starter and brake pedal, so keep watching carpyscaferacers.com and see how we go.


Formula 1 Livery CB750 SS Honda Project

Well, I have been playing about with the F1 project and have decided to fit the good old Rocket 4 seat assembly and then upholster the seat with traditional style snaps, just to show the times of yesteryear and the old school seat set ups of the day.

I am happy with the way it looks and it feels super comfy.plus your legs do not foul the air induction side scoops of which I really like now and want to try and represent some of the Ferrari’s styling, I still need to get all the body work wrapped but locating a company that knows what I am on about is not easy, my guy I use has flaked so its off to find someone who wants my money.

I will be looking forward to firing this old girl up and taking her for a spin about where I live as it was made for Motorcycles as we have miles of winding roads with off cambered corners and chicanes etc, this will be a blast to ride.

I went with a 17 LED stop tail light to give people lots of warning that this machine is there and again, give an old look with modern internals and this really does suit the bike, I still have to fashion a license plate bracket under it but thats later on.

Starting to look like a Classic Motorbike again and got plenty of hand waves and beeps from people driving by over the weekend, so that’s something positive eh?

I’m getting closer each time I do something and I believe the only hang up will be down to the graphic company, if I can’t find one that can do the job them I will have to paint it and letter it by hand and thats a time consuming job but we shall see.

Just thought I would do a little blog to let you know what I have been doing lately and hope you are enjoying the build????

Honda CL77 unloaded and now in workshop.

I managed to get the old girl off the Truck and Now its at My workshop and will be a while before I get into it as I have a few projects I must try and sort out, its getting to be a bit of a cluster as I have a lot of bikes at the moment and will try and get through them when the weather cools off a little . right now its a scorcher but I shall get there.

I shall put the motor in at some point and will add other pieces when I take them out of the boxes that I picked up, no idea what’s there in its entirety but will plug away and see what we have, should look pretty cool though as it has great lines that flow very well for 1967.

Will look out for a few parts like foot peg rubber and wire harness etc but for now I shall put boxes on the shelves and the bike is in the Barn now with many others keeping it company.

Some of you may be interested in this build?  It really is something you wont really see around and is a great conversation piece for the enthusiast out there, but I will plug away when I get some time as it looks like it will be fun.

I will of course post anything that I do as many people ask what I am up to at the workshop and I thank you all for the emails and phone calls etc as well as texts about the parts and the bikes I am working on.

Picked up a 1966 Honda CL77 305 today

Today was a GOOD day, you know, when you find a penny and pick it up?  I had an email from a Client and he said he had an old Honda that had been in the family from new, its been torn apart a few times but was I interested in it?  I said of course, I love trying to keep old Motorcycles from going to the junk yard and drove up to the guys parents to pick it.

I asked who originally owned it with any back story, here is what he replied to me:


It was my Uncle. He returned from Vietnam. Bought the motorcycle rode it for 6 months. Put it in his parents garage for storage. His parents died 10 years ago sold their house and offered it to me. It had not been ridden since then until I restored it. Mainly rust removal. Mechanical clean up. I rode it around my block and put it away in my garage for many years. Sold my house transported it to my parents house where I restored it for the second time to the current color. One family owner. After I restored it the first time I offered to give it back to him for his granddaughter when she was old enough. He didn’t want it back.

So, with that I jumped into my F250 and made the trip up to Rancho Cucamonga before it got too hot as it would be well over 100f there after 10am, I arrived in good time and loaded the bike up, there was a tote box of parts and the engine was sat in the corner of the garage.  I loaded the bike up first, it has no shock absorbers so had to get the guys parents to help me push it up onto the bed of the truck, where I have a motorcycle chock and then strapped it down.  I picked the Motor up and loaded that and the box up and wished them all the best and headed home.

I have never owned one of these models, the scramblers were so popular and quite fast for the era and even though the color is not my cup of Tea, it’s great to get the bike and not sure what to do with it at this moment but it will go up in the Barn and wait until I have finished getting the workshop finished as Its hard to move for bikes in there lol.

But, it will be fun later as even though too much of this has been powder coated One color, I think it will look pretty cool once together and a few changes with a bit of Chrome here and there to break up  the Sea-Foam Green embodyment.

These are classic bikes and some how there is a Single seat frame attached as well as the original double seat in the parts pile, but, it reminds me of me and my brothers NSU quickly we had as kids or an old D1 BSA Bantam, so I think I will stick with the single seat set up as it does have a Brit Iron look to it.

The good thing about it being stored in a Garage and of course being Powder coated everywhere, is that it isnt rusty at all, just dust from sitting in one place, a rare thing indeed, and the original License plate with Original Tags from 1966, still has pink and registration in the tube that is affixed to the plate and numbers match frame and motor, so all good, another thing you do not often come across when you pick a machine up.


I had no plans on building another bike as I have about 12 other bikes in the Barn but eventually I will get to this machine and every now and again when I get stuck on another build, I can turn to this one, it will be fun, unless somebody out there is interested of course?

I shall be having fun creating something cool with it when I start to wrench on the Green Machine, as I can get parts still for these machines, they were a great motor back in the day.


  • Honda CL77.
  • Years produced: 1965-1967.
  • Claimed power: 27.4hp @ 9,000rpm.
  • Top speed: 85mph (est.)
  • Engine type: 305cc air-cooled SOHC parallel twin.
  • Weight (dry): 319lb (145kg)
  • Price then: $707 (1967)
  • 28.5 bhp (21.3 kW) @ 9000 rpm
  • 17.6 lbf·ft (2.44 kg·m) (23.9 N·m) @ 6500 rpm
  • 4 speed
  • Tube steel
  • Front: telescoping fork
  • Rear: swing arm
  • Front: 3.0″ × 19″
  • Rear: 3.5″ × 19″
  • 52.4 in (1,330 mm)
  • Length: 79.1 in (2,010 mm)
  • Width: 32.3 in (820 mm)

The bike features air-cooled, four-stroke 305cc overhead parallel-twin cams. The gas tank holds three gallons. The CL77 redlines at 9,000 RPM, reaching a top speed of 85 miles per hour.

There is quite a following for these bikes.  The first CL77s were imported into the United States in 1965. They were a dual-sport version (then known as scramblers) of the CB77 Super Hawk, a 305cc overhead cam parallel twin. The Super Hawk had been on the American market since 1961, two years after Honda had established its import arm in Los Angeles.

In 1965, Honda finally decided there was an American market for a 305cc scrambler. Cycle World immediately tested the bike and liked it, even through it was not the production racer they had hoped for. Cycle World referred to the CL77 as a “gentleman’s scrambler,” stating, “It is, in fact, the appeal of scrambler-type styling that sells the CL77.” Period testers found the CL to be too heavy for competition and not as fast as the CB, but perfectly adequate for both offroad fun and reliably getting to work.

The four-stroke engine was almost identical to that used in the CB77 Super Hawk, with the same aluminum cases and chain-driven overhead cam. A lower compression ratio to aid low rpm power was allied to long, upswept pipes to assist ground clearance, and reliability was ensured by full-flow oil filtration.

Unlike the Super Hawk, which used the engine as a stressed member of the frame, the CL had a heavy duty single downtube cradle frame, topped by a small silver gas tank and protected underneath by a steel skid plate. The front brake was smaller in diameter than the one on the Super Hawk and the steel wheels were 19 inchers, with deep ribs to resist dents.  Large air filters and a battery were tucked up under the seat. The CB’s electric starter was omitted in the interest of saving weight.


So, a long way to go when I get into this machine but a fun one though and even though it does have the original dual seat, I do like the single sprung saddle to give it a more European look.

“In those days, a Honda Scrambler was a very desirable motorcycle, and it is still adequate for the job. You just have to keep in mind that it is only 305cc, and the suspension only has three or four inches of travel, and the brake gives you that Nostalgic feel of, ” the harder you press, the quicker you will stop” feeling.

Well, thanks for looking at this 1966 Honda CL77 that I have taken on, you can always email me questions at: carpy@carpyscaferacers.com or text at 714-598-8392.

Picked up 6 CB750’s today

Sometimes I get a call asking if I could clear out a garage or back yard as it has a motorcycle in it, this time it was 6 CB750’s, so what closed the deal was it was free but a friend of mine I have known many years and helping him out was the least I could do, and as he was less than 4 miles from me, I took the big G F250 out there and loaded up and bought the bikes home. I dont like to have to many as the place gets jammed packed but, its hard to not when it is so close to home.

To be honest, I can never really turn bikes down, especially CB750’s as I have had over 150 of these over the years and parts are always good to have handy, so I could not say no to this fella and help him out of a predicament too, these were in the back yard of his place, so a huff and a puff as some had flat tires etc but, determination is always key here and I wanted to get these home to eventually be used as another build. Once I get the Barn doors completed I shall space in the workshop to haul these up there and find a corner to rest them up together.

I have always enjoyed coming up with another build, they do take time and of course money, but when you hear them fire for the first time in many years, its something you get quite a buzz from, I get many texts or emails from Builders and customers who tell me that they just got their machine to run and I feel so stoked for them as I understand the euphoria that they feel when they first time you hit the starter or kick the kick starter and the engine coughs into life.

These are getting harder to find in back yards these days, I remember at one point I had 25 CB750 Honda’s in my back garden and driveway about 20 years ago and I have built every one of them over the years, so I was quite stoked to have these and bring them home. But don’t want the place to look like a junk yard so have to hold back on other stuff I have been offered.

Nothing super rare like sandcast etc here, but a couple of K1’s of which I have always liked anyway as never was a fan of the Ko with the Big side covers etc, there is no rush to do anything with these 500 pounders, so just unload and put them up in the Barn later until I come up with a build plan for them.

I have spent a lot of my life with Motorcycles and finding new stuff is always fun, just bringing them back with a plan of getting these to be back on the road in one form or another is always a challenge that I quite enjoy.

I have some Motors to look at tomorrow, so who knows what I may bring home, the hunt is half the fun and even though they are what I call snotters, parts are always handy to have when building machines.

So now is the time to unload these and see what is there and then I can mentally remember what these are as I store them and know that I have a choice of frames and years if I get into creating a new Build that will turn into something head turning, its hard to refuse when you build motorcycles and parts for a living, some will get it, many will not and think its some disease etc. LOL!

Of course, if I do start a creation, I will be sure to post on the website and share with you lot as many of you ask what I am up to these days and I thank you for that, I will be making more new parts too, so keep checking back on the website to see what’s going on, I do like to post blogs too and give you lot something to read.


Honda Santee Chopper, replacing worn out engine covers

As you may know, I picked up an old Santee framed Honda Chopper in a Local Garage a while back, progress has been slow as I am making parts for it to offer to the Chopper builders that are all around the globe, but i noticed that the engine case covers were looking bad.

The covers had been chromed, and as these are aluminum, the material gets hot and then cold and sweats, causing the chrome to bubble as it can’t expand like aluminum does, so it had bubbled, peeled and then started to corrode the aluminum, so I thought I would try and repurpose some old spare covers I had by polishing them to a chrome finish . As you can see from the photo above, the transmission cover was removed and the old gasket was toast, so luckily I had a New one in my cupboard as well as other parts needed to refurbish this area of the bike.

I removed the stator cover, but it took me a while to get this sorted as that round dark blue plate that is on the starter collar, fell off and hid behind the crank sprocket, took me a bit to fish that puppy out but never lost hope and now it’s time to remove the coil winding and the infield coil that are screwed into the case, I also leant the bike over and placed a blue tarp on the floor, as I did not want to drain the New oil that’s in the bike that I put in when I got the bike running for the first time, I knew I would lose a little bit of oil, so placed a catch tray under the chassis to save any catastrophes that could occur on jobs like this.

Make sure that when you remove any Factory Phillips shaped screws on your Honda- That the screwdrivers are JIS models. ( Japanese Industrial Standard) as regular Phillips screwdrivers will most like round the screw heads off.

What is the difference between JIS and Phillips?
JIS, or Japanese Industry Standard screws are just different enough in shape that Phillips drivers will not fit well and slip/strip them. The difference is in the leading angle of the point of the driver. Phillips bits have a larger angle and therefore don’t bottom out in the JIS screws, causing slippage.
Also, make sure that you use OEM Factory Gaskets, as the aftermarket versions not only fit badly, usually the holes do not all line up and the gasket seems to be inconsistent in thickness, I did learn the hard way, thinking I would save a few bucks on the cheaper brand, only to find I had to take the case all apart and fit OEM ones to stop the leaks.
Glad that I managed to get some time to work on this old girl today, she was left in an old garage in La Mirada for many years, sat on a pile of dirt and then covered with years of hoarding, so I will be happy to have it running and use it for a bit, before I put her up for sale, its a good looking rig now and I am sure when I have the New Stainless exhaust system on, it will find a new home ok.
I have lost count of how many SOHC motorcycles I have built, let alone worked on but in the hundreds for sure and always something different to find on some, I love what I do and continue to offer service for customers all over the world.These inline four Motors are fantastic machines and have given me many miles of smiles once they are tuned right.
Covers are on now on this side of the bike, still got to add a finned cover on the stator and fit another gear shifter as the old one is a horrible welded thing that I do not want to use, then I need to turn the bike around and remove the clutch cover and give that the same treatment.
On closer inspection of the front drive sprocket, I see a couple of issues here, the offset is out a little as the sprocket is wearing against the side of the chain and secondly, the sprocket that is fitted is an earlier version 530 and 77 and 78 Motors had 650 chains, I will fit a 540 but will address the issue here and have a sprocket on the way as I do not want any dramas of the chain breaking and destroying the cases.  Also, Chops have super long chains so need to count the links so that I can buy a custom one to replace this tired version.
The Old girl was looking tired, dirty and in need of a good clean up before any polishing can take place on this part, I always like to vapor hone these, that way the material is super clean and ready for some serious polishing, using some good old Jewelers Rouge.
Time to change the look of this 40 year old girl and turn it into something fresh and clean and to be honest, look like a brand New factory part, now I could refit the part in its OEM look but want to polish the piece to a chrome finish seeing this is a Chopper and not a restoration bike.
Now you can see how different that the Clutch cover looks after a process of vapor cleaning and now this part is ready for another transformation and get it polished up for that Custom styling that is so popular.
I am going to try and vapor many parts before I polish, as it makes everything so much easier to buff with no oil residue or grime in the way when I begin the Polishing stage, I am sure that you agree that this way is way better than the old school way? Now, the stator cover that’s on the bike is chromed and all peeling off, I want to use a spare old Stator cover I have and will vapor hone it to make it clean before trying to polish it.
This  spare old stator cover was just as tired as the other parts on the inline Four, and I am sure that yours looks in the same way too???? This Chopper will not be a show winning machine but a traditional Custom bike that was created back in the day and want to try and show what was in the magazines in the 70’s and 80’s when these were seen all over the place.
There is a bunch of old dings and scratches in the stator cover but many will buff out luckily and then it will have an old Finned cover going on the outside to embellish the engine as I have other finned covers on the bike, also these parts are getting harder to locate and finding some parts in my boxes of old stash came in handy but of course, still needed a lot of work, but the other one on the bike had been chromed and was peeling off and oxidizing badly, so this is the better way to replace it i think?
There is still a ton of stuff to do on the bike but wanted to share this with you today as it’s almost the weekend. Here are a couple of little videos that I took with my phone to show you what I am doing as the weather was raining outside, hope you enjoy?

Fiddling about in the Barn.

Well, I am sure that you lot must have some parts tucked away somewhere?  With…. “ I will get to it later” Tag attached to it, and I am no different.  I have an old depressed 1974 CB750 Frame that has been sitting around and needs to be given a New life, so- I thought that I would look about my place and see if I can at least mock something up, no idea how it will go, I may change the design a few times but, people ask me what I do at home and I thought that this would be the perfect opportunity to share with you lot out there what I do in the Barn.

So, I thought I would just use my iPhone as chat as I try and do a few things to this old frame that I have, sorry if it gets a little boring but you can fast forward if you doze off.

Click the videos below to see what I usually get up to in my abode.

The KC Special CB750 Honda inline Four

I have always loved creating My style of machine for Customers and this one is no exception, the KC Special turned out to be a great looking ride and the Owner Keith Conrad ( Hence K.C.) lives in Milwaukee and asked if I could revamp his old 1975 CB750 into a Silver and Black Cafe bike, I said sure thing and the deal was done, a build sheet was agreed upon and Keith sent the bike out to me.

I took the bike apart, right down to the frame, as I do all my builds, then I set about cleaning the frame up some what and smoothing some of the old factory welds, as Honda welds are quite rough back then as i guess they were hand welded and not automated as they are today.

As you can see, I took my time as I wanted the frame to really look nice in a Gloss Black on this build, I wanted it better than factory, so I took a long time to make sure that this Chassis came out nice, as i mostly powder coat my frames, unless I am using Candy Paint or Metalflake etc. Above you can see how Glossy the main frame rails are.

I took the stock gas tank and using my Egg Hammer, I pounded the sides to create Knee inserts, so you can tuck your legs in tighter to the bike and get a little more stream lined, just as they did back in the day for racing etc, this is no easy task and you will see how much it takes to do when you have a go your self, but worth the look in the end thats for certain.

The Paint scheme is High Gloss Black with Metalflake Silver panels and racing stripes and I really needed to make sure that this flowed well, and am happy with the result.

Plenty of Detail too, I hand machined out of 6061, a Custom Finned Oil Tank Dip Stick cap, this really did look trick, compared to the stock version.

Its like the saying says, the devil is in the detail and there is plenty to look at on this CB750 Cafe Bike and am stoked how the bike turned out in the end, worth all the hard graft.

The seat is one of my own that I manufacture, called “The Rocket 4” its a sleek sturdy and well rounded seat base that I produce and has the same curve as the gas tank, that way the body work then flows and give the machine the Status Quo.

Keeping in the theme of Old School styling, the seat upholstery was hand machined and small 1 inch Diamonds in white stitching with Silver piping and vintage snaps was completed to really make this stand out from the crowd.

I used an LED Custom Tail light that I offer on my website and this is bright as Einstein, and I think is a nice addition to the back of the Rocket Four seat unit, also the silver flake racing stripes really stand out nicely.

I machined some covers for the rear piggy back shocks as well as making some risers for the lower, to increase the ride height by 2 inches, out of 7071 Military spec Aluminum.

I also Chromed the rear swing-arm and hand made then Chromed a Custom Chain Guard to show the Gold 530 X-Ring chain off, I also polished the Hubs of the rims and painted the centers black to give a nice offset.

The Motor was rebuilt, as well as the carbs and synchronized etc, my Custom Oil lines were added in Black for a nice offset too, I fitted an oil Pressure gauge to keep the rider informed as to what is going on below.

As you can see, there is plenty going on here, I took a lot of time on the front sprocket cover and I even polished the rear set brackets for a more Custom look too.

Rebuilt and polished Carbs with hand machines velocity stacks from Steel Dragon really help the look of this bike and give it that Nostalgia look and it runs really hard too, there is something about hitting 6 grand on a 750, then you know you are starting to pull like a steam train.

People ask me about my gauges that I create on these inline four machines, and this one is no exception, unless I am restoring a bike, I don’t really care for the Honda’s Gauge faces as they are Green or Blue, not my favorite color of choice to be honest, wished they would of gone Black with White numerals like the Classic British machines, but oh well, so what I do is take the gauges apart and then I fit my Custom faces thats an overlay I print out, then repaint the needle and add chrome cups to embellish the bodys and give it a little more Custom look.

I have always liked to do this and it really does personalize your gauges, this time I went with the Cafe Racer Font and crossed Flags of which I think suit this Motorcycle to a Tee.

You may also notice that I have fitted a 2 inch handle Bar riser, to give a more comfortable riding position and easier strain on the wrists too, then fitted my Relocation bracket on top of the handle bar clamps to clean the top end of the bike up, with a BIG oil pressure Display light to match the Needle ends.

This is one tasty ride, the 4 into one system of mine is Ceramic Coated Silver, its a great look, almost a brushed polished Aluminum look to it, and she barks like a scolded dog when you get on the loud button, you will also noticed I machines a Finned Stabilizer Bar at the rear of the bike and did my usual drilling on the brake hub to let brake dust and heat escape under hard braking.

A lot of time and energy went into creating this machine and the owner really digs it, it is just how he wanted it and am glad that i was able to oblige with his demands.

The Customer wanted Gloss Black Rims with stainless spokes and he really did like the way these turned out on the bike and the attention to detail that I am known for on these inline fours.

I always fit an Oil pressure Gauge, as I do not trust the Honda Pressure switch thats behind the Barrels, so these run great and give true pressure as soon as you fir the bike up, as it is connected to the oil galley plug.

As you can see, New Levers, new Control switches, new Handle Bars, polished triple tree, New cables, New master cylinder and stainless nuts and bolts through out this motorcycle.

A great but solid Motorcycle, with aggression when you want it, reliability for everyday riding, and an awesome stance to give it that moving look standing still, sure does sit well in my stable.

I really did enjoy putting this bike together and felt good to know that I had done all and more than the Customer had asked me about, its one fine steed and I enjoyed slinging my leg over it.

I wanted to share it with you guys and Gals and hope you like what I have created too?

Maybe if you are in Milwaukee area, you might come across the KC Special? if you do, take a snap and send it to me, love to see it again.


What Happens When You Stick A Honda CB350 Four Engine In A Monkey?

I love seeing quirky stuff as by all rights, it should not function, but here ut is none the less, and what a great littlke set up this is, I am certain we shall see many different styles popping up from all over the place but worth a look for today, cheers to Janaki Jitchotvisut for the words below:

Have you ever thought to yourself how cool it would be to stuff a Honda CB350 Four engine inside a 1973 Honda Z50 Mini Trail bike? Even if the answer is “no,” don’t worry—collector, builder, racer, and long-time Honda enthusiast Bob Guynes took it upon himself to craft exactly that combination. At Mecum Las Vegas, 2022, a number of bikes from Guynes’ collection crossed the auction block at no reserve and sold, including this not-so-mini minimoto.

From the factory, the Z50 produced an eye-watering 2.5 horsepower from its tiny little single-cylinder engine. Guynes loved building bikes, and decided that simply wasn’t enough. Could he fit Honda’s tiniest little inline four engine into that frame? Apparently, he made it work—adding additional downtubes, custom motor mounts, and making that engine a stressed member for this heckin chonker of a minibike. We can’t tell you how it rides, but it does at least look pretty fantastic.

It’s also not clear what kind of power this particular custom Z50 makes. A stock CB350F made a claimed 34 horsepower at 10,000 rpm at the rear wheel, but Guynes was well-known for tuning any bikes he got his hands on so the true power is unknown. This bike is listed as having sold at Mecum Las Vegas 2022, so we can hope that perhaps the new owner will dyno it and post those numbers somewhere (or, you know, write to us about it). We can always live in hope, right?

Other customizations include a dual carburetor setup to make things a little simpler, as well as a four-into-two exhaust setup. Stock Z50 elements include that adorable little peanut of a fuel tank, as well as the saddle and wheels. Tommaselli Cross handlebars give the front a more serious look, and there’s an adjustable center stand to make life easier. According to the listing, it “needs sorting,” although it’s not entirely clear exactly what that means. Details suggest that it could be made road-legal with installation of things like turn signals and lights, but it’s unclear if additional work needs to be done just to make this bike ridable in general. Here’s hoping it’s as fun to ride as it is mad to contemplate!

I love the whole concept, here at Carpy’s Garage we hope to make a few Hybrids and showcase them on here but I just love this little terrorizing machine and, if you give this Monkey bike no respect, when you pull that throttle, it can spit you off and then beat the crap out of you for not believing in it.

This little Whiz Bang of a Motorcycle is just pure fun to look at, let alone have a blast down the back roads, scaring all and sundry.

I love the whole concept and its as mad as a box of frogs, thank you for making my day and I am sure many people have little Motors like this sat in there workshop collecting dust?

So have a look what’s in your shed, garage or even storage, you may have some spare time on your hands with this crappy Pandemic, what better way than to cobble something head turning in the free time you have a home?

Happy New Year Everyone

Here we are 2022 at last, man – What a crappy 2020 and glad to see the back of it and start a fresh and hope that we all have some good health and enjoy life as much as we can.

I somehow caught the Flu over Christmas and it Royaly buggered me up, Only about 80% right now but at least I am up on my feet, and I wanted to make sure that I did a bit of work at the house and get a few things ready for when My Barn arrives for assembly on Wednesday.

I have a few Projects I would like to finish this season and I hope my health gets a lot stronger as I took quite a whooping last year with Covid and the Flu, so lets all keep our pinkies crossed that we are all fine and can go and wrench on our machines to our hearts content.

There are many things that I hope to make and offer on my website for all the avid Motorcycle builders out there, I receive so many emails and texts about what you lot are up to, it drives me to help get your machine completed, and sure hope that you can complete yours this year to get on the tarmac for the new season when it eventually arrives where ever you are located.

Just wanted to wish you all a Very Happy New year and thank you for all of your orders, emails, phone calls and texts, I love chatting to you all and look forward to continuing great communication with you in this New year we have all started.

Look Forward to seeing what you are all creating and maybe see you on the road one of these days?


Here is something to have a laugh at at days gone by back home 1965.