Paint scheme I did almost 15 years ago

Well, it is almost the 4th July, the weekend is almost here, I was looking through my Computer and happened to come across this body work that I did back at home in my garage in the City Of Orange, some 15 years ago.  I didnt use it in the end and sold it on Ebay, never did see it again, I did a similar paint scheme to the HTML bike 8 years later but forgot I had even done something similar.

I had an old K4 Gas tank that was pretty beaten up and not wanting it to go to waste, I hammered the sides to give them Knee inserts a certain pop when you look at it, these take a while and I hand hammer them, but the end result is always cool to see.  They came out great and then I decided That I would have a play around with some paint, as I received some sample Candy Paint from a friend of mine.

I used a Candy Aztec Gold Base and added the flake with it and sprayed the whole tank and seat I had as a spare, then wet sanded it and masked it ready for the Candy Apple Red candy paint and laid that on super think, wet sanded and then a liter of Clear Coat to make sure it seals the color in good.

This was all experimental and was super glad at the way she turned out and, all in a garage at home, make sure you put a tarp on the floor and water everywhere as Metalflake gets everywhere.

I wanted to share this with you as to be honest, I had totally forgotten about this bodywork and now on reflection, how could I have forgotten about such a great color scheme for a motorcycle?

The Seat base is my own Dunstall assembly that I still sell many of on the website and it held the paint really well with no issues at all and was a breeze to prepare and spray.

I have always loved Metalflake and the likes of Roth, Barris, Watson, Starbird and Von Franco all loved to incorporate on their rides back in the day and when the Sun hits the color it really does Pop!

Wished I kept that now but I am sure we have all done that and I needed the money for electricity bill or something back then so it helped me out of a jam at the time.

Its a nice combination and very MV Augusta of the day, sure hope that you lot like it too?

So, I thought  that today would be a good day to show some old photographs of this tank and seat set up for a CB750 Honda and maybe it will inspire you to get out in the shed, garage or Porchway for that matter and have a go on your bodywork?

There are tons of color options that you can use and the end result will always wow you with Candy paint.

I think I have made over 100 pounded gas tanks over the years and never tire of it, albeit its a lot of hard work, but the end result is worth all that sweat.

I test fitted this on the bike I had just started, the Tenacuois Ton Alloy bike, so shows you how long ago that was.

A sharp set of Bodywork thats for certain, and glad that I took a risk on it, and all them years ago too, just makes me smile when I see this photograph.

I am building a few bikes this year and have some different Custom designs that I hope to incorporate into the bodywork, so stay tuned on my website for that.

Thank you for taking your time to read my Blog today, hope it at least made you smile, this is a very cool paint scheme that I am truly proud of putting out there in Cafe Racer Land.

Have a Super 4th of July weekend everybody.


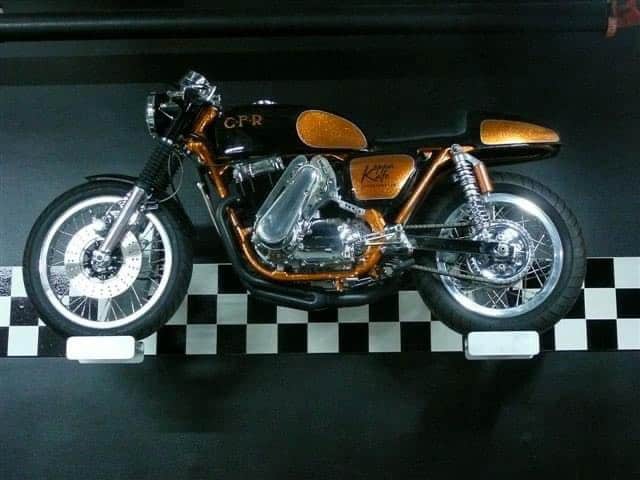
The Old Koppa Kafe was a fun Custom to create in my Garage.

No idea where the time has gone to be honest, but I always loved creating this machine, just because it has so many great Original parts on it that really did make people turn heads.

So I started off with a bunch of parts and already had the idea of how I wanted this, as the KOPPA KART was a famous Barris Kustom Truck that I had loved as a teenager and wanted to have some Copper Influence on this Motorcycle, but I had to do a ton of preparation to the Honda Duplex cradle frame to make sure all looks good when painted.


There was a lot of hand sanding and grinding of old Factory welds to try and make this Chassis as smooth as I possibly could, but also, I cut the neck and added a couple more degree’s to the rake, not too noticeable but I didn’t want it too aggressive, and I think this came out perfect for what I was looking for.

Also made up a Hoop and welded that to the frame, nobody was doing this back then and wanted it to finish of the seat that I was going to fit to it, and welded a bracket at the rear so I could attach the seat cowl and make it sturdy. But the most work that really needed some attentions was how was I going to extend the stock gas tank 5 inches, as I wanted a much longer fuel tank and thought that I may as well use some of my old spare gas tanks to cut up and make the change.

This is no easy task but, I was fortunate to have a bunch of K series Petrol tanks laying about in my garage rafters and thought the best way was to keep the front end and extend the tank backwards using sections from a couple of old gas tanks.

You can see the section cut and of course had the gas tank media blasted to get all the paint off so at least there was clean metal to work with, this will also have hammered knee inserts to give it that touch of Nostalgia of TT racing days and I was glad that I did go this route in the end.

You may not notice the stretch but its way past the original mounting bracket on the frame, you may also notice that I cut the rear exhaust and passenger peg supports down, this was to clean the lines up and allow for the lower part to become a bracket that my Italian rear Sets could attach too, I also braces gusseted the frame under where the gas tank sits just to give the frame a little more rigidity.

Here is the cross bracing that I did and used the pieces I cut off the bike, so it all got re used into this creation and I had not seen anyone do this before too so another added attraction I guess?


Putting this machine together in the garage was pure fun, I really did love the way the old girl was being revamped and as you can see, I did a lot of detail as at the end of the day, I was building bikes for a living now and this would be a great business card bike. many cool Parts and I used a pair of 18 inch Aluminum rims that were for a CB750 Automatic, of course I used to rear rims and then polished them to a chrome finish to give it a little more Bling.

So many hours were put into this and it became quite a challenge at times, but kept pushing on, I had to retap most of the thread holes as metalflake gets everywhere when you paint it and not use a booth, but I kept being persistent and it paid off, I used stainless Allen head Bolts through out the bike too, not cheap at almost a dollar per piece but makes the bike for sure.

Hand polished all the Aluminum and it took me forever to find an intake Plenum, I had one but it just would not fit, found out it was a Suzuki one, so thought to my self, ” Where the hell am I going to locate one of these Plenums for a SOHC?”  Then I got an email from a guy in Sweden who had a Suzuki and was Supercharging his but, his Plenum didnt fit and he thought his may be for a Honda.  So we traded and sure enough, when I tried to fit the Swedish one, it fitted like a glove. What were the chances of finding another eh?

What a piece of art it is too, so happy to be able to fit this to the machine and another tick off the list of things that needed to be accomplished to get the bike to the standard that I was after.

Just look how cool this Copper Metalflake looks, we used 3 pounds of the stuff to get the required depth that i was thinking of and a ton of clear coat was used to smooth it all out, but that Polished Aluminum offsets the Copper really well , what do you think?

I really was happy at the way the bike sat and looked and bit by bit I would get things accomplished, then I would push it onto the driveway to see how it looked in natural light.

I had Machined the front Lower forks and rebuilt them with New uppers, springs and this was a neat and unusual look as I had never seen anyone machine lower forks on a 750 before.

When I had these on the bike at Shows, people would ask about the forks and send me theirs to rebuild and give it that Custom look, it sure added some Custom touches as I painted the grooves Copper to go with the rest of the bike.

Finding someone to drill the correct hole on the stator cover, turned out to be a pain in the arse, I had one so called shop in another state have a go and messed it all up, so I did it my self and under cut the hole then used a drum sander to keep adjusting until the oil seal fitted tightly, and there you go, job done.

I had an Old Drouin Supercharger that was once going to go in an old chopper/drag bike and after I got all the parts I knew what bike I was going to build.  Now, the Motor I had was a fully Blue Printed motor, costing 7000 Dollars many years ago and this was perfect for the bike and thats how this came about.

I had a local company water Jet a bracket out of 7075 Aluminum and gave them a paper template, this worked out and treat and bolted right up to the SOHC motor with exact clearances, I simply Polished the bracket once everything was test fitted and you can see the Crank Pulley at the bottom fitted perfectly too.

All fitted and this Mechanical Washing machine looked Bloody awesome all hanging out of the engine on the Left hand side, it is Belt driven too so pretty quiet to be honest with a neat Polished Aluminum Belt cover for added coolness.

Yeah, it was an intricate bit of Kit to begin with but loved looking at this Motorcycle I looked at it as a piece of art and used as many pieces from a 1969-1978 Honda as possible.

I hand Hammered the knee Inserts using a Tear Drop Hammer from Eastwood Supply and this came out so nice with the Copper paint and boy did it shine when the Sun hit it too.

There is a lot of work here and those who have tried to Polish their Hubs will know what I am talking about, I also added a Double Chain and Sprocket set up as there was a lot of Torque here in that engine, I couldn’t locate one for the longest, but Azusa Chain helped me as this was for an Old Lathe and converted it to the bike and worked really well, ran a slightly wider sprocket carrier for the offset to be right.

I also fitted an Old Lockart Oil Cooler to the bike as it will run 15% cooler with that fitted and as the Oil Filter Housing has some broken fins, I cut them off and polished the body and it looked pretty good to be honest. I ran Braided Aircraft lines to the cooler too some Dash 12’s.

That’s an Original Lockhart Cooling Radiator too, I made a thick Aluminum Bracket to mount it to the Horn bracket and then polished it to look like chrome, it worked really well too.

That tank turned out so well, I used Por15 to seal it before painting and then pressure tested it at a Radiator shop, C.F.R was for Cafe Racer but in the style of the old H.R.D Motorcycles of years gone by.

This was My first attempt at making a Fiberglass front fender, since then I have sold over 500 of these to Customers all over the world, its 22 inches and has a bead all the way around it.

Cant get enough at looking at that, even today, it was a tough Motorcycle with loads of interesting parts and so Glad that I jumped in and had a go at creating this machine, there wasn’t many Café bikes at all about, so many people used to comment on what sort of bike it was and I think i was lucky enough to inspire a few people to have a go their selves and create their own unique ride.


My First attempt at a Custom Gauge, using an original one, I wanted to put BOOM at 140 MPH, got many comments on that and it was a great discussion point at shows etc.

I fitted an Original Series One Yoshimura exhaust of which was the pattern for all the systems I make today, I used a CB750 Connecting Rod for the license Plate holder, I later swapped the plate to the other side as the exhaust gases would tarnish the chrome lol. They are New Old Stock FOX shocks too and they really did give the ride height that I wanted on 18 Inch rims.


Allen bolts all through out the build and I did my drilling style on the sprocket cover just the break up some of the glow of the polishing, I have made many of these covers and sold to customers too over the years.

Rear Hub gets the same treatment and that’s an Original Dresda Boxed Swing arm that I chromed and boy does it look sharp on the bike, it really does accent that rear end.

I used Cow Hyde to upholster the Custom seat and used Gel foam for a comfortable ride and its a nice riding position with that 5 inch stretched gas tank.

Everything I feel on this Motorcycle Flows well, its such a warm color too, I hope that you liked just some of it as I know that you understand how much effort goes into creating a machine such as this.

Time has moved on and this bike now resides somewhere in Australia and hope the owner is having fun with that Custom built CB750 HONDA.

I took this bike to many shows all over the USA and had many great conversations with like minded people.

I think this was Seattle show but ALL the shows were super fun and made so many friends and acquittances etc. it’s a healthy industry now and I am still making many parts for these super fun inline four motorcycles.

I used a headlight from an Old DeSoto Automobile as I think it fitted in between the fork ears really well, I hand drilled the front Rotor using my drill press, I even made the bike stand.

One of the last photos before the bike made her way to the other side of the world but am proud to say I created that Monolith of a Café Racer.

As you can see, on the Right side of the bike, I fitted an old 1974 ARD Magneto, that too is Belt driven and gave the bike its Status Quo, she sure does sit well on the Tarmac too.

I used a Pontiac Taillight for the rear on My Custom Rocket Four seat assembly and I still sell them to this day and send all over the Globe.

Thank you for reading my Blog today, I just wanted to show you a bike that I really did have fun creating and love seeing what you lot are putting together. Below is a before and after shot.

Have fun with what ever you are creating and if I can help, you can call, email or even text me, I am always here to advise Thanks again and keep on building and Riding.

.

Sunday and many an hour getting this CB550F Dialled in.

A Super Hot Weekend, why do I attempt such crazy work when the weather is like this? I guess we all do right?

A long day but managed to get the old carbs out as the idle was not functioning, but a complete redo was needed and boy what a pain in the arse the 550 carbs are top get out of the frame.

I dont know what Honda was thinking and if you are like me, you dont have time to look for a service manual and then read through all the jargon as to the correct way to remove the carbs.

Honda never want to share photos to make it easier, so no quick way there, I looked at the bike and just went ahead and took it on as a Customers machine and went from there.

Sure, I have worked on over 100 of these bikes but they all had the air box missing and now I know why, as they are a fecking Royal pain in the rear thats why, but I did manage to figure it out and as it was 100 degree’s in the Garage, I had to be as quick as I could muster, but that plan went right out of the crappers window and I struggled for quite some time to be honest.

But now I can look back and laugh, well maybe now LOL, it required a lot of patience and I had run out after 20 minutes and the swear jar is filled to the brim now, but much better for it.

The Carbs are on tight and I had to undo the air filter box and move it back about half an inch as thats all it would go and no matter how fecking hard I tried, I could not get the whole air filter box out, probably because the breather hose was catching but I did not want to remove it if I didn’t have to. I then managed to remove the rubber hoses from the air box and that gave me a little wiggle room to get the carbs off but not much.

I managed to pull the carbs out from the Left, but many people told me they will only go in and out from the right, so no idea how I managed that but, they came out and undamaged too.

The carbs needed a complete overhaul and I checked the rest of the bike over, the throttle cables are OK but I could do with new ones, I didn’t have a pair on hand, so lubed up the originals and they function great. but, putting the carbs back in is not as easy as 760’s, especially if you are using the stock air box.  I basically did the same thing but this time I headed from others and went in from the right.  And after much swearing, sweating and a lot of grunting, I got the carbs to get to their position, and- to help the carbs fit back into the intake manifolds, I put a smearing of axle bearing grease around each opening.

Plop, they went in, I did up the hose clamps on the manifolds and then I covered the air box rubbers in WD40 and then slipped them back into their positions, rotating until sat flush in the box.

After reconnecting the clutch cable and throttle cables and more hoses than a bloody fire truck, I emptied gas tank of the old fuel and bunged that in my van, as that will run on anything.

Bought some higher octane gas and poured her in and the bike fired up right on the first go and idles lovely now, pumped tires up and took her for a little blast up to about 60 mph around the houses and it runs great now.

So, any of you attempting to put carbs on or off and still use the stock factory air box, take heed, use WD40 and grease as it really helps and get those rubber hoses off the air box first to give you a little wiggle room.

A nice all together machine, Genuine 11K miles and now she fires right up and rides quite well to be honest, I do think I will replace the tires as these are original ones and I will feel happier with new rubber on this machine as this is now my Girlfriends bike and I want to make sure all is good for her to take out anytime she wishes.

What amazes me is how damn quiet the bike is with that big old chrome Cannon perched at the rear of the bike, but, its staying on there as the bike is too original to mess with to be honest and would like to keep a stocker around anyway.

I will do a few more things to the bike as we go along, I would like to powder coat the main stand and kick stand at some point, so may buy another set and do it when I feel like I have some coating to do, that way Jennifer can still use the bike and no real down time needed.

I am happy that the bike now fires up right away and purrs away to its hearts content, this will be a keeper and I am sure will only get miles on it around the countryside where it will reside in an old style barn.

Hope that you like the Blog today? As I am sure that many of you can relate to the trials and tribulations that we have to go through sometimes, just to keep these machines running?

Have fun with your machine and I am here to help or advise if I can, this is a big family when it comes to 2 wheeled machines and thank you for taking your own time to read my exploits and hope that it made you smile at least once?


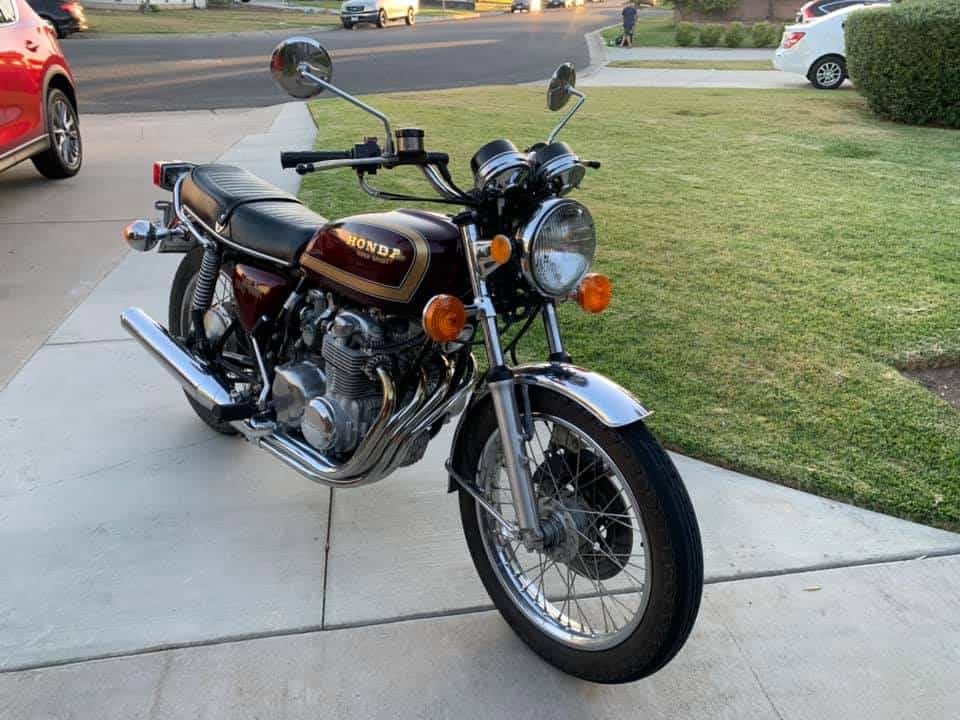
New ride arrives at the stable 1977 HONDA CB550F SUPER SPORT

Well, a fun weekend and today being Sunday, I have plenty to do back in the workshop as we acquired another two wheeled machine that is a real classic find and glad that I was able to snag it from the buyer.

It does pay off to go through a few listings from time to time on the social media pages and Facebook was no exception- I was just periodically scrolling through the bikes for sale page and all of a sudden, this Burgundy Honda 550 came into my View.

To be honest I was surprised to see it in the condition it was in, so I messaged the owner and wondered what he would take for it, as I had just spend a few quid on presents for my girlfriends birthday and a few bills had come up lately, so wasn’t really in the market for a ride at this moment in time. But I thought I would see what the person could tell me about the little inline four and maybe I could go and look at it.

The owner was a young fella that acquired the bike from his grandfather recently, it is a one owner from new 1977 Super Sport, so I made plans to come down on Saturday and take a peek and this classic Honda Four Motorcycle.

I drove down with my Girlfriend Jennifer to Los Angeles , its only about 35 minutes drive, so in the Big White Transit we went and before I knew it we were there, with no where to park, so parked up down a side street and left my Girlfriend with the van, as LA is notorious for parking finds or being towed etc.  And then walked about a Block to the underground parking where the bike was located, I got there and I was pleasantly surprised how nice the machine was.

It ran OK but didn’t idle and the chap said its only got 11,000 Genuine miles on it, he used to ride it on the weekends as it was his granddads, and he purchased it from him in Minnesota and then had to move to LA to work, and didn’t want to take it on the freeways, and needed a bigger motorcycle, he said his granddad bought it from the dealer brand new in 77 and had never dropped it and looked after the bike. I knew that the problem was probably just the slow jets were blocked and a rebuild isn’t too much of a deal to get that purring right again.

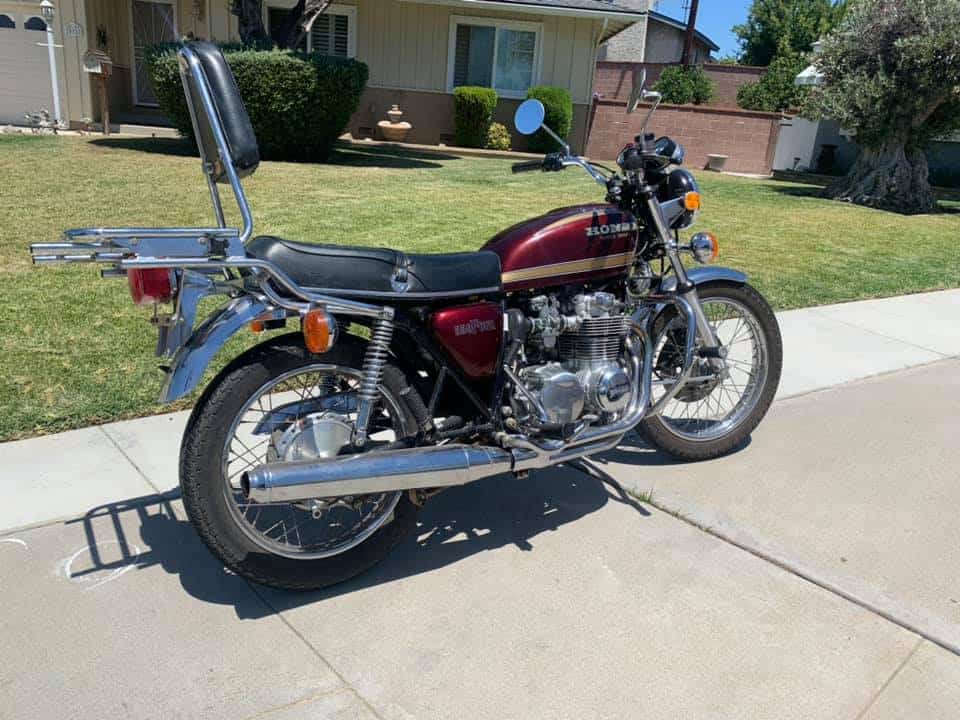
The bike Sissy Bar on the back with the chrome rack and a big Chromed Crash bar at the front to protect the engine etc, both purchased back in the day in 1977 from the dealer, not the lovelies of choices but that was the thing to have back then, but that wouldn’t take too long to remove from the machine to look cool ones again.  The deal was struck and gave the guy the cash, he was happy and so was I, I happily pushed the bike around the corner and up the sidewalk for a block, feeling happy that I just acquired a true classic machine.

As soon as I turned the corner, I could see Jennifer by the van, rear doors open and the ramp already laid out, but what I then notices was a Huge smile on Jennifer’s face, she said ” I love it!”

I knew I was in trouble then, as she asked if she could have it, and of course, being the big hearted guy that I am, I melted to her and now we have a CB550F in our driveway.

The first thing I did, was remove the old sissy bar and rear luggage rack, we shall keep it in storage in case Jennifer goes out and needs to load the bike up or go camping etc, but I removed the Sissy bar and the front Chromed Crash bar with the cruise pegs on, the bike looks like it did when it was on the showroom now.

Will clean her up a little over the weekend and during the week, it does need the slow jets cleaned but will get into that another day, but its super clean for the year and wanted to share the bike with you on my Blog, to see what you think, this is a keeper and will get used for sure.  Nice to know there are still a few about like this and glad I took the time to follow up on this inline four.

Thanks for reading my Blog today and see what we sometimes get up to on the weekend, Motorcycling is a great hobby that turned into a Career for me and never tire of it.


Little bit more drilling, but this time, the Front Sprocket Cover.

Another day and some more Therapeutic drilling to do, this time I thought I would show you how I drill the Front Sprocket cover, just to give it that Custom look from the standard plain version.

It is totally up to you, how far and wild you want to go with your sprocket cover, but I love doing this as it is calming and I enjoy making pieces like this, not one pattern the same.

I always secure my covers onto an old piece of ply wood, using a drywall screw and some washers, this holds it fine, then simply get the drill out and an assortment of drill bits. make sure you wear gloves and goggles as you will get plenty of shavings everywhere, so keep a Vacuum handy too.

Yeah I know, Swiss Cheese, but I really like the look of this and having the Lightning holes is a reminder of yesteryear of the old racers etc.

This takes about an hour, but all depends on how intricate the pattern you are going for, I simply fire the drill up and just go for it, no plan really, just see where it leads me.

Looks a lot different when its all polished up eh? and I always smile once I have completed one of these pieces and boy does the Sun catch the Aluminum.

I have made about 50 of these over the years and they are always a different pattern, its fun to do and once you start, you will be happy that you did this.

Another one I did, these are like Jewels when polished up and really do change the look of your Custom Ride, so if you are bored at home, dang it- have a go at this.


Fitted on my CB750 and changed the look of that area right away, I get many comments on the drilling, so it must grab people attention.

Let me know if I can help you with yours , as I drill many of these and really do enjoy the task of changing them from boring solid plates, to Custom pieces.

Thanks for reading my little Blog and maybe I have inspired you to have a go at home whilst you are in lock Down.


Quarantine – How I deal with the Lonesome Blues

Well, we are entering a new World right now, times are hard and quite scary to be honest, most of us have been Quarantined and have to stay at home, in Isolation from the world, but keeping safe, Healthy and away from that nasty Virus.

But, I am getting many orders for parts this month as so many people are at home and have decided to pull up their sleeves and got into their Garage, Shed or Cave etc and start or finish off their project they had started a while ago and ran out of time to complete.  And now we only seem to have time on your hands, you may as well tick some of those jobs to do off the list and make this time in isolation a rewarding one.

I just received an order for a drilled rear brake hub assembly, I have made quite a few for Customers over the years and to be honest, I find it quite therapeutic doing the drilling on the hub and thought I would share some of my experiences with you lot and maybe you will want to have a go your self??????????

I’m about to go out to get a few parts as I had orders today, wont see anyone but I have to go to storage and grab some stuff so will be back in a tick.

Right, I am now ready to get myself situated to get some drilling done on a hub that a Customer has ordered from me and you too can do this if you have some time, a drill and some patience, as it really pays off in the and and gives a unique Custom look on your machine. So, have a look here, I have three hubs to create for Customers and I will show you what I do ok?

Strip your old hub down, just have to remove the 2 springs that hold brake shoes and the split pins that hold the swivel, remove brake actuator and arm and you will be left with a bare plate, once you have completed that task, which only really needs a pair of long nosed pliers, you will then need to secure the hub onto something sturdy, so the plate doesn’t move when you start to drill your lightning holes. I always use a piece of old plywood and secure the plate on top it by using a washer and a wood screw, easy as that.

I use an array of drill bits and to be honest, I just go for it, no set pattern, what ever I think looks good I just drill and change bits as and when I see fit, that way, not one hub is ever drilled the same.

I always have a shop vac at hand, as you are going to get a lot of swarf from the Aluminum and it gets everywhere to be honest, so every now and again, I vacuum the mess it leaves, else you will be feet deep in alloy shavings.

So here you go, this is the pattern that I like the look of and I can still add or make a few holes bigger to give a different pattern.

Looks a lot different when its polished eh? Also, I add New brake shoes and actuator arms etc to make this really look like a Custom piece and so easy to fit too.

So as I have plenty of home time, I thought I would show you how I make these great pieces out of old tired brake hubs for the CB500-CB550 and CB750 Honda’s.

I am sure that you may want to have a go and see how you fare? Its such a great feeling when you bolt it all back together and its therapeutic for me thats for certain.

See, the Patterns are always different, that way, each one is unique to any other out there, its a neat old school look and cools the brake too as it aerates as you ride.

A trifecta of hubs I am doing and this does take some time to complete , but I really like doing these and they come out looking very cool indeed, as you can see below.

So, once all together you can fit right away to your wheel, or, if you are building a Custom rim, just plop in into the hub, it sure dresses that part up so well.

I have built so many that I have lost count over these last 20 years but always fun to create and I still get orders for the custom hubs all the time and glad that you lot like what I do.

Thank you for reading my little Blog today, I have fun writing these and its always cool hearing from you all to see and hear what you lot are creating in your sheds or garages etc.

Drop me a line if I can help you at all, even if its just for advice, my Number is 714-598-8392, you can also TEXT me on that as well for a faster response.

Stay safe everyone and we shall all get through this and be back on the tarmac having fun with our creations.


Doing some electrical on a K5 CB750 Honda Four in the Garage today

Well, Project Wire harness is the goal this weekend, I have a customer and friends, 1975 CB750K model Honda four in the Garage and it apparently wafted out a bunch of smoke under the seat, so it was bought here on the back of a truck and here it is at my place where I need to take a look at whats going on with this old 500 pounder.

I need to see what has happened the the wire harness and switches as these do look like they have been on there since it was created in late 1974. Just a few vids I did today with my phone, sorry for the quality.

Below, just look at how dry rotted the connectors are for the wiring, this old bugger has got to be all taken out and replaced im afraid and new switches as well.


Bit more video

I wanted to try and at least record what was going on today and I went on facebook and did a few video’s etc, may not be very clear but you get the idea I think?

My other bike, the Triumph Scrambler

I have always been into dirt bikes as I call them, from when i was a teenager and before I guess, My brother and I used to drool over the pages of MotorCycle News or Dirt bike magazine, we came from a humble home where there was never any extra money, so we made the best with what we could find, and even though we found old buckets of snot, we would get them running and keep up with the rich kids on their machines.

I used to love my T100 Daytona in North London, that thing was faster than a 750 and I rode the snot out of that bike.

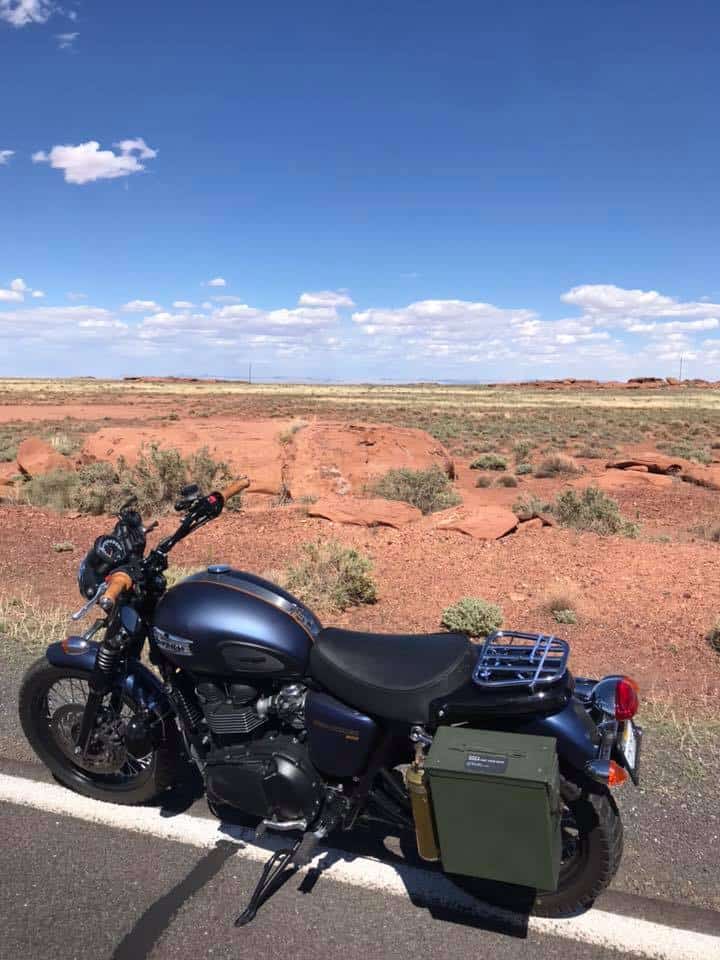
I will always have some sort of two wheeled motorcycle, no matter what age I am lucky enough to live too and today i cleaned up my triumph Scrambler, this 2016 900 air cooled Triumph is my daily and, I use it every day with no issues, I make sure that it always had Gas, check the tire pressures and make sure I have enough oil in this puppy and she fires up every time with no worries.


I love ALL motorcycles, be it Cafe Racer, Brat bike, Custom, Drag, MotoX, Speedway, Flat track or even trials, I love all them styles and if I was a rich guy, I would have every bike I always wanted to own, from Steve McQueen’s Triumph, to Barry Sheene’s Heron Suzuki trans Atlantic machine, but I’m not rich and can always dream.

But- I always have fun on what ever machine that I am riding and hope that some of you share the same smile that I get when I sling my leg over a Motorcycle.

Jennifer and I have a Triumph each, she has a T100 Bonneville and we go and explore places like the Grand Canyon, or the Sedona mountains to the petrified Forrest of Arizona, always time to check out the great sights that the USA has for us and there are so many places for us to go visit, we would need 5 lifetimes, but- its fun trying.

Have fun with your machine as much as you can, there is always somewhere to ride, even in the rain and wind.

Jennifer and I love riding together, her Bonneville is as fast as mine, she also experienced crazy 70 mph cross winds for the first time but Boy! What an adventure we had.


Weekend is here already, working on a New braided brake line set up, and a Custom Headlight Assembly.

Well, Saturday soon came around, I have been pretty busy as of late at the shop here in La Mirada, it is always a busy time of year as many people need pars for their bikes and I help all that I can to make sure they can complete their Motorcycle in time for some great riding.

Now, I am bringing out many more new products that will be available for you to use on your machines and I do all the prototype work to make sure it not only fits easier, but that it performs better than what you have right now.

The 2 parts I want to feature today are my Custom European headlight, which is a really Custom look and comes with a Stone guard and a Yellow Lens, to get you noticed.

So right now, today I have been working on a Project motorcycle, a CB750 F Super Sport and the stock brake line set up just wasn’t cutting it, so I removed that and used my brand new Braided hose stainless brake line that has Stainless Steel adapters and is so easy to fit to your machine too.

So, above you can see the Braided hose, this is Top Quality all the way, even the Formula One Race cars you see use this brand of hose, so you know these are a great deal.


These Braided hoses will fit the CB750K and the CB750f but- this is for removing your front brake switch, I dont like them and remove them from the triple tree and fit a single one piece brake hose, and this will give you 40% more braking and so easy to fit too, but- if you want to have your brake switch, I offer a 2 piece brake line kit on the website, so check that out at your leisure.

I use a straight fitting that simply screws into the caliper, then you use the crush washer I supply, then route the braided line down to the caliper, going behind the lower triple tree and then into the caliper, simply screw the adapter in place, undo the bleeder, fill the reservoir on your mater cylinder and bleed it into a bottle with a clear pipe so you can see the air bubbles exiting the bleeder.

These are such great quality and gives your brake more power but also a more Custom look as well.

You will find this so easy to bleed and the brake will feel way more positive when you grab the lever and thats a good thing.

This literally took me 5 minutes to fit and bleed and now functions so well and gives me more confidence in stopping when i am out on the tarmac next and now available to you lot.


The Brake hose is fitted and now I have fitted the Euro style headlight and made a special bracket to house it, this allows you to use the stock location of the lower triple tree bolts, i will chrome the bracket when completed and that too will be available on the website .

The Stone Guard will protect your lens from any stones or projectiles that are sometimes left on the highway or byways when you are riding to an event or a job etc.

Also, the strong Yellow lens, gives it a European style but will grab more attention from drivers but with out blinding them, look how cool this front end is now.

So, I am off to the garage to do a wee bit more but wanted to show you what i got up to today, have fun with your Motorcycle and thanks for checking my Blog and my parts out, I am here to help, call or text 714-598-8392 and I will do my best to get you sorted out.

I love my job and love to promote Custom parts too.

The Vesco Brat Bike Honda CB750 SOHC Rebuild Report

Well, the weather has been fighting me this month, worse Month since 1962 for the amount of H2O we have received and again today as we head to the end of February, we have more Rain coming down this week, so I need to try and use my time wisely and get as much done on this machine as I can.  Lets start off with the Triple Tree on this bike, as I wanted to change the Cable Tach and Speedometer and make something more Custom.

So, have a look above and you will see that I have started to make a start on the fabrication on the triple tree, first off I ground off the Original Factory outer tabs that housed the stock gauges, then I hand cut an Aluminum Holder out of a small sheet of Aluminum and made sure that it would be able to fit the stock location tabs that the Ignition switch used to fit into, and it looks great, if you look to the right, I already made a start on the Speedometer Bucket.

Not an easy task this but a block of 6061 T6 Aluminum was chucked up on the Lathe and turned down to the size I need for the Speedometer to sit snug and tight in the housing, also reliever three areas for the set up to really fit snug as a bug with no rattling about.

I wanted to incorporate fins into the casing as the front forks have this look as well as a few other features on the bike to make the whole concept flow and I am quite a big believer in that, I also need to grind a little more on the top triple tree and then smooth and polish to give the whole set up a look of chrome, no easy task too.


Now I am happy as its all Polished and the GPS Gauge set up looks really Custom, I machined Three 7/64 locator holes to allow the gauge to Clock right in the Location I wanted and have to say I am super stoked at how this now looks on the polished Triple Tree.

The bike I am creating is a 1974 Model Honda CB750 But I am using a later upper and lower tree to allow me to have the small tab brackets in the center and glad I went this route.

I wanted to create something that is different from the norm and I do enjoy what I call ” Newstalgia “, New parts with a feel of Old, and I believe I have created that with this.

I really like the look, the Gauge is 4 inches and the bucket is 5 ” and a strong solid appearence, I think it blends in well with the style of bike I am building.

So just a final clean up and then I need to pick the lower tree up from the Chrome shop, this should really set the whole top end off on the bike and glad I took the extra mile.

I will Clean up once more and add some polished Handlebar clamps that I make and she will be all ready for when I start to bolt all this together again, so in a week or two I can start to assemble the frame, it is still at the painters but not for long and thats going to be Silver Flake, should be a good contrast to the rest of the bike.


Thanks for reading my blog today and hope I have inspired you to get into the Shed, garage or lock up and have a go with your ride?