Picked up 6 CB750’s today

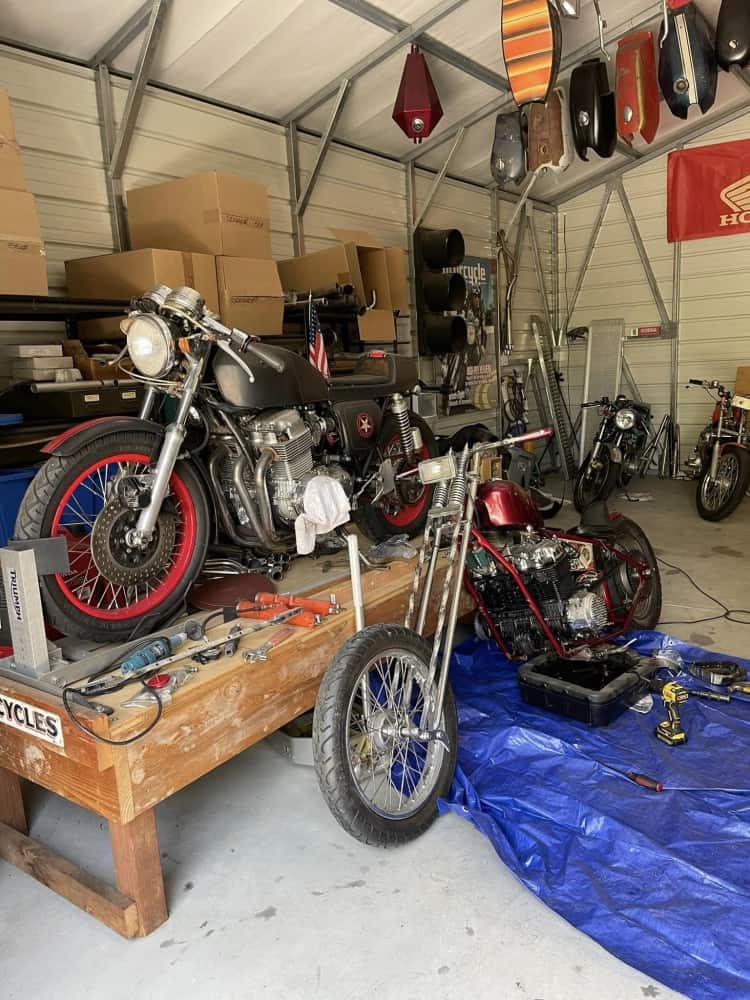
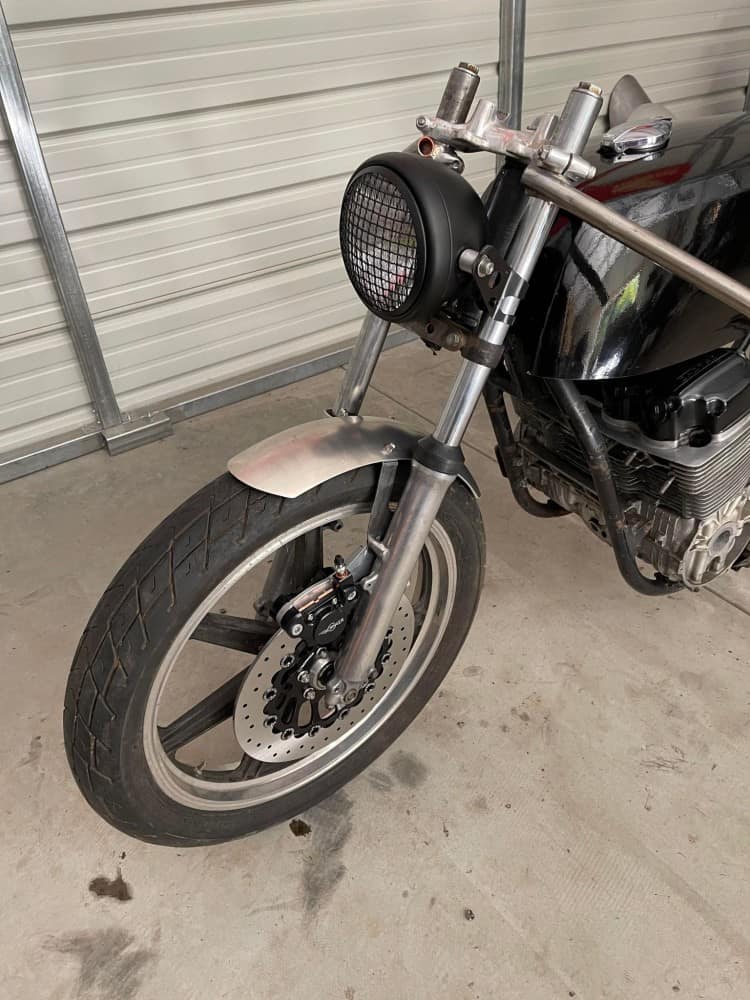
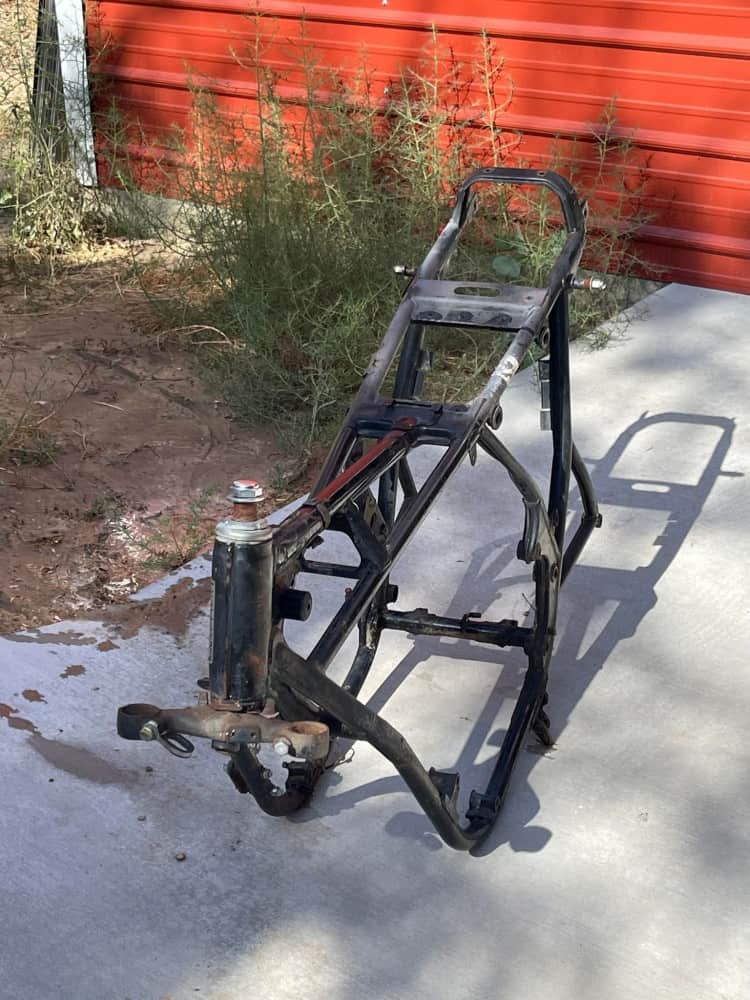
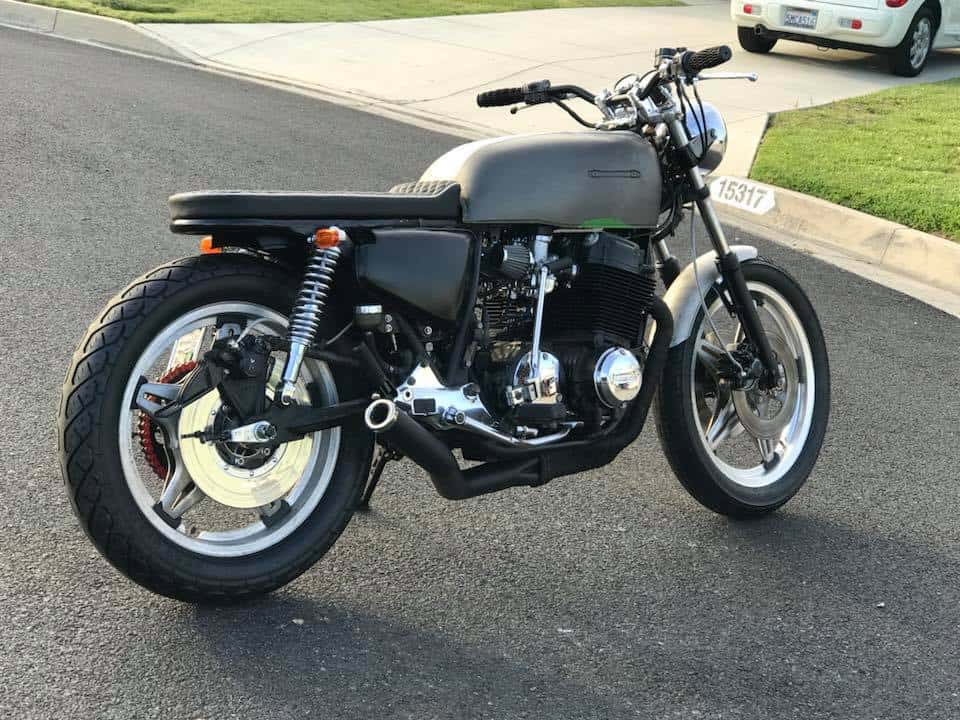
Sometimes I get a call asking if I could clear out a garage or back yard as it has a motorcycle in it, this time it was 6 CB750’s, so what closed the deal was it was free but a friend of mine I have known many years and helping him out was the least I could do, and as he was less than 4 miles from me, I took the big G F250 out there and loaded up and bought the bikes home. I dont like to have to many as the place gets jammed packed but, its hard to not when it is so close to home.

To be honest, I can never really turn bikes down, especially CB750’s as I have had over 150 of these over the years and parts are always good to have handy, so I could not say no to this fella and help him out of a predicament too, these were in the back yard of his place, so a huff and a puff as some had flat tires etc but, determination is always key here and I wanted to get these home to eventually be used as another build. Once I get the Barn doors completed I shall space in the workshop to haul these up there and find a corner to rest them up together.

I have always enjoyed coming up with another build, they do take time and of course money, but when you hear them fire for the first time in many years, its something you get quite a buzz from, I get many texts or emails from Builders and customers who tell me that they just got their machine to run and I feel so stoked for them as I understand the euphoria that they feel when they first time you hit the starter or kick the kick starter and the engine coughs into life.

These are getting harder to find in back yards these days, I remember at one point I had 25 CB750 Honda’s in my back garden and driveway about 20 years ago and I have built every one of them over the years, so I was quite stoked to have these and bring them home. But don’t want the place to look like a junk yard so have to hold back on other stuff I have been offered.

Nothing super rare like sandcast etc here, but a couple of K1’s of which I have always liked anyway as never was a fan of the Ko with the Big side covers etc, there is no rush to do anything with these 500 pounders, so just unload and put them up in the Barn later until I come up with a build plan for them.

I have spent a lot of my life with Motorcycles and finding new stuff is always fun, just bringing them back with a plan of getting these to be back on the road in one form or another is always a challenge that I quite enjoy.

I have some Motors to look at tomorrow, so who knows what I may bring home, the hunt is half the fun and even though they are what I call snotters, parts are always handy to have when building machines.

So now is the time to unload these and see what is there and then I can mentally remember what these are as I store them and know that I have a choice of frames and years if I get into creating a new Build that will turn into something head turning, its hard to refuse when you build motorcycles and parts for a living, some will get it, many will not and think its some disease etc. LOL!

Of course, if I do start a creation, I will be sure to post on the website and share with you lot as many of you ask what I am up to these days and I thank you for that, I will be making more new parts too, so keep checking back on the website to see what’s going on, I do like to post blogs too and give you lot something to read.


Honda Santee Chopper, replacing worn out engine covers

As you may know, I picked up an old Santee framed Honda Chopper in a Local Garage a while back, progress has been slow as I am making parts for it to offer to the Chopper builders that are all around the globe, but i noticed that the engine case covers were looking bad.

The covers had been chromed, and as these are aluminum, the material gets hot and then cold and sweats, causing the chrome to bubble as it can’t expand like aluminum does, so it had bubbled, peeled and then started to corrode the aluminum, so I thought I would try and repurpose some old spare covers I had by polishing them to a chrome finish . As you can see from the photo above, the transmission cover was removed and the old gasket was toast, so luckily I had a New one in my cupboard as well as other parts needed to refurbish this area of the bike.

I removed the stator cover, but it took me a while to get this sorted as that round dark blue plate that is on the starter collar, fell off and hid behind the crank sprocket, took me a bit to fish that puppy out but never lost hope and now it’s time to remove the coil winding and the infield coil that are screwed into the case, I also leant the bike over and placed a blue tarp on the floor, as I did not want to drain the New oil that’s in the bike that I put in when I got the bike running for the first time, I knew I would lose a little bit of oil, so placed a catch tray under the chassis to save any catastrophes that could occur on jobs like this.

Make sure that when you remove any Factory Phillips shaped screws on your Honda- That the screwdrivers are JIS models. ( Japanese Industrial Standard) as regular Phillips screwdrivers will most like round the screw heads off.

What is the difference between JIS and Phillips?
JIS, or Japanese Industry Standard screws are just different enough in shape that Phillips drivers will not fit well and slip/strip them. The difference is in the leading angle of the point of the driver. Phillips bits have a larger angle and therefore don’t bottom out in the JIS screws, causing slippage.
Also, make sure that you use OEM Factory Gaskets, as the aftermarket versions not only fit badly, usually the holes do not all line up and the gasket seems to be inconsistent in thickness, I did learn the hard way, thinking I would save a few bucks on the cheaper brand, only to find I had to take the case all apart and fit OEM ones to stop the leaks.
Glad that I managed to get some time to work on this old girl today, she was left in an old garage in La Mirada for many years, sat on a pile of dirt and then covered with years of hoarding, so I will be happy to have it running and use it for a bit, before I put her up for sale, its a good looking rig now and I am sure when I have the New Stainless exhaust system on, it will find a new home ok.
I have lost count of how many SOHC motorcycles I have built, let alone worked on but in the hundreds for sure and always something different to find on some, I love what I do and continue to offer service for customers all over the world.These inline four Motors are fantastic machines and have given me many miles of smiles once they are tuned right.
Covers are on now on this side of the bike, still got to add a finned cover on the stator and fit another gear shifter as the old one is a horrible welded thing that I do not want to use, then I need to turn the bike around and remove the clutch cover and give that the same treatment.
On closer inspection of the front drive sprocket, I see a couple of issues here, the offset is out a little as the sprocket is wearing against the side of the chain and secondly, the sprocket that is fitted is an earlier version 530 and 77 and 78 Motors had 650 chains, I will fit a 540 but will address the issue here and have a sprocket on the way as I do not want any dramas of the chain breaking and destroying the cases.  Also, Chops have super long chains so need to count the links so that I can buy a custom one to replace this tired version.
The Old girl was looking tired, dirty and in need of a good clean up before any polishing can take place on this part, I always like to vapor hone these, that way the material is super clean and ready for some serious polishing, using some good old Jewelers Rouge.
Time to change the look of this 40 year old girl and turn it into something fresh and clean and to be honest, look like a brand New factory part, now I could refit the part in its OEM look but want to polish the piece to a chrome finish seeing this is a Chopper and not a restoration bike.
Now you can see how different that the Clutch cover looks after a process of vapor cleaning and now this part is ready for another transformation and get it polished up for that Custom styling that is so popular.
I am going to try and vapor many parts before I polish, as it makes everything so much easier to buff with no oil residue or grime in the way when I begin the Polishing stage, I am sure that you agree that this way is way better than the old school way? Now, the stator cover that’s on the bike is chromed and all peeling off, I want to use a spare old Stator cover I have and will vapor hone it to make it clean before trying to polish it.
This  spare old stator cover was just as tired as the other parts on the inline Four, and I am sure that yours looks in the same way too???? This Chopper will not be a show winning machine but a traditional Custom bike that was created back in the day and want to try and show what was in the magazines in the 70’s and 80’s when these were seen all over the place.
There is a bunch of old dings and scratches in the stator cover but many will buff out luckily and then it will have an old Finned cover going on the outside to embellish the engine as I have other finned covers on the bike, also these parts are getting harder to locate and finding some parts in my boxes of old stash came in handy but of course, still needed a lot of work, but the other one on the bike had been chromed and was peeling off and oxidizing badly, so this is the better way to replace it i think?
There is still a ton of stuff to do on the bike but wanted to share this with you today as it’s almost the weekend. Here are a couple of little videos that I took with my phone to show you what I am doing as the weather was raining outside, hope you enjoy?

Building an Inline Four Project out of bits and parts laying about.

Well, I still have not made my mind up how I am going in the design part of this ride, I thought I would use my phone and record a few sessions as I continue creating a machine that I personally like and want to use and I am sure that it will go through a few guises before I get on the right track, although that’s half the fun of it.

So here are a few videos I have cobbled together and hopefully you will like what I am trying to achieve, remember, Rome was not built in 7 days.

Inline Four build out of scattered parts around the Barn Part 3

Here is Part three of the video that I have just done, still no idea where this build will go, and if it will stay the same guys, thats the fun of creating something.


So follow me along the way and see what happens, some good stuff and I am sure some bad but I hope I at least entertained your time on your screen and maybe gave you a little insperation too?

Fiddling about in the Barn.

Well, I am sure that you lot must have some parts tucked away somewhere?  With…. “ I will get to it later” Tag attached to it, and I am no different.  I have an old depressed 1974 CB750 Frame that has been sitting around and needs to be given a New life, so- I thought that I would look about my place and see if I can at least mock something up, no idea how it will go, I may change the design a few times but, people ask me what I do at home and I thought that this would be the perfect opportunity to share with you lot out there what I do in the Barn.

So, I thought I would just use my iPhone as chat as I try and do a few things to this old frame that I have, sorry if it gets a little boring but you can fast forward if you doze off.

Click the videos below to see what I usually get up to in my abode.

The Sidewinder Exhaust System for SOHC Honda CB750 CB550 and CB500 Four.

My Exhausts System named the Sidewinder is a Fun and Easy to fit 4 into 1 Performance system that will fit all CB750-CB550 and CB500 Four Honda Machines.

I am super proud of all my systems and this one I like because it allows for you to use your main stand if you so wish, the system flows so well and breathes like New lungs for a smoker.

I have sent these to all over the United States and the Globe, I get so much Positive feedback it really does make my day and of course, make my parts help people get their machines back on the tarmac.


Just thought I would share some pics today seeing its a Sunday and many people will be either on their machines riding, or building.

Have a great weekend and if you can get some time with your 2 wheeled machine, that would be even better.

Fitted one of my Exhausts to a 750 that hasn’t run in 8 years or so

People ask me about my exhausts all the time, I have had many repeat customers over the 22 years here and just happened to come across this 750F that a Customer bought to me on a trailer and has sat for 8 years, it was a mess and other people could not get it to run , so as the exhaust and motor were in much needed attention, I gave it a shot and she cleaned up pretty good, thought I would share it.

It wasn’t a show bike, just a run around machine that was in bad shape, I spent a weekend and got the motor looking nice, used one of my Yoshimura style 4 into 1 Performance exhaust systems and wrapped the headers with DEI Black 2″ wrap and boy was this a fun ride now, she was a little cold from the get go, not surprised as it hadn’t run in 8 years but, with rebuilt carbs, new gas, chain, exhaust , speedo and even brake lines, this old inline four breathed new life and to be honest, I wouldn’t of minded keeping this as a parts getter, as it was a blast to ride.

I also added a hoop for the Customer, his Original seat was rotted beyond recognition, so made him a seat assembly and upholstered with Diamond Stitching, I used memory foam and it was really comfortable.

I used my rear Custom License plate Holder that has a Model A Ford tail light attached and was an LED version, so nice and bright to get you noticed when you are applying the brakes.

This old Supersport has no turn signals, they were lost many moons ago and ugly as hell anyway, I sell a lot of these Brushed Aluminum 12v Signals and these were just the ticket for this build, you will also notice I made a new Braided  Stainless Steel rear brake line as the original one had rotted out and the Caliper had seized up. The tires were totally rotted out, so fitted my Favorite Bridgestone brand, these look great and handle so well, sits the bike up nicely too.

I also Added a New RED 530 DID chain, this was a good Combination, have always liked Black and red and with New sprockets and the old ugly 630 chain and sprockets removed, this was a smooth ride, no binding noise you get from old chains etc.

The Original headlight was broken beyond repair, so used my own Custom Chrome 7 inch set up that has LED turn signals inside the lens, cleaning the front end up as you may remember, 1977-1978 F models had huge Turn signals that jutted out like elephant ears, you may also notice that I fitted New Aluminum Levers on handlebars, New grips and new cables.

I added a set of 2.5 Mini Gauges, these are calibrated for the 750 and clean the whole top end of the triple tree up, his Originals were missing, so these were a great choice and I think suite the bike well, not cluttered like many you see on the road.

This 78F has the Double Disc front end, which is something Honda should of created on the earlier models, but I had to make new lines for it, went ahead and made some braided steel ones up, took a long time to bleed but it stops on a dime now. The old Master Cylinder was totally rotted away, so I fitted a larger Kawasaki version to allow for the double disc as it needs more fluid and that worked out really well.

I made some New side covers as the original ones that were fitted were so brittle and cracked, these are Urethane and will last for another 40 years, I replaced the Original shocks as there was no rebound left and these are just the ticket and look like original 70’s ones but made with todays materials. The Motor was Black being a 78 F, but in need of some love, so cleaned the motor with degreaser and painted high temp wrinkle that I have made and it came out nice, added Pod filters to the rebuilt carbs and the Front fender was dented on the front and rear, so I cut the Old stays off and shortened the mudguard to give it that Sporty look.

All in all, this non runner Classic has been resurrected  to a fun Bar Hopper machine and pulls quite hard too, still needs paint and a bit of chrome but this sure was a fun bike to ride, I really enjoyed it. The Original Carbs were the keyhole version, they are fine when working but they were toast, so, I always fit earlier intakes, Cables and carbs to the 77-78 SOHC Motors as you can remove the float bowls with the carbs still on the bike, also the choke is a lever on the side, not the ugly cable that goes up in between the gauges, runs smooth now too.

Here is a Video of a little try out in my area to see how the carbs are dialed as this was the first real time on a major road, I loved this bike as it had linear power, have a look and see what you think.

CB500 Honda by Duke Motorcycles

When tackling a custom build, there are a wide variety of approaches available to the craftsman. From extravagant to austere, there is no right way to create art. In the case of the Duke Motorcycles Honda CB500 Four Café Racer, Frenchman Lionel Duke chose to keep it clean, building a chassis around a classic 1970s inline-4 powerplant.

Although the powerplant is easily recognizable as an air-cooled four-cylinder Honda, most people would expect the more iconic CB400 or CB750 Fours in a café racer. Instead, Duke went with the less-heralded middle child. That, of course, is hardly the point of the build, and the motor was kept relatively stock. Instead, the Duke Motorcycles Honda CB500 Four Café Racer is all about minimalism and a striking chassis.

To give the build undisputed café racer credibility, the Duke CB500 gets thoroughly modern suspension. Despite being painted white, that is an inverted Öhlins fork, a Ducati Panigale single-sided swingarm, and an Öhlins piggyback-reservoir shock. Matching the suspension is high-performance Brembo braking, while Bonamici Racing provided footrests from Central Italy. Retromod, indeed.

Above the chassis is an aluminum tank/seat/tail unit. “It was realized by hand,” Duke says. “I wanted to keep the proportion of the tank and form of the original so that one recognizes the CB500.” The tank also houses a retro-modern Motogadget MST Speedster analog/digital speedometer.

The tank is adorned with a #7, as is the headlight and the aluminum front fender. “I engraved the front with a 7 to recall the decoration of the tank,” Duke explains, “the 7 being the symbolic figure that represents the purity. It seemed to me that was connected to the bike.”

Furthering the purity theme, the motorcycle is overwhelmingly white. “The color white, pure white, it’s something that I wanted to do for a long time,” Duke reveals, “a completely white motorcycle with decoration that I made in 18-carat gold leaf.”

For the rear bodywork, I wanted it to be very short to free the rear wheel and give it a racing side.” The seat is covered in Alcantara, which has a microfiber pile that recalls suede. Nice-based NMB Design was responsible for building the seat.


Throughout the motorcycle are decorative and functional cables. “Stainless steel cables through the length of the bike give it a luxury side,” Duke says, “and a finesse to this preparation.”


Four Keihin carburetors are retained to feed the Honda motor, with the velocity stack intakes made in the Mediterranean coastal town of Toulon by USVRacing. The engine was fully restored by Duke Motorcycles for optimum performance and reliability, with the unique touch of a CNC Racing hydraulic clutch from Arezzo, Italy.

While the exhaust retains the four-into-four architecture, there is a substantial twist. Unmuffled, two pipes exit under the seat and another short pair peak out on the right side—both a nod to modern MotoGP designs and made from stainless steel. Speaking of MotoGP, the Duke CB500 sports Michelin Power Slick Evo racing tires.


The Duke Motorcycles Honda CB500 Four Café Racer is a long-time coming in more ways than one. Getting his start customizing a Honda Dax (CT70/Trail 70 in the US), Duke has built dozens of custom motorcycles in preparation for this outstanding result.


Working alone in his Tourrettes-sur-Loup shop 17 miles east of Nice, Duke has spent 700 hours on this motorcycle. “It is a personal project that I wanted deliberately different from what we can see,” he says, “a project that looks like me and that highlights my style and all the methods of work that I use.”

“I have been passionate about motorcycles since the youngest age,” Duke says, “but especially of design and manual construction. I studied mechanics, bodywork, and painting, which really helps me in my work. I’m crazy about music, and design in general. I have a passion for watches, architecture, and supercars.”


Often, builders have twinges of regrets and second-guessing when they are done with their builds. That’s not the case with Duke and his CB500 Four Café Racer. “There is not really a thing that I would change,” he asserts. “It is really as I wanted it, and when I finish a bike, I think about the next one and do not think to modify what is already done. I tried to bring the French touch and maximum finesse of work to create this bike.” An indicator of that French touch is a French flag embedded in the tank, under a screen between two stainless steel cables.

One reason Duke is satisfied with the CB500 Four Café Racer is that he built it for himself, rather than a customer. “With a client, it is a little different,” Duke explains. “I advise him, and I listen to what he wants. When I make a bike for me, I take the opportunity to do new things, show what I am able to do. With a client, we create a thing for two. The difficulty is that clients do not often project themselves. They often want copies seen on the Internet.”


Undoubtedly, the Duke Motorcycles Honda CB500 Four Café Racer meets Lionel Duke’s standards for individuality. Likely, though, this striking white motorcycle will have clients of other builders pointing to it for inspiration.

Located between Cannes and Monaco, Duke cane supply you with parts to create something of your taste or a complete build for you to ride home on.


Photography by Julius Designs

Weekend is here but its going to be damn Hot In Southern California

I know, I know- I should not complain about the weather, but- I left the shores of Blighty back in 1997, this weekend it will be in the 90’s and I am lucky that I now have the Barn to work in, albeit no A/C.  Its surprising how much you can get done when there is a big ball of fire trying to make you evaporate.

Today I shall be packing up quite a few New exhaust systems, with more on the way, busy time of the year for me as people are wrenching on their machines and of course, with warmer temperatures, then riding season is at its most fruitful, I too love riding early in the morning as the warmth of the Sun begins to make the tarmac steam and for me, there is nothing better to clear your head than a crisp morning.

But parts have to be re-stocked and I am trying to get the New Place in some sort of order, so I can pick and pack my parts a little easier and then ship right out to my Customers, I am lucky as the Main Post Office is just down the road, so that means I can take them directly to the Loading dock to scan and load the packages and boxes onto the truck that is going out to deliver.

I am coming up with a few different parts too and this all takes time, but I am enjoying what I do and when you work from your own Workshop with no landlord hassling you, a lot of stress simply disappears.

Happy Sunday everyone and hope you get a little bit of time to be able to do some wrenching on your machine, let me know if I can help by phone or text, 714-598-8392.  keep building and keep riding.

The KC Special CB750 Honda inline Four

I have always loved creating My style of machine for Customers and this one is no exception, the KC Special turned out to be a great looking ride and the Owner Keith Conrad ( Hence K.C.) lives in Milwaukee and asked if I could revamp his old 1975 CB750 into a Silver and Black Cafe bike, I said sure thing and the deal was done, a build sheet was agreed upon and Keith sent the bike out to me.

I took the bike apart, right down to the frame, as I do all my builds, then I set about cleaning the frame up some what and smoothing some of the old factory welds, as Honda welds are quite rough back then as i guess they were hand welded and not automated as they are today.

As you can see, I took my time as I wanted the frame to really look nice in a Gloss Black on this build, I wanted it better than factory, so I took a long time to make sure that this Chassis came out nice, as i mostly powder coat my frames, unless I am using Candy Paint or Metalflake etc. Above you can see how Glossy the main frame rails are.

I took the stock gas tank and using my Egg Hammer, I pounded the sides to create Knee inserts, so you can tuck your legs in tighter to the bike and get a little more stream lined, just as they did back in the day for racing etc, this is no easy task and you will see how much it takes to do when you have a go your self, but worth the look in the end thats for certain.

The Paint scheme is High Gloss Black with Metalflake Silver panels and racing stripes and I really needed to make sure that this flowed well, and am happy with the result.

Plenty of Detail too, I hand machined out of 6061, a Custom Finned Oil Tank Dip Stick cap, this really did look trick, compared to the stock version.

Its like the saying says, the devil is in the detail and there is plenty to look at on this CB750 Cafe Bike and am stoked how the bike turned out in the end, worth all the hard graft.

The seat is one of my own that I manufacture, called “The Rocket 4” its a sleek sturdy and well rounded seat base that I produce and has the same curve as the gas tank, that way the body work then flows and give the machine the Status Quo.

Keeping in the theme of Old School styling, the seat upholstery was hand machined and small 1 inch Diamonds in white stitching with Silver piping and vintage snaps was completed to really make this stand out from the crowd.

I used an LED Custom Tail light that I offer on my website and this is bright as Einstein, and I think is a nice addition to the back of the Rocket Four seat unit, also the silver flake racing stripes really stand out nicely.

I machined some covers for the rear piggy back shocks as well as making some risers for the lower, to increase the ride height by 2 inches, out of 7071 Military spec Aluminum.

I also Chromed the rear swing-arm and hand made then Chromed a Custom Chain Guard to show the Gold 530 X-Ring chain off, I also polished the Hubs of the rims and painted the centers black to give a nice offset.

The Motor was rebuilt, as well as the carbs and synchronized etc, my Custom Oil lines were added in Black for a nice offset too, I fitted an oil Pressure gauge to keep the rider informed as to what is going on below.

As you can see, there is plenty going on here, I took a lot of time on the front sprocket cover and I even polished the rear set brackets for a more Custom look too.

Rebuilt and polished Carbs with hand machines velocity stacks from Steel Dragon really help the look of this bike and give it that Nostalgia look and it runs really hard too, there is something about hitting 6 grand on a 750, then you know you are starting to pull like a steam train.

People ask me about my gauges that I create on these inline four machines, and this one is no exception, unless I am restoring a bike, I don’t really care for the Honda’s Gauge faces as they are Green or Blue, not my favorite color of choice to be honest, wished they would of gone Black with White numerals like the Classic British machines, but oh well, so what I do is take the gauges apart and then I fit my Custom faces thats an overlay I print out, then repaint the needle and add chrome cups to embellish the bodys and give it a little more Custom look.

I have always liked to do this and it really does personalize your gauges, this time I went with the Cafe Racer Font and crossed Flags of which I think suit this Motorcycle to a Tee.

You may also notice that I have fitted a 2 inch handle Bar riser, to give a more comfortable riding position and easier strain on the wrists too, then fitted my Relocation bracket on top of the handle bar clamps to clean the top end of the bike up, with a BIG oil pressure Display light to match the Needle ends.

This is one tasty ride, the 4 into one system of mine is Ceramic Coated Silver, its a great look, almost a brushed polished Aluminum look to it, and she barks like a scolded dog when you get on the loud button, you will also noticed I machines a Finned Stabilizer Bar at the rear of the bike and did my usual drilling on the brake hub to let brake dust and heat escape under hard braking.

A lot of time and energy went into creating this machine and the owner really digs it, it is just how he wanted it and am glad that i was able to oblige with his demands.

The Customer wanted Gloss Black Rims with stainless spokes and he really did like the way these turned out on the bike and the attention to detail that I am known for on these inline fours.

I always fit an Oil pressure Gauge, as I do not trust the Honda Pressure switch thats behind the Barrels, so these run great and give true pressure as soon as you fir the bike up, as it is connected to the oil galley plug.

As you can see, New Levers, new Control switches, new Handle Bars, polished triple tree, New cables, New master cylinder and stainless nuts and bolts through out this motorcycle.

A great but solid Motorcycle, with aggression when you want it, reliability for everyday riding, and an awesome stance to give it that moving look standing still, sure does sit well in my stable.

I really did enjoy putting this bike together and felt good to know that I had done all and more than the Customer had asked me about, its one fine steed and I enjoyed slinging my leg over it.

I wanted to share it with you guys and Gals and hope you like what I have created too?

Maybe if you are in Milwaukee area, you might come across the KC Special? if you do, take a snap and send it to me, love to see it again.