Quarantine – How I deal with the Lonesome Blues

Well, we are entering a new World right now, times are hard and quite scary to be honest, most of us have been Quarantined and have to stay at home, in Isolation from the world, but keeping safe, Healthy and away from that nasty Virus.

But, I am getting many orders for parts this month as so many people are at home and have decided to pull up their sleeves and got into their Garage, Shed or Cave etc and start or finish off their project they had started a while ago and ran out of time to complete.  And now we only seem to have time on your hands, you may as well tick some of those jobs to do off the list and make this time in isolation a rewarding one.

I just received an order for a drilled rear brake hub assembly, I have made quite a few for Customers over the years and to be honest, I find it quite therapeutic doing the drilling on the hub and thought I would share some of my experiences with you lot and maybe you will want to have a go your self??????????

I’m about to go out to get a few parts as I had orders today, wont see anyone but I have to go to storage and grab some stuff so will be back in a tick.

Right, I am now ready to get myself situated to get some drilling done on a hub that a Customer has ordered from me and you too can do this if you have some time, a drill and some patience, as it really pays off in the and and gives a unique Custom look on your machine. So, have a look here, I have three hubs to create for Customers and I will show you what I do ok?

Strip your old hub down, just have to remove the 2 springs that hold brake shoes and the split pins that hold the swivel, remove brake actuator and arm and you will be left with a bare plate, once you have completed that task, which only really needs a pair of long nosed pliers, you will then need to secure the hub onto something sturdy, so the plate doesn’t move when you start to drill your lightning holes. I always use a piece of old plywood and secure the plate on top it by using a washer and a wood screw, easy as that.

I use an array of drill bits and to be honest, I just go for it, no set pattern, what ever I think looks good I just drill and change bits as and when I see fit, that way, not one hub is ever drilled the same.

I always have a shop vac at hand, as you are going to get a lot of swarf from the Aluminum and it gets everywhere to be honest, so every now and again, I vacuum the mess it leaves, else you will be feet deep in alloy shavings.

So here you go, this is the pattern that I like the look of and I can still add or make a few holes bigger to give a different pattern.

Looks a lot different when its polished eh? Also, I add New brake shoes and actuator arms etc to make this really look like a Custom piece and so easy to fit too.

So as I have plenty of home time, I thought I would show you how I make these great pieces out of old tired brake hubs for the CB500-CB550 and CB750 Honda’s.

I am sure that you may want to have a go and see how you fare? Its such a great feeling when you bolt it all back together and its therapeutic for me thats for certain.

See, the Patterns are always different, that way, each one is unique to any other out there, its a neat old school look and cools the brake too as it aerates as you ride.

A trifecta of hubs I am doing and this does take some time to complete , but I really like doing these and they come out looking very cool indeed, as you can see below.

So, once all together you can fit right away to your wheel, or, if you are building a Custom rim, just plop in into the hub, it sure dresses that part up so well.

I have built so many that I have lost count over these last 20 years but always fun to create and I still get orders for the custom hubs all the time and glad that you lot like what I do.

Thank you for reading my little Blog today, I have fun writing these and its always cool hearing from you all to see and hear what you lot are creating in your sheds or garages etc.

Drop me a line if I can help you at all, even if its just for advice, my Number is 714-598-8392, you can also TEXT me on that as well for a faster response.

Stay safe everyone and we shall all get through this and be back on the tarmac having fun with our creations.


A YAMAHA TRX850 REVAMPED IN MOSCOW


IF YOU’RE LOOKING for a donor for your next build, look back to the 1990s. That decade is chock-full of untapped potential—hidden gems that might not have been big sellers, but now offer great performance at bargain prices.

We’re quite intrigued by the Yamaha TRX850 in particular. First launched in Japan in 1995, then in Europe a year later, it was something of a parts bin special. It was powered by the same 849 cc parallel twin as the TDM850, but with a 270 degree firing interval.

MCN said it was “a match for Ducati’s 900SS in its day, but it never sold well.” And it wasn’t bad looking either, with a trellis frame that mimicked the Ducati it was trying to nick sales from.

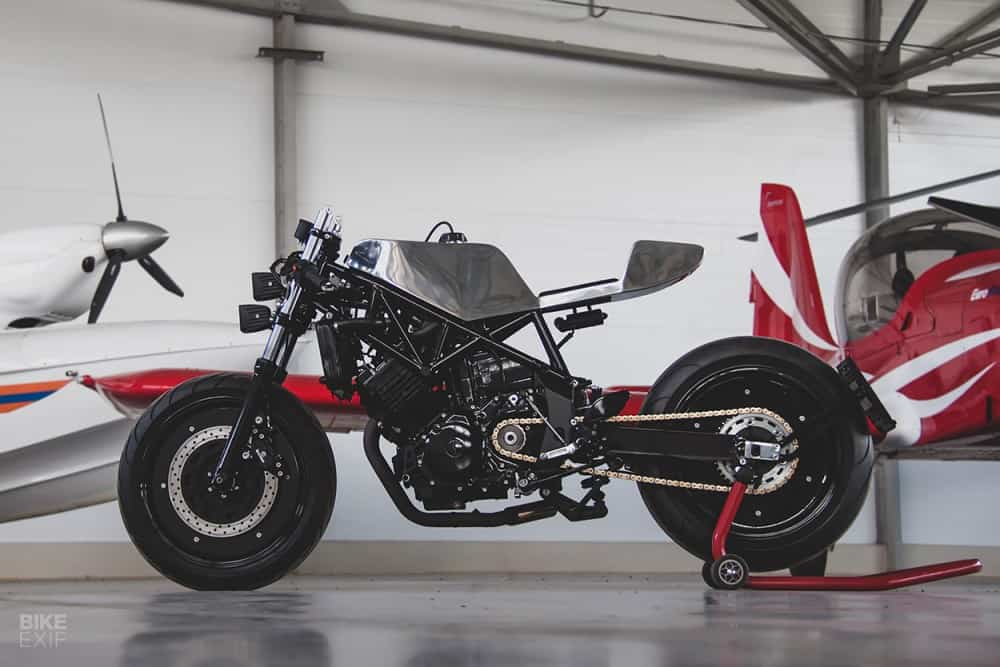
But is it customizable? One relatively young custom shop in Moscow thinks so. Chemisov Custom Works were handed a 95 TRX850 and an open brief, and responded with this angular café-fighter.


CCW is a two-person team, made up of Ivan Chemisov and his wife, Lyudmila. They’ve been operating for less than two years, but Ivan has plenty of prior moto-experience. He’s worked as a mechanic for sixteen years, including a stint wrenching for a race team.

A desire to do more creative work prompted him to launch CCW, and before long a friend booked in the TRX850 for a makeover. Even better, he gave Ivan and Lyudmila complete creative freedom on the project.


The couple drew inspiration from the most unlikely source. They’d tied the knot in Georgia a month before the build began, with the Ushba Mountain in the Caucasus range as a backdrop.

So the tank and tail of the TRX850 would symbolize the mountain’s distinct twin peaks, and the polished and black finishes on the bike would hint at the ice, snow and rocks that cover the mountain.


But before Ivan could whip up a new design, he had to bring it back to spec. The TRX850 hardly started, ran badly when it did, and made poor compression. So he tore into the motor, did some head work, and replaced a whole list of parts, including the valves. Then he installed new air filters, and rejetted the carbs with a Dynojet kit.

All of the Yamaha’s original body parts, including the fairing, went in the bin—revealing more of that pretty trellis frame. “Visitors at the workshop constantly asked the same question,” Lyudmila tells us. “From what Ducati is the project being built?”

But with the bike stripped down, Ivan noticed that the frame design was not symmetrical—which gnawed at his perfectionism. So instead of just editing the subframe as planned, CCW ended up tweaking the central part of the frame too.

The TRX’s new bodywork is a monocoque affair, which Ivan shaped from aluminum using the only tools available: a wooden mallet and his hands. The fuel pump’s hidden under the tank, to keep the design as compact as possible.

Ivan’s always had a close connection to racing, and that’s influenced the smaller details. The seat is bare bones—a single layer of race foam, to keep weight down. (In fact, the entire tank and tail section weighs just four kilos). And the tank breather tube integrates with the radiator and crankcase breather tubes.

There’s more metalwork lower down, in the form of a set of aluminum wheel covers. Finished in gloss black, they add some presence to the bike without appearing bulky. Getting them to fit meant modifying the front brake setup, and Ivan built in angled valve stems, so that you can still pump the tires.

With respectable 135 mph performance and handling out the crate—and a limited budget—there wasn’t a need for excessive chassis upgrades. CCW simply added braided brake hoses, and upgraded the reservoirs.

They reworked the top triple tree though. The ignition was moved, and LED built idiot lights into the triple. The stock dials gave way to a single tacho; in keeping with the race theme, there’s no speedo.

The stock clip-ons were replaced with a new set from LSL, mounted lower for a more aggressive stance. LED turn signals were installed in the ends, with a pair of square LED headlights doing duty up front (one each for high and low beams).

There’s another nod to Ushba up front—a mountain-shaped plate that doubles up as a headlight mount and triple clamp reinforcement.

Out back is a side-mounted license plate holder, which also carries a taillight and turn signal combo LED. The whole bike’s been rewired too, with most of the components—including the battery—now stashed under the tank.

CCW kept the bodywork polished, and finished almost everything else in black. Little parts like levers were polished, and all the fasteners were swapped for stainless steel items.

A pair of stubby stainless steel mufflers with built-in dB killers finish things off, mounted to the stock headers via custom connector tubes.

The overall vibe is muscular and mechanical, even if it doesn’t look particularly comfortable or practical. But this is completely intentional, born out of Ivan’s love for performance machines that are built to go fast rather than far.

“In our ideology of customization, style and functionality stand in first place,” says Lyudmila, “and comfort and practicality go to the background.”

Between budget restrictions and the condition of the donor bike, it took CCW a year to finish the TRX850 off. Now that they’ve broken onto the scene, we’re hoping their next project kicks off soon.

With any luck, it’ll be another forgotten 1990s jewel.

Chemisov Custom Works on Instagram | Images by Lyudmila Chemisova