CR750 ALLOY ROAD RACER

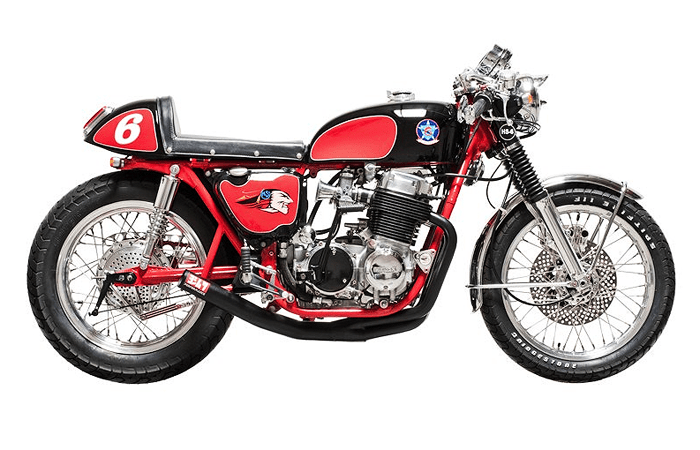
Well, this time a little CR750 Flavor was sprinkled into this AHRMA project, this started off as n old Custom 750 and made quite a transformation.

I took the bike apart in my old drive way and built this little tarmac chaser.


I cut the frame and welded brackets for the Alloy seat and the tank, then powder coated the frame a high Gloss Black and started to assemble the mean machine.

Starting to assemble the frame and get this puppy ready for the Customer in Canada, and this will be a ripper.

I had Original early Lester rims, 19 inch front and a 19 inch rear, so cleaned them up, painted them a race Gold and added dual Rotors of which I drilled.

Now all the parts are starting to take shape, I am going to miss this bike as it just screams Road Racing.

This will be ridden in Canada, so it has to have Gauges and turn signals to be Road legal.

The GOLDEN ORB 1973 HONDA 750K


1973 GOLDEN ORB –

The GOLDEN ORB 1973 CAFE RACER

SOLD to a cool guy in CANADA.

Of course I WILL ship worldwide.

OK, here we go again, as if I have not got enough to do, I got a call from a breakers, asking me if I was interested in an old 1973 CB750.

Seeing I was less than 5 miles away and in my Snot mobile, I thought why not have a goosie Gander and see what they have.

Sure enough, it was just as I expected, it was a Snotter but with a little bit of color to it.


I thought that this time, I would powder coat the rims an Aztec Gold color and match the paint on the tanks and side covers.


I also cut the neck of the old original tank and weld in an Aircraft pop up gas cap in it’s place.


The Gold and Black color scheme seems to go hand in hand, this was a lucky idea I had as I was watching a tv show on ancient Egypt and the Color came to me in a flash.

I drilled the hub and the sprocket cover out by hand and no real pattern, I just go with it and see what happens, and for me, it turned out well, this is has an original R.C. Engineering exhaust set up too.

Plenty to look at, and I even took this bike to Sturgis, where it received some great comments, of which I was so surprised, being a Metric machine there.

Great Color combo.

I really enjoyed building this machine,.


CB750 BLACK MAMBA

More Aggressive than a Pit Bull with sore balls.

Well, sometimes there comes a time when ya gotta let go of the cool stuff ya own.

As you lot know, I design and build Cafe Racers out of these baby elephants, and have a heap of fun with them.

This by far is my favorite to date.

And here she is, all ready to have a burn up on the freeway with the modern crotch rockets.

But this will always look cool, no matter what speed you achieve.

The Black Mamba was built by me and has the whole build up on this website.

Now, There are some rare parts on here so I want you to know that these things are now becoming harder to locate than someone without road rage.

This 750 is all set to have miles of smiles and show the rest of the crowd how cool these inline fours are as a Cafe.

I built this 1974 Black mamba as a rideable bike and a fun one, that  re-creates the old 60’s look of the Ace cafe back in London.

My Old man is an original Rocker and I grew up in that era and have always had Cafe styled Motorcycles.

Being British kinda shows in the Cafe’s I build, and, I think, with the almagamation of British looks, Japanese technology and parts and some American tools, these bikes really do look timeless.

I really like the lines of the bike and I have a rare 5 gallon Aluminum knee recessed gas tank that was RACED at Brands hatch in England in the 70’s.

The beginning of the Black Mamba.

A very Cool Cafe, with Classic lines, following the Vintage curves of my Icon of a Cafe, The Vincent.
 Have a look at the pic’s and remember, you can email me for more information, at caferacer@socal.rr.comand I will help all I can.This is a great bike, but, I aint giving it away.It has too many cool parts.The whole build up is on the website under “bikes I have built’ title, so check that out for complete build up story.The frame is powder coated and not painted, as I have found it to out last any paint and very tough against gas and any other liquids that may get spilt on it.

Has Triumph front Rim with stainless spokes and polished hub, with, New bearings and tire.


16 inch Harley rim, laced to a CB750 Hub and drilled rear brake hub.
The front wheel was a Triumph Akront and came from the infamous DON VESCO’S shop a few years ago now, I cut the old spokes out and re-laced to a polished CB750 hub.All hubs have new bearings, no expense on things like that.New tires and new chains etc means a great ride for a lot of miles.

Hear that wild 4 into 1, it barks like a Crazed Dog.
This pulls like a train.

2 powerhouses stood still in time.
Now ready for the new owner.

CB750 BLACK BANDIT

WE ARE SNOT AMUSED !!!

OK, I have to try and take this ole snot box apart and CREATE a snarling 750 CAFE RACER in a few weeks.


But this will be as tough as the others and more, as the Motor is about as much use as a hairbrush in Kojak’s Bathroom.


There is a mixture of snot, sand, dirt and good old Rat crap over the bike and the motor is as seized as the Titanic’s toilet door.


But with determination, money, sweat and a lot of swearing, this Rat crap wearing Snotter, will rise above the stench of dispondency and roar down the road in it’s new guise as a 500 pound Cafe Racer.


Well, Here we go then.

Another build, another story and yet more knuckle scrapping weeks ahead.

But hey, I choose to do this and will stop complaining.

***************************************************

OK, this is as I always say on builds with a totally stock snot box,

 “A real

Snotter”.The bike is in dire need of help, I have had a few snot boxes in my time but,

this one doesn’t just take the biscuit, it snatches the whole damn box.There is all the usual snot and grime I am used to seeing, but on closer

inspection I could see rat shit on the Motor, talk about having shit in your

Carb, I believe this really does….

Just like that long haired bloke on 2 nailed sticks,  this can be resurrected

from the dead and go on to give more happiness than a guy with a trailer

load of perky breasts.

I started to take the bike apart and this thing was just snot, all the way.

The carb’s were stuck and would not move at all.

The Motor was a seized up as a pacemaker in water.
I knew this would be a challenge and it sure is, I could not believe how

much crap kept falling out of this bike.

Everywhere I looked there was crap, the wire harness was torn up and hockey

repairs made .

I think the Rats had been  chanking away ( like that word) on the batter

area and shit on the Motor from afar.

The Gas tank STILL had gas in it, it stank like a 2 week old diaper and I

had to dump that stuff out quick, i am sure half the ozone has gone with

this stuff evaporating into the ether.

Anyway, Once I took all the stuff Off, I could at least get some sort of

idea what is going to be needed.I looked at the exhausts and they were only held together by the old ruty

chrome that wrapped around it.

The spigots were almost welded to them and 2 of them would not come out,

they stayed on the exhaust, I will use some spare ones rather than spend

half the day heating them up to pry them off.

The bike really had an adore that a deodorant manufacture would even loose a

challenge at.All them years of sitting out in the desert had taken its toll for sure.

The Brakes were all seized up and about as useless as a brain dead

accountant.

It took some time to get the caliper off the wheel as it decided to lock up

on me.

————————————————————

But, After pulling and pushing and a lot of swearing, I got the whole 750 apart.
The forks were in pretty bad condition too and will need replacing on the uppers for sure.
********************************************
The seat, well that is another story, that thing had rotted from the inside, it just crumbled like a paper wall, it was only the cover that held it together.
…………………………………………………………..
Getting the Motor out was not too bad, usually they sit in there and refuse to budge and with half your arse grapes hanging out ya boxers, its not a good idea to keep lifting that Motor around, well, not on your own or, if you do, keep a cold spoon in the fridge to put your arse grapes back in.
I took the frame and rims and got them bead blasted, as that gets rid of any of that stinky Rat piss smell right off the bat.
then off to the powder coater,  where I shot this all Gloss black and it came out great.
This really looked good and was glad to now get into this build and start to put this Cafe Racer together.
I was Happy at the result and powder coat was darker than a pint of Guiness.
I put the frame up on the bench and began to start work, I fitted the rear swing arm and got that to fit nice and smooth, then fittes a rear shock to get the ride height correct.
Then, it was onto the front end.
I had taken all the snot off the front forks and polished them, they are now as clean as a priests driving record.
It was then time to paint the fork ears and they came out pretty darn good.
The head stock and triple tree i powder coated Black and fitted new  1/4 inch bearings, packed it all in grease and slipped it all together.
The steering does not grind like a cheap pole dancer any more and is as smooth as honey.
I then inserted the polished forks and New Gators, and this went in really well.
The front end is looking Classic now.
Then I got the bloke around to check it out, he loved it but asked if we could do RED rims.
No problem, so I powder coated rims Red and then set about polishing the piss stained hubs.
They came out great, and, with New bearings fitted, this was a sweet set up.

OK, next job was to Lace the rims up and get them ready for New tubes and Rubber.

Whilst I had to wait for the New tires to be delivered, I set about working on the gas tank.


I made the inserts my old way and then bead blasted the tank to make sure no bog or mud was in there.

Gloss black set this off right and with my gold decals it was time to mask the tank up for pinstriping.


I masked her up and the lines were laid, a few coats of clear and Wham!!! A sweet looking tank.

This will have a new Chrome cap as well as a new petcock  too.


The gas tank was sealed up and she looks great, i have a few quarts of high gloss Black on this, as well as heavy duty primer and with the clear coat ontop of all the tank, it gives it a deep finish.


I will be making a Cafe seat for this with a hump styled back and most probably with the ribbed cushioning in the middle.

I am happy the way this is coming out and I am sure the guy will be more than pleased with the outcome  of the racer.


The tires are here and I shall be adding new tubes as well, want to be sure this has good quality stuff all the way through, not some half assed stuff a few other builders are doing right now.


Ok, here we go, bung on the tires and get ready for the hardware to I go onto the rims when they are ready for fitting to the bike.


Many of you email me questions about your builds and that’s why  I show as many photo’s as I can, to try and show you how i build these and, the problems that occur.


I do know  of a few builders of when they have sold the bike, they break down or leak or just a pile of shit cleaned up with cheap aftermarket rubbish, well, not me, they can all go and blow a monkey.


I have been into this for years and I know my stuff, others are jumping on the band wagon and I am glad to say the reports I get from customers of thier rides is a sad tale and they sell them and get me to build them one or help them repair the crap someone else knocked out fast.


I can build stuff fast but you want the quality don’t you, I can’t be arsed with a quick buck, just not me.

I am working class like all the rest of you and I understand what you want.


OK back to the ride, as this is all about the Black Bandit.

The rims look great with the new rubber on and I can now concentrate on other parts of the ride now this is completed.


I took the rear sprocket carrier hub and cleaned all the crap off it, I then polished this up to gleam, as it is made of alumium, and it came up prettyy good.


The rear 48 tooth was powder coated as well as the safety shield and a nice contrast with polished stainless nuts.

I then slung this all together and it looks great, the other side was the brake hub and now that is all completed and together, it is time to mount this wheel for the first time, into it’s new home.


It makes the ride I think, Classic lines all the way.


The Wheel slipped in, easier than a burgler through an unlocked door.

I also had some more hardware ready to fit to this ride when the Back wheel was fitted.


The Chain adjusters were powder coated and stainless bolts added to make the contrast.

Seeing the weather will get to the rear of the bike more than anywhere it made sense to have stainless bolts etc.


I also took the brake stabilizer bar and stripped the old Black paint off it and chromed it.


Looks the parts now and sets off the rear end too.

I hooked the brake rod up and we were pretty much done with the rear section now.


Now it is onto the front end and get that rim in the forks.

But first I had to build the caliper as the old one was nasty.


The rear wheel is in and everything is all hooked up and looking great, I wanted to show a few pics for the customer, just so he can see what’s going together.

And I am sure he will be stoked with how this is looking..


Well, This has been a task as the ole Bandit was a real mess.

I have come a long way with the old girl and also I am building another guyz Cafe too, so, plenty to do.

Although I do not cut corners, unless they are made of steel.

This is looking great, every cafe I build, i try to make personal and different, I do not build anything exactly the same, as I will change some patterns or add different pin lines to change the seat and light style.

This Black Bandit will be a great eye catcher and I am certain Martin will be laughing all the way to the bank.

(Maybe he won’t, when I give him the Bill)

But seriously, this ride was hard as the Motor was seized solid, the Cam shaft had spun with no oil for quite some time.

The oil pump had taken a dump and then all the metal from the scorched bearing shells, just went through the motor, and at some point it must of got hotter than a Trile X rated Porn movie.

This motor has completely been gone through, the camchain was chewed up like a new bone for a Pit bull.

I am so glad to have got this motor back in the original frame.

This 750 will breathe again.

Although parts are now becoming harder to locate and in good condition.

But I have found a place to order NEW switches, as these ones were all broken inside and the wires were about as much use as a knitted diaper.

The parts will take some time to arrive, but worth the wait as they are New, and what a blessing new stuff is, no snot, no rat piss and no broken wires with them bloody pade connectors on.

The Exhaust is now ready and on the bike and I made the tail end in my tradtional style, short, loud and looking aggressive.

Still a little way to go with this build, but am almost there.

OK, I am almost there now.

I have spent some time getting the Cafe to where I wanted it.

This month has been busy.


And I am now trying to push hard to build all these rides for customers.

So, the Bandit is all but completed,  just one kick start oil seal needs to be changed.

I need to tighten a few brackets.

Then add some fuel lines and fill this baby with new oil etc and she will be ready to run.

The gas tank and seat Combo go together well and i am sure Martin will be stoked with this Classic looking Cafe bike.

I am totally pleased at the outcome and now another cool ride has come out of my stable and will soon be able to stretch it’s legs for the first time this week.

Remember, this was a pile of snot with Rat shit on top of the engine.

This motor will purr and will also have some grunt in it.

I am happy with the bobbed fender I made and I am looking forward to giving Michael the keys to this wonder ride.

I still need to get some Models on this bike, so I can show the lines off and also you lot can perv at the birds arses.

I took the old master cylinder apart and then polished it all up on the buffer, it now shines like chrome and has new internals.

I made braided hoses for the brakes and the caliper is totally rebuilt.

Took me 10 minutes to bleed and now we have a new front brake, this thing will stop a runny nose.

New clutch cable and i polished the lever and fitted a NOS bolt to make this really look fresh.

Brand new chain and sprockets should hook this Monster up good and proper.

This should eat the bends up with the new rubber on the rims too.

This will soon be ready for its first road test and I am looking forward to having a go this week.


I love the Red and Black combination.
Here she is in all her Beauty .

The ROAD WARRIOR Built for Captain Jack Schuller on the USS NIMITZ

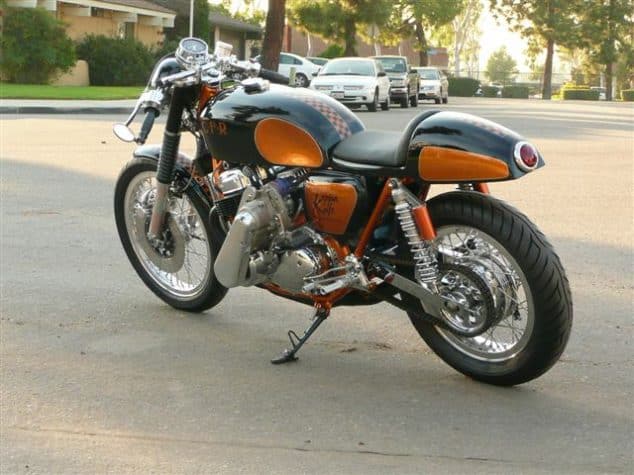
This will be known as “The Road Warrior”

IMG_0543


IN MEMORY ..

 This Motorcycle is dedicated to the Brave Men and Women of HS-6, and to the memory of “Indian 617”,   recently LOST with all hands.

 The crew of Indian 617:
LCDR Eric Purvis, LT Allison Oubre, AW1 Grant Kerslake, AW2 Aaron Clingman, AW2 Sean Ward. 
 All were Veterans of both Operation Iraqi Freedom and Operation Enduring Freedom.

I have been so lucky to have met some of these tremendously brave people and its things like this, that make me sit back and think how lucky we are to do what we do in this free and great country.

I just wanted to pay my respects to Jack and all his colleagues, as they put their lives in Jeopardy without hesitation, to make sure we stay safe and sound.

cb750_indian

I will always remember the crew of INDIAN 617 with uttermost dignity and respect.


I was appropriated by Captain J. Schuller to see if I would be interested in building him a CB750 Honda Cafe but with some of his Navy insignia and a little theme to the bike to remind him later on when he retires of the Navy, Jack flys the HS6 Helicopters in some pretty Dodgy places and I was more than happy to try and help him out.

carpy nimitz

A few trips to Coronado island got me on the Nimitz, I went out to sea for 131 Miles and got a great flavor of the Carrier and some good ideas of how to incorperate some of the things I saw into the bike.

carpy nimitz3

This time we are going to take a slightly different route with this machine and have a Big, bulky, powerful brute of a machine that will shake windows and set off car alarms.

Getting on the aircraft carrier was fun, and then going out for 12 hours on it out to sea and watching the helicopters and F18’s take off was such a blast.

carpy Nimitz4


The transition may take a little while as my guideline book is thrown to the way side, but this is all about self expressionism and I want this particular Cafe Racer Project to look just like the Customer explained to me. Also, I shall be using a snotter as a donor and this time, the customer wants RED Frame and a cool Black tank, with Alloy rims that will really bling the bike out and scream Nostalgia racing. But, I have my work cut out and I hope to accomplish this in time for him to cruise the streets of his town and wake up the sleepy residents with a thunderous roar of this 500 pounder. And I have to keep my cards quite close to my chest, as the chap is in the Navy and this is going to be his good luck charm, as well as a Rocket for him to launch when ever he see’s fit. Check this build as I am going “OverBoard on this Cafe”

carpy nimitz5

I shall install an 836cc Kit. A street racing cam and a few more tricks that will wake King Neptune up on his Sea Bed ,The bike will be known as ‘The Road Warrior” And I am sure it will get more attention than a Commander of a Sea Hawk Helicopter. I can pull these Motors out on my own with not too much problem now and the best bet is to remove the exhaust snouts, that gives you more room, as well as remove the square breather cap on top of the valve cover, as that will give you about 1/4″ or more.

Road warrior2


I stripped the frame down to its nuts and then cleaned up a few marks, then it was time to cover the old head stock and off to the bead blasting machine, where I removed all the old enamel and got it to bare Metal.


Road warrior1


Have a look and see what you think, I love the way it turned out as I wanted to incorporate a little of the Helo Jack fly’s as well as the USS Nimitz that he is on.

Road Warrior

The Motor is now an 836cc and has some headwork that I thought would help her breathe a bit better.

I used a WEBCAM 270 Cam, good for the street without getting too lumpy. I managed to plonk this monster in the rails and – with my foot on a floor jack, managed to raise the bottom of the motor, so the mounting holes lined up.

A good tip for you lot is to remove as much of the engine as you can, that way, you can have more room for wiggling the thing into place.

I always remove the breather cap on top of the Valve cover, so that gives you some extra room, the exhaust spigots also take too much space up and that saves allot of fumbling with them removed, you will thank me later for that tip. The stock Gas tank I have changed a little, I used a 1976 gas tank and made my inserts, I then ground the old gas cap off and fitted an Aircraft style one to make the bike more Aeronautical for the bike as I think this fits he needs and interests and, to go with that these, i painted the knee inserts the same color as his Sea-hawk, so that will tie in nice with his stuff.

The tank looks bloody great and have still to add a different color as he wants Black and red, but this tank will do for the setting up and will simply repaint it and add graphics of the ship.

Also I am also going to shorten the front fender for that bobbed race look and I am sure he will be pleased with that?

I have still to add a Race number, as well as some more bits and bobs, and I am going to Bob a steel rear fender and paint that to match and fit a classic looking Tail light to it.

jackseat

OK, time has gone on a bit and I am trying to get a few things together for this bike, as parts are getting harder and harder to locate, even in japan, so I must try and push on.

I have now completed some cool stuff and if you look at the pics on the right, you will of course see what has been going on in my garage.

The Gauges I took apart and replicated the dashboard of his Sea Hawk helicopter, he will be surprised when he claps his eyes on this set up but wanted to trick this out a little for him, just to remind him of his HS6.

Also I have just painted the oil tank and gloss black and fitted that and now I needed to try and come up with a cool set up for his side covers.

Well, I sat there and wondered what  I could come up with to make the thing stand out and then I came up with the idea of his squadron logo, the screamin Indians.

Very cool logo and this now really does show some of his career on the bike and hope he likes this?

I am now going to fit a RED X-ring chain, they are almost $250 but they will last and look cool too.

I will be receiving the freshly made 4 into 1 of mine for the bike too and look forward to fitting that up.

I have now come up with a cool set up for the rear end, this time the Stabilizer bar got some serious treatment, and made from 6061 aluminum, it now has his name cut into it and fins machined into the rest of the stabilizer bar, I shall add some red in between the fins to detail it out, now this really has given the bike some character for sure and it is more personal for Jack, he has become a really good mate of mine and I want this looking cool.

Here I am on deck of the Mighty NIMITZ where the helicopters reside at sea.

I added a good chain and sprocket set up as this will have some Horse power.

These chains are not cheap at $250 but you need it and don’t want to bugger your cases snapping a cheesy cheap stock chain.

Also I have JUST fitted one of My new Yoshimura style 4 into 1 systems and it fits great and tight.

I am sure this is gonna sound great, but still making Baffle today and should have that done by tomorrow.

Right, I have done more to the Road Warrior and she is taking shape now and not too long to go until i fire this puppy up.

I have made all the bolts for the Motor and used Chrome Acorn nuts to make this stand out, I want my mate to remember me for this ride as this guy is such a cool chap, and I really have enjoyed creating this unique Cafe Racer for him.

Having been taken out TWICE on the USS NIMITZ, I will always remember this build and want to incorperate some of the stuff that he too remembers from his Navy days.

I shall try and get this completed, so he can ride the thing around the base to get all the other motorcycle fans all hyped up at this new ride.


To complete this set up I wanted some cool old vintage Velocity stacks. I have had these for many years, saving them for a certain build and decided that this is the one.

These velocity stacks were from Japan and are really suited to this bike and am stoked how they look.

I am so stoked at these and I know he will like them too.

There are many tricks on this bike and it will take time for people to actually notice it, but that’s half the fun and I am getting closer to completing this, but still more to do to the gas tank and seat as yet.

But will add more photo’s as I go along, as I get many emails asking about this build and I am sure my old mate is checking up on the Progress and is eager to get his hands on this Road Warrior.

Almost done with this seat, it has Leather and snaps but still go to add a race number, but almost there and I love the way the Color works on this creation.

The front end is almost completed but, I am awaiting a NEW front fender from the united kingdom, as this will add to the Nostalgia, as well as the Classic lines that i envisioned when i started to get an idea as to how this was going to go.

The harness and ALL the electrical is now all brand new, from the harness, the switches, the battery, the coils, the solenoid, the Solid state rectifier set up too, so no issues with this puppy.

Plus I made a cool Custom oil Filter cover from the old one.

And this does make a nice transformation to the bike from the front end at least.

I also did a bunch of other things that i thought I would share with you.

Today I fitted the rebuilt carbs and then I made some Aircraft braided overflow pipes and then made an Aluminum catch tube and used that to fill the void in the frame where the old main stand used to frequent.

As well as polishing all the parts i made, i did fit a New non maintenance battery and shall also fit a Batter tender to this, so no issues with flat batteries.

I also fitted a Solid state regulator kit so plenty of voltage at a constant 14.5 volts too.

New throttle cables and new clutch cable will be here this week.

new switches as well as Original GT grips from the 1970’s add to the flvor of this ride.

There are a few more little tricks going on this but still in the mick up mode and hope to get all that done by next week with any luck.

The exhaust is my own style like Yoshimura and has a good baffle that sounds awesome. You can check the sound by going to my parts page and looking up the exhaust section, i think you will be bloody surprised to be honest.

I fitted my finned Breather cover too, very cool and out of solid 6061 billet T6 Aluminum too.

This is RED now and looks great on Jacks ride and many will comment on this as it fits nice and snug in the frame too.

I am also adding all the braided hose to the Motor.

And the Motor will look great once everything is polished and detailed.

As I think they look unreal when they are sat in the chassis, its just All Engine.

As you can see, I took all the Honda logo’s off and polished all the casesm to hell and bike, this is a stunning machine to say the least, I really want Jack to be more stoked than an old steam ships boiler when he see’s this ride for him.

Ok next up was the brake caliper, as the old one was as stiff as road kill.

So, I took the piston out by using an old set of handle bars and a master cylinder, then I honed the bore and then I polished the caliper body, and also fitted new rubber seal and of course cleaned the piston up with a rubber polisher.

Now we are talking business, and this came out pretty good for a snotty piece of alloy.

I also had to polish the rear assembly as that was as bad, but I am glad I did now.

The next job is to polish the old caliper bracket and then fit it all to the lower fork leg, I will also use Aluminum Buttons headed bolts, as this gives me more room to fit a wider tire, as stock bolt heads will catch the tire as you try to fit it inside the fender later on.

The front fender fits like and Glove and dresses up that area really well.

I made an Engine mount out of 6061 Aluminum, then cut a recess and fitted The screamin Indian logo in the middle, this really is a nice touch to his ride.

next up, i thought about this for a while and as he used to road race, what would be better than a set of italian Torrozzi rear sets.

So I got the kit from Italy and began putting it together.

These will be really cool on this bike and give him the old feel of the race days.

I love the way these actually work and the shifting is so much easier than the other after market brands out there to be honest.

OK, next up, I wanted to dress the sprocket cover up, so I cleaned all the oil from it and then went and drilled the heck out of it, making a pattern up as I went along.

I had an arm like popeye by the time I had finished this, but after I had Polished it and fitted the cover to the Motor, well, it was all worth it in the end.

This really is a cool set up and I know you will like this.

Next up, I wanted to try and build a Cool front headlight, so this time I thought I would incorporate a cool look, as he flies the Seahawk Helicopter, I would use a Tri-Bar style Bezel to look a bit like a Propeller or on his Seahawk, the ROTOR Blades.

This works quite well.

So, now we are getting there, not too much more to go and I can fire this baby up, but am stoked at the way she sits and looks right now.

The wiring is now all complete and I wanted to test the light.

I have also added another cool set up for the bike, I added a neutral light, but this time I applied it to the Main Nut on top of the steering stem, then wired through the stem and into the back of the headlight.

The bike is now going to get all buttoned up as I am finalizing a few things on this Creation.

I made sure everything was working correctly and now I just have a few more bits and bobs to iron out, the next step is to fit some of my chrome Bar end Mirrors on the Clubman’s and that should be the front end done.

These are always a great set up as these are not them ugly Elephant ears you see on a lot of bikes, I have always used this set up.

I really wanted to have as much detail as I could muster for this USN themed Cafe Racer, and I thought it would be great for me to make an ID tag, the old dog tag and have all the information on it like owner, Vin number, Engine Number etc and tell them who built it.

I shot down to the Local Army and Navy store and got them to press me up a Dog tag, where upon I curved it to fit the frame rail ,and riveted it to the bike Chassis for all to see.

I am stoked how this looks now, and am sure Jack will be too?

I am now getting close to completing this long haul, but worth every minute as I have become great mates with jack and of course, got to know the USS NIMITZ Aircraft carrier, as well as the HS-6 Helicopters too.

I am now getting a few more things tied up and thought about how i could make something cool for the starter cover, as often this is missed out for any sort of detail work on builds etc, i usually paint them and decal them, but this time I wanted to keep some of the Helicopter them going and thought that I would attempt at making a .50 cal Ammunition box.

I actually broke the handle off my Harbor Freight tap and die set, and then I looked at the handle and thought, I could attach this to the starter cover, of which was welded, then stripped of all chrome, i then bead blasted and powder coated the starter cover a Drab Olive Color.

Then had the stenciling done on the top and simply clear coated, but then , I attached it and Bang!

There you go, one cool Ammo box that some of these helicopters have to carry from time to time.

After this I wondered what else can I do, I mean I have cleaned, polished, buffed, chromed, painted, powder coated and carefully gone over the Cafe bike to see what else I could do for this great guy that has put his life on the line, for us to be able to have the liberty we do.

I thought I would actually detail all the Allen Head bolts on the bike, and this will help the design flow, as the color is the same as the frame.

Now, doesn’t that look the dogs wobblies?

The rear light is a cool set up and should sit on there proudly once worked out how to make a bracket, for it.

Here she is getting ready for it’s debut at the International Motorcycle show in LONG BEACH.

That’s the New owner and boy is he happy with the end result.

This was a long build but, worth it all, I met some of the crew when I visited them at the base, and now tragically some of them are not here now, – I know they are looking down giving the thumbs up on this bike, as it has many Naval themes on it.

I then thought about not only the bike being honored to them, I thought a Helicopter helmet with all their names airbrushed on the back of the helmet, alongside the colors of the bike and of course in memory of the Squadron, would be a fitting completion to this Motorcycle.

The headlight represents the blades of the Helicopter that the crew fly in.

I loved creating this machine and Captain Jack was super stoked to receive it. I asked him what was the most important light on the control panel of his Helo, he said the  Low Rotor RPM as if that comes on , he is in trouble.  So I incorporated that into the Display light section on the bike which is the Oil light originally and told him if that light comes on, he is in trouble too as its out of Oil.

jacks bike 2

So thank you Jack, wish I had taken some more photos but cannot locate any, but shall ask Captain Schuller if he can maybe take some when he is has a spare few minutes.

Jack captain

Thanks for commissioning me Captain, proud to have made you happy.

carpy nimitz


1976 G.C.R.

The Cafe Racer known as The G.C.R.

Well, off we go with another Cafe Racer design, this time we have a 1976 CB750K model thats pretty much as stock as they came from the factory, right down the the beep, beep beep, of the turn signal horn.

So, the customers wants a cool looking Cafe Racer, using my parts and of course my design.

This will be known as the G.C.R. and will be a Black framed bike with black rims and a hammered gas tank with my Rocket four seat base.

As this is stock, it will be easier to strip than some of the others I have had, the bike will be torn down and then rebuilt, the motor too will get rebuilt and dressed up and one of my 4 into 1 exhaust set ups done too.

So, if you have a k series bike like this, follow the build and you can see how you can turn your bike into a rip roaring and fun, Cafe Racer Machine.

I stripped the bike and generally, put everything into a big blue rubbermaid bin, kinda keeps it all together and easy to find later on when you are searching for the part you need.

The chassis is then cleaned up and I grind any tabs off the frame that i am not going to use, I bead blast the frame and then have it powder coated with a high gloss Black.

I then plonk the frame down on a work bench or a bike table and start the process of putting it all back together.

Here she is, sat on a step stool on my work bench, I remove some of the protective covering and then i actually go through all the threads with a Tap, just to make sure no grit or powder coat has blocked the threads.

Even with the holes all covered up, they still get crap in there, so just run a tap through the whole frame, as it will save you a headache later on.

You can buy a cheap tap and die kit from any harbor frieght and yes, they are metric too.

Once you have done that, it is time to get into rebuilding the bike.

But, even though the frame is good, the other stuff might be rusty, bent, or just in need of replacement, there are some parts still available from HONDA but some you just cant get, thats why i make or sell parts to help you lot out too, as I know what it is like to have some cool stuff, then stuck with some snotty bent up rear brake rod thats about as appealing as herpes.

The rear brake rod is always goosed, always, be it bent out of shape or 20 years of the local cat and dog pissing post being used, makes the thing rust like the Tin man’s boxers.

So what do you do?

Well, I use New ones I now have made and boy do they clean the rear end up and of course, look good too, no more rusty threads etc.

The ends of these stock rods are always a pain, so I use my new ones and

I am sure that you will understand when you see it yourself, that this is the best way to go if you are rebuilding your rear end of the bike?

OK, once I had cleaned all the threads on the frame, I then went about putting the rear end together, I thought this time I would use the stock swing arm and clean her up and chrome it, using new bushings etc.

This looks pretty darn cool too and am so glad I went this route as the Black and silver really flow well.

I am also going to rebuild the rear shocks and chrome them too.

This will set the rear off nicely and give it that Classic motorcycle look.

I am really liking the way she is turning out now and with all new bushing, NOS bolts and nuts etc, this will turn a lot of heads.

I do throw a lot of detail in my builds and this does eat up my profit margine but she sure looks cool when its done and this is what I like to do.

Right, I chromed the swing arm and fitted new bushings etc, this is such a cool looking set up, and with the chrome shocks, this will really look trick.

I have attached the new rear brake rod and all the spring and nut and roller will be new as well.

I then went about the rear wheel, this now has a 16″ Harley rim, laced to a polished CB750 Hub, as well as having Black painted inside the center of the hub, to make a nice contrast, of course, this also has polished Stainless steel spokes and a new tube and tire to show the rear end off.

I have still to do my signature drilling on the hub and went to town on it at the shop, and once I had got the pattern I liked, I then cleaned it up and buffed the plate to a chrome finish.

To also make sure this is tip top, I fitted New brake shoes and springs and cotter pins and also, I fitted my New Rear Brake Arm too, as the original one was rusty.

This always looks good when everything is replaced or refurbished.

I am also gonna use a New wire harness too, making sure everything is clean.

This bike will be a cool ride and the new owner is excited to see it on this website.

The Motor is in need of a tear down and will have new internals, and will be a good strong motor with miles of smiles.

I fitted NEW intake manifolds and for me, the best way to make sure they line up, so the carbs fit easier, is to use a flat bar, that way she is dead in line and you will find you dont have to struggle pushing the carbs, like you are trying to bump start a car with a flat battery.

This will also get the 4 into 1 exhaust set up too, as that Bark from the Yoshi style system is a real head turner.

But still a long way to go but I like the way this is turning out.

Next up is the Gauges and wanted to make them look more appealing.

So, took them apart and fitted my decals and now she looks a lot better.

And I am happy with this set up.

The top of the Bars now look great with the new embelishment.

Next up I thought I will now make some Braided steel Oil lines for the Oil tank and fit them, as well as drill and fit my rear engine mount and also add a Breather line for the valve cover.

All this takes a little bit of time but it really is worth the effort in the long run and I do like the way this set up works and of course looks.

Another thing that the owner wanted , was that i fit hs old Army Dog tag some where on the bike, as I had done that to the Navy Bike I created, so, I chose a part of the frame up by the oil tank and riveted it there.

So he now has his personal I.D. on the bike, ie, blood group and name, as well as Religious persuassion etc.

I then went and fitted the oil tank with the New oil lines and after that was all Buttoned up, I swung round to the Left side of the machine and got the New X-Ring Chain from the box and removed the extra links and used a chain breaker to shorten and also to fit the Master link to the set up.

This was run around New sprockets too, and now the Gold Chain sets off the machine very well indeed.

To enhance this look, I drilled and polished the Sprocket cover and fitted that with new stainless Allen Bolts.

I am sure he will dig the way this is now looking and soon be riding it around the Palmdale area with a Big grin.

Ok, lets see, as there are quite a few things I have to do to get this bike completed.

So, this weekend I have been working on the bike and thought it was time to fit a few more of my own parts, so I made sure I got ready one of my TON UP PERFORMANCE 4 into 1 Exhaust systems.

This is gonna be a high temp black and will suit this mean machine.

Should run real nice and have fun riding this Cafe Racer around the tarmac.

I also fitted New oil filter, with new O-Rings and of course Check valve and then once I did that, I made sure that I taped up the down tubes of the cradle frame.

This is now ready for the frame to be taped so I dont scratch it up.

Also , I was fitting this on my own , as at 7am on a saturday, I am the only person working around here.

I taped the frame up and then to help me more than anything, I ran a M8 Tap through all the holes in the cylinder head.

That way I know all the threads are clean and the bolts will run smoothly into the head.

Nothing worse than struggling with a new exhaust, only to find the bolt has cross threaded itself.

So by re chasing the threads, I have a good head start and not really any issues when I come to fit the header.

I also fitted new Copper HONDA crush gaskets and the trick with them is to just slightly oval them in your hand, that way they wont keep falling out when you try to fit your exhaust.

I then got the exhaust ready and put the exhaust in its rough position and then to help me, I put a cardboard box under the muffler, to keep the height and helps me guide the exhaust into the head.

Once that is on, I simply used the M8 bolts that I supply and hand tightened each one.

Once I was happy with that ,I  tightened them down in sequence and kept checking for fit whilst I did each one.

I also fitted rubber bands around the header pipes, as this stops the flanges from slipping down when you are struggling on your own, so I will just snip them off the pipes after I have fitted the exhaust system.

It fit stight and looks great, I added my decal and will fit the baffle and thats done, then tighten all the bolts up snug, I shall re-tighten after the bike has run too.

So, that job is now out of the way and onto the next one.

I thought at this point I would fit a breather on the right side of the motor, this will have a pipe run from that, to the top of the Valve cover, as there is a breather there.

I see many bikes with no piep at all and when the haze of oil that does come out of the head, hits the carb linkage, it makes a real mess over time, so thought this would solve that issue.

I have now worked on the gas tank, and did my knee inserts and this is going to come out really well, the tank is in pretty good condition inside and I am happy with the result.

I hammered the tank on my jig that I made from an old 750 frame and once I had the shape I needed, it was time for bodywork, paint and pin lines etc.

This will be the G.C.R. as it is the Customers initials, as he liked my Supercharged bike and thought it would be cool on his ride.

I took all the rust off and then cleaned the whole area up before any body work was started.

This has to be done right else it will come out badly and all that work for nothig, so try and make the steel as clean as you can after you have done all your modifications.

The whole tank and seat set up and side covers are painted at the same time, then scufed, then add the checkers and pin lines, then once all that is done and cured, it is clear coated and buffed.

This is going to look great on the Customers machine and now things are getting closer to completion.

The rest of the bike is coming along well and soon will be fitting this all to the bike and getting things ready for assembly.

I still am working on the seat and light set up now and what I shallbe doing is fitting one of my Oval tail lights to the rear of the Rocket four seat base, this will set the rear end off nicely.

I have Just upholstered the seat base with this black leather look material and it does look smooth on the bike.

Next up is one of my custome License plate holders, I shall fit this to the left side of the bike.

I usually fit this to the lower shock with a longer bolt, but it looks a great set up and like the way it sits.

I have fitted a chrome surround to the front to add a touch of definition and offset the white of the plate itself.

The side looks great now and am happy I went this route.

All now taking shape, just a few more things I have to do as I need to fit the seat base and then I need to make some aluminum brackets for the rear turn signals.

As you can see , it turned out pretty cool eh?

The bike has taken on a cool stealthy guise and I am hoping the customer digs what he see’s?

Check the Gauges and the instrument panel out I made, this ROCKS !!!

I am sure he will get dizzy just looking at her?

I know I do and this has been a fun build .

I hope that you lot have enjoyed the little journey you took, watching this change from a stock as a rock K6, to a cool Cafe Racer.

If you want help creating your Cafe Racer, just drop me some ink, I am here to help and hopefully, you will soon be having fun, creating your own special Cafe racer Motorcycle.

KOPPA KAFE

KOPPA KAFE MY WILDEST RIDE.

Here is a Video I have done to show the build.

Enjoy:

Hey Gang

OK, here we go, I miss my  Vincent Cafe, I must build something Cooler!

COOLER?

How can that ever be achieved?

I know, a big task is ahead of me but hear me out.

How about a Cool Copper Flaked frame that has a 1969 First year Motor that is BLUPRINTED and Balanced.

koppa5

And to throw Gas on the fire, how about a Belt driven SUPERCHARGER one side of the Motor and hanging out on the left, a Magneto that is also belt driven, there will be more belts on it than a Taekwondo champions locker.

And, just to throw the Cat amongst the pigeons, how about a sprinkling of Nitrous Oxide to really give it some punch?

Then add a Custom Tank of mine that i shall make from 3 stock CB750K tank and stretch the thing 4 inches, to give me more Gas room for longer journeys.

Dunstall Clip ons.

One of my cool  Rocket Four seats with Leather trim.

Rear sets.

NOS Dresda swing arm. that  I have chromed the Balls out of.

Alloy Racing Rims.

Finned equipment.

And a Yoshimura exhaust that i am having re-made in quantities so you can all use them and have that Raspy sound too.

Sounds cool enough???

Stay tuned Gang, I am underway!!!!!!

As you will see from the pictures up there on the right handside, I had to use a SNOTTER of a bike, to show what can be done, this thing has been beaten to within an inch of its life, it was a weird conglomerate of parts, some way out of my head, Police lights for gods sake, whats all that about?

I found this sat in the Middle of the desert out by El Mirage and Edwards Air force base, they should of used it for target practice, and on Closer inspection, I think they did.

But, from little Acorns,  grow  big Oak tree’s –  so had better get on and give it plenty of water to grow into something cool.

All the bolts were as tight as a locked safe door.

I used more penatration fluid than a  Gay priest at a kids school.

There were all sorts of Critters living in the fork ears, some I am sure have not even been discovered.

I think it is the first time I have slung everything I took off the bike except the frame and forks, over the wall, nothing worth saving, it has more snot than a Barry Manilows hanky after a cold.

The last time I got rid of a bent Fork was when my Mum cooked potatoes when I was a kid.

This will be a Challange and I am sure you too will enjoy the transformation.

Challenge is right and I am running out of time, but I shall try and make some time in between working on Customers rides, selling parts and of course answering the 900 emails plus i am receiving lately, but this is what I enjoy and you lot seem to be having a ball with it.

OK, the frame was taken apart, crap, grime, snot and weird looking critters all buggered off real fast when the media blast shells hit them in the booth, the frame was cleaner than Grandads new Hankerchief and ready for some major changes.

I wanted to change the trail and rake of this frame this time, you know the deal, give it a more Ballsy look, bit like a Sprinter in the traps for his 100 Meter dash.

So, lets see what I can do, as having a Supercharger will give me 50% more power and, up to 10 pounds of boost, thats a bigger increase than Obama’s election lead.

So, I decided to use the stock parts that i cut off the frame and add it to the inner sides, gusset the frame to make it more sturdy, I want the ridgedity, as this bike will have some H.P. in it.

So I made a few adjustments and marked up where everything was going to get TIG welded and thus the build begins.

Many hours was sat at night and day, thinking what I could do and I have pretty much built this Cafe Racer in my head, so I now need to make this a reality.

The frame was in good sgape and I had no worries about cutting the headstock by the neck and making a 5 degree rake in there.

This has alot of strong Vee grooved welds that was more penatrating than a cheap Porno movie.

The Chassis now has the lines I am looking for and all welding done of a steel bed with a jig to make sure everything is bang on and plumb straight.

Next, well, grinding, I grinded more than ya Granny does her gnashers when she is asleep in the armchair when the Football is on.

I wanted to remove the ugly Japanese factory welds, as the early ones were pretty bad with spattering and the like.

After many hours of sanding, grinding and sweating, I finally got it to where I am ready to Bondo all the welds and make everything smooth.

More sanding and shaping but it is all worth it for the end result.

I used about a pound of original Copper metalflake in the paint to get this to how i want it, reflects back to the 1950’s of America and the cool Custom cars that ran around these roads.

Loads of clear coat was applied and sanded, then buffed like a bald mans head at a wedding.

I am happy with the result and now other things have to be started if I am gonna get to any shows in the new year.

The gas tank was a big challenge, as I had to use 3 of them to get the shape and contour needed for the bike to look right.

I have seen some tanks out there for sale but the tops are way too high and look like some one has made them in a hurry.

This has to flow, like all my tanks, it took many hours of drawing, shaping, trimming, cutting and reshaping, just to get the rough look, and then the time to clean and weld and grind and clean again.

but the tank is now done, I have cleaned it up and did the bosy work, I put in my knee inserts and then I primered the whole tank, Remember to make sure your petcock does not foul your carbs too, alot of thought gone into this.

The Gas tank looks solid and I sealed it with good old POR 15 sealant and let dry for 96 hours, yes 96 hours else she will leak before that time.

I have seen some leak more than a bunch of Old timers at a bus stop, and I didnt want that at all.

Now the tank is sealed and now painted Black with Copper Flake inserts and a copper and black set of checkers.

I shall sign write the sides if the tank too and add new chrome cap etc.

The rest of the bike now needs to be sorted and I am continuing with this at some sort of pace now, burning the candle at both ends has kind of become a tradition these days but the days are running out for sure.

I used my infamous Rocket Four seat, as I want to show you lot I do use my parts too, and this is going to really look Cool on the bike when it is all together, i already sprayed it Black and metalflake Copper and made a Leather seat cover for it too and used an old Pontiac light for her.

The swing arm as I mentioned was an old one I had in my MUMS shed back home, back in the day when i used to go to Road racing and watch all the cool guys race, one of my heros’ was Barry Sheene and also Rocket Ron Haslam.’

This is a race Dresda swing arm and it was NOS, I had it many moons but got my brother to send it from the UK and I stripped it and then got it chromed, this will look great in that flaked frame.

Well I have now started to get alot of work done on this and have had to build it in my old garage as there is way too many bikes in the way at my workshop to be honest.

And as the kettle is close to the garage, why not?

So, I have bunged the motor together and slung on another head gasket.

The Motor was taken out of the frame way back in about 1973 and then the 69 mill was totally taken apart, BLUEPRINTED, polished and ported and hauls so much ass.

But this time I want to try and really show this as a cool bike that has alot of old options available back in the day, so, as well as having more balls than a golf shop, this thing is gonna have a Belt driven Supercharger and a Aluminum ARD Magneto on the other side to try and even up the look of the Motor.

This will be a really wild looking machine, and I am still a long way off, although I have the ineternational motorcycle show coming up in 2 weeks and am trying hard to get it completed by then.

The Motor looks awesome and I have just fitted the Finned polished Aluminum Plenum (Manifold) that will sit in the head and allow the Supercharger to sit in this.

I guess for people that want to know about how this works in laymans terms, it is pretty much the same as pumping a tire up at a gas station, the  same principle.

More compression etc and the velocity of the fuel atomozies in the plenum chamber, thus resulting in peak ignition and the thrust of the piston at a much faster rate than a conventional carb system.

This is a great set up, but an old one.

Half these bits did not fit and, then to find out, some parts on this unit were kawasaki, some suzuki and I was banging my head against the wall for a while.

But I knew my mate Chris had one in Hungtington beach and a trip there and back  I was ready to “Simply ” bolt the thing on.

No luck there, looks like lady luck not only kicked me right in the nutz, she stole them, squeezed them in a vice and then to add to the pain. flushed them down the shitter.

My mates Supercharger was the same name but all the internals were different. I looked at 2 more in some magazines I got and they two were all different, maybe the dozen or so model they made were all proto-types?

So, up until the wee hours I was stumped.

I researched more and tried some templates, I got the help of a guy I knew who works with modern sport bikes and he helped make a new bracket and we fitted the charger to the bike.

So, after much ado, we came up with a plan to modify the original mounting plate, as it was way off.

After hours of trying, spacing, and grinding, we said to hell with it.

So, those of you who think some of this stuff is easier than pissing down hill, it simply isnt’ at times and I have run out of ADVIL, so gotta get it right in the next few days, else the show is a no go and, I am hoping to not only do long beach, but Seattle Washington too.

I have done a lot of work on this bike and still more to come, the back brake hub got my usual drilling and, I do this by hand with an electric drill, I know, I know, I can use modern stuff, but, for me, that’s not what it is about.

It is about having fun, creating your own bike, anyone can bang a button on a cnc these days and there you go, something perfect. I want to create stuff that my old Man and many peope did back in the day, in their garage with minimal tools, just have a go and see what it looks like, if you dont like it, do like I do, and sling it over next doors wall.

So my brake hub got well and truely drilled right up, came out pretty well dont ya think?

The rest of the bike will have all sorts of stuff and I am still thinking as I go along. I use Stainless allen head bolts and I polish each one by hand, takes some time but looks so much better.

Many of you email me about my detail and you are all having a go, thats so cool to hear from you lot and glad you too are having a riot building your rides out there in Cafe Racer Land.

To add some more different looks, I went for a Double chain and sprocket set up, I had tried these many moons ago and thought I would again.

I called my supplier about a double sprocket set up, and he sorted me a set out, to be honest  , this is the best way to go if you have more power at the rear wheel.

But there is not much clearance and had to wangle it to get it to sit how I wanted, but it does look cool, shame I cannot get a chrome chain, I rang Azuza down the road, as they still make all the chains and they do not do chrome anymore, so this will just have to work until I find something else.

The rear shocks I fitted look great, these were an Original set of FOX shocks that were made for a CB750 back in 1973 and still have the recipts for them,. I took them apart and chromed the springs and painted the resevoir.

Looks so cool with them on and all period parts too.

.I am still trying to think of other idea’s and wil show you how I am getting on as I develop this machine and will take pictures as I go along.

Hope you lot are all enjoying the ride as I am, although at times it is like shoveling shit uphill.

The Rear sets I had are the italian set up, but I took them apart and got them chromed, as I want them to be a god contrast aginst the Copper flake paint and think this will really brighten the rear up.

I have polished an original Oil cooler Adapter I had kicking about in the Garage at home, I now need to look at what sort of cooler set up to use, as I don’t want to hinder the Yoshimura header pipes at all.

But at least I am making some headway and hope to try and get alot of parts mocked up and then cleaned, buffed and fitted, intime for the shows that are coming up way too fast for my liking. Remember, I have other customers bikes to get built too and all my parts and accessories to send out to you lot.

And you think Santa is busy right now?

Right, back once more, and things are slowly getting sorted out, this kit was really a bunch of crap bodged together, Lucky for me, chris managed to work out a few of the problems, without out his help, i would be up shit creek, I would of not only lost both my paddles, but the boat would of had a hole in it and a Sunami of shite would be fast approaching, so things really are now starting to take shape.

So, the brackets I had for mounting, all of them were not correct, we went and had one water cut and that is now so much better, we put the Supercharger back up on the new plate and things really seemed to pan out.

Now the long arduous task of polishing the brackets etc, trying to work out how to make the Belt tension-er as mine is missing, as well as making sure a cable will fit on the Bakalite slide thats inside the Supercharger, a lot to do, and if I have time, maybe some NOS, just to give it that added PUNCH.

If you buy an old kit off the internet, make sure it is for that bike, as mine had more wrong parts than an EDSEL.

This will save so much time in the long run and I will not go this route at all ever again.

Be easier to rig a New TURBO up to be honest and there you go, but time is ticking and now things have to start to change gear and get things to fit and hopefully make this look really like a mechanical Bull on Steroids.

To add to the spark, I have used a vintage ARD magneto, i had about 6 of them a while back and have kept 3 of the better ones, this will really give the spark something to be happy about and no need for Coils with a magneto etc.

Plus it will give the Status Quo to the engine, with 2 Belt driven units sitting opposite each other.

This will look so mad when you see it in person, I am sure you will be head scratching for a while.?

So, tomorrow I have some polishing to do as well   and try and work out the guts of the Supercharger and make a tensioner for the belts, then once all done, add the polished parts and start to hook this beast back together, then add some cool H-T leads for the spark Plugs, and then i can start to do other things like maybe add some NOS with a bottle on the side, that should turn a few noggings eh?

So, keep watching as my KOPPA KAFE starts to transform into something unique and entertaining.

This has been quite a toughie project as many of the Supercharger parts did not fit, or, had the incorrect parts anyway, so I had to try and find stuff and lucky for me I did.

Anyway, time has gone on a little bit but, I am burning the candle at both ends, as for 2 days I had a stomach infection and was puking more chunks than a Pumpkin Smasher.

I am now fitting everything else up and today I made the front fender fit and sat that on the bike for final fit and am happy with it, the bobbed fender I sell looks great on the Koppa Kafe and I am sure you will like it too?

I made up braided hose Brake lines and then polished the master Cylinder, as the stock look  was black, but had faded over the years, and i wanted all the Grey off and down to the Aluminum and it came out nice, and, not to get the paint work buggered, I fitted a new Master cylinder repair kit.

I wired the bike up about 50% today and still need to shorten all the wirtes in the switches and on the harness , so it will fit in the 1930’s Hot Rod headlight shell, a trying and cumbersome time of which i am sure you have all sweated about, and I am too.

I buffed the side covers and fitted them and they look as sharp as a tack, and am pleased at the outcome, Just hope i can get the tank to look cool as that was heaps of work to get the correct style and look.

I also made my own Speedo face and this time I am not running a tach, just a single Speedometer on the tree and am cutting some 1/4 inch 6061 Aluminum by hand for the bracket and then will hand polish it. Should look pretty trick?

I cut the ends off the old oil lines and made a set of braided steel ones up and boy does that tidy up the area?

Also I hooked up the brake system to the Italian rear sets and this is now looking the part.

The bike took me some time to plan out what it was going to resemble and I am stoked it came out how I really wanted it to.

The Gas tank took me some time to really get it how I wanted and I am now glad I kept going.

Some people ask me where the Supercharger came from, and I usually tell them it was from my Mums washing machine.

The KOPPA KAFE was  a bike I had envisioned as a 15 year old kid and now it has become a reality, and just another page in my life of Cafe Racer motorcycle, and hopefully, many more chapters in that book for me to continue writing.

I used a Stock CB750 con rod I had laying about, drilled, bent and welded it, then chrome the thing and boy does it look Swanky on the bike. what ya reckon????

I have used up all my Yoshimura’s and now have New ones being made  to look simular but of course, they are not Yoshi pipes, but my own Brand, called Ton Up performance.

And they turned out superb and just like the original ones with a removable baffle, hand bent pipes with open welds and high temp coated in Black.

koppa6

A fun machine that now resides Down Under.

koppa2

Thanks for looking.

koppa7

1971 NUT BASHER

A Classic set up that looks like it came out of the 1960’s.


I loved the color combination I designed as it has always been somewhere on my builds and wish I had kept this bike.

This bike took some time to get how I wanted but it sure looked swell when it was finally completed that’s for sure.

What do you think????


The F- BOMB

This is a 1978 Cb750 Super Sport

Well, here we are with another Ton Up machine.

Now available SOLD !!!!!

As you can see, I  am actually making good headway with this now.

I have rising Sun Gauges too, as well as an instrument light and ignition relocation bracket assembly.

Here is what I have done to this bike.

  • Painted rims and new tube and tires.
  • New chain and sprockets.
  • Custom sprocket cover.
  • Drilled rotor in rear.
  • Drilled twin rotors up front.
  • Rebuilt front calipers with new pads.
  • Braided hose brake lines.
  • Polished master cylinder.
  • Clubman bars.
  • New grips.
  • New levers.
  • New clutch, throttle and speedo cables.
  • Custom rising sun guages.
  • My Yoshimura style 4 into 1 exhaust.
  • Pod filters.
  • Custom starter cover.
  • New non maintenance battery and tender fitted.
  • Custom gas tank.
  • Custom seat.
  • Custom tail light.
  • New turn signals.
  • Polished tappet covers.
  • Allen head stainless bolts through out.

The Motor is a wrinkle finish and has a cool oil pressure gauge set up.

The clutch cover is a custom piece of my own too.

As well as the Starter cover too.

Many cool parts for the price to be honest, but I am moving to a bigger shop and will be selling some of my own stuff to help the move.

The seat is one of mine that is now upholstered and has the old style racing snaps on the seat to give it that Cafe look and, its really comfortable too.

This bike Does not have a title yet and if I did get one that would be an extra $700 and right now i am selling as is with no title but a bill of sale.

The bike is cheap is it has many many cool New parts on it and I am sure someone is gonna have a blast with this machine.

The exhaust barks like a dig and I am happy with this set up.

The tank is an od one of mine but it does the job and it has knee inserts as well as a stainles gas cap and a Brand new petcock and fuel lines etc.

I drilled the Rotors myself and they work well as the brakes are all rebuilt with NOS parts too.

The bike will be available for $3999

And it is a cool looking ride for someone out there.

If you want any more information on this Cafe Racer.

714-598-8392 for more details.