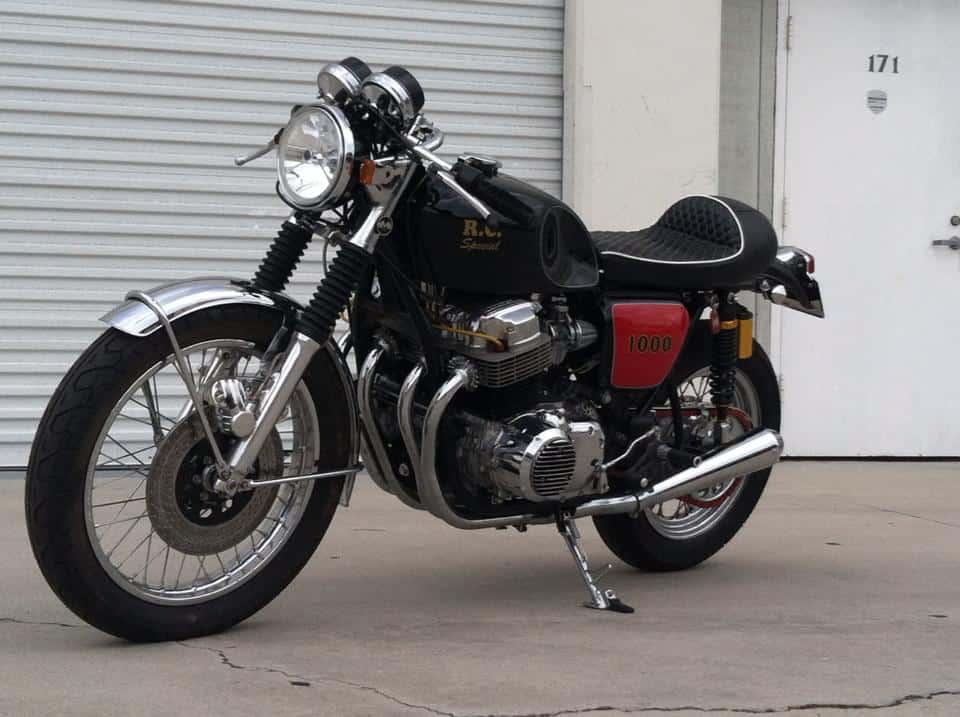
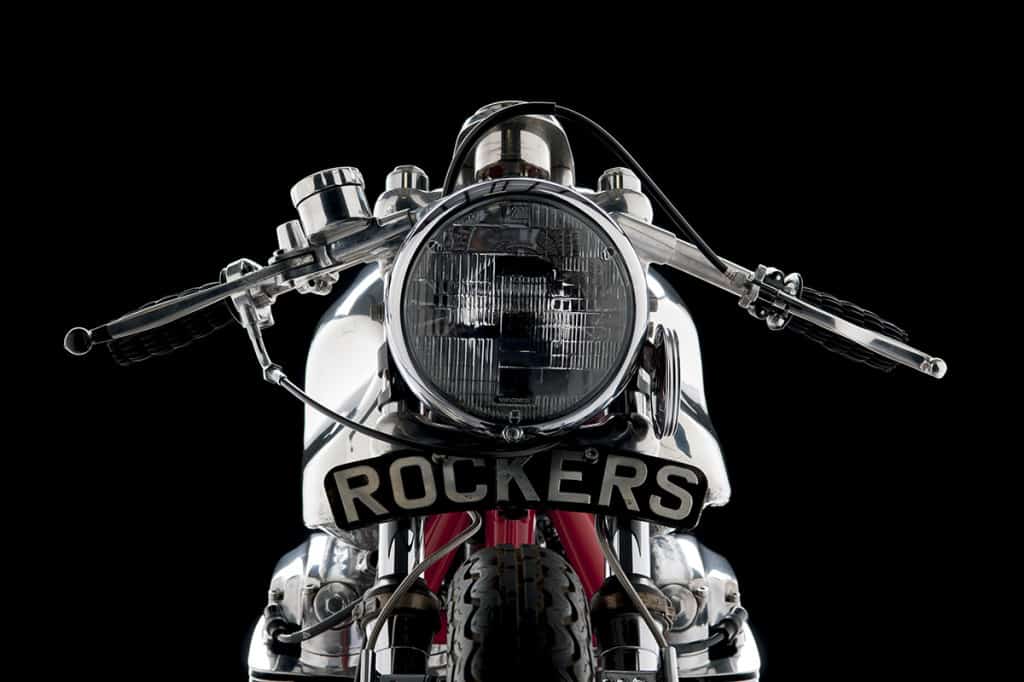
CAFE RACER 1970 CB1000 RUSS COLLINS SPECIAL

This is the Old Russ Collins Bike I created from parts.

Below is a Video but hard to hear as the old Powder coating shop behind us is loud as hell, but it was a tight motor and loved to ride it, hard to hear but this is the only video I have of it.

This machine was just a frame sat in the garage at home and boxes of old parts, and I wasn’t sure how i was going to go about this build but, as I had a russ collins Magneto I thought, what the heck I will be a traditional Cafe bike for fun.

This bike has so much work but for me it is fun and I enjoy every bike I create, sure, people say why not restore but heck, its not a sand-cast and plenty of these later K models around, I had a bucket load of parts and wanted to put something together and here it is at long last.

I started with a stock 1970 KO frame that had been sitting for many years in the back yard with 15 other CB750 Honda’s that I had acquired from an old guy out in the desert some years ago.


Then I started to get a few parts together and the light bulb came on and that was it, lets build a great looking Caff bike with a 1000cc Russ Collins Motor, what a Hot Rod that would be.

Motor was really good and came out of a running bike, compression was 185 all the way through so no point on a full rebuild, just a freshen up on gaskets and get her running.


New Chrome rims and used stainless spokes to Polished hubs I did, along with the frame being powder coated, the swing arm was too, New bridgestone Spitfires give the bike a more traditional look and really hold the road well.

Original 1970’s finned speed equip covers adorn this motorcycle and gives it the unique richness that shines from afar, I chromed the cases this time andwent throught the Whole bike with Allen headed stainless bolts.

I machined a Custom Finned Engine Bracket up to flow with the rest of the finned speed equipment that is on this bike..

This has an Original never used and out of the BOX, Paul Dunstall header set up from 1974 and this is the genuine article too. I have the trick Tri-Bar set up at the front to show you which way you are heading. Brand New OEM Fender, and I polished the fork lowers, fitted new uppers and resealed, also added the old school OEM Ribbed Gators too.

CI made my own seat, of which I made a mold from an old steel seat and then fitted the steel plates to allow for the stock Hinges to be used, then refoamed and Diamond stitched the seat for the old cafe racer look with the proverbial hump on the back, but also I made a Bobbed rear fender and fitted a old style Lucas Tail light, all of which I sell on my website www.carpyscaferacers.com and have sold many too.

I hammered and painted the tank- New side covers and new paint and has the 1000 logo on the side covers to show them what she really is. I loved the whole concept and with New petcock and Gas cap, this really looks factory to many, until they see the numbers on the side cover.

I used a set of TEC rear piggy back shocks that are 14 inches eye to eye and the rear tire is a Bridgestone Spitfire 130/90 to give it that beefy look and handles so well.

Oh yes, it has a Brand New Guilerri style diamond stitched seat base and that is a new base and foam too and I believe enhances the look of this machine.

Also- Lots of polished Aluminum, like the valve cover and caps, the clutch cover and stator and gear shift cover too.  With Braided oil hoses as well. I even chromed the kick stand, but look at the front Rotor, I drilled that, rebuilt the Caliper and polished that to a Chrome look and the front rim is new with stainless spokes and a bigger front tire to fill that fender out nicely.

Brand New Non maintenance  battery, Solid state rectifier, makes sure this fires up and of course with the original RC Magneto, this has so much spark, I fitted iridium spark plugs too. You will also notice that I made New oil Lines from Braided steel hose and Drilled and chromed Kick starter for a Custom look.

You want detail? Well she has loads of it, just check out the kick starter I drilled and re-chromed and the clutch cover set up. As well as the Italian Tarrozi rear sets added for a real comfortable ride as these set your feet back about 7 inches from the stock position and perfect for the Clubman handlebars up front.

New cables help this puppy along and I rebuilt the Carbs, bench synchronized them and then once running synchronized with a Mercury stick and it purrs now.

I have hours and hours and hours into this machine, I even chromed the kick stand as it looked to dull before.

Oh yeah- Do you like my Oil tank Dip stick? I machined this from a solid piece of 6061 T6 Aluminum to dress the cap up as thats always missed on builds so wanted to cover all the bases.

This is a really cool head turning machine, as where ever you loom there is cool stuff. like polished rear brake hub, with new brake shoes and actuator. Yes new brake shoes as well.

Yes, these New tires, on the back there is what I use most of the time, the Bridgestone 130x90x16 and at the front I use a 110x90x19. Custom RED X-Ring Chain, flows with the red on the gas tank and side covers etc and this bike sits so well, them Original Dunstall exhausts are a real piece of History as they were still in the original box when I had them as they were sat in my loft for many years.

Such a period looking Caff from back home and I remember as a kid, and I am glad that I went this route, its truly a fun machine and with 1000cc it does not hang about and is really Torquey.

I love the way the bike sits, it is a good, tough looking machine and with Brand new wire harness and handlebar switches, this is reliable as hell, I am very proud of this machine and it styling.

It has a New rear brake rod, spring and adjuster to make sure this thing stops at the rear, and a New 530 Chain and new sprockets 48 rear,17 tooth front.

The RC Special is a one off and I loved doing the build, I also made up stainless braided Brake hoses for the front brake and added a 14mm Master cylinder too.

The front brake caliper is rebuilt and polished to a chrome finish and I fitted a Brand New $400 genuine HONDA front fender.

To help this bad boy stop at the front end, I fitted a New BREMBO master cylinder to the Clubman bars.

Other col parts that you will notice, unlike many others out there is that I have used genuine NOS handlebar controls, over $220 each side.

The carbs are all rebuilt with new throttle cables and custom air filters.

The New headlight has a New bucket and insides too. And a 65 watt halogen Bulb to make sure you are seen on the road at night.

This has a cool display set up with the ignition relocated at the top of the tree, I wanted to move the ignition switch away from the motor as these get hot.

Also I polished the top triple tree to look like chrome, the steering has all new bearings and brand new chrome Honda steering Nut and washer.

All the bolts are Stainless Allen heads and this has had so many hours of work done to it. A new Clutch cable and Custom Adjuster.

This is clean and under the seat will be a brand new battery, the frame is powder coated and you can see how great she looks from these photo’s.

This has a new solid State rectifier and a battery tender too.

Also the shocks are brand new TEC models and I made custom lowers to lift the rear end a little higher by 50mm.

The bike just is cool to look at and with a RC1000 Motor it really does turn heads FAST!

This has Original New Old stock Superior Waffle GT grips from 1974 and were still in Original packaging on the shelf for years and years.

I may put some more little touches to her before someone buys her but I do hope it does get a great home.

Thanks for looking at this machine, it has now gone to a New owner and sure hope they ride the hell out of it,

I doubt I will locate another Russ Collins Built Motor any more and so glad I happened across the engine over 10 years ago,

2 of my Classic machines that I have built from just old bits and pieces that were literally in the garage and all in boxes or on shelves, love what I do and hope you do too, thanks so much for looking. If you want a bike built, serviced or just parts, drop me a line carpy@carpyscaferacers.com or you can call or even text me on 714-598-8392 as I am always happy to help, been building over 17 years here in California.

CB550 HONDA BROWN BOMBER BRAT BIKE

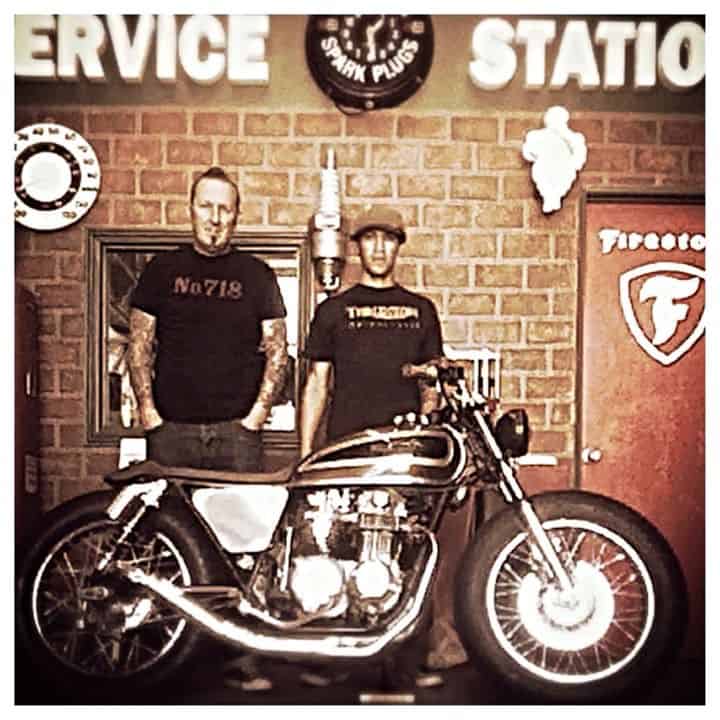
Sometimes I forget to take photos when I am working on something, then a little later on down the line, I end up kicking myself as somebody usually comes into my place or calls or even emails me and asks if I have built a Honda CB500 or CB550 Brat Bike.

4

I did take a few photos of this ride but not enough and to be honest it was a Bike I picked up locally not three miles from the house, a guy had had it for many years as he used to use it to go to college as a cheap means of transport.

2

10 years after he completed College, life in general took over and had no time for the little inline Four Honda and it sat at the way side of the house under a tarp and then a few years later it was put in the corner of the garage.

1

I bought it and even though the bike was a sad state of affairs, it would be a fun little project that I could have a little bit of artistic sculpturing on and see where it ends up.

5

I used one of my Special Stainless Steel 4 into 1 systems and boy did this thing Bark like a scolded dog, this really did turn heads and in a good way, such a perfect breathing motor.

25

The seat was made from 20 Gauge steel and then we welded about 5 inches of old rear fender to the seat base and I thought it would look cool if it were all upholstered.

13

Removed the forks, took apart and then machines some cool fins in the lower legs, then magnafluxed to make sure all was safe and it sure was, New upper tubes fitted and rebuilt.

12

The bike sat so well, and when you jumped on this bike, it would go as hard as you wanted it to go with out any question, it really breathed so well you would be so surprised when you opened the throttle, the little CB550 felt like a 750.

14

The wheels were all new and used stainless steel spokes and polished the hubs, then shod both of them with Coker Diamond treaded tires that fills the bike out very well indeed.

15

Should of kept this little Ripper as it would suprse any motorcycle at the traffic lights yet it was great on gas, the Carbs were set up on a Mercury stick and loved the gas I used.

18

Hand made 7/8 Brat/Tracker Bars of mine that I chromed, help steer this Bar Hopper in the right direction. used Metalflake grips and 2 inch Bar Risers.

19


One piece of steel and a rear fender shortened and welded to it, then covered in Foam and upholstered over, came out so well and stoked that I wet this route on the bike.

20

Old carbs rebuilt, Dipped and re-jetted and then synchronized to make sure it ran even and smooth under load and boy did it handle well, fitted new cables too.

21

Rebuilt the forks but machined these fins and then polished to a super high Luster you would think they were chromed and these last a long time until you need to polish once more.

24

New Fork top Rubber fitted and New Rims were laced to the Polished Hubs, not a show bike but New parts in the right places.

22

New Brake shoes and Polished hub with New shocks, sorts the rear end out and it handled so well too.

23

Old speed Boat headlight I used with a Toggle switch ontop to illuminate it, I think it suited this machine very well indeed.

25

A great bike that was super fun to create and ride, the guy that bought it was a New marine and rode it to Pendleton with no worries all the time, great testament to a cool machine.

26

Kota taking the Brat for a little run and loved it, Dakota Made the seat and he loved this mean machine.

27

Hope I see this bike again one day as its one of them that you wished you had kept, thanks for reading about this little Honda, it was a Giant Killing machine.


CB750 Creation ” The BRATSTER”

Over the years I have built a number of inline Four machines as you may well know, I have always liked these Motorcycles because I used them as a Courier Bike back in the UK, they were Affordable and reliable and lastly they were an awesome Platform to be able to adapt to how you wanted the machine to look.

1

Beauty is indeed in the eyes of the beholder, but with this bike when I first picked it up, it was in a bad way and needed help, but, trying to change something on a shoe string budget is some times almost impossible, so when I pushed this bike onto the Concrete and saw the potential, well I had to at least give a go eh.?

2

This old Girl was a 1974 CB750 and many many Moons ago it was Created to be a Land Speed Racer, I have a little or know information on if it ran, where it ran or what speeds, it was very poorly made and to be honest, too Bloody dangerous for me to sling my leg over and have a go up on the dry lakes for any record.

6

It had no title and was leaking oil and looking very sorry for itself when I parked this 500 pounder up, but once I had made a Brew, sat back and thought for a bit, I knew I could at least resurrect this CB750K Model in to some sort of head turner.

9

So, with pen and paper in hand I jotted down a few ideas and came up with the idea of building a fun little Brat style Bike that would have a Chunky look and feel but real fun to ride.

7

After a day of Mulling around , I decided that I would get the Motor running first and if that runs I will then go from there as this may take some time as it was not a commission for a build but a cry of help as I bought a few bikes off a buddy who needed space in his Garage, so this would be an on going bike and Not at all a show bike, just a tough Motorcycle that would probably suprise a few motorcycles at the lights as it buggered off into the sun set whilst you are watching it disappear into the distance..

8

The bike had a terrible set of gas tanks made from old alloy Cylinders that were Bolted to some old Nuts that were welded to the frame, there were parts hanging off that shouldn’t even be on there, so I decided that this would be a Brat style and I am going to change oil and plugs, add some coils and Battery and rebuild a set Carbs to see what we have hear, as there are no carburetors on this bike at all. So off I went in search of some carbs, and took an old blocked up set I had as spares apart, cleaned, re-jeted and fitted to the old Dry lakes Bike.


Below I have fitted Carbs and a exhaust to see how she runs and it is now tuned and am happy about the sound and crisp response that my 4 into 1 systems make.

My ears were ringing and actually Blew the Sub-woofer out in the workshop because the bass not was so strong, but a minor price to pay to now know this motor runs hard and true.

20e

So, as the rear end of the bike was missing, I thought I would massage one of my rear Hoops I make onto this frame and create a Brat style bike that will be so much fun to ride around on.

20h

An easy job and looks great, so I can later make a Flat seat with New Foam and Diamond stitching to give it that Brat look that is so popular right now over here.

10

The old 16 inch rim had a massive sprocket, I think 170 or 200 teeth, erm, not for the street for sure , else it would wheelie everywhere ha ha, so removed the rims and rebuilt a new set but Polished the Hubs from this bike and laced with stainless spokes.

19

Now that looks a lot better and now ready for the Rubber to go onto the outside, this time I thought I would spare no expense on the tires as they are an important part to make sure these keep you on the tarmac, so opted for a Set Of Cokers Tires and I am going to make a Diamond stitched seat later so wanted tires to match in a way.

20d

I also removed the forks, rebuilt and fitted New upper tubes, as well as Rebuild brake caliper and refurbishing the old rusty brake rotor too.

20a

A lot cleaner that it was when it first limped into my hands and am real happy at the way this is coming along, as I said, no show bike so not removing the motor and painting a frame, this will be a fun bike with a few new parts or refurbished ones at the very least.

112

Above, I repainted the Motor and detailed it with Stainless steel Allen bolts and I wanted wrinkle paint this time to help dissipate the heat when riding.

99

Getting there, Rebuilt Carbs, new boots and a cool Aluminum Airbox made this Motor breath and respond so well, its the devil in the detail or carboration that wins the race.

20ab

Now the job of fitting Headers and so many choices from the styles that I have created for these 500 pounder machines, but the bike is taking shape now and I really like the way it is going.

20aa

The Motor looks great, I also added a cool Oil tank with a Battery Box already inside it, so this will really look trick and can hide some of the electrical in it too and clean the frame up some more.

26

I wanted to use my Newest design exhaust system, the Side Winder, this breathes like a New Nose and wanted to also Hot Rod it out by wrapping the headers in Titanium Heat wrap, it sure came out well and this will look great perched in front of that inline four engine.

27

Now, that is a lot better and glad that I went this route, I have sold lots of this heat wrap and this is the first time that I have used it and as its Titanium it doesn’t fall apart like that cheap fiberglass stuff thats out there does.

28

On the Arse end of the header I wanted to fit my New Sidewinder tail pipe with the Yoshi style Baffle, and boy does it look great and super stoked that I did go in this direction.

24

Next up I need to make a seat pan to cover the Battery tray and oil tank up and will go simple with some 18 Gage steel and then will add foam and upholster in a Light Tan Naugahyde material with Diamond stitching.

25

Simplicity is the name of the game for this machine and I am now cutting the foam to fit the seat pan that I just made, this is almost there, maybe another half an inch of foam then upholster.

22

I am now happy with the thickness of the Foam and am looking forward to seeing this with a Light Tan seat ontop of the frame, I feel it will be a good contrast. so lets go and see.

53

Way better now, I also added a Blue frame to go with the old 1970’s painted gas tank i found and think its a good combination for this creation, it is a tough machine for sure.

49

The Brat sits well and with the Custom Oil tank that I now offer on the website, it runs well and uncluttered like man I see.

Added some NEW Handle Bar switches to make sure that all works well and stays like that, no faded grey crap like you see on so many on the internet these days.

37

My Custom made license plate frame with Hot Rod stop tail light assembly looks great and another thing I produce and sell on the website.

Tail light tells you when you need to stop too, neat eh?

81

This bike runs hard and strong and was so good to see it back up and running again, after years and years of neglect, if she had a face she would be smiling, that I am certain of.

52

The Bike also has my Own Handlebars that I designed and had mandrel bent and chromed, and gives that bike that Period look of the day, it sits well and rides so comfortably too.

59

A strong machine and this has already been sold to a customer and is now residing in Canada, my fruits of labor paid off and the new owner is super stoked to get this bike from me.

90

My Bulldog Bailey standing guard as I get some snaps, before it heads of to Maple Country.

82

Hope you liked this little resurrection? I sure had fun creating this Motorcycle and Glad somebody is enjoying it right now.

96

Added a Fog light for that European look and something the New owner is going to need up there in Canada, so just another cool touch to show this motorcycle Bratster off a little more.

DSC_0056

A tough little Machine with plenty of swag, and I am sure that it will get many looks in the warmer months.

110

Big transformation and I did more work than I thought I would do and sold it way too cheaply but hey, its all fun at the end of the day and I enjoyed creating this bike.

DSC_0005

If you want a Motorcycle created, or just parts etc, drop me a line carpy@carpyscaferacers.com I am always glad to help or just advise, and you can also call or text me with questions on 714-598-8392 and I will do my very best at helping you with your own creation.

DSC_0030

Thanks for reading my Blog on building this machine , and many others I have created and still continue to.

DSC_0040


I fitted 2.5 Analog gauges and also made a Neutral light that is fitted into the steering stem nut, plus New master cylinder, New levers cables and Grips.

DSC_0020

Another thing I did was add my headlight ears that I sell on here as well as the cool headlight with the internal LED Turn Signals, as that cleans the front end up, I fitted my Fork Brace too to stiffen the frnt end as I removed the fender, many dont do this and have floppy forks.

DSC_0049

The heat Wrap I now sell on the website too, in Black or Tan, both look great and clean up your old headers to revamp them, 50 feet is enough for your headers and I used two inch wrap.

DSC_0042

Thanks again and another Build leaves my place and I am now looking at another creation, appreciate all the cool comments whilst i was building this, have a great week.

DSC_0071


The Rice Boiler – 1974 Honda CB750K

OK, for a long time I had been planning this build and now it is here and I am so stoked the way that the machine turned out.

I used a snotty old bike to create this head spinning machine and had already built it in my mind hundreds of time, so thus was really a piece of cake for me.

I had an old set of Henry Abe 7 Star rims back in the UK, these are at least 3 decades old and had them sent over the water from back home and wanted to take them apart and fit new front and rear bearings, as well as paint the stars and polish the outers.

Once I chose New rubber for it ( Bridgestones ) I then made sure I had the rear brake set up drilled and polished, as I want the bike to stand out in many places.

I had a S.S. tank and cut all the top flap out and welded that in with a flat plate, then fitted a Stainless Steel polished Monza style racing Gas cap in it.

I then used one of opur own designed “Razorback” seat bases, As I really do love the lines of thaat seat base and knew this would really flow and give that yesteryear look.

I bead blasted the old frame and then powder coated a high gloss full flow Black on it and love the look, almost an enamel look to it and very inert to many fuels and substances.

If you look, you can see our New battery boxes we now make and offer on our website, this is the ww2 style battery box made from 6061 Aluminum and has cool rivets in.


I removed the old Oil tank and we washed that about 7 times and then cleaned out with some simple green, then stripped the paint, had it copper-ed, then chromed and buffed. you can see i was also setting up the rear sets and polished the brackets to give a Chrome finish.

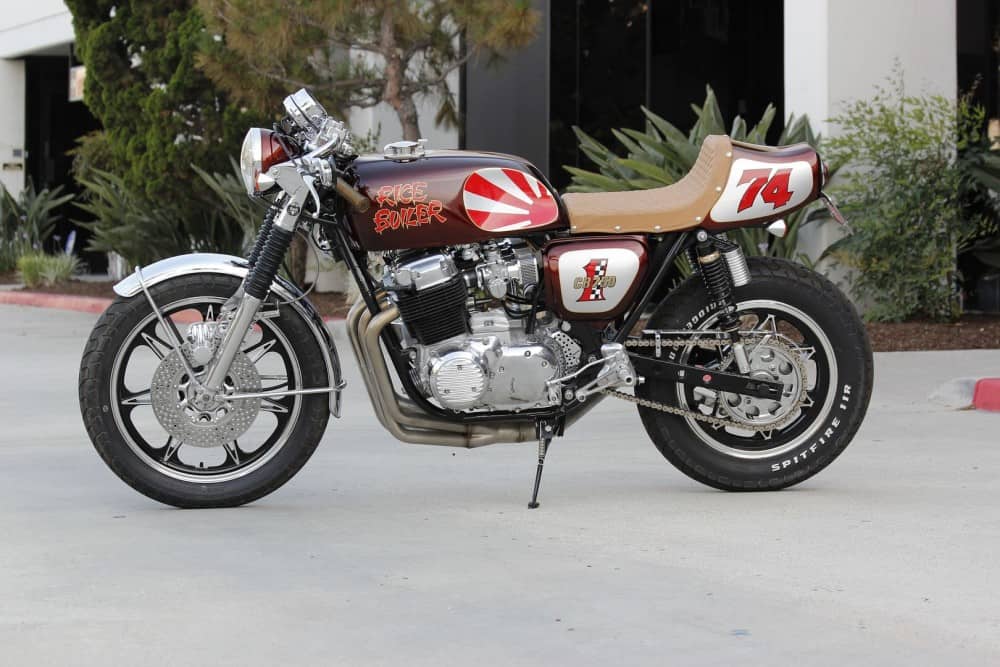
I designed this color scheme by drawing this out on graph paper and used water colors and came out with this design, the reason that I came out to this conclusion is simple.   My old man always ran down anything to do with Japanese machines, and as I was a teenager in the 1970’s,  Japanese bikes were predominant in all parts of the globe and the old man just looked down on them and called them “Rice Boilers” 

So That’s why I named this bike “Rice Boiler”

She was fun to build and I am so stoked at the reaction it gets from people when they first see the bike.

I had a few people just stand there and just keep looking at it, as this bike did not start off like this.


I really enjoy the putting everything together part as you see such a transformation.


The Racing number 74 is really just the year of the bike but I wanted this to remind me of days gone passed when I used to hitch hike to Clubman Racing at Snetterton track and getting a lift on one of these bikes.

There are so many things that I have done to this bike, I should of named it the Magician as it is loaded with tricks. the lower forks are polished to a Chrome finish and all rebuilt, etc., and we hand-drill these rotors at the shop, then surface grind and polish them, looks cool eh?

I hand-hammered the gas tank as I do on all my bikes and wanted to use the Rising Sun as the filler, and boy does it pop!

The finned covers are early 70’s ones I have kept for this particular bike build, I must of had them 12 yeas in my tool box and so glad i got to get them on the Motor .

The red is very bold and I chose an Aztec style gold for the pin line, the whole paint scheme was completed using House of Kolor and I chose a Candy Rootbeer Brown as that was a cool Candy Color that Honda had back in 1971 and wanted to try and get that old School feel to it.

I actually incorporated  the neutral light into the head stock nut and think that it will be a cool addition to this ride and make use of the new lights we sell.

New Old Stock handlebar controls were a must, we used one of our polished throttle embellishers and some very cool flake handlebar grips, as well as new alloy levers, etc.

You can see how many brand new or rechromed parts I have fitted to this machine, by just glancing at the photos on this page.

The Ggold flake on the grips really do make the colors blend with the gold of the bike and the shocks.

I wanted to have the race number on there, as well as incorporate the year of manufacture, and it came out really well.

 I fitted new old stock fork ears and made our front fork badges t0 fit the sides where the original ugly reflectors sat and it cheered the machine up.

Yes- that is our very own Boxed Swingarm that we drilled and powder coated and really does suit this machine well, as well as helps the cornering as it stops all the rear end stepping out, this is a copy of my Original Dresda swingarm.

Our Stainless Steel Yoshimura-style 4-into-1 exhaust is a very cool sounding and looking set up and is a must with the style of machine that I create, by does it hang well.

You can see the work it took to make the tank look great, also the GPS speedometer is a cool look, but the bracket and the bucket we had to make and polish, it all worked out fine in the end and even though this was not a cheap option, I think its the cherry on the cake.

The headlight is from an old Desoto truck and then changed a little, it looks great with the Candy Rootbeer brown on it and the bezel was re-chromed.

Pretty Much everything is new on the build and am so happy to have gotten this machine done to the way I originally imagined, it screams out to you that this is an old cafe racer from back in the 70’s and I hope you like looking at her!

I tend to use Bridgestones as my personal choice of rubber on the rims I use, as I have always had them and stuck with what I know.

I spent a lot of time getting this bike right and many, many hours taking things off that didn’t work that you will never see, but thats how it goes with bike building and at the end of the day I have a really cool looking classic that is bound to turn a head or two.

I took the old broken and cracked fins off the original oil filter housing and machined and polished it and this is how she comes out. I do this to a lot of my creations, it adds a unique look.

Fitted our Finned Aluminum Ton Up Stabilizer Bar and the whole rear end is new, Brake Spring, Rod and Adjuster, no expense spared on this build.

A fun machine that is something that was made from old snot, rust and cold steel, also so nice to be able to recycle this and get it changed into another form.

I have already had a lot of interest in this machine and will let it go for the right price – this is a unique motorcycle with many, many new parts and one off pieces.

Within two days of finishing this motorcycle, I got it featured in Japan’s Lightning magazine, what a honor that was.

This bike did take a long while to complete, but I changed quite a few things on this until I was happy with the end result. Sometimes that is what happens with custom bike builds- I like this, and some of you may not. But to me, this is a cool machine that just screams out the bikes of the 70’s when I was a teenager in the United Kingdom.


I drilled the brake hub, the rotor and (of course) the front sprocket cover, as that’s my signature style I like to do, but I also had a very cool license plate frame that I have had for donkey’s years and was so stoked to have the opportunity to use it on this bike.

If this does not say cafe racer, then I don’t know what does – it’s an original piece that I am happy I didn’t discard over the years.

The tank took me some time to hammer and weld, but I wanted to incorporate the Rising Sun in the knee inserts and I am glad I did as it really does add a great concept to the bike.

Quite a few coats of Candy Root Beer brown were applied over the Aztec Gold and the end result is exactly the color that I envisioned.

No stickers, this is all real paint you see and I think you will agree, this really does stand out from many that just have decals.

A good stance for this tarmac eating machine.

I used rear sets which gives the bike a well-balanced feel, as the stock pegs are too far forward.

Our Boxed Swingarm and one off Chromed Chain Guard is a good component that i wanted to use on this bike. the Boxed Swingarm was made at the shop using 2X1 steel and it looks and works really well.

All the cases are hand-polished, the starter is rebuilt and the carbs are like new now. This bike runs smooth as we synchronize them using a Mercury stick.

The carbs have to be right on this machines, if you do not sync them they will pop and backfire, something you don’t want to have happening.

The front brake caliper was stripped and polished and our machined stainless steel piston fitted. We also have new side stands to stop the bikes from laying over too much. The originals had a tendency to bend over time. The DeSoto headlight and cool Chromed Diamond Signals, tell people what is going on in front of them.

Stainless Steel Flip-top Monza-style Gas Cap we sell was used on my tank, as well as our own ‘Ton Up’ Fork Badges.

New cables throughout (throttle, tachometer, speedometer and clutch cables) and new adjuster and stainless bolts all over the machine make this a long lasting ride.

I used a Ford big block connecting rod to use as an exhaust hanger. Once it was the right size and fitting, we chromed it and added this nice custom touch to the build.

I didn’t like the stock oil tank dipstick, so we machined a col finned cap for it and boy does it look trick, we shall be making more now to offer to you lot.

See how that cap makes everything flow that has fins on it, I really am happy how this came out, we used 6061 T6 Aluminum and then polished it.

The bucket below we made from a solid piece of  7075  and it came out so nice, tig welded the base and polished it, the bucket attaches by 3 small Allen head screws that sit at the front of the plate.


I wanted to combine new and old components to clean the top of the steering area up and it does look really tidy and clean now.

This was a fun build and I hope that you liked looking at the good Old ” Rice Boiler ” I can hear my Grumpy old man moaning about it right now!

I have already been featured in Japans’ leading Lifestyle magazine and have just had an Italian magazine come over to shoot it and hopefully a brit mag the month after, so I must be doing something right! Interested parties, please contact us for details.

The Rice Boiler CB750 SOHC

Well, here was a bike that came together just because of my Grumpy Old man when I was a Teenager, and thought that I would share this creation with you all.

My Dad is an Old School sort and, if it wasn’t British, then it wasn’t good enough, and as a kid I had never been able to afford new bikes, my first bought bike was a 1955 Francis Barnet which I turned into a dirt bike, but all I ever heard from my old man if he saw a Japanese Motorcycle was. ” That bloody thing is a “Rice Boiler” And it stuck in my head for all this time.

I don’t really get on with my old man, too strict and a terrible aggressive temper to boot, it was his way or the highway and a boot up the arse for good measure.  I had plenty of parts about and I wanted to really make this creation something that would indeed get plenty of attention and what better title than “The Rice Boiler”

If this was going to get built, then I am going to go all out and both guns frigging blazing, I wanted this 1974 CB750K to really turn some heads where ever it stood and I think I pulled it off?

I had these Alloy Star rims for over 20 years that were simply stuck in the hangers of the garage loft and thought that these would fit the bill, they needed cleaning up, new bearings and then paint and polish, but they are period rims and this was the perfect Motorcycle to fit these too, I also shod them with my favorite Bridgestone Spitfire Tires and like many of my machines, I drill the brake rotors and polish all the Aluminum that I can.

I totally stripped the front and rear Brake calipers, removed the paint and stripped to bare aluminum, vapor honed them and then polished to a chrome finish, machines stainless Pistons and rebuilt the calipers like they were new, and then made sure to add Aircraft grade Braided Brake lines too.

Yes indeed, the Devil is in the Detail and this was no exception, the Sprocket carrier I stripped and polished and Chromed the safety plate, then to really make sure this is a sturdy ride and accepts a wider rear tire, I made a Boxed swing arm, drilled holes in them and inserted steel tubing and welded smooth, so they swing arm looks drilled but its stronger than when it wasn’t by the tubing inside.  I also made the Chain Guard and Chromed that and set the look off with a Nickel “O” Ring 530 Chain.

I have always drilled my brake hubs, for aeration and to get rid of brake dust too, just looks like the old race bikes back in the day when they did the same thing.

Every Bike that I do create, always has an Alcohol filled oil Pressure Gauge, as it gives true Motor pressure reading and looks pretty darn cool hanging out of the side of the Motorcycle.


I had a collection of Original Racecrafter finned speed equipment for a CB750 and thought that it was time they came out of the cupboard draw, got polished and could fit them to the motor, this clutch cover was great and loved eventually using it after being locked away for over 20 years.

This was the old after market Racecrafters finned Points cover with 750 cast in the center, never really see these much, so wanted to fit this to the bike for more eye candy.

Of course, the Stator cover was missing some of that Bling and wanted the finned styling to flow and this original one I had got cleaned up and polished and looks great sat in place on the motor that it was intended for.

Unfortunately nobody made a finned engine mount, so I thought ” feck It” I will design and make my own, and that’s what happened using some 7075 T6 Billet and it came out super cool.

I really wanted to make a statement with this build, so I drilled the front sprocket cover and then polished to a chrome finish to dress that part of the motor up, as many leave that area as its so oily inside.

The Carbs were totally rebuilt and tuned and added a Custom made Dragon Airbox to match the Old Chopper aftermarket versions of the day, we called them bread Boxes and it breathes really well.

Rebuilt engine with Polished Valve cover and even an aftermarket 1974 Finned starter Cover, this Motorcycle looks amazing at any angle that you take a peek at, so many New parts, including stainless Allen head bolts throughout.

I thought to myself, I may as well push the boat out of design etc and made out of solid billet, a Oil Tank Dipstick Finned cap and It came out so nice, glad I went ahead and did that.

The exhaust had to be cool and what better way to get the spent gases out of the cylinder head than by a set of slightly wider Stainless Steel headers and Yoshimura style tail pipe.

For some added Custom touches I cut down a Connecting Rod and use the Big end around the tail pipe as a hanger, then shortened it and triple chromed, it came out great.

Another Custom Touch was I stripped both of the old tired Gauges and gave them a New Lease of Life with my own New faces, these looked sharp as a tach. LOL

The Gas tank was a 1975 CB750F Super Sport Model, I cut the old gas Cap flap out of the top and welded it smooth and then fitted one of my Alloy Monza styled cap, Hammered by hand the knee inserts and smoothed all the body work before getting a buddy to paint it for me with the Rising Sun in the insert.  Many coats of Candy Brandy Root Beer was mixed and applied.

I love using Italian rear sets and these look very cool once I removed the anodizing and polished to a chrome finish, they work so smoothly too, the pegs are folding as well.

This is my hand made seat and I used this cool Custom LED light to keep me safe at night, the License plate frame is an original 1974 After Market one that is the epitome of Café Racers of the day.

I wanted to try something way out of the box, so what I did was used some old used CB750 Connecting rods and chromed them to make wickedly cool wing mirrors and boy, did they turn out swell, many people loved the idea.

I just wanted to really push the proverbial boat out with the Rice Boiler, and I think I did accomplish such a task, it took some time but was worth all the effort to bring something a little different out to the shows.

A serious piece of kit and I had such a Ball creating this bike, all from a pencil drawing inside my skull as a kid and to bring it to fruition was such a fun achievement for me.

I was determined to bring something out of the stable that was all me, all my years of motorcycles and put so many tricks into this that it would be looked at for some time where ever it went.

Where did the headlight come from I hear you ask? Well I wanted to try something different and located an old DeSoto fender light and this turned out to be a winner for me and really suited the bike.

A fine thoroughbred machine that loves to have its legs stretched, and is pure fun to run around anywhere that you choose to take it, so many things to look at too.

I put a lot of Pride and Joy into this, its my creation and love to look at it, it may not be your cup of Tea but hope you can see the work that went into this build.

I used real leather on the seat, soft as hell too and did Diamond Stitching with snaps on the side for quick removal. I actually hand made the side covers too.

Thanks for reading my build page and hope that you found some of the photos I took, interesting. Its my passion and my life to be honest and continue to create Motorcycles and Custom parts.

I am sure my Old Man would still scoff at it but that’s his opinion, I love it and glad that I took on this challenge and saw it through to the very end.

Until next time I guess, have to see what else that I can come up with as I carry one with these fun inline four Honda Motorcycles. Ton Up Everybody !!!


Tenacious Ton – 1975 Honda CB750K Custom Alloy Cafe Racer

 MY ALLOY CB750 CAFE RACER called the “Tenacious Ton”.


 This is a 1975 CB750K Original model that has been customized over 9 years and a fun bike at that, I have a title and she runs and drives.


 I have been in many Magazines all over the globe with this machine and it also went to Sturgis last year for the Ton Up show and had great reviews.


 I am now building other machines and am going to be selling a few of my Personal Motorcycles to make space, this is a cool ride and I know you will get plenty of head snapping reactions.

 This has a One Off 5 Gallon Manx Tank built by an old fella in Ireland that has since passed on, this is one really cool gas tank and it screams out Isle Of man T.T.


There are so Many mods on this I have forgotten how much work I did to this, but have a look and you will see the tank, I made the Alloy seat and it has WW2 material on the seat.

We also have a Lithium battery that powers the 836cc Motor and minimum instruments to be honest, stripped down to the bare bones is cool.


This has Original 1970’s Borrani rims that are hard to locate these days, not aftermarket and these are the real deal, not only that, check out that front end an original Arces of Italy front end, even rarer than Cerriani. And that came off a GP road racer from the UK back in 1978.


I converted this K frame to a Rear Disc set up ad its a super cool design, but also, I used 3 Alloy swing arms to come up with this set up and it works great.


The Oil tank is from 1972 and was on an early Drag bike from Santa Pod back home in the UK and fitted with Goodridge Hoses.


 Original 1973 Finned Engine dress up goodies adorn this machine too. Hand made Chain Guard and old CB1100F shocks at the arse end.

The exhausts are our Dunstall style 4 into 2 and these were the first ones we made.


This bike is a classic, its not a showbike and never wanted it to be, but all the frame is smoothed out and has plenty of life in her.


Polished cases and whats cool is we hand turned the Velocity stacks out of 7075 and then polished and fitted stainless bug screens.


Double disc front set up with an old De-soto headlight up front just looks cool.

So many things done to this bike I have forgotten half of it, but as I said I have the title in my name and can ship if needed using Eagle One trucking.


 It has Marzocchi Clips on’s too with early waffle grips.


A fun machine that would look good anywhere, be it in a studio or in a museum for sure.


Below is fresh off the Press, this book JUST hit the stands and my machine is in there for all to see.


I was super stoked to have my machine at Sturgis for this show and many people commented on it.

Flipping through the pages I was stoked to see quite a few cool photos of the alloy Machine of mine.

If you can understand half my smile, then you know what I am feeling right now.

A truly cool day for me when this came thudding onto the floor from the posty.

This is a unique bike with so much character.

Grab the hardback book if you can as there are superb motorcycles featured in there.


The Arse end is a good shot too.


So another Chapter closes but a new one begins.