My Triumph Thruxton Daily Ride

My 2013 Triumph Thruxton has served me well over the years, compared to my vintage triumph, this is chalk and cheese in the reliability league and the bike has given me many thousands of miles of fun and still does. it has now had 3 different guises since I acquired the bike from Socal Motorcycles and it certainly gets a lot of attention.

I bought the bike but it was the British Racing Green Color scheme, I’m not a fan of green but, stuck it out as long as I could but, saw so many this color, that I had to do a few things to make it into the bike I really want to ride. I first made a Diamond Upholstered seat for it, long before people were doing it and got a lot of compliments, then I set about designing reverse Cone megaphones in Stainless Steel, and that sure did get people looking.

Next up was to remove the swing arm and weld tubes in to make it look like drilled holes, then re-chrome it, soon as I did that, I fitted New Alloy Rims, wide 5.5 rear from Canyon of the TT range and this really filled the swing arm out nicely.  I repainted the gas tank and made side covers as well as the front fairing and the rear cowl, making the seat fold down to allow access to the storage compartment.

The New rims were such a change in handling for this machine, the fatter tire grabbed the tarmac like glue and this was a fun machine to now take out and enjoy .

I loved slinging my leg over this 900 and tear away up the road with a smile on my face, it was now a machine that was starting to get dialed in to how I wanted it, but there was another look I wanted after a while, I mean I also build and design bikes and parts, this is my business card, so always like to change things up and now its on its way to its third livery.

I removed the fairing and was contemplating a different look, so it came to my mind to fit An Alloy Gas tank and side covers, but, I wanted to make an alloy rear cowl for the bike, so with Egg shape Hammer in Hand I set about and made a rear cowl, then frenched a pocket into the rear cowl to alloy for a Vintage light but have a LED insert in that light, old with new.

Loving the look of this and am glad that i went this route, this time I wanted to change the seat padding and went for a soft Tan leather with Diamond Stitching.

Now this sure is comfortable and feels way better than the old one as I simply wore it out with my fat arse sat upon it all the time and this is now comfortable once more.

I now have my Alloy Gas tanl on the bike and sometimes I fit different seats when I make them to check for fitment and this bolted right up with no issues at all.

Right now here she is sat at home and I really do like the way she looks, Classic styling and its a fun machine, this afternoon I shall change out the grips to go with the New leather seat and give the bike a better flow and color coordination. I shall take some pics later in the week to see how they look and feel first.

The front fender I made from an old BSA mudguard and then welded some brackets to the side and the contour is just how I want it too, came out well and love the look of it. if you look at the lower part of the chassis, you see I have my own hand made Bash plate that I made out of Aluminum and then added a Bottle opener, just in case ya stuck when you are out camping.


The Zard pipes sound great and may polish them to get a mirror finish to accentuate the rear cowl that I made as I love how this has turned out as a one off design.

You will also noticed that I wrapped my headers, this was something I wanted to try with an Aircraft application and rather than the old school wrap, I thought that this would look pretty cool as a slip on heat Sock, and sure glad I went this route as these Performance pipes get bloody hot when riding.

I also have a set of Works Performance  piggy back race shocks to soak up the bumps, not cheap but my old shocks I had that were TEC, Blew the Nitros out of them when I was in the Canyons on a few pot holes, so a more expensive and professional set were purchased and I am also a dealer for Works Performance and so glad that I have these now as it is night and day on suspension set up.

I also designed and made the Knuckle Duster Heel guard, and offer that on my website as well, I then blanked off the rear passenger foot peg hangers to tidy that area up a little.

Bike now sits well and I am happy with the look, I will be fitting the grips and will show the pics on here so you can see what they look like.

I went with some Cole Foster grips, looked at many but thought that these would be best to go with my leather seat, and am happy with the choice and are really comfortable too.

Really happy with my choice and my hands will thank me later too.

Sat next to My Hot Rod, the Triumph looks happy in its new set of clothes, looks a different bike too, still a little more I want to do as I go along but, thought that I would share some pics on a Blog and see if you like what I have done.

Here is a list of what is on here.

Motone Alloy Gas Tank

Motone Side Covers

Cole Foster Grips

Custom Clip 1″ on’s

Wide wheel kit from Canyon

Custom Drilled and Chromed Rear Swing Arm

Upsweep Rear Polished Alloy Caliper Bracket

Zard Stainless Steel Exhaust Kit

Titanium Aircraft Heat Shield Sock

Speed merchant Finned Engine Covers

Wave Brake Rotors

Beringer 4 pot Brake Caliper

Hand Made Alloy Mudguard from a BSA

Hand made Seat with Leather Upholstery

LED internal turn signals and 6000 Lumens headlight

4 inch Chromed Fog light

Custom hand Made rear Cowl with LED Rear Light

Works Performance Piggy Back Racer Shock Absorners

Hand made Knuckle Duster Heel Guard

Joker bar End Mirrors

Lithium Ion battery by EarthX

K&N Pod Filters

Fender Elimination kit

Custom Horn

Hand made Alloy bash plate with Bottle Opener

Power Commander

Irridium Spark plugs

LED rear Turn Signals

TEC Front Steering Stabilizer

Custom Machines Foot Pegs

Rear Blank Off Plates On Hangers


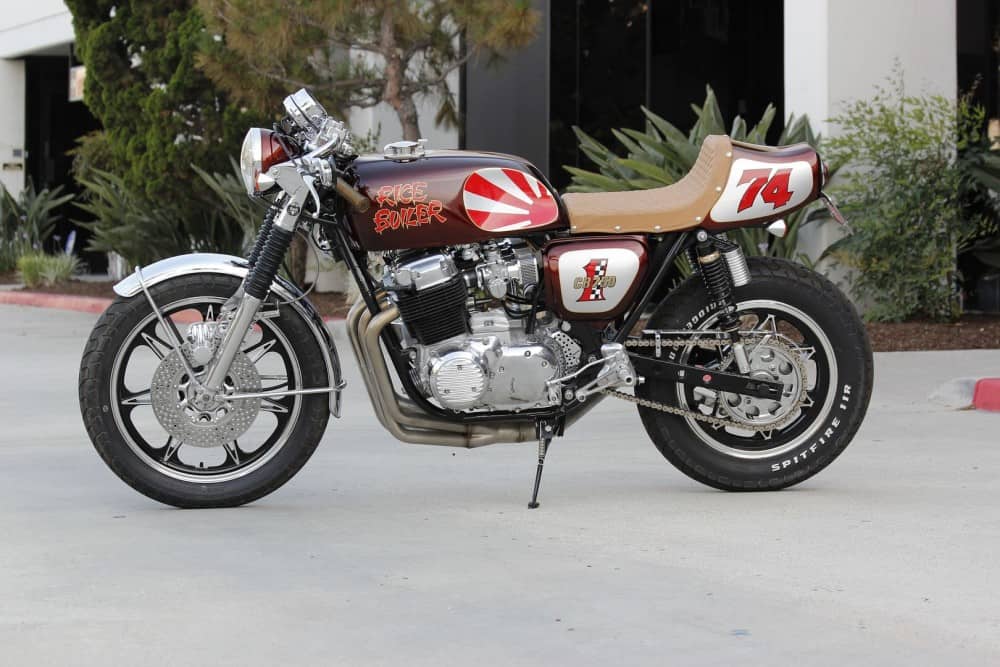
The Rice Boiler CB750 SOHC

Well, here was a bike that came together just because of my Grumpy Old man when I was a Teenager, and thought that I would share this creation with you all.

My Dad is an Old School sort and, if it wasn’t British, then it wasn’t good enough, and as a kid I had never been able to afford new bikes, my first bought bike was a 1955 Francis Barnet which I turned into a dirt bike, but all I ever heard from my old man if he saw a Japanese Motorcycle was. ” That bloody thing is a “Rice Boiler” And it stuck in my head for all this time.

I don’t really get on with my old man, too strict and a terrible aggressive temper to boot, it was his way or the highway and a boot up the arse for good measure.  I had plenty of parts about and I wanted to really make this creation something that would indeed get plenty of attention and what better title than “The Rice Boiler”

If this was going to get built, then I am going to go all out and both guns frigging blazing, I wanted this 1974 CB750K to really turn some heads where ever it stood and I think I pulled it off?

I had these Alloy Star rims for over 20 years that were simply stuck in the hangers of the garage loft and thought that these would fit the bill, they needed cleaning up, new bearings and then paint and polish, but they are period rims and this was the perfect Motorcycle to fit these too, I also shod them with my favorite Bridgestone Spitfire Tires and like many of my machines, I drill the brake rotors and polish all the Aluminum that I can.

I totally stripped the front and rear Brake calipers, removed the paint and stripped to bare aluminum, vapor honed them and then polished to a chrome finish, machines stainless Pistons and rebuilt the calipers like they were new, and then made sure to add Aircraft grade Braided Brake lines too.

Yes indeed, the Devil is in the Detail and this was no exception, the Sprocket carrier I stripped and polished and Chromed the safety plate, then to really make sure this is a sturdy ride and accepts a wider rear tire, I made a Boxed swing arm, drilled holes in them and inserted steel tubing and welded smooth, so they swing arm looks drilled but its stronger than when it wasn’t by the tubing inside.  I also made the Chain Guard and Chromed that and set the look off with a Nickel “O” Ring 530 Chain.

I have always drilled my brake hubs, for aeration and to get rid of brake dust too, just looks like the old race bikes back in the day when they did the same thing.

Every Bike that I do create, always has an Alcohol filled oil Pressure Gauge, as it gives true Motor pressure reading and looks pretty darn cool hanging out of the side of the Motorcycle.


I had a collection of Original Racecrafter finned speed equipment for a CB750 and thought that it was time they came out of the cupboard draw, got polished and could fit them to the motor, this clutch cover was great and loved eventually using it after being locked away for over 20 years.

This was the old after market Racecrafters finned Points cover with 750 cast in the center, never really see these much, so wanted to fit this to the bike for more eye candy.

Of course, the Stator cover was missing some of that Bling and wanted the finned styling to flow and this original one I had got cleaned up and polished and looks great sat in place on the motor that it was intended for.

Unfortunately nobody made a finned engine mount, so I thought ” feck It” I will design and make my own, and that’s what happened using some 7075 T6 Billet and it came out super cool.

I really wanted to make a statement with this build, so I drilled the front sprocket cover and then polished to a chrome finish to dress that part of the motor up, as many leave that area as its so oily inside.

The Carbs were totally rebuilt and tuned and added a Custom made Dragon Airbox to match the Old Chopper aftermarket versions of the day, we called them bread Boxes and it breathes really well.

Rebuilt engine with Polished Valve cover and even an aftermarket 1974 Finned starter Cover, this Motorcycle looks amazing at any angle that you take a peek at, so many New parts, including stainless Allen head bolts throughout.

I thought to myself, I may as well push the boat out of design etc and made out of solid billet, a Oil Tank Dipstick Finned cap and It came out so nice, glad I went ahead and did that.

The exhaust had to be cool and what better way to get the spent gases out of the cylinder head than by a set of slightly wider Stainless Steel headers and Yoshimura style tail pipe.

For some added Custom touches I cut down a Connecting Rod and use the Big end around the tail pipe as a hanger, then shortened it and triple chromed, it came out great.

Another Custom Touch was I stripped both of the old tired Gauges and gave them a New Lease of Life with my own New faces, these looked sharp as a tach. LOL

The Gas tank was a 1975 CB750F Super Sport Model, I cut the old gas Cap flap out of the top and welded it smooth and then fitted one of my Alloy Monza styled cap, Hammered by hand the knee inserts and smoothed all the body work before getting a buddy to paint it for me with the Rising Sun in the insert.  Many coats of Candy Brandy Root Beer was mixed and applied.

I love using Italian rear sets and these look very cool once I removed the anodizing and polished to a chrome finish, they work so smoothly too, the pegs are folding as well.

This is my hand made seat and I used this cool Custom LED light to keep me safe at night, the License plate frame is an original 1974 After Market one that is the epitome of Café Racers of the day.

I wanted to try something way out of the box, so what I did was used some old used CB750 Connecting rods and chromed them to make wickedly cool wing mirrors and boy, did they turn out swell, many people loved the idea.

I just wanted to really push the proverbial boat out with the Rice Boiler, and I think I did accomplish such a task, it took some time but was worth all the effort to bring something a little different out to the shows.

A serious piece of kit and I had such a Ball creating this bike, all from a pencil drawing inside my skull as a kid and to bring it to fruition was such a fun achievement for me.

I was determined to bring something out of the stable that was all me, all my years of motorcycles and put so many tricks into this that it would be looked at for some time where ever it went.

Where did the headlight come from I hear you ask? Well I wanted to try something different and located an old DeSoto fender light and this turned out to be a winner for me and really suited the bike.

A fine thoroughbred machine that loves to have its legs stretched, and is pure fun to run around anywhere that you choose to take it, so many things to look at too.

I put a lot of Pride and Joy into this, its my creation and love to look at it, it may not be your cup of Tea but hope you can see the work that went into this build.

I used real leather on the seat, soft as hell too and did Diamond Stitching with snaps on the side for quick removal. I actually hand made the side covers too.

Thanks for reading my build page and hope that you found some of the photos I took, interesting. Its my passion and my life to be honest and continue to create Motorcycles and Custom parts.

I am sure my Old Man would still scoff at it but that’s his opinion, I love it and glad that I took on this challenge and saw it through to the very end.

Until next time I guess, have to see what else that I can come up with as I carry one with these fun inline four Honda Motorcycles. Ton Up Everybody !!!