Weekend is here already, working on a New braided brake line set up, and a Custom Headlight Assembly.

Well, Saturday soon came around, I have been pretty busy as of late at the shop here in La Mirada, it is always a busy time of year as many people need pars for their bikes and I help all that I can to make sure they can complete their Motorcycle in time for some great riding.

Now, I am bringing out many more new products that will be available for you to use on your machines and I do all the prototype work to make sure it not only fits easier, but that it performs better than what you have right now.

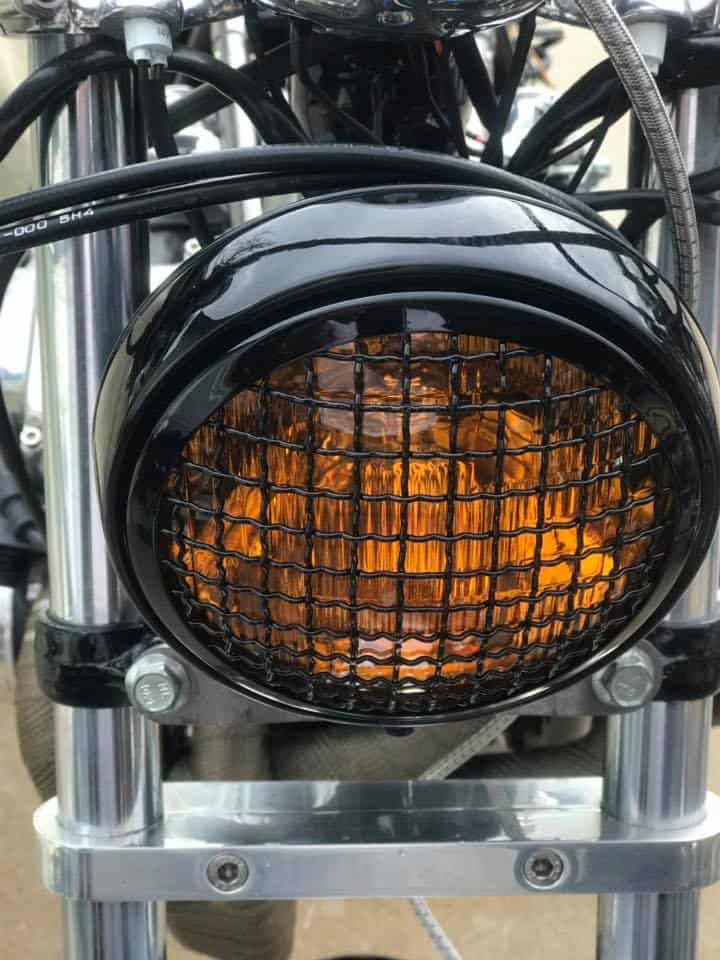
The 2 parts I want to feature today are my Custom European headlight, which is a really Custom look and comes with a Stone guard and a Yellow Lens, to get you noticed.

So right now, today I have been working on a Project motorcycle, a CB750 F Super Sport and the stock brake line set up just wasn’t cutting it, so I removed that and used my brand new Braided hose stainless brake line that has Stainless Steel adapters and is so easy to fit to your machine too.

So, above you can see the Braided hose, this is Top Quality all the way, even the Formula One Race cars you see use this brand of hose, so you know these are a great deal.


These Braided hoses will fit the CB750K and the CB750f but- this is for removing your front brake switch, I dont like them and remove them from the triple tree and fit a single one piece brake hose, and this will give you 40% more braking and so easy to fit too, but- if you want to have your brake switch, I offer a 2 piece brake line kit on the website, so check that out at your leisure.

I use a straight fitting that simply screws into the caliper, then you use the crush washer I supply, then route the braided line down to the caliper, going behind the lower triple tree and then into the caliper, simply screw the adapter in place, undo the bleeder, fill the reservoir on your mater cylinder and bleed it into a bottle with a clear pipe so you can see the air bubbles exiting the bleeder.

These are such great quality and gives your brake more power but also a more Custom look as well.

You will find this so easy to bleed and the brake will feel way more positive when you grab the lever and thats a good thing.

This literally took me 5 minutes to fit and bleed and now functions so well and gives me more confidence in stopping when i am out on the tarmac next and now available to you lot.


The Brake hose is fitted and now I have fitted the Euro style headlight and made a special bracket to house it, this allows you to use the stock location of the lower triple tree bolts, i will chrome the bracket when completed and that too will be available on the website .

The Stone Guard will protect your lens from any stones or projectiles that are sometimes left on the highway or byways when you are riding to an event or a job etc.

Also, the strong Yellow lens, gives it a European style but will grab more attention from drivers but with out blinding them, look how cool this front end is now.

So, I am off to the garage to do a wee bit more but wanted to show you what i got up to today, have fun with your Motorcycle and thanks for checking my Blog and my parts out, I am here to help, call or text 714-598-8392 and I will do my best to get you sorted out.

I love my job and love to promote Custom parts too.

My Triumph Thruxton Daily Ride

My 2013 Triumph Thruxton has served me well over the years, compared to my vintage triumph, this is chalk and cheese in the reliability league and the bike has given me many thousands of miles of fun and still does. it has now had 3 different guises since I acquired the bike from Socal Motorcycles and it certainly gets a lot of attention.

I bought the bike but it was the British Racing Green Color scheme, I’m not a fan of green but, stuck it out as long as I could but, saw so many this color, that I had to do a few things to make it into the bike I really want to ride. I first made a Diamond Upholstered seat for it, long before people were doing it and got a lot of compliments, then I set about designing reverse Cone megaphones in Stainless Steel, and that sure did get people looking.

Next up was to remove the swing arm and weld tubes in to make it look like drilled holes, then re-chrome it, soon as I did that, I fitted New Alloy Rims, wide 5.5 rear from Canyon of the TT range and this really filled the swing arm out nicely.  I repainted the gas tank and made side covers as well as the front fairing and the rear cowl, making the seat fold down to allow access to the storage compartment.

The New rims were such a change in handling for this machine, the fatter tire grabbed the tarmac like glue and this was a fun machine to now take out and enjoy .

I loved slinging my leg over this 900 and tear away up the road with a smile on my face, it was now a machine that was starting to get dialed in to how I wanted it, but there was another look I wanted after a while, I mean I also build and design bikes and parts, this is my business card, so always like to change things up and now its on its way to its third livery.

I removed the fairing and was contemplating a different look, so it came to my mind to fit An Alloy Gas tank and side covers, but, I wanted to make an alloy rear cowl for the bike, so with Egg shape Hammer in Hand I set about and made a rear cowl, then frenched a pocket into the rear cowl to alloy for a Vintage light but have a LED insert in that light, old with new.

Loving the look of this and am glad that i went this route, this time I wanted to change the seat padding and went for a soft Tan leather with Diamond Stitching.

Now this sure is comfortable and feels way better than the old one as I simply wore it out with my fat arse sat upon it all the time and this is now comfortable once more.

I now have my Alloy Gas tanl on the bike and sometimes I fit different seats when I make them to check for fitment and this bolted right up with no issues at all.

Right now here she is sat at home and I really do like the way she looks, Classic styling and its a fun machine, this afternoon I shall change out the grips to go with the New leather seat and give the bike a better flow and color coordination. I shall take some pics later in the week to see how they look and feel first.

The front fender I made from an old BSA mudguard and then welded some brackets to the side and the contour is just how I want it too, came out well and love the look of it. if you look at the lower part of the chassis, you see I have my own hand made Bash plate that I made out of Aluminum and then added a Bottle opener, just in case ya stuck when you are out camping.


The Zard pipes sound great and may polish them to get a mirror finish to accentuate the rear cowl that I made as I love how this has turned out as a one off design.

You will also noticed that I wrapped my headers, this was something I wanted to try with an Aircraft application and rather than the old school wrap, I thought that this would look pretty cool as a slip on heat Sock, and sure glad I went this route as these Performance pipes get bloody hot when riding.

I also have a set of Works Performance  piggy back race shocks to soak up the bumps, not cheap but my old shocks I had that were TEC, Blew the Nitros out of them when I was in the Canyons on a few pot holes, so a more expensive and professional set were purchased and I am also a dealer for Works Performance and so glad that I have these now as it is night and day on suspension set up.

I also designed and made the Knuckle Duster Heel guard, and offer that on my website as well, I then blanked off the rear passenger foot peg hangers to tidy that area up a little.

Bike now sits well and I am happy with the look, I will be fitting the grips and will show the pics on here so you can see what they look like.

I went with some Cole Foster grips, looked at many but thought that these would be best to go with my leather seat, and am happy with the choice and are really comfortable too.

Really happy with my choice and my hands will thank me later too.

Sat next to My Hot Rod, the Triumph looks happy in its new set of clothes, looks a different bike too, still a little more I want to do as I go along but, thought that I would share some pics on a Blog and see if you like what I have done.

Here is a list of what is on here.

Motone Alloy Gas Tank

Motone Side Covers

Cole Foster Grips

Custom Clip 1″ on’s

Wide wheel kit from Canyon

Custom Drilled and Chromed Rear Swing Arm

Upsweep Rear Polished Alloy Caliper Bracket

Zard Stainless Steel Exhaust Kit

Titanium Aircraft Heat Shield Sock

Speed merchant Finned Engine Covers

Wave Brake Rotors

Beringer 4 pot Brake Caliper

Hand Made Alloy Mudguard from a BSA

Hand made Seat with Leather Upholstery

LED internal turn signals and 6000 Lumens headlight

4 inch Chromed Fog light

Custom hand Made rear Cowl with LED Rear Light

Works Performance Piggy Back Racer Shock Absorners

Hand made Knuckle Duster Heel Guard

Joker bar End Mirrors

Lithium Ion battery by EarthX

K&N Pod Filters

Fender Elimination kit

Custom Horn

Hand made Alloy bash plate with Bottle Opener

Power Commander

Irridium Spark plugs

LED rear Turn Signals

TEC Front Steering Stabilizer

Custom Machines Foot Pegs

Rear Blank Off Plates On Hangers


Triumph Bonneville gets the Stealthy Look.

Here we are again

Where does time go? I try and type up a blog as quick as I can, but, being a 2 fingered key Board picker, I cant get as much down on the website as I would like, but none the less I try and seem to get a following for the Motorcycles that I see on the net etc and tend to grab my beady eye and then I will do a quick Blog on it.

It brings me to this Twinline Triumph Bonneville, Another Australian Motorcycle but, before this transformation came about, the owner had had a bit of a to do with the tarmac. the exhaust was knackered, Gas tank had more Damage than a Boxer who just wet a round with Tyson, and the Bonny had seen better days, so- Time to revamp this Meridian style 2 Cylinder and this time the Owner by the name of “Mixy” decided to give a Sydney Based “Gasoline” Shop a go.

Founder of this little shop in Sydney “Jason Leppa”

The Bonneville was riddled with other issues too. Mixy had made some mild modifications himself, but after meeting Jason and the Gasoline team, he decided to leave it to the experts. Plans for the rebuild expanded, and ‘Blak’ began to take shape.

The front end was binned, and USD forks from a Suzuki GSX-R grafted on. A custom axle and spacers ensure that wheel specs remain the same, and the sportbike forks are held in place by a CNC’d triple clamp. This was by no easy task but, Jason managed to massage the GSX smoothly onto the frame using a set of TT wheels made in california and shodding them with a sticky set of  Pirelli Diablo Supercorsa tires.

2014-triumph-bonneville-cafe-racer-2

The triple clamp was designed to house a Motogadget Classic speedo—in black of course. An m.lock keyless ignition system keeps the wiring simple, and the Purpose Built Moto switch blocks are sleek and contemporary.

2014-triumph-bonneville-cafe-racer-6

Adding to the racing vibe is a shift from mid to rear sets, this made the motorcycle was more comfortable and a far Racier look, going back to the Days of the North Circular back home in the UK in the 60’s.

But the rear tire is wider than Burt Reynolds old shirt collar with a whopping 190 shoe horned onto the Aluminum rim, this sticks to the road like Gum on a sweater.

2014-triumph-bonneville-cafe-racer-8

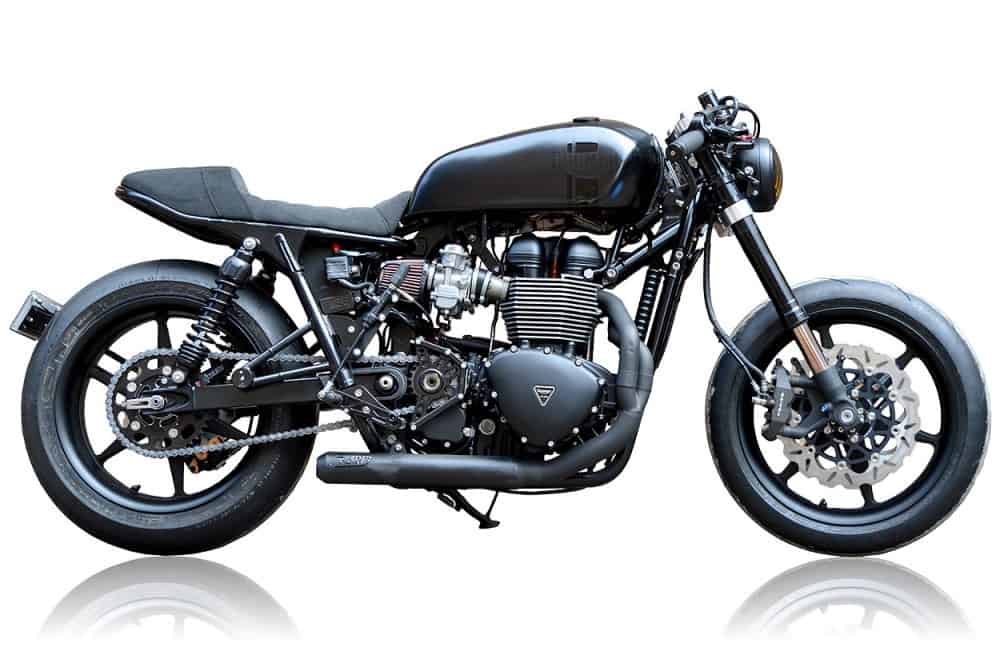
The biggest visual change is the new tank, which eschews the somewhat bulbous proportions of the Triumph original.

It’s Gasoline’s take on the classic Yamaha SR tank, fabricated in aluminum and shot with deep satin black paint. Running across the top is a subtle gloss black racing stripe.

2014-triumph-bonneville-cafe-racer-5a

The subframe has been reworked in-house too, and now supports a new fiberglass seat pan hand molded by Gasoline’s head tech. The local artisans at the Bad Arse Trim Co. made up a new seat to match, using a dark shade of suede.

There’s an integrated LED tail and indicator light strip flushed into the tail, and tiny indicators up front from Kellermann. “They are some of the smallest LEDs you’ll ever find,” says Jason, “but still bright enough to cut through the darkness.”

2014-triumph-bonneville-cafe-racer-7

The headlight has the old style Fog lens that gives the impression of a Foundry’s  Cauldron when ignited, plenty of brightness from that and letting people know that this Stealthy Middleweight is coming through.

2014-triumph-bonneville-cafe-racer-4

Petrol tank was hand fabbed in Aluminum then plastered in Black Semi Gloss paint and it has a bulbous shoulder to exaggerated the lines a little and something that really works well.

This is a pretty well sorted machine now and its a shame I wasn’t still a Posty in St Leonards,  as I often went into Sydney and would of been great to check this Bonny out.

2014-triumph-bonneville-cafe-racer-3

Great job to “Jason Leppa” you did a fantastic Custom look in a short amount of time, something that is not easy to do and get right.

2014-triumph-bonneville-cafe-racer-1