Here we have a short snippet of the infamous Guy Martin and his special build that he has been working on for a few years, I am looking forward to seeing more on this machine and what it will do.
Just thought I would share today.
Here we have a short snippet of the infamous Guy Martin and his special build that he has been working on for a few years, I am looking forward to seeing more on this machine and what it will do.
Just thought I would share today.
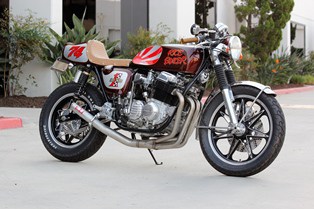
OK, for a long time I had been planning this build and now it is here and I am so stoked the way that the machine turned out.
I used a snotty old bike to create this head spinning machine and had already built it in my mind hundreds of time, so thus was really a piece of cake for me.
I had an old set of Henry Abe 7 Star rims back in the UK, these are at least 3 decades old and had them sent over the water from back home and wanted to take them apart and fit new front and rear bearings, as well as paint the stars and polish the outers.
Once I chose New rubber for it ( Bridgestones ) I then made sure I had the rear brake set up drilled and polished, as I want the bike to stand out in many places.
I had a S.S. tank and cut all the top flap out and welded that in with a flat plate, then fitted a Stainless Steel polished Monza style racing Gas cap in it.
I then used one of opur own designed “Razorback” seat bases, As I really do love the lines of thaat seat base and knew this would really flow and give that yesteryear look.
I bead blasted the old frame and then powder coated a high gloss full flow Black on it and love the look, almost an enamel look to it and very inert to many fuels and substances.
If you look, you can see our New battery boxes we now make and offer on our website, this is the ww2 style battery box made from 6061 Aluminum and has cool rivets in.
I removed the old Oil tank and we washed that about 7 times and then cleaned out with some simple green, then stripped the paint, had it copper-ed, then chromed and buffed. you can see i was also setting up the rear sets and polished the brackets to give a Chrome finish.
I designed this color scheme by drawing this out on graph paper and used water colors and came out with this design, the reason that I came out to this conclusion is simple. My old man always ran down anything to do with Japanese machines, and as I was a teenager in the 1970’s, Japanese bikes were predominant in all parts of the globe and the old man just looked down on them and called them “Rice Boilers”
So That’s why I named this bike “Rice Boiler”
She was fun to build and I am so stoked at the reaction it gets from people when they first see the bike.
I had a few people just stand there and just keep looking at it, as this bike did not start off like this.
I really enjoy the putting everything together part as you see such a transformation.
The Racing number 74 is really just the year of the bike but I wanted this to remind me of days gone passed when I used to hitch hike to Clubman Racing at Snetterton track and getting a lift on one of these bikes.
There are so many things that I have done to this bike, I should of named it the Magician as it is loaded with tricks. the lower forks are polished to a Chrome finish and all rebuilt, etc., and we hand-drill these rotors at the shop, then surface grind and polish them, looks cool eh?
I hand-hammered the gas tank as I do on all my bikes and wanted to use the Rising Sun as the filler, and boy does it pop!
The finned covers are early 70’s ones I have kept for this particular bike build, I must of had them 12 yeas in my tool box and so glad i got to get them on the Motor .
The red is very bold and I chose an Aztec style gold for the pin line, the whole paint scheme was completed using House of Kolor and I chose a Candy Rootbeer Brown as that was a cool Candy Color that Honda had back in 1971 and wanted to try and get that old School feel to it.
I actually incorporated the neutral light into the head stock nut and think that it will be a cool addition to this ride and make use of the new lights we sell.
New Old Stock handlebar controls were a must, we used one of our polished throttle embellishers and some very cool flake handlebar grips, as well as new alloy levers, etc.
You can see how many brand new or rechromed parts I have fitted to this machine, by just glancing at the photos on this page.
The Ggold flake on the grips really do make the colors blend with the gold of the bike and the shocks.
I wanted to have the race number on there, as well as incorporate the year of manufacture, and it came out really well.
I fitted new old stock fork ears and made our front fork badges t0 fit the sides where the original ugly reflectors sat and it cheered the machine up.
Yes- that is our very own Boxed Swingarm that we drilled and powder coated and really does suit this machine well, as well as helps the cornering as it stops all the rear end stepping out, this is a copy of my Original Dresda swingarm.
Our Stainless Steel Yoshimura-style 4-into-1 exhaust is a very cool sounding and looking set up and is a must with the style of machine that I create, by does it hang well.
You can see the work it took to make the tank look great, also the GPS speedometer is a cool look, but the bracket and the bucket we had to make and polish, it all worked out fine in the end and even though this was not a cheap option, I think its the cherry on the cake.
The headlight is from an old Desoto truck and then changed a little, it looks great with the Candy Rootbeer brown on it and the bezel was re-chromed.
Pretty Much everything is new on the build and am so happy to have gotten this machine done to the way I originally imagined, it screams out to you that this is an old cafe racer from back in the 70’s and I hope you like looking at her!
I tend to use Bridgestones as my personal choice of rubber on the rims I use, as I have always had them and stuck with what I know.
I spent a lot of time getting this bike right and many, many hours taking things off that didn’t work that you will never see, but thats how it goes with bike building and at the end of the day I have a really cool looking classic that is bound to turn a head or two.
I took the old broken and cracked fins off the original oil filter housing and machined and polished it and this is how she comes out. I do this to a lot of my creations, it adds a unique look.
Fitted our Finned Aluminum Ton Up Stabilizer Bar and the whole rear end is new, Brake Spring, Rod and Adjuster, no expense spared on this build.
A fun machine that is something that was made from old snot, rust and cold steel, also so nice to be able to recycle this and get it changed into another form.
I have already had a lot of interest in this machine and will let it go for the right price – this is a unique motorcycle with many, many new parts and one off pieces.
Within two days of finishing this motorcycle, I got it featured in Japan’s Lightning magazine, what a honor that was.
This bike did take a long while to complete, but I changed quite a few things on this until I was happy with the end result. Sometimes that is what happens with custom bike builds- I like this, and some of you may not. But to me, this is a cool machine that just screams out the bikes of the 70’s when I was a teenager in the United Kingdom.
I drilled the brake hub, the rotor and (of course) the front sprocket cover, as that’s my signature style I like to do, but I also had a very cool license plate frame that I have had for donkey’s years and was so stoked to have the opportunity to use it on this bike.
If this does not say cafe racer, then I don’t know what does – it’s an original piece that I am happy I didn’t discard over the years.
The tank took me some time to hammer and weld, but I wanted to incorporate the Rising Sun in the knee inserts and I am glad I did as it really does add a great concept to the bike.
Quite a few coats of Candy Root Beer brown were applied over the Aztec Gold and the end result is exactly the color that I envisioned.
No stickers, this is all real paint you see and I think you will agree, this really does stand out from many that just have decals.
A good stance for this tarmac eating machine.
I used rear sets which gives the bike a well-balanced feel, as the stock pegs are too far forward.
Our Boxed Swingarm and one off Chromed Chain Guard is a good component that i wanted to use on this bike. the Boxed Swingarm was made at the shop using 2X1 steel and it looks and works really well.
All the cases are hand-polished, the starter is rebuilt and the carbs are like new now. This bike runs smooth as we synchronize them using a Mercury stick.
The carbs have to be right on this machines, if you do not sync them they will pop and backfire, something you don’t want to have happening.
The front brake caliper was stripped and polished and our machined stainless steel piston fitted. We also have new side stands to stop the bikes from laying over too much. The originals had a tendency to bend over time. The DeSoto headlight and cool Chromed Diamond Signals, tell people what is going on in front of them.
Stainless Steel Flip-top Monza-style Gas Cap we sell was used on my tank, as well as our own ‘Ton Up’ Fork Badges.
New cables throughout (throttle, tachometer, speedometer and clutch cables) and new adjuster and stainless bolts all over the machine make this a long lasting ride.
I used a Ford big block connecting rod to use as an exhaust hanger. Once it was the right size and fitting, we chromed it and added this nice custom touch to the build.
I didn’t like the stock oil tank dipstick, so we machined a col finned cap for it and boy does it look trick, we shall be making more now to offer to you lot.
See how that cap makes everything flow that has fins on it, I really am happy how this came out, we used 6061 T6 Aluminum and then polished it.
The bucket below we made from a solid piece of 7075 and it came out so nice, tig welded the base and polished it, the bucket attaches by 3 small Allen head screws that sit at the front of the plate.
I wanted to combine new and old components to clean the top of the steering area up and it does look really tidy and clean now.
This was a fun build and I hope that you liked looking at the good Old ” Rice Boiler ” I can hear my Grumpy old man moaning about it right now!
I have already been featured in Japans’ leading Lifestyle magazine and have just had an Italian magazine come over to shoot it and hopefully a brit mag the month after, so I must be doing something right! Interested parties, please contact us for details.
A Very Happy New Year to you all and hope that the next 12 months will be a happy, prosperous and healthy one for all.
I saw this in MCN and here is their report on it, to each his own, but surely as you will see at the bottom of my Blog, there are far better ways to change the stock XV into something cool? the paint Scheme looks something out of a Home depot catalog, the Body work is too Boxy and it looks more like a Customized Speedway bike, what do you think???
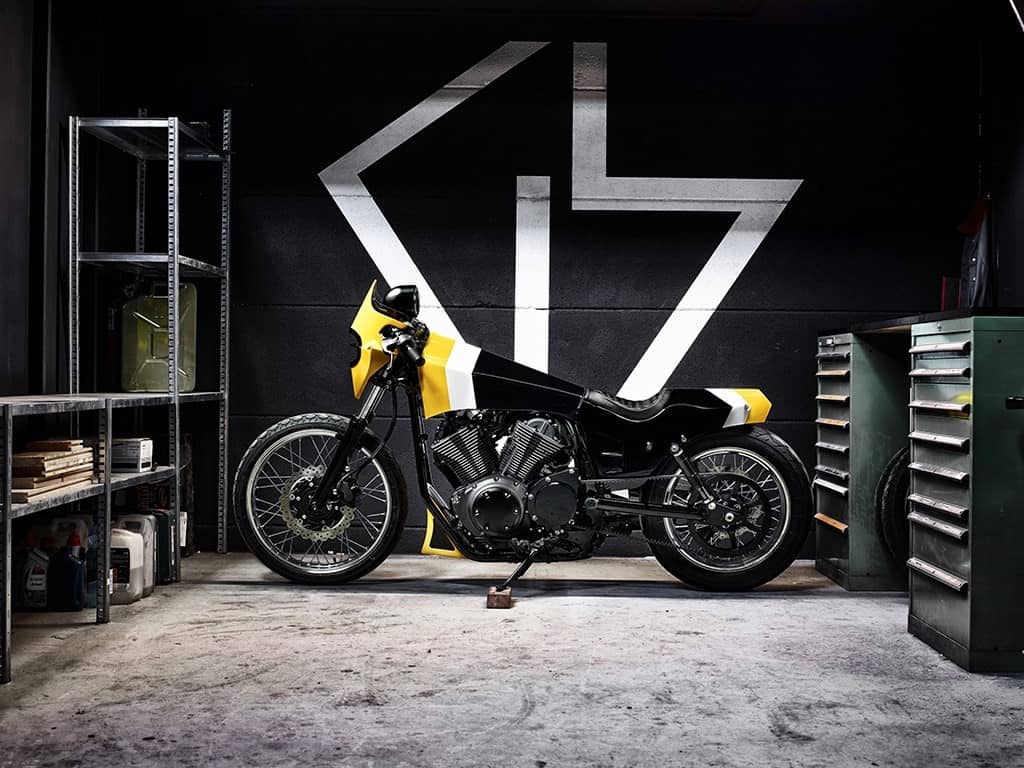
Yamaha’s ever-growing Yard Built series has gained another son in the shape of this Yamaha XV950 by Swiss builder GS Mashin. The result, the Yard Built XV950 ‘ULTRA’ is a total transformation, bringing a whole new vision and style to the Yard Built line up.
Founded three years ago by ‘Niners’ crew member Tom Mosimann, GS Mashin blends solid, hand craftsmanship with eye catching new design ideas. Working from a small garage in Bern, Tom works to deliver truly different bikes within functional and technical requirements, meaning everything he builds is fully roadworthy and not just eye candy.
The Yard Built XV950 ‘ULTRA’ is no exception, looking radically different from the standard XV950 it’s a truly custom machine that follows the Yard Built principles requiring no cutting or welding to the frame to realise the concept.
“I love what Tom has created with the XV as his base,” saysYamaha Motor Europe Product Manager, Shun Miyazawa. “I’m really happy that despite going for a really radical look, he shares our principles that a custom machine needs to retain the most important function; rideability.
He’s kept the soul of the XV950 and wrapped it in a really original look without any cutting or welding to the frame. What is perhaps also very impressive is that 95% of the work he does is completed with just a few tools, an angle grinder, a bag of sand and a hammer!”
The Yard Built XV950 ‘ULTRA’ fairing is handmade from 1.5mm steel sheet with the mounts cut from a stainless steel pipe. A small Bates floodlight sits inside the fairing with the two Highsider turn signals.
The custom fuel tank is also hand crafted from 1.5mm steel with the upper edge made with a trimming press. The lower section is cut from the original XV950 fuel tank. One of the standout elements of the build has to be the super clean prototype rear suspension units built by K-Tech, based on their signature style Bullit units.
The hand crafted steel tail unit wraps around a Shin Yo rear light unit and the seat is again a hand made affair with leatherwork by Jose Rey Saddlery. The beautiful aluminium upper fork crown is machined by Asic Robotics and is super clean without the holes for the risers. The wheels are a work of art, the original hubs were used then 18inch back and 21inch front rims were added with new spokes, with ABS!
……………………………………………………………………………………………………………………………………………………………………………………………………………….
I am always a fan of many bikes but- this one I think misses the mark, but that’s my 2 pennies worth and you may like it and thats fine, but i would of gone a different route like these.
Really cool and so much work but I dig this version.
Bang- What a tough machine and I would love to own this myself.
What another winner we have here, tough, big, brute- and sure would be fun to ride and has that Nostalgic paint scheme too.
These is a great machine as well, so how did they go so wrong with the main feature I have here?
Well I leave it up to you, but I know the route I would of taken.
Europe’s premier bike builders will be descending on London in February as the London Custom Building Championships get underway at the Carole Nash MCN London Motorcycle Show.
Fifty of the very best choppers, cafe racers, flat-trackers and bobbers will be fighting for a huge purse of £12,000 in a championship that looks set to become one of Europe’s biggest custom events.
Entries from the cream of custom builders: but to name a few: –
Auto Fabrica
Big CC racing
Black market customs
Burnout bikes
Celtic Choppers
Customized Choppers
Destiny Cycles
The Hogfather Motorcycles
House of Custom
Krazy Horse Customs
Lamb engineering
Medeza Cycles
Nick Gale Customs
Old Empire Motorcycles
P & D Customs
RedMax Speedshop
Second City Customs
Shaws Harley Davidson
Sickboyz Customs
Sooty’s Customs
Taylormade Wheels
The Carole Nash MCN London Motorcycle Show runs from February 14-16 at the Excel centre in London docklands.
Advance tickets are just £16 and the event includes the star-studded all-action Revolution show, Custom, Adventure, Classic and Sports and Performance zones plus every important 2014 model will be on display. Get your tickets now!
http://www.mcnmotorcycleshow.com/
COOL NEWS FROM LOTUS
Back in June, Lotus announced it was getting into the motorcycle business. Or, we should say, Kodewa and the Holzer Group are getting into the motorcycle business, and have acquired the rights to use the Lotus name. One way or another, we’re now receiving word on some of the specs we can expect from the prototype dubbed C-01.
The Lotus motorcycle is being designed by Daniel Simon, the automotive futurist who has penned, among other things, the light-cycles for Tron: Legacy and the livery on the LMP2 racer Kodewa also fields under the Lotus name. So you know it’s going to look pretty awesome, but what will make it go?
According to Visor Down, the C-01 is being tested with a V-twin engine sourced from an undisclosed supplier that produces 170 horsepower in stock trim but has been tuned to produce nearly 200 hp in Lotus trim. A pair of prototypes – one with carbon-fiber bodywork and one without – have already undergone several thousand kilometers of testing, and are said to be handling “very well.”
We’ll have to wait until next month when the talents behind the project are expected to release more information, but for now it’s sounding pretty sweet indeed.
So, the wheel has come full circle and now we have Automobile manufacturers mixing their cooking pot with some 2 wheeled flavor.
I just got this from a mate of mine in Thailand and as I am an avid Motorcycle News reader, thought I would do a little blog on this New machine.
MCN has the world exclusive images of the new Lotus superbike in this week’s issue of the paper along with details of the project and how running prototypes are already out testing.
We have exclusive high resolution images of the new Lotus C-01 superbike as well as exclusive information from those close to the project revealing more details about the 200bhp V-twin.
The C-01 is the first bike to come from a new set-up using the Lotus name under licence.
Lotus announced it was moving into the world of motorcycles in June last year and at the time it promised a 200bhp bike would be on sale in late 2013 or early 2014 but no images of the bike have been seen so far.
MCN managed to get hold of two images from a source close to the project. That source, who didn’t want to be named, was able to hint at a few details of the bike which certainly looks very different to anything else currently on the market. These computer generated images have come directly from the Lotus factory and are not the work of MCN.
————————————————————————————————————————————————————————————-
OK, I have been waiting to see a whole exhibition on prototype machines, so hope other manufacturers take a feather out of the Lotus machine and have a go at creating their unique 2 wheeled creation, I am sure BMW could knock something out of the park quickly?
I shall be keeping my eyes open for you tube video’s too as someone always manages to get sneak peeks. So, I watch with baited Breath.
Peace and Grease as always.
What a Great start to the New year and here is our Latest Product from us at the shop.
Here we are with my New 4 into 2 exhaust systems, they are now ready to be Double Nickel plated and then they can be shipped off to anyone that has a 1969-1978 CB750 HONDA. That’s the S.O.H.C. Machine
These are a great exhaust and I shall be adding more photos as I go along, I shall also be fitting a set to my very own Cafe Racer machine so you can see and hear them as i fire it up and ride her around. We are very excited about our New product as the Mac style are OK but have no thickness and sound too quiet.
So many people asked me about this set up and I hope you like what we have done here as it took quite some time, once these are Nickel plated they can be shipped and that will be next week for sure, so place your orders as I only have 12 sets right now.
Have a look, you will see that these are all hand bent and welded, these take time to make but thats how they did it back in the day and that is how I want them on my bikes and thought that you lot would also like them.
These will look in the same style as the Paul Dunstall pipes of the day and am sure that you will like the way these sweep upwards too.
Sturdy and hug the frame well, these also have a Brazed captive nut so if you want to mount your own bracket to where ever you can, it is there for your disposle.
Once these are Nickel plated, these will shine and look just like they were originals from back in the day, we looked long and hard at designing these ans fitted this system a dozen times until i liked the bends and the sweep etc and I am now pleased to say that this is how I envisioned these to look like.
Have a look and see what you think, by next week I will have these Nickel plated and they will look great, but wanted to get these on the website for the New year and I have now managed that. I fitted these but painted this Black so you can see how they look a different color but this also is fitted to a 1977 CB750K and it fitted very well.
These are $499 a set and come complete with Nickel coating and the baffles as well, these will really set your machine off and we are proud to have these for sale to you.
Finally these are ready and I am happy to offer them to you, and yes of course we ship all over the globe too as we make all the other exhausts from cb350 up to the dohc 750, so keep checking our product lines as we are going to be making other systems too.
These Exhaust systems are ideal for you if you are building that Cafe Racer, Brat or Custom machine, or – just want to take your old rusty stock pipes off and have some exhaust that scream the style of the race track days of the mid 1970’s, and we tried hard to get these to look the part.
Please let us know if you want any more photos etc and we shall do our very best to answer all your questions. I am sure that you are curious now and as I said we only have 12 sets of these right now, we shall be manufacturing some more but have many other systems we are working on right now, including Royal Enfield too.
So- have a good look and remember, these are raw steel, 049 wall from cold rolled, but we shall be Nickel plating them to give it that Vintage look. These sit very well and give the Motorcycle a Racing look right out of the box.
We just painted these Black, so you could see them as a different color and they look pretty cool like that as well.
Also these are removable baffles too, look how thick the Aluminum end cap is. These are first class and you will see how well the systems are made when you unwrap them.
Shipping is about $45 to NY and FL and a wee bit cheaper the closer you are to us as we ship via FED EX.
.
Published by Cyril Huze November 7th, 2013 in Builders, Editorial and Events.
You read it right. Brough Superior is back. In Milan at the EICMA Show, Brough Superior unveiled a new SS100 high performance luxury motorcycle for year 2014. It’s a 1000 cc V-twin Sport Classic designed as a 90th anniversary of the most famous Brough Superior model in the company’s illustrious history, replete with technical innovations and high-tech components. The new SS100 will only be available in limited numbers and it precedes a range of exclusives motorcycles… The company executives stated that they want Brough Superior to become again the new reference in technology, performance and distinction.
Brough Superior is a legend in the motorcycle world, known for the highest level of quality, innovation and design in its motorcycles. The new SS100 is coming out from the 20’s and 30’s -motorcycle golden age- taking for inspiration the outstanding design of George Brough that has passed over trends and years as a reference. The new SS100 keeps a minimalist simplicity, the typical round shape of the tank, the same front suspension system principle, the small diameter brakes discs, etc for an iconic neoclassical look.
Why Brough Superior bikes were called “The Rolls Royce Of Motorcycles”. It’s a motorcycle magazine road tester of one of Brough Superior first bikes who printed for the first time these words.
One day A Man from Rolls came calling, requiring Brough to cease and desist from infringing his company’s trademark, or there will be legal retribution. After an abortive attempt to talk his way out of trouble, Gorge Brough hit on the plan of showing his Rolls visitor around the small factory where by chance his hand-picked team of skilled artisans was preparing the bikes due to be displayed on the Brough Superior stand at the forthcoming Olympia Show in London. To prevent their fingerprints soiling the gleaming finish of these show bikes, the workers had donned white gloves, allowing Brough Superiror. to infer that this was the normal modus operandi for such a high-class motorcycle operation, well worthy of being likened to Rolls Royce.
The visitor, a high-up executive at Rolls-Royce – was so impressed that he gave Brough the explicit permission to continue using the slogan “The Rolls Royce Of Motorcycles.” And so the tag stuck.
– See more at: http://cyrilhuzeblog.com/2013/11/07/brough-superior-unveils-a-90th-anniversary-ss100-for-2014/#more-128904
Many people ask about some of the machines that I have built over the years and I like all the bikes that I have created, I know that these machines are very popular these days, but when I built this, it just stopped traffic, this bike was a great ride and inspired many people too, there are a few clones out there and I love seeing that.
So, I thought I would show this Cafe Racer that I created at home on the driveway around late 2006 and am sure you can enjoy the photos and relate to how ling something like this takes.
So sit back, have a brewski and just keep scrolling down to view the bike I built named……. The Golden Arrow !
Once More, here we are with one of my motorcycles that I turned into a Cafe Racer and built in my garage, this was a cool bike and had stretched the gas tank 5 inches to give it a longer look.
Below was how it was going to start off like but i wanted it way longer so I could go further distances.
The bike was a fun project to begin with and I knew how i wanted it to come out like, I even made the Ace logo up to say Cafe and used to sell them later on as decals for other peoples rides.
I was the first to make gauge faces up as I used to do these on my motorcycles in the UK in the 90’s and wanted to do the same here.
This came out well and went onto designing and using many on my machines.
Everything I did on this machine was hard work, but I persevered and she came out so well it was a shame when I was offered good money for it and I let it go to a new home.
As you can see on the tags, that was built 6 years or so ago on my driveway when I worked at home in my garage, those were the best days I tell ya.
I spent a lot of time on this machine and the Gas tank was stretched, I used 3 gas tanks to get the 5 inch stretch, but it paid off and thought that I would use my own Dunstall seat base t cap the whole thing off.
I did my usual signature drilling of the hub and I chromed the rear swing arm, Laced the polished hub to the good old Harley rim and slung a good old Spitfire on her.
That was my favorite Motorcycle I built and still love it today and would love to have it back at the shop.
I am not sure where she is in the world today but I know it is around as people send me a few photo’s from time to time.
Below, these were my Own decals i designed and have sold many to people all over the globe for their machines.
I hand drilled the front Rotor and rebuilt the front brake caliper too, as well as polish the deep dished Akront rim.
Oh yes, must have new switches when I can afford them as they set the bike off well.
Again, I was the First to use these lights and I have sold over 300 of these to people and are a super set up and last ages.
Original 1974 Speed equipment that I have had for many moons and I wanted it on this machine.
A little bit of creative drilling and polishing really does go a long way on anything that you create.
Rebuilt engine and polished valve cover is a must when you go all out on a full build and this worked out really well.
I was also the first to use this type of braided hose and I have sold over 1000 of these to builders.
I took all the crap out of this and then polished all the anodizing off and got it to a chrome finish and boy did it turn out well.
The Golden Arrow is a really nice machine and sits well on the driveway.
I used 3 gas tanks to get the 5 inch stretch to look right as all the underneath has to have the stock indentations to allow for the carbs to function and petcock too.
I designed this myself and this was the First time I had used it, I have sold many of these decals since and even met a few people who have had this tattooed on them.
I rebuilt the rack of four and then me and my Buddy Johnny Harper synchronized them with a mercury stick, this ran like a dream.
I loved building this machine and I think you will agree, it turned out pretty good.
My own Pedestrian slicer, I must of sold about 100 of these for owners I should think.
Back from its first ride and it was an awesome feeling to hit the corners with this bike but I noticed the weight increase when I put 5 gallons of gas in her.
I used the 750 con rod to make the license plate set up and this was something I made for many over the years.
The bike rolled out very well with all new bearings in the steering head and as much polishing as I could muster.
The Custom oil filter housing was one of my originals but I am now manufacturing new ones, but this was a unique one and I loved it.
I polished an old 10 inch Akront front wheel and that really did set off the front end.
Fun times that’s for sure and also made a good neighborhood watch guy as I was always in the garage building something for motorcycles.
I polished all them motor part at the side of the house using a harbor freight 3/4 Horse buffing wheel.
I used my Dunstall seat base and my LED tail light and of course had to pin line the bike as most of my machines are and this set the look I was after.
I polished the upper triple tree to a chrome finish and also made a display panel in alloy for the neutral and oil pressure switch, with old style lights.
Had some fun with the Gauges as I wanted to add some more to the face and thought that Bang would be appropriate on this machine.
Rebuilt the front hub and has new bearings, as well as polished the body and powder coated the covers and used stainless bolts though out, used stainless spokes too.
Below, I thought I would do my signature drilling and polishing, now all I use is a cordless drill and I polish this on a three quarter horse harbor freight polishing wheel.
A super nice contrast with Black, Gold and of course Chrome and Alloy, sets the front end off on this Golden Arrow Motorcycle.
Sitting pretty but- this is no slow poke, it gets up and right into it when you open that throttle, don’t you worry about that.
Plenty of things to polish and detail on the good old CB750 and I am sure many of you have been there and done it? And can understand how long all this takes.
This is a 5 gallon Gas tank now and really took a bit of work to get it to lay correctly, but the end result looks great.
I hammer the inserts to the tank and have always done this to get that race look, you can tuck your knee’s into the tank better too.
The Oil tank got cleaned and then I boiled the inside with lemon and then coated with oil again after painting and is super clean inside.
The license plate sets off this cool and classic machine and it was fun to build this at home back then.
Some more Bling to look at on the bike, as i like to add as much detail as I can, but this is a personal preference and you don’t need to do it if you like blander styles.
Yes, there may be a few of these around now, but not when i was doing them and so cool to see these as a popular machine of choice these days.
More to see with, that’s always a good thing for motorcycles these days.
L.E.D. rear light set up really does let drivers know what you are up to.
My front driveway was always packed with my creations, just as well I got on with the neighbors though eh?
OK, here we go with a Cafe bike that I created a little while ago here in Anaheim California, this CB750 HONDA was just a Rusty Hulk of a bike and needed some love, I was not sure what to do on this build but thought what would be cool is think of a name that I remember from back home in the UK when i was a Teenager and Cafe racers as well as many other Motorcycles were doing on the tracks and on the roads etc.
Now Speedmaster was a Tire brand that was synonymous with col bikes back in the day, be it Cafe racers or trials Bikes, so I thought that I would base this machine on them said tires and build the bike around that title, so, here is the build up of this bike that now resides in Australia and is on the tarmac there right now bombing about the curves of Melbourne, Victoria.
I took the old rusty machine apart to see what I had, and what I did have was a bunch of corroded and rusty parts, so it was time to strip this right down to the skeleton.
This bike took some time to dial it in, as I was always trying different set ups, this set up here was pretty much how I wanted it but I thought that I could use the Original Dunstall exhausts on another machine.
The Motor was gone through and she seemed pretty good, the build up didn’t really take that long but I kept trying different parts to see how she would ride.
I did a double drilled disc set up on this bike, using a few parts that I had in the garage and it seemed to work out good, but took some time to get the rotor just right.
I went ahead and had a drilled Dresda style swing arm of mine fully chromed, as i think it would set the motor off well and I wanted to have a drilled swing arm to match the front Rotors.
Obviously the Ace bars were a must and I think that I got the height of this machine to a good stance and was happy with it.
Took some time to get good calipers and then strip all the old Black anodizing off them and then put the kit all together as the trick on these set ups is to get the off set bang on, else they would drag all the time.
Original Dunstall headers here that I had in the original packaging, as i wanted to know how these fit and sound and boy did they look great.
Looking at the rear tire you will notice that it is of course a Speedmaster which is from back home and Avon was a huge name in tires and racing when I was a teenager.
The Chrome swing arm has Bronze bushes and I had a set of early Race shocks that I wanted to try on this puppy and i think I got the look I was searching for.
I used a Harley rear wheel and laced it to a CB750K hub with new bearings and stainless spokes etc, I also make sure in New chains and sprockets too.
You may notice that my signature sprocket cover gets the drilling and polishing look.
I had a set of 29mm smooth bores that i wanted to try on this 836 engine and it ran pretty well, but can be a bare to set up sometimes.
OK, here is the money-shot- as I love the way the rear end looks on this bike, should of made a poster of it.
Of course, I went to town on the rear brake drum with new shoes and fittings this bike was like a new machine.
Original finned speed parts I used as I had stored that stuff for some time for this bike and glad I managed to use it all on the bike.
Original Beeston grips I have had for donkeys years ftted well and I wanted to start to detail the top end out, so I polished the master cylinder to a chrome finish.
Nothing is better than polished aluminum or chrome, its just a fresh and clean look I believe.
Oh yes, did I mention I polished the whole engine, not many people were doing this the and this took a long time.
Plenty of lines to look at and I still was not sure if I was 100% into the overall look.
Polished stainless steel Allen head bolts through out the bike, gave it some more detail and this sure was beginning to look sharp.
I hand hammered and smooth the tank and then took the tank to a Radiator shop just to make sure it is all sealed and then had a coating laid inside and then pressure tested.
A New Gas cap as well as a New Locking mechanism was needed for the freshly painted gas tank and sets it off nicely.
I have lost count to how many of these I have polished in my back garden over the years but they sure look great when they are all buffed up.
The switches had faded from the stock black to a dreary grey, so I had to polish these to look the best that they can, as originals are not cheap.
The more I look at these photos, the more I sit back and say to myself, why did I sell this.
Fun set of carbs once they were dialed in but a bear to get one of the throttle cables right but I sorted it out in the end.
One of my New machined finned engine mounts set the right side of the motor off.
The megaphones were a must and this did look reminiscent of the days gone by in London when speed to do the Ton was a must.
I hand cut an alloy plate and drilled holes etc and made this rear engine mount, this was the first one I had made until I then got orders for them.
I know, I know- Swiss Cheese, but I do get carried away but enjoy just making any pattern up and drilling by hand, takes some time and boy does it make a mess.
Rebuilt front forks and the good old TRI-BAR headlight makes this stand out at the front end of the bike, as well as Alloy turn signals which are a must in California.
New fork boots too that I bought from HONDA as I like gators, they kind of add Nostalgia.
New cables of course are a must with any build as you want a smooth throttle when you take your bike out for the first time.
I fitted a New horn and brackets to make sure that people know you are coming if for some reason you got to get on the loud button.
Original Cycle west Finned Points cover sets the scene for this Cafe Racer.
Sat on the table at the shop for electrical and little bits and bobs.
This time I went ahead and took the old megaphones off and fitted one of my performance 4 into 1 systems on and ceramic coated it Black.
I changed the carbs as it was running a little rich for the 4 into 1 and it ran great, I added some old 1974 Velocity stacks that I had for years and like the look.
Just chilling as now I have just sold this to a bloke in Australia and he too is English, so nice to have someone have this machine and enjoy it.
This was the last shot of the bike in the shop before we shipped it to Melbourne in Australia.
Well, here are some shots of the Speedmaster on the other side of the world in Australia and the Owner loves it, as he should.
This is a great looking motorcycle that has gone through some guises but the bike looks tough and sounds even more.
Hope you enjoyed the pages about this Cafe Racer and it is still hard to comprehend that this is now on the otherside of the globe.
I am sure he will be bombing about the place and hitting them corners as hard as anyone here would be thats for certain.
Maybe one day when I get back out there, I will get the chance to sling my leg back over the machine and go for a burn up?
So, the Speedmaster has a New life in a new Country and I am glad its being used.