Some older machines I built

Funny thing the internet, although it may seem new, it has been around just over 20 years now and I remember when we had My Space etc, the things we did to promote ourselves back then.

Anyway, just thought I would add this old video, forgive the clarity, but I created some cool rides back in my garage and thought that I would share with you all today.


My shipping adjuster on the website took a massive crap and we have just about sorted it out and also added a choice of UPS as a service for way cheaper shipping too, thanks for ordering from me at this time of year, I really appreciate it.

Here’s that Old Video of just some of the bikes I used to create at home.


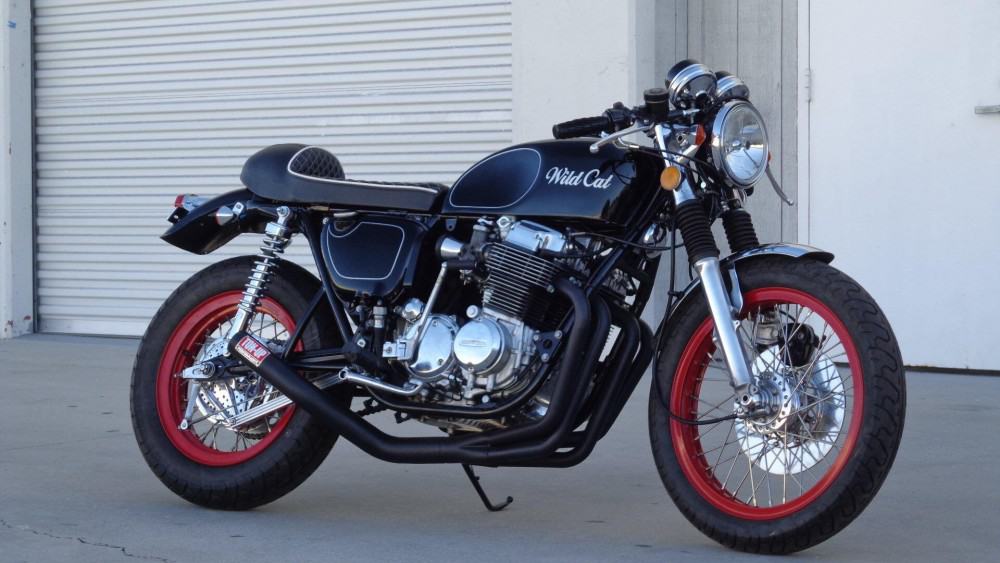
The WILDCAT CB750 HONDA FOUR

You would seem it strange to have forgotten about a Motorcycle I had built for a Customer, but as I have created so many machines over the years, I guess I do get a bit of a Brain Block sometimes, it was not until I was flicking through some photos that I noticed this CB750K Model Honda Four  Motorcycle that I did my surgery on and turned it into what he wanted, a real Wildcat.

It was a Shiny Chopper-ish style machine that my Client had owned for a long time, but wanted a change and Loved the Cafe Style Bikes that were hitting the tarmac around where he lived, so my job was to transform this cruiser into something more Racer Looking.

The Rims were stock but I wanted to add a Fatter rear end with some nice Rubber on the Rims and also give it some color to stand out right away, you cannot miss the Gumball Red, it is so striking.

I used Polished stainless spokes and Polished both hubs, as well as hand drilled the rear brake hub to give it that Road Race styling, it gets rid of the heat from braking, Dust from the shoes and cools the brakes when running along the tarmac etc.

New adjusters, Brake Rod and actuator arm, make this machine brake like a New bike and it sure looks clean now, a lot of attention to detail that I am known for.

New Rear sprocket and chain finished off the rear end but I think I want the rear end to sit a little higher, so them shocks will have to go for longer versions.

Longer Chrome rear shocks made all the difference in the ride height and the response when cornering, I am glad that I went this way, I also machined some 6061 and milled a Finned Stabilizer Bar to give that more Custom look, rather than the Flat Bar Honda uses.

I made a nice Bump Stop leather Racing seat unit for this bike, that still allows the seat lock and hinges to be used, that way you can get to your tool box and documents easily, the Motor got a once over and then I removed the stator cover, sprocket cover, Trams cover off and polished to a chrome finish.

The Customer worked at the Zoo with the Tigers etc, hence the title of the bike Wild Cat and that’s what he dug, so we applied that in a Gray color to the Petrol Tank.

I took the Gas tank off and hammered the sides to make my Classic Knee inserts, reminiscent of the old racers back in the day, making it easier to tuck your knees in and get more tighter on the bike and be a bit more aerodynamic as it were. Smoothed out and painted a Gloss Black, also applied my Checker Decal Kit then pinstriped the edges and ran a line around the knee inserts to finish them off, ready for Clear coat now.

New Gas cap and Lock to finish the tank off nicely, I do prefer the stock gas tanks, so this mod I do really makes this look like a factory item.

The Customer didn’t want rear sets, I would of preferred them but its personal choice and I have long legs – so need to have rear sets on my builds, but this looks pretty darn cool now its all back together and can run under its own power once more.

She is sporting my 4 into 1 Yoshimura style Performance Exhaust system and the inline Four Motor now breathes so much easier and sounds awesome with a Velvet Tone out of the tailpipe.

I cut the old fender down as it had some dings in it, rebuilt the front brake and added New Hose lines to it as I wanted this to stop on a Dime, well- maybe a Dollar Bill.

Sitting in all her Glory- The Wildcat runs hard and strong and boy is it fun in the twisties, as you can see I added my Signature Clubman handlebars, for that low stance.

I always enjoy creating these Motorcycles and the owners are always super stoked when they take them out for a spin for the first time, there is a lot of detail here and I offer the parts on my website if you want to build your own version.

A fun Machines that will give you many miles of smiles this bike sat right and really handled well when you gave it some beans in the corners, super proud of this one.

This has rebuilt front forks, New side covers, custom Turn Signals, New bars, new controls, new throttle cables and levers with new cables, plus New GT grips, rebuilt Carbs and Custom Bellmouth Velocity stacks.

Look at how well the bike sits has a New TriBar headlight, new fork gators and New ignition too, The seat I upholstered and used High density foam so you have a comfortable ride.

Thanks for reading this and hope that you like what I have dome to this old inline Four CB750 Honda, these are brilliant bikes and phenomenal engines.

I hope to post more creations that I have completed and share with you lot on here, love hearing all the positive feedback, thanks very much indeed and let me know if I can help you with your build.

The KC Special CB750 Honda inline Four

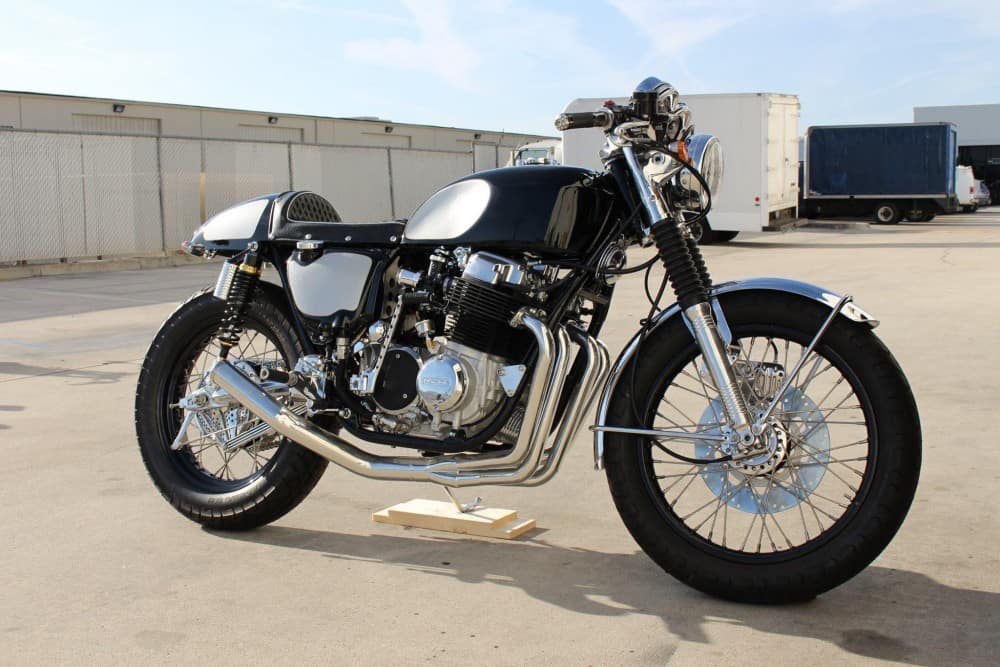
I have always loved creating My style of machine for Customers and this one is no exception, the KC Special turned out to be a great looking ride and the Owner Keith Conrad ( Hence K.C.) lives in Milwaukee and asked if I could revamp his old 1975 CB750 into a Silver and Black Cafe bike, I said sure thing and the deal was done, a build sheet was agreed upon and Keith sent the bike out to me.

I took the bike apart, right down to the frame, as I do all my builds, then I set about cleaning the frame up some what and smoothing some of the old factory welds, as Honda welds are quite rough back then as i guess they were hand welded and not automated as they are today.

As you can see, I took my time as I wanted the frame to really look nice in a Gloss Black on this build, I wanted it better than factory, so I took a long time to make sure that this Chassis came out nice, as i mostly powder coat my frames, unless I am using Candy Paint or Metalflake etc. Above you can see how Glossy the main frame rails are.

I took the stock gas tank and using my Egg Hammer, I pounded the sides to create Knee inserts, so you can tuck your legs in tighter to the bike and get a little more stream lined, just as they did back in the day for racing etc, this is no easy task and you will see how much it takes to do when you have a go your self, but worth the look in the end thats for certain.

The Paint scheme is High Gloss Black with Metalflake Silver panels and racing stripes and I really needed to make sure that this flowed well, and am happy with the result.

Plenty of Detail too, I hand machined out of 6061, a Custom Finned Oil Tank Dip Stick cap, this really did look trick, compared to the stock version.

Its like the saying says, the devil is in the detail and there is plenty to look at on this CB750 Cafe Bike and am stoked how the bike turned out in the end, worth all the hard graft.

The seat is one of my own that I manufacture, called “The Rocket 4” its a sleek sturdy and well rounded seat base that I produce and has the same curve as the gas tank, that way the body work then flows and give the machine the Status Quo.

Keeping in the theme of Old School styling, the seat upholstery was hand machined and small 1 inch Diamonds in white stitching with Silver piping and vintage snaps was completed to really make this stand out from the crowd.

I used an LED Custom Tail light that I offer on my website and this is bright as Einstein, and I think is a nice addition to the back of the Rocket Four seat unit, also the silver flake racing stripes really stand out nicely.

I machined some covers for the rear piggy back shocks as well as making some risers for the lower, to increase the ride height by 2 inches, out of 7071 Military spec Aluminum.

I also Chromed the rear swing-arm and hand made then Chromed a Custom Chain Guard to show the Gold 530 X-Ring chain off, I also polished the Hubs of the rims and painted the centers black to give a nice offset.

The Motor was rebuilt, as well as the carbs and synchronized etc, my Custom Oil lines were added in Black for a nice offset too, I fitted an oil Pressure gauge to keep the rider informed as to what is going on below.

As you can see, there is plenty going on here, I took a lot of time on the front sprocket cover and I even polished the rear set brackets for a more Custom look too.

Rebuilt and polished Carbs with hand machines velocity stacks from Steel Dragon really help the look of this bike and give it that Nostalgia look and it runs really hard too, there is something about hitting 6 grand on a 750, then you know you are starting to pull like a steam train.

People ask me about my gauges that I create on these inline four machines, and this one is no exception, unless I am restoring a bike, I don’t really care for the Honda’s Gauge faces as they are Green or Blue, not my favorite color of choice to be honest, wished they would of gone Black with White numerals like the Classic British machines, but oh well, so what I do is take the gauges apart and then I fit my Custom faces thats an overlay I print out, then repaint the needle and add chrome cups to embellish the bodys and give it a little more Custom look.

I have always liked to do this and it really does personalize your gauges, this time I went with the Cafe Racer Font and crossed Flags of which I think suit this Motorcycle to a Tee.

You may also notice that I have fitted a 2 inch handle Bar riser, to give a more comfortable riding position and easier strain on the wrists too, then fitted my Relocation bracket on top of the handle bar clamps to clean the top end of the bike up, with a BIG oil pressure Display light to match the Needle ends.

This is one tasty ride, the 4 into one system of mine is Ceramic Coated Silver, its a great look, almost a brushed polished Aluminum look to it, and she barks like a scolded dog when you get on the loud button, you will also noticed I machines a Finned Stabilizer Bar at the rear of the bike and did my usual drilling on the brake hub to let brake dust and heat escape under hard braking.

A lot of time and energy went into creating this machine and the owner really digs it, it is just how he wanted it and am glad that i was able to oblige with his demands.

The Customer wanted Gloss Black Rims with stainless spokes and he really did like the way these turned out on the bike and the attention to detail that I am known for on these inline fours.

I always fit an Oil pressure Gauge, as I do not trust the Honda Pressure switch thats behind the Barrels, so these run great and give true pressure as soon as you fir the bike up, as it is connected to the oil galley plug.

As you can see, New Levers, new Control switches, new Handle Bars, polished triple tree, New cables, New master cylinder and stainless nuts and bolts through out this motorcycle.

A great but solid Motorcycle, with aggression when you want it, reliability for everyday riding, and an awesome stance to give it that moving look standing still, sure does sit well in my stable.

I really did enjoy putting this bike together and felt good to know that I had done all and more than the Customer had asked me about, its one fine steed and I enjoyed slinging my leg over it.

I wanted to share it with you guys and Gals and hope you like what I have created too?

Maybe if you are in Milwaukee area, you might come across the KC Special? if you do, take a snap and send it to me, love to see it again.


Working on Customers parts they send to me

Well, I have been really really busy as of late, many of you are at home and are now working on some long term projects, and this is the perfect time to catch up on them “Need to do” lists that you have mentally noted and tucked into the back of your skull, and I do get a lot pf phone calls, emails and texts asking how to repair this, service that or get them out of a pickle.

Nine out of ten times I can help them or at least steer them in the right area and get them on the road, but sometimes there just isn’t a way of completing the issue unless I can physically see it and this is the case with what I have been doing this weekend.

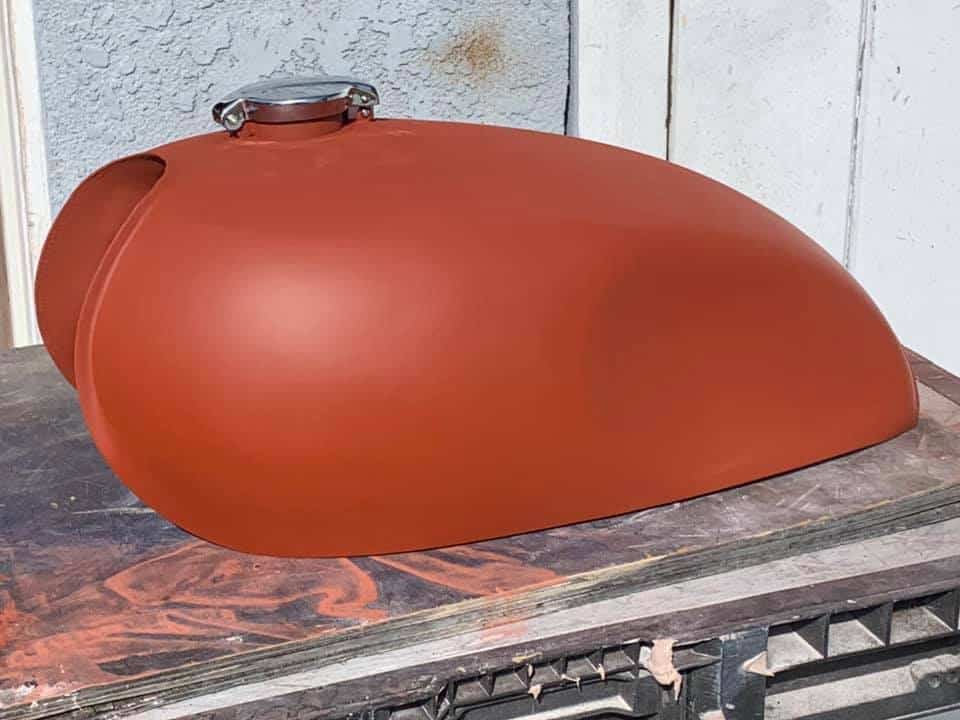
The Cafe Racer machine is synonymous with things like Clip on’s, loud exhausts, sleek designs and even some streamlining of the body work. And the other day a rather Large parcel turned up and on inspection I could see it was a Honda CB500 Gas tank, and it really did need some help.  The Customer had seen my machines and noticed the knee inserts that I hammer and shape into the tanks and wanted to have a go himself- Nothing wrong in that but he went a bit too heavy and put a crease in the tank one side and tore a hole on the other.

This is a tough repair to be honest but I am here to help and over the weekend I am going to attempt to have a smooth hammered Cafe tank all in primer with gas cap and lock and can get him out of his proverbial pickle that he is in. he did a pretty good job to be honest but sometimes these can go pear shaped real fast once you have crossed a line of hammering.

But, nothing ventured, nothing gained is something I tell my self a lot and its time to resurrect an old gas tank and get it to the look that he wants.

I have looked at the gas tank and I am afraid its 86’d, it has too many holes, tears and had to grab another old gas tank to try and emulate the look he was going for, its not the same color but its going to be painted anyway.

Sometimes the gas tanks are bad inside anyway and can tend to have hair line splits, then when you stretch the steel the hairline crack opens up and you then end up with a lot of work to try and fix, sometimes the steel is so thin in places, it is super hard to weld up, even using a Tig, so the thing is to evaluate the time its going to take, and when I did, well, it is far easier to get another gas tank and just begin from the start.

So, another Honda Tank was located and now I am about to start on the knee inserts, but first, you need to remove the tank emblems and the plastic trim that has hardened like a rock and will easily crack off anyway, take out the petcock too.


People ask me all the time, “What hammer do you use to make the knee inserts?”  And this is my personal choice of implement. I prefer the Egg shaped hammer as I can control where I want the metal to go to an extent, some people use other bodywork hammers, it’s Just personal choice.

As you may well be able to see, I tap and tap until I see the side of the tank stretching and then just take my time and keep hammering, it has a long way to go but you will see this change quite quickly and I guarantee to you, your arm will be aching thats for sure.

Take your time as it is way too easy to over hammer and get a crease in the side and that will be a bugger to pull back out, so just go slow, its noisy but its worth the effort of you want hammered knee inserts in your gas/petrol tank. there was a bunch of dents in the right side of this old tank anyway but I got that all sorted after some manipulation with hammer and heat.

As you can see, it is a slow process but dont give up, the more the do, the better it is, I can hammer with either hand now, but I have made many of these over the years but still find it therapeutic.

Well, almost there, just a little bit of spot filler and wet n dry sanding and we shall be ready to send to the customer.

The customer should be well happy with this, he will of course paint it what ever color he likes, this paint is just red Oxide high primer, but covers well and i like using it.

I am now ready to add a New Gas cap and locking mechanism of which will be Genuine Honda.

So, the New OEM Chrome Gas cap is now to be fitted, I prefer fitting these before main paint as when you remove it for final paint, the holes line up nice and the cap shuts good and snug.

I also fitted a Locking clasp mechanism which is stock Honda and these not only work well, it is a nice look against the tank.

I just make sure that the gas cap locks and unlocks and sits well, as if you fit these out of square, sometimes the cap will stick and you cannot get it undone, so just take some time.

So there you go, thats all fitted up and I am more than happy at the way this tank looks now, it took a little time but it was well worth it.

Have a go your self, I am sure that you will get a lot of self satisfaction from changing your old gas tank into a cool unique Custom style.

This is now ready to get packed up and shipped to the customer, thanks for following this Gas Tank conversion and hope that you enjoyed the coverage I have put on my blog this weekend.