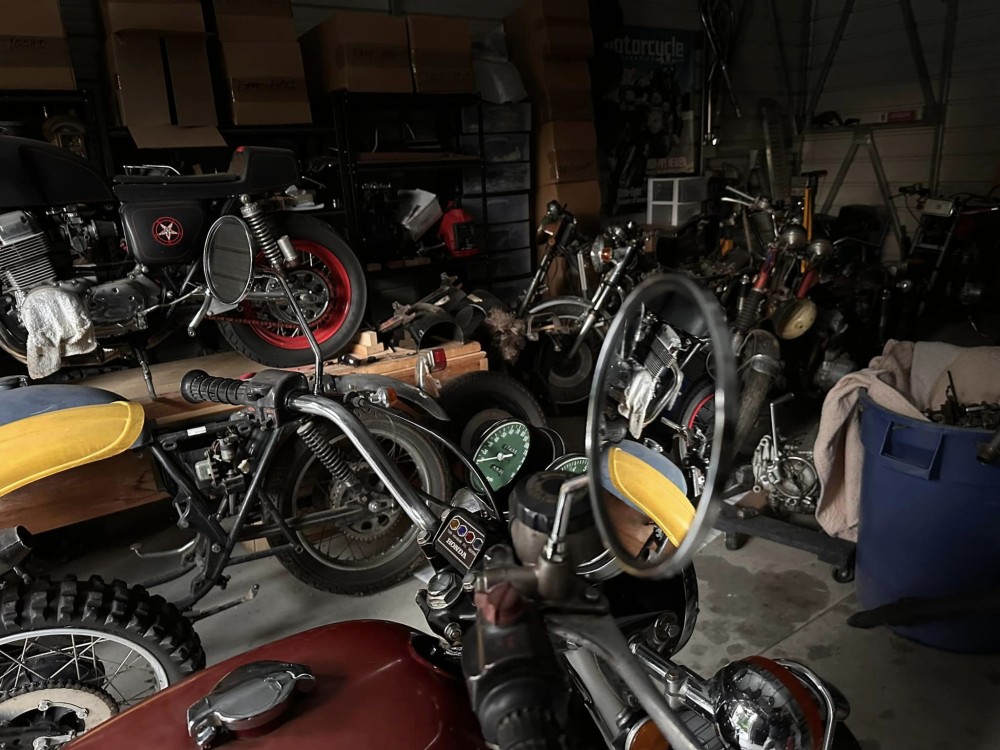
Honda CB750K 1976 getting a little more work completed.

I decided that whilst I have some spare time and a few parts etc I shall get into the K6 a little more and clean her up, as she has sat for so many years in a Back Garden, its only fair I revamp her a little and put her to a more Original style as to be honest, the 1976 CB750K Model was probably the best looking bike of them all and ran well.

So, I thought that I would try and clean up the lower front forks, as the factory clear coat has long gone and and as the sprinklers, hot and cold climates happen, the lower forks and anything aluminum takes a beating.

I jacked the bike up and removed the front wheel, I also made sure I used a pair of jack stands too, just to hold the chassis incase we get an earthquake here in Southern California, as 530 pounds is not so easy to pick up if its laying on the floor.

As you can see, the lower stanchions have seen better days, the pitting is caused after the clear coat gets eaten away by heat and moisture then aluminum will break down slowly in cold temperatures causing oxidization, of which you can see on the left fork lower, but I have refurbished so many of these over the years, I was not worried at all about cleaning these up to a more original look, but it does take a bit of dedication and hard work to achieve that goal, like anything else in life really.

After sanding the forks by hand, I start my process of buffing, using Block  compounds you can buy from shops, to my “Special” Secret Sauce that I have used for decades and slowly improved to get it to the standard that I like, yes its messy but that’s the reward afterwards when you see a shiny piece of art.

Its not a 5 minute process that’s for sure and the more effort you put in, the bigger the reward at the end, this is just its early stage and I increase pressure and change cutting compounds as I go along, remembering that this gets bloody Hot as you increase the pressure on the wheel.

As you can see, that is a good comparison with just a little bit of work, more to do but I am happy how this is going and people ask me how I get the finish on my Polishing, so thought I would share this with you lot today.

Yes, I wore gloves as these get super hot and being aluminum, they hold the heat for a long time, I am really happy how the forks are starting to turn out and am glad that I made the decision to pull the front forks and rebuild them.

So, a bit pf scotch pad, sanding block, then polishing will get you to this stage, I can go more but don’t want it too showy chrome looking and will rebuild these now, the upper tubes are total toast, as you can see below.

The forks at the top are always covered by the headlight ears but Honda did not take into consideration that the metal will sweat in hot and cold condition and of course rain etc can get down the forks and sit there, these forks are typical of the many that I have pulled out of the bikes over the years, so a common problem.

I believe Honda went cheaper on the chroming, using less on the forks as you don’t see it and putting money into the Motor, as I have seen hundreds like this and that’s always been the look when you drop the forks at the top. But I have a Replacement set of aftermarket ones ready to go.

I have always liked Polishing,I was taught at a old 17th century Barn when I worked for Rolls Royce as a kid and it always stuck with me and its so rewarding to turn something ugly into quite the jewel.

I use my circlip pliers to fit the snap ring into the lowers, a real life saver these are as you do not want to risk scratching the chrome by using regular pliers etc.

I try to use Genuine Honda parts where ever I can as the parts are top quality and of course guaranteed to fit perfectly, as many aftermarket parts do not.

I refitted the springs and will fill with oil when the wheel is on but still up in the air, that keeps the pressure off the springs and easier to fill the forks that way and not have the springs flying out towards your eyes if you put the bike on the ground.

So there you go, forks back on and they look so much better than before. I will be fitting New speedometer cable and New Tach and speedo gauges to clean it all up at the front, but she is taking shape and will continue to revamp her as I go along.  I will be fitting Brand New 4 into 4 exhausts to the New Honda spigots that you see in the cylinder head, also New footpegs and New kick starter and brake pedal, so keep watching carpyscaferacers.com and see how we go.


The rebuild of the Vesco Brat Bike for a show

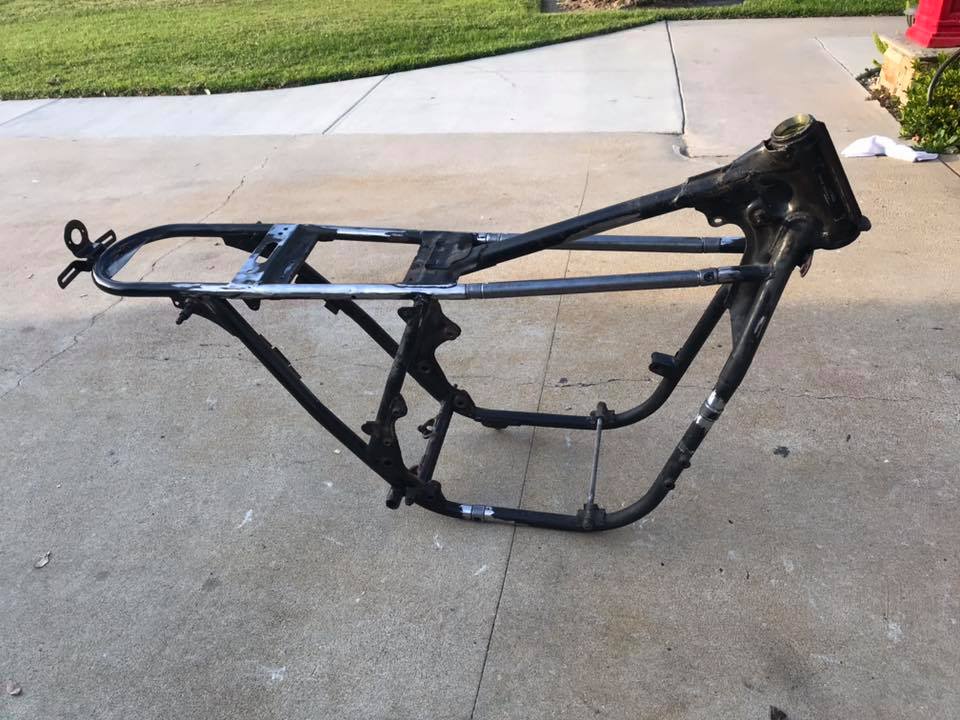
Well tomorrow will be 19 years since I have been doing this stuff here and I am super stoked to revamp the old Vesco bike I created a few weeks ago, but this time I want to trick the frame out before Custom painting it in metal Flake, so here is my Blog as to where I am at with this old 500 pounder Honda Four Machine.

The frame has over 40 years of paint, scratches and holes in it, so need to weld up the holes and of course the new quick release tubes on the frame and get this ready to strip to bare metal, a long Process but I will stick with it, unfortunately we have a few days heavy rain, so I am restricted with what i can do until it warms up.

Made sure that I protected the Bearing races as these are for New Tapered Roller Bearings for smoother steering, the poor old frame was pretty beat up and will need a lot of TLC but I shall get there for sure.

A lot of re-welding needed to be completed and then it was time to start to clean this frame up, this will look so cool in Metalflake paint.

The quick release kit is all welded in and this will be so much easier to fit the motor and to get to to service etc at a later date and am glad that I went this route.

That’s a lot better and now time to get all the paint off of the chassis to see what I have and then can begin to get this to a better standard and looking more Custom too. Video below is just using my Iphone, so not good quality, but you get the idea of what I am doing though.

So, plenty more to do but, as the clouds keep opening, I have to stop what ever I am doing, we had 3 inches of rain today, not good for a bead blasted chassis but I wont give up at all.

Look at the chassis now, way better and now can see where I have to work on and get this bang on, this is almost ready for sealer, then primer, then bondo welds over, then base coat, then flake, then clear coat, so a super long way to go.

The frame rails came out well and am happy at the end result, makes it so much easier to get to the Cylinder head now if I need to work on the top end at a later date.

With over Four decades of paint and stuff plastered all over this frame, this is now so refreshing to see and the skeleton is all set to have some cool plastic surgery.

Now then, I really am stoked to have gone in this direction, I mean, the bike would of gone to the Junk yard and lost for ever, so at least i saved it from there, its not a restoration and not a super rare year either, I really wanted to make this machine stand out from many of the others as it belonged to the Vesco family who are world known for racing and getting world records etc. I am super stoked I decided to make the side of the frame removable and, having steel tubes inside the hollow tubes, makes this frame more stronger than stock.

This will be a cool look, many people will not even notice the Custom fabrication of this inline four but thats OK with me.

So, a little more grinding and then ready for applying sealer and then paint, its all systems go from now on.

Few more little repairs but this will sure look Custm once all the paint and flake grabs the metal and I hope you are enjoying the journey this machine is taking with me?


The Vesco Honda now gets a Coat of Paint

Today was a good day, you know what its like when eventually things start to go to plan, albeit around the houses a little but I did get the end result that I was seeking and today I want to share with you how far I got on with the Vesco Honda CB750 Today.

I wired up the tail light assembly, and these can be no easy task at times, especially when the wires are different colors to the Honda version and no instructions of diagrams, I usually test the assembly on a battery before hand, just to save me from blowing fuses, I keep a few handy anyway, as there is nothing more frustrating than connecting something up on your harness, hot the switch and hear the Phhffft of a fuse blowing and a small small or burnt ether as you start to raise your own temperature and let out a few choice words that would make a Sailor Blush!
So, I wired up the rear tail light assembly, all works great now and, being a LED module, this will make sure that you will be seen in any weather condition and thats a good thing, especially having a strong braking tail light.
I fitted a new battery and leads and fuse box too and am happy at the result for now, remember, this is no show bike right now, I want to get her running to be able to asses the Honda to see what I will need to tear down and rebuild into a show bike, but its fun doing this and today was a good day.
The Gas tank looks so much better now, it was a sort of Maroon Oxide when I picked the bike up and I removed the gas cap neck and welded in a Harley bung, so the top would look a little smoother and more Custom to be honest.
But I was unsure as to what color to have on this bike as I dont really have a them for it, but though that I would go with a cool bright design and use smaller metallic/ flake with the old fish scales and shadowing thats so reminiscent of that 70’s back home in the UK and over here in the states.
As you can see, this really does brighten up the bike and I am happy that this is this color for now, doesn’t mean I will stay with this if I chose to build into a Custom machine but right now I am happy with the look and the side covers flow with the gas tank, thats very important to me and the outcome is pretty much how I first envisioned creating this 750 Four and we are almost there to take it for a test ride.
The Lester rims are tall and even though I am 5″11 I am almost on tip toes when I am sat upon this motorcycle, but I have tried to make the stance of the bike as level as possible, I believe I have achieved this look and my own Brand of Handlebars really do set the bike off better, something I am quite proud of to be honest.
The 4 into 1 of mine looks so aggressive with the tail pipe Cut down low and I wanted a short turn and exit to make this Brat bike something of a head turner, but I have still more little things to do and clean up.
The gas tank still needs to be sealed up as I ran gas through it and the bloody carbs blocked up dues to sediment in the gas tank from the flake in the paint, so I have now taken the gas tank to a radiator shop and they are going to seal the inside the tank and I should be good to go then.
The colors came out well and represent days gone by over the 70’s and I am pretty stoked at the outcome, and with a New petcock and throttle cables, this will last quite some time now.
The side covers are great, and I have just received the emblems to put on the covers, the 750 four script and the Diamond emblem below, so that will set the side covers off.
Obviously the bike needs to be taken down to the frame and all gone through later but I want some fun on it now and hopefully by the weekend, this will be ready to take for a run on the road and see how she is.
So, a little more bits and bobs to do but this bike has come a long way in a relatively short amount of time and I am really happy at the result and the guise of the Honda it is in right now.
Lester rims are Original Race ones from a CR750 I removed them from, front is a 1977 and the rear is a 1978, still need to fit new bolts and a speedometer cable tomorrow.
Sure looking forward to test riding this later on this week, its been sat since the mid 1980’s, so this will be quite a fun ride.
I have just received some side cover emblems too and they look really Nostalgic.

Vesco Honda build so far.

Well, I was lucky enough to get a call from a film Producer, they are doing a TV Commercial this weekend and needed a couple of bikes to use, so I let them take my Sportster Cafe and this Vesco Brat, as its not finished yet but pretty much altogether now.

But wanted to share a few photos of how she is right now as its getting closer to be able to ride, that will be quite exiting as it had not run since the 1980’s, I have fired her up a few times now and happy with the idle and the oil pressure, so this week I shall be able to fire her up and take the bike for a quick run around the block and see what happens.

This gas tank needs painting and I have side covers for it now, just need painting etc, thats why you can see all the electrical and the oil tank, but once it is painted and side covers fitted, the bike will look a lot better.

What then? Well not sure, depends on how the bike runs and handles to be honest, but this coming weekend, Jennifer and I will load the bike up and go to EL MIRAGE, to watch the races, meet some friends and to ride this about a bit.  Sure it will get covered in dirt and dust but, if I am to strip and rebuild this into a show bike, thats not going to matter as dirt wipes off right?

The gas tank and side covers later will be painted a Yellow color, just wanted something really different, so we shall see how that goes.

I changed the front headlight from a 7 inch to a more compact 5.75 version, and to be honest, i really like the look of this on the bike, so will be keeping that on there.

I fitted New foot pegs too, as the old ones were so bent out of shape, this will make for a fun ride, the Brat seat has soft Leather and memory foam, so another bonus there to ride on the dry lake.

I also used my Own brand of handle bars, these are the Euro-Tracker Bars I have had hand formed, then triple chromed and I do love the way they lay on the bike and give the whole machine a different look and feel for that matter.

Yes, its not a finished bike, but- you have to get a bike going to see what the issues are before pulling it all apart and throwing all your time, money and hard effort into a project.

I also pulled the old rusty rims off and had a set of Original Lester wheels that came off a CR750 Honda, the front wheel is dated 1978 and the rear is 1977, the front is a 19 inch and rear is an 18 inch set up, these are getting harder to locate these  days and wanted to use them.

I did change out the swing arm as the old one had been chromed back in the day and the elements had gotten to it and it was as rusty as the Titanic’s Crapper, but I am thinking of remaking some Boxed swing arms again and will offer them on my website when available.

I had noticed that the Kick stand on the bike was an old 70’s Chopper one and it did not sit well, you had to push the side stand all the way forward for it to stay, I looked closer and noticed that some of the frame bracket has broken off many years ago and that is why the side stand would not stand upright.

My trusty Miller Mig welder helped me out and I built up a platform again and used one of my own kickstands, and now it sits right, and am happy with the look of it now.

The shocks were pretty knackered on the bike, so i chose some aftermarket SRC piggy backs, they work fine and are Liquid Nitrogen filled and sets the stance where I want it to be honest.

My 4 into 1 I had fitted great but, this time I wanted to cut the tail pipe right back and fit the baffle just before the turn out, for a more aggressive look and I really do like the look of this system and it sounds pretty tough to say the least.

Later on when I strip the bike down, I will clean up the Lester Rims and re-paint them and add some Knobby Tires, but I am in two minds whether to change the front end for a CBR or, stick with the traditional fork set up and just rebuild the fork lowers and add New Upper tubes that will be 2 inches shorter. The front brake works and thats surprising for how many years it has been sat, its functioning but will of course totally rebuild that or fit newer brakes as I am a dealer for Beringer and may fit their set up, but all depends on funds etc.

It is all to easy to let a Custom build get away with you, financially, I have created some awesome machines for customers but, if you start to add a modified engine, you will be into $5000 in a flash just in the engine itself, these bikes are fun and fast enough, you really do not need a big cam and heavy duty head studs but if you want response, just port and polish the head and go no bigger than a 3/4 street cam.

I love the stock ignition system as they are dependable, I am not a fan of electronic ignition systems and points take very little maintenance, if you keep it simple, you disperse any issues with modified stuff, most of the time its a waste of money as many that have bigger displacements have over heating issues  or head gaskets blow and for what? 10 MPH? Just have fun with your bike, a good pipe and jetting is more than enough for many roads here, of course if you are on a race track, thats a different game all together , but just watch your budget on these machines, as it can easily get away from you and you then tally all your receipts up and have a small heart attack when you add it all up at the end of the build.

So for right now, I will run this old bugger around with a painted gas tank and covers but the rest as she is, as I want to put a few miles on her to see how the motor responds to daily life, then- when I am ready I shall pull back off the road and strip the bike and create a cool Brat bike thats fun to ride and easy on the eye.

Of course I offer these for sale, as thats what I am in business to do, its hard to let them go but I have a New Scrambler I use for riding about and it makes it a whole lot easier to let another creation go off into the sunset and then, the fun begins with another creation.

So, its a Sunday and I have taken a couple of photos and blogged on here today, she is looking pretty fun now and YES of course if someone wanted to Purchase this machine from me as is I would probably sell it, as I love create machines from junkers that have not run for years, but I shall still add more bits and pieces to this machine until I am ready to tear it all apart once more.

This Vesco Brat has a really cool ride stance and I am glad I took a chance and grabbed this inline four, its a fun ride and more to come too.

Hope you enjoyed my Blog today and of course I put the build up on my face book too. steve richard carpenter or carpys cafe racers or carpys garage you can look at any of them pages too.

Thanks for reading and have fun with your project.


Custom Carburetor Lamp from a SOHC HONDA Four

Well, lots of you may know about the bikes and parts I make for these inline Four Motorcycles, I mean- I have been flogging my guts out over them for 18 years here now in Southern California.

But being a Leo, I enjoy many art and craft things in my life and I have been making Desk lamps for a few years now as a Hobby, I enjoy using broken no usable parts and create unique 110 volt lamps to be used in the Home, Shed, garage or in a shop etc, they make a pretty cool gift too.


So many people that have had Motorcycles have always had some broken or non usable parts laying about their Shed, garage or just in a Rubbermaid tub in the back yard, hard to throw away something you paid good money for years ago and even though it is not usable, be it broken, cracked or warped, there is always another life that the particular part can be reused for.

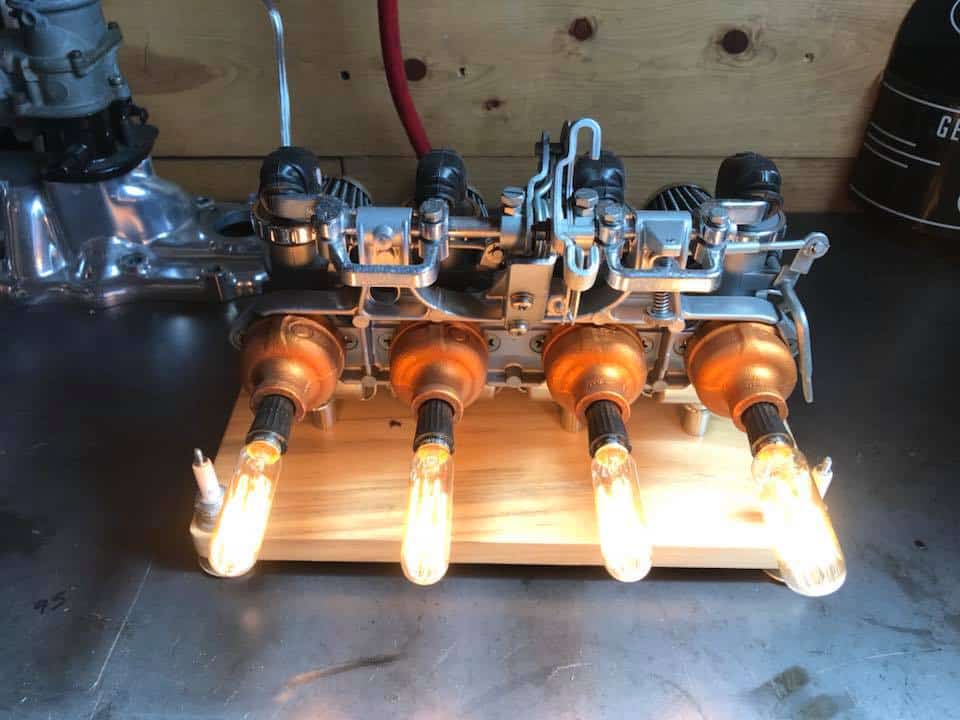
For me, well, I had an old set of broken Carburetors off of a 1974 CB750 Honda, S.O.H.C. model, I would loved to have saved these carbs but the posts inside were broken and the seats where the slide sat. had worn past its use and were no use to anyone on any motorcycle, but, I couldn’t bare to get rid of them and simply toss them away.

So, what I ventured to do with this rack of carbs was first to thoroughly inspect them to see if these were savable, of which they were not- then I wanted to take these all apart and wash them with S-100 to get oil deposits off, then put in the vapor Blasting cabinet and clean everything up, as Vapor honing will bring the aluminum back up to how it was when they first arrived into the Honda factory.

So, I removed all that I could and Vapor Honed the bodies and made sure everything was clean and ready to get transformed into this unique Desk lamp that I had come up with, I have made a few of these now and seem to be a hit, so continue to create these great Lamps for people as they tend to have them made for their Business, a birthday or at Christmas.

I put this together as carefully as I would if it was going to be used on the motorcycle, took me a little while to get the wiring done and had to drill some holes to allow the cable to run from one Carb body to the next.

I Polished the float bowls and the Knurled top rings, as I want the carburetor to pop when you see it and also gives the carb rack a nice contrast when its mounted on the wood base that I shall be making. I used Poplar Timber and cut to shape it, rounded the ends and then sanded and stained to give it that old timey look.

I mounted the carbs using some old Chrome spacers I had in my parts drawers and these seemed to work out just fine for the height of the carbs as I didn’t want them to sit too high up in the air.

You will also notice that just as an embellishment, I fitted a Spark Plug at each corner of the wooden base, to give some Status Quo, of course, it had to be a set out of a CB750 Honda too.

These plugs were pretty sooty and set the base off very well and indeed, as well as a good connection for the carbs as these are Genuine NGK units I have always used on CB750 Honda’s.

See, they look great lit up and give that warm glow and give to a new life now as something else but this is a real head turner and quite the conversation piece where ever it is located.

I also wanted to incorporate these Vintage filament bulbs too and these really set the whole piece of and am stoked the way these have turned out in the end.

So, let me know if I can help you create a unique lamp out of parts, it takes a little while but its so worth it in the end and of course, always good to recycle stuff right?

I have made a few different styles of these Lamps for people over the years and enjoy what I do, I throw myself into the design and love the outcome when it is completed.

Drop me a line if I can be of help to you at carpy@carpyscaferacers.com or drop a dime at 714-598-8392, you can even text me on that number too for that matter.

I make these parts starting with small lamps at $150 then go up as per intricacy.

Thanks for looking at my other creations, it makes my career a fun one.


New ceramic Bronze Exhaust systems now available

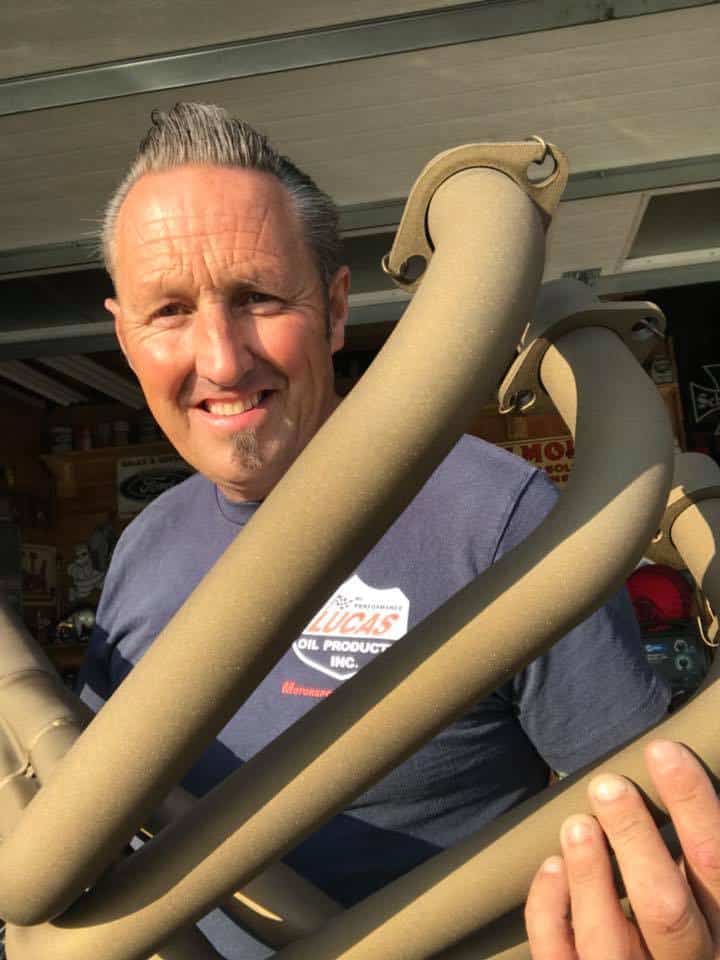
Well, I have now added this great Custom Burnt Bronze metallic ceramic Coating color to the 4 into 1 Exhaust systems we make, this is a superb Custom application that really enhances the look of your two wheeled machine and wanted to show you how great this looks.

Its almost a Metallic look and I love the way it looks and this is a New look for Exhaust systems and wanted to offer this color on the systems we manufacture here in California.

We ship Globally and this is a 2 piece set up so easier to fit and cheaper to ship as well.

I am glad to offer this Color to you and you simply go to the exhaust page and chose the Ceramic Color you would like, be it Burnt Bronze, Black or Silver, as well as Raw Steel or a show version of Stainless Steel.

These also come with a Chromed removable Baffle and what is good about my systems is that if you wanted to, you could cut the tail pipe down to the length you lie and the baffle will still fit.

So if you are looking for a Custom Exhaust for your inline four from 1969-1978 SOHC Honda or even the DOHC version, we make them here and offer them to you in different finishes.

Our systems flow and Perform, over 1500 systems sold around the globe and over 18 years in business, love doing this and we get great feedback and many repeat customers too.

Thanks for looking, I love this Color and look forward to seeing it on other Customers machines, let me know if I can help.