The ‘Hot Tamale’ Otherwise known as the HTML

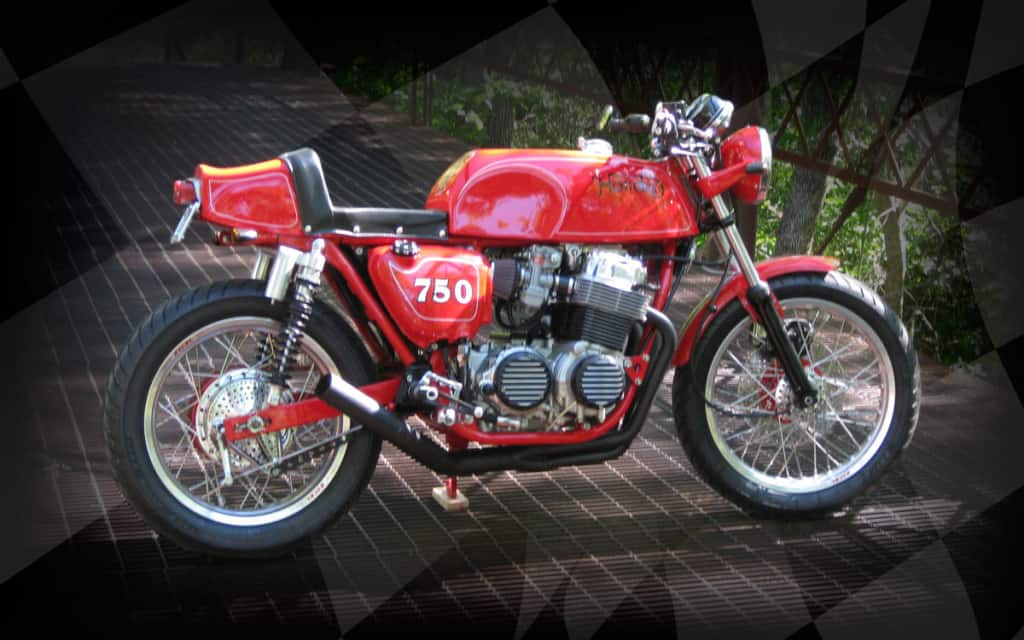
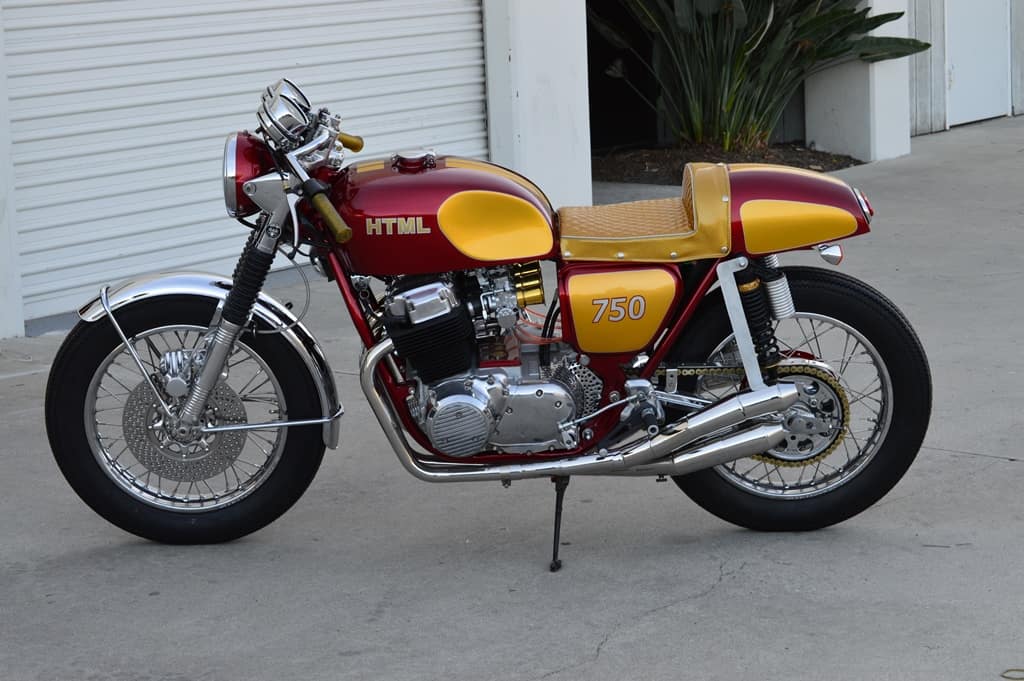
Well, this time we have come up with a fun concept for this machine, started off as quite a loud and obnoxious Orange color that would never get lost in a parking lot.  This bike is actually a friend of mine and he has designed me the New website.

So-if you need a web design or anything web related drop him a line atchristian@riggscreative.com

A very cool guy that will walk you through what ever need you require and, at a very affordable and workable price too.


So I always need a wee bit of information on the bike etc and what the owner does before I get started, as that gives me some cool insight to what they do and then can try and think of a name or theme for that creation.


The color concept on here right now was right ut of the 70’s and had quite a lot of corrosion from being sat outside for many years.


Christian purchased the bike down near the border in San Diego, so I thought that a cool name for this machine would be Hot Tamale, seeing as it was close to Mexico, but also as a double barrel, I am going to have the initial of that and it will say HTML, but thats also the machine code for websites etc and a great tie in with the owner.


To make the right start, I stripped the bike down to the frame, bead blasted it until the metal was clean, filed the frame for any imperfections, then all the hard work began on this as the whole chassis then had all the welds covered and smoothed and then 6 layers of high fill primer that was sanded by hand to get a really smooth finish to allow for a few layers of Candy paint to be applied.


Hard to appreciate the time and effort that goes into the preperation of a show quality frame, but this had so many man hours into it.

As you can see, this is a long process and to be honest you haven’t seen much of the entire work that has gone into the frame alone, first the frame is bead blasted and cleaned, then the welds grinded and filled smooth, then hit with high Fill primer and hand sanded until a smooth finish is acquired, then it has to be sanded again and the base coat of Aztec Gold needs to be applied.

IMG_6265


This machine undergoes so many procedures and work by hand, until you have tried this yourself, you will never inderstand the man hours alone just to get the frame completed as well as the tank, side covers and seat, as these have to all be painted at the same time as you cannot for the life of you, match candy paint.

IMG_6264

So, now all the parts that I want Candy have now been spainted and sanded and ready for the Color, and the color is Hot Tamale Candy, which I wanted to match the Red from the real Candy you used to buy as a kid and still available today. To get the Candy color of the kids sweets, I used an Aztec Gold base to set the base.

IMG_6260


So now its time to get some paint to try and emulate the kids Candy from the local store.

hottamales-retro

It was fun trying to match it but we managed to get it bang on to be honest.

Tamale

I am So glad that trying different colors finally worked out to the shade of Candy red we wanted and had to count all the coats of candy Red to make sure that it matches the rest of the parts, else it would all look different shades, Candy is one of the hardest to paint.

I think I did pretty good and as I said, this is a double barrel name so it works really well, a hot color that will really pop under the sun.

 Now the work begins on this machine and I have to be so careful not to scratch any of the paint work as you simply cannot match this color by touch up.

 I am being as careful as I can, but still needed a soft hammer to tap the swing arm into lace and then push through the spindle, and- this is all on my own today so really have to be careful.

 I rebuilt the front end and made sure that I chromed the lower tree, and then polished the upper to look as good as a chrome finish, then simply added the races and new grease and bearings.

 Front forks I machined and magnafluxed, and New tubes, as well as new seals and hardware, makes this stand out from the crowd, i am just going to add old rims as I am going to be polishing the hubs and painting Candy red in the centers.

Next up is My Hand made Battery Box that’s made from 6061 Aluminum and we use brass Rivets to give that Aircraft quality, nobody was making anything for the SOHC bikes and I needed some cool parts for my own machine and set about designing some neat styling to add to your inline four and from there on I continued to make more parts.

 This fits in the original area that the stock battery did, but you must admit, this looks way cooler? I have always liked the Hot Rod styling and think that this design of mine pulls that look off big time and is a very functional lightweight piece for the bike.

 So much to do, in so little time, but rebuilding is always fun when everything goes to plan. I was also fed up with dim headlights and not a huge fan of turn signals and wanted to clean the front end up, i started to fit these to bikes years ago and now it has become quite popular but I fitted my 32 LED Light and the internal signals are bright and very very cool.

So easy to wire up, they look clear, but when the turn signal is used they glow bright Orange.


Now onto to some cool stuff, as I thought long and hard about this creation and she sure is going to be bright and attention getting.

I then used brand New Genuine Honda rims and after the hubs were stripped, polished, painted and New bearings fitted, re-laced to the rims and finally, throwing on some vintage style Firestone tires to have that old School Custom Look.

I drilled more holes in the front Rotor than BP has done in the Louisiana state, then polished the center.

Just have a look at how much work this takes, I stripped the forks and then machined the fins into the lowers, then I magnafluxed them to check out of there was any hairline cracks, once that was established I polished them and fitted the dampeners and then brand New fork tubes and seals, as well as fitting New Black Factory gators and New chrome fork ear clips, to really make this stand out from the rest.


To match the front Brake Rotor, I did my usual and drilled the rear brake hub, then polished it to a chrome like finish, fitted new brake shoes, actuator and springs and this looks killer.


This makes all the difference when painting the center of the hub and making final touches to the rest, this is one sweet rear wheel.


With New Bearings, and I also powder coated the rear sprocket to match the tire, gives it some contrast, I even chromed the safety ring to give it a little more Bling.


 Of course, I stripped the original rear swing arm and then chromed it, fitted New Bushings and plopped this all together on my own on a Saturday afternoon.

 OK, this time I fitted brand New piggy Back Shocks, new Honda hardware and our 2 inches extended Alloy Shock lowers, gives this bike the right stance.

Oh yes, one of our finned rear spacers was a must on this creation.


 I like the way that this bike is taking shape and the Customer is letting me run with this, so I can use my own creativeness.


How can you not like this?   It really is a warm and Custom color that will really stand out where ever the bike is parked up.


Christians machine will get a lot of detail and a mixture of Aztec Candy Gold and the Candy Tomale Red to show this unique machine off.

150

As you can see, the Motor is in and she really is a head turner, I am going to do many cool little attention details you may not even notice at first but the owner is super stoked and thats the main thing for me. I am wiring the bike with all New wiring and New OEM controls.

010

As you can see, Aztec Gold and Candy hot Tamale red is a great Combination, the 750 digits are hand painted there are no decals here on the bike at all.

014

So, with the Side covers fitted, I also Chromed the oil tank and then machined some Dipstick caps to embellish the top of the tank and go with the flow of other finned alloy parts that are through out this machine.

013

.Other things you may notice on this ride is I have started to fit the mounts for the Rear sets as these will set the pace of the bike and Instead of the stock Anodized black versions you see, I stripped that all off and polished the body to a chrome finish and really sets that off.

Below , this is how cool the turn signals are that are inside the headlight.


????????????????????????????????????
What do you think? very crisp, sharp and modern, with a touch of yeaster year thrown in too.
????????????????????????????????????
Been seen and be safe, that’s the name of the game these days and you will be seen with these 32 LED’s when they flash for sure, looks tasty eh?
????????????????????????????????????
The rear Brake hub got all the attention as this will air the rear brake and help cool it too, but has the old school look of the racing days too.
????????????????????????????????????
The Front sprocket cover got the same effect to make the design flow, polished Alloy looks so classic.
????????????????????????????????????
I drilled the front Rotor and machined a smooth face, you try drilling and countersinking on an old drill press, takes some time but worth it in the long run.
????????????????????????????????????
As you can see, I have used brand New rims and then used New Polished stainless steel spokes to give this bike a Classic era look, I also polished the hubs but painted the centers to match the frame paint just to add some more detail to the machine, and a OEM front fender hugs against the bigger Firestone tires.
????????????????????????????????????
I stripped old forks apart, machined the lowers and then magnafluxed to check for any porosity or fractures, but all good, then polished and rebuilt with new fork tubes and oem Chrome Caps and fork gators.
????????????????????????????????????
The Carbs were stripped, dipped, powder coated and rebuilt, also used new OEM intake manifolds with stainless rolled edged hose clamps and dressed with machine turned velocity stacks that set off the gold of the paint.
????????????????????????????????????
Original Race Crafters finned Points cover was addd and my own machned engine covers were attached to give that Hot Roddy styling to the Motor.
????????????????????????????????????
Sticking with all the speed Equipment, I machined an oil tank Cap and that really does set the bike off as many miss that part on a build.
????????????????????????????????????
The rear shock reservoir got the same treatment to make all the lines flow on the bike and I loved the outcome.
????????????????????????????????????
The kick starter is only for looks as we have Rear sets and an electric starter, but wanted to leave the kick starter on the bike do drilled and chromed it to make an accent.
????????????????????????????????????
So many details, where do I start? But as you can see, I have polished the upper triple tree, I also made handlebar extensions to lift the bars up 2 inches, New handlebar controls, Custom Flake grips added, as well as New throttle Cables, levers and the master cylinder I stripped the anodizing off and polished to a chrome finish. rechromed original fork ears and added my Custom badges to the sides.
????????????????????????????????????
These are the Original gauges but rebuilt them and look so much better now, I also added a Display bracket for the bike and will add a watch or compass to go in the top of the bracket.
????????????????????????????????????
There is so much I have done to this machine but you can see from the photos that this is very detailed and hope that you like it.
????????????????????????????????????
I also drilled the starter cover and fitted Gold Mesh underneath to give the bike a little more style and the exhausts are a one off and hand made section by section, a long and laborious job but boy did it turn out nice in the end.
????????????????????????????????????
A very unique style that I was gunning for, as i wanted a similar shape to the old MV Augusta motorcycles of the day and they sound awesome too.
????????????????????????????????????
This bike is tall as the owner is over 6 feet in height but sure has come out great, I used my Rocket four seat base and upholstered it with original Metal-flake Aztec Gold material and then added my oval LED stop-running light that sets the rear end off.
????????????????????????????????????
The HTML or Hot Tamale as many know it comes as a double barreled name as the Owner of this machine is a Web Site developer who helped me design my New site and does an awesome job of building sites and helping in computer program coding and HTML is of course the coding, so thought it apt I added the lettering, it is hand painted no decals anywhere on the paint at all.
????????????????????????????????????
As I said, she sits well, no blocks of wood for the side stand to sit on as MY side stands are made here and they dont need any assistance like so many buids you see out there, she stands on her own, high and proud,
????????????????????????????????????
A great machine that looks very stylish and the owner loves the bike as we were in communication all the time with it and I am pleased to see it completed as it was a long journey but worth it in the end.


IMG_5329

This Motorcycle looks great and from any angle too, I am happy with the outcome and with Christians input, we managed to knock this build right out of the park for a well earned and deserved Home Run!

IMG_5321

Here she is on the San Diego side of the road, taking in some fresh Grey air as even the Gods were trying to Thunder clap their applause at the creation of this motorcycle that took a long time to get done right and to how we both felt happy with.


IMG_5317

Here she is sat on one of my Side stand, no blocks of wood or bits of metal to have it sit against, she sits loud and proud and a wicked machine.

1111

With a Blue sky above, the HTML really does stand out amongst the crowd, this was a long journey but the end was such a great uplift.

IMG_5294

Even at night she will turn more heads than a Dewalt cordless screwdriver.

IMG_5410

.Even stands out in a stable of thoroughbreds, a fun bike to ride and look at and hope it gives miles of smiles.

IMG_5327


Keep you eyes open for this Motorcycle if you are in the San Diego area and make sure you say hello to Christian the owner, as he will be more than willing to talk about the bike and how it became to be.

IMG_6157

These sweeping pipes are a sectional custom set that I do not want to reproduce, so many hours but so worth the look at the end of the build.

IMG_6166

Thank you for looking at this magnificent machine, it is always nice to think out of the box and as Sir Winstone Chruchill once said.

“Onward and Upwards” To the next build. Its been a long build but the outcome made it all worth while.

THE REVOLVER, A Golden Cafe Racer now in Australia.

The REVOLVER : This old 1976 Honda is gonna get a make over.


Here are the good photos, then below the ones I took with my phone to show you the build up and what I had to start with.

I put so much work into this machine and it really did turn out to be a Jewel, just like the Gauge faces I designed.


The Gold flake I bought and had to spend about 2 weeks getting the frame shaved and smoothed before even applying the base coat.


This bike was built and shipped to the other side of the world to Australia where it now resides.


I am sure you wont even notice half the detail I have put into this machine but I really wanted to keep this bike once I had finished it.

This really was a fun creation and it certainly drew a crowd where ever it went, the gold flake really did its job well and stunned man people looking at it.

I wouldn’t mind building another in this guise as it just is a cool piece of art as well a great riding stance. the Motor was built to a tasty 836 and ported, then the bike got tons of cool Original parts like the 70’s velocity stacks etc.

I should of taken more photos of this bike as I get many emails asking about it and what I did to it.


I know- I know, you cannot stop looking at it, its a rich Aztec Gold flake with tons of clear coat on that puppy.

Yes, Gold bolts and gold Shocks etc as I wanted this bike to have some sort of flow to it and I believe I did create that look, the Gold Chain is a $230 DID and boy does it hold together well.

Yes, one of our swing arms that we Chromed, came out pretty cool and I am glad i went that route as it all ties in with the name revolver as they are like Bullet holes.

I machined the forks and magnafluxed them, then polished a rebuilt, as well as polished the front caliper and drilled the brake rotor.


The bike took on its very own unique look and I loves the aggressive stance to the bike.


I fitted one of our Yoshimura style 4 into 1 exhaust systems to this bike and it sounded like a scowled Cat!

The front end of the revolver did look quite menacing and we actually lowered the front of this motorcycle 2 inches.

Just look at all the detail, I added Braided Throttle cables, Tach and speedometer cable, as well as the Clutch cable too.

I like to use the good old Bridgestone tires and have used them for decades.

So many cool parts that we sell on this bike, the rear sets, the engine mounts, exhaust, oil breather, battery, leads, velocity stacks, pretty much all you see here you can get from us.

Just a well rounded Custom Built machine and the Customer got all they asked for and much much more and now it is on the other side of the globe.


Polished hubs that are all rebuilt and then Painted rims with stainless spokes is a great contrast to the bike and am glad I chose to go this route on the build.

A Classic stance of a Classic Cafe Racer, this is something that I loved to build and could use all my creativity and the customer was over the moon with it.

I hope that you enjoyed the photo’s of this machine? the build is below but thought you would want to see the cool photos first.

So, here is the build up of the bike known as The Revolver!

Just some little video I did the other day.

Here we go with a super cool ride that I have been commisioned to create for a Rocking, Bopping Girl that loves bikes and Muscle cars.

This thing is gonna really turn some heads when I am finished and once completed, will be shipped to the otherside of the globe.

So, I chose an old snotter that I had in my back yard, it has sat for over 20 years and about 5 years in my garden, so there is all sorts of crap all over it and more spiders than an Aracnaphobia movie.

So, once I busted a nut pulling the Monster from the back yard, I had to lift it in the back of my Silverado and get it to my shop.

Hoping that the wind from driving along the freeway may blow some of the cobwebs and snot off, as it sure is gonna be some task to sort this thing out.

But I have done this many times and I am sure that this will be a great looking ride and she will have miles of smiles for sure.

This bike was an old Drag racing machine that was riden to the track and raced all night and then ridden home.

But that was well over 20 years or so ago and this bike really is in need of a total restoration, and I will pull the bike completly apart, take the motor out and get the frame all cleaned up.

There is rust on the frame too and I can see there was quite a bit of Bondo work put on to cover the factory welds, but, they have all got contaminated with weather and I am going to not only strip the paint, but will have to dip the whole frame in a Costic Soda tank to remove everything thats on there, so I can begin with a fresh clean frame.

The gas tank is totally goosed but I shall be using a 750F gas tank on this build, as this is what the customer wanted and it will really make the bike flow, I shall also be ditching the seat from here and using one of my Clubman seats, as thats a great set up and brings you a little lower to the floor.

This frame needs some additional work as I will be stretching the rear of this chassis, to accomodate the seat section.

The front fender is too rusted to save and will probably fit one of my Shortened Race fenders to it, as well as making the front forks look more appealing.

I think the rims will be replaces and I am going to use steel rims, but paint them Black and make this a stealthy set of rollers to offset the frame, as the frame is gonna be a killer full metalflake Gold.

Totally cool set up and this will have some real neat touches to it.

The Motor has sat for years and is seized up soild, so- A total strip and replacement of parts if going to be needed, and I think this will be banged out to 836cc using a Wisco set up that i am now a Dealer for.

But I have to get all the crap off the motor before I even attempt to pull it out of the frame.

As I said, this is a challenge- but once completed, you will never know to look at it- that it was the same bike.

I took this apart at the shop and boy did it take some time to remove parts, as many bolts were either seized, or the heads were rounded off etc, plenty of swearing and banging , late into the night was heard from my shop.

But I got it done and the frame is now on its own, I have stuck the seat base on to see how much I want to change the frame itself.

And I am sure this is going to work out pretty good in the end, and am eager to start the process now and mold this thing into something really cool.

I cut the old brackets off and any tabs, as well as the old exhaust triangle bracket and shortened it, so that the rear set will fit snug.

Now the frame needs some work and a new back bone made and tig welded to the rear.

This will give it more length and strangth and the seat can bolt up alot easier from within the frame.

This will really help with the clubman seat and boy will it strengthen everything, I am happy with the outcome of this set up amd may offer some kits to do your own like this.

Now that all the parts are grounded off, this will be ready to get dipped and then blasted to make sure everything is cleaner the my cats sausage.

Well, the frame came out really clean and I am stoked that this has no bad faults with it and will make the painting process a lot easier to be honest.

Now here we are with all the GOLD flake on the chassis, this was cleared over 3 times as well, just to add to the dazzle.

You should be able to see this from the Monn.

Now the rebuild continues and this will really be something else once altogether.

Right, first off I have to build the front end. So I have taken the stock triple tree and Chromed the lower section, and polished the top to a chrome finish.

This looks really classic now and offsets the sparkle of the frame.

I fit new bearings too and new hardware to make this as smooth as silk to turn.

This time I went ahead and powder coated the Clubman bars a gloss black, as this will offset it all and match the tires and the Motor, so everything kinda flows.

This is a fun build for sure. And will continue to be as I go along.

OK, the forks were in need of dire repair and wanted to strip all the crap off them.

I then machined the forks with my signature styling and rebuilt the internals and NOS fork cap.

Front end is taking shape and everything seems to be flowing nicely, I love this machine already.

The front wheel is now all rebuilt, it has Powder coated rim, with polished stainless steel spokes, the hub is polished but- the centers painted a gloss Black, this really looks the ticket now.

Also new tire and tube fitted and I hand drilled the front rotor to finish the front end off.

Even the speedodrive unit got polished to hell.

The frame and the Chrome and Black is a really good combination.

Ok I am gonna really push the boat on this and next is a cool rear swing arm that is my design.

Not only is it a boxed dresda style swingarm, it is detailed and chromed, I love this set up and am sure you will too.

This will definatly turn heads and it really is a cool piece that will make the rest of the bike flow.

I have also fitted a cool set of shocks to this with new bushings etc.

I cut the frame at the lower end to allow for rear sets too, this will be so much fun to ride.

I like the swing arm set up and am pleased how easy it fitted into the frame.

OK, now time for the rear wheel set up and the brake system.

This will be as detailed as the rest of the bike and want this to stand out as well.

I used a new rim this times as the old one was shot to bits, so took the chrome off the new rim and powder coated it Gloss black.

Then the hub was all polished and sprayed the center black.

I then had stainless spokes thrown in for a great looking set up that will last a long time.

I turned my attention to the rear brake hub, this time it needed a lot of cleaning and I did all that by hand, then it was time for me to start frilling my signature styling in this hub.

I never have a pattern, i just go with the flow and what ever turns out is what it will be.

I really enjoy this parts for some reason and take a long long time to get it how I want and my arms are killing me as I drill this by hand.

After I have the effect I am happy with, I clean it all again and then buff the balls out of it, until it looks like a milky chrome finish.

Now, this looks really cool, so I then rebuild all the brakes using new parts, new shoes, new springs and even new cam.

Once this is all together, I fit a new brake arm, but this one I drilled and powder coated Black to give the offset and boy does it work well.

The wheel of course gets a new rear tire that is nice and fat and should sit well in that Chrome swing arm.

I am stoked the way the swing arm looks, and fitting the 16 inch rear wheel inside that void, will definatly make this rear end look tougher than old bacon.

I also used one of my New axles and of course my Finned rear wheel spacer, just to add to the detail.

I shall be running a $250 X- ring chain to make sure this thing gets down the road with no issues.

I Could not use the original brake rod, as it was a rusty as some of the old Gas tanks I have had in my yard.

But, I now have New brake rods available and use them on all my creations now, stops the headache of trying to bend the rods back into shape.

I cleaned the brake arm up and fitted to the frame, making sure to add a dab of grease inside the frame, so she moves smoothly.

Then I fitted the brake rod and used New Honda brake hardware, so everything is clean and looks great.

Be like a Brand new machine when all is said and done and many miles of smiles are gonna be had, that’s for certain.

Right, next up, I wanted to spend some time working on the old Gauges, as they had seen better days, with 30 odd years of sun, rain, wind and crap etc, these took a real battering.

These were in need of some ressarecting and I thought that I could strip all these and make some cool custom Gauges that would set the front of the bike off really well.

Now I am stoked how this came out.

I used Gold Flake this time.

You will notice that I have put Bollocks at the end of the speedometer reading, a great expression for OMG.

The faces of these set the frame off too and all hopefully flows in the design I have come up with.

I am sure these will get many comments where ever they see this machine in Australia.

And I am having fun with this build, this is gonna be a real kick arse bike for sure.

Right, The wheel is all laced and with Polished Stainless spokes, new tube and a big fat Bridgestone tire, this will fill the Custom chrome rear swing arm out nicely.

See how cool it looks? I love this set up and am sure Jess will too?

New Brake rod and all the internals are new as I am a distributer for EBC brakes now so good stopping power.

The flake frame is awesome and now the task of putting her all back together.

So this time I am putting the Motor in, it is now an 836cc and will have fully rebuilt carbs too.

The Engine will be a mix of High temp wrinkle Black ( Kinda Hot Roddy) and some cool hand polished aluminum.

The motor is in and now needs to be detailed out.

I still have to polish paint and fit the finned parts of which I am going to re-cast again.

This is gonna look tasty for sure.

A long way to go as yet, I have ordered a New wire harness from Japan, I also have ordered New switches, i had one of them turn up from Tokyo yesterday and will be fitting that to the handlebar tomorrow.

The switches are going to be New old stock too.

But all taking shape nicely.

I am making the steel Gas tank and also engine mounts with a few cool details thrown in for good measure, its fun but long days at the shop but I am glad I do this and have been for 10 years in the states now.

Oil pressure gauge will be fitted, just drill and tap the oil Galley plug, fit my elbow and your choice of gauge, this time I wanted to Hot Rod it a bit so chose to fit a MOON gauge.

The Bike is taking great shape, the carbs are now ready to get fitted, as they are all rebult inside, the carbs will be sincronized once the Motor is running.

But this has the tops of the carbs and the bottom bowls polished, to make this stand out.

I also located a Original set of Aluminum velocity stacks for this ride.

These really well set off this machine.

Look how cool these are on the Carbs now.

I dig the whole set up now.

Alright, I have now started to get more stuff done and have been burning the candle at both ends recently.

Next up for me was to cut and fit a X-Ring Chain, I use these all the time on my machines, they are Bloody expensive but-worth every penny,.

So, I put the chain on the bike, taking all that crap paste all over it so i can handle the damn thing, measure where I want to shorten the chain and then I mark the chain with a Black Sharpie.

I then grind the head of the rivets off, as that saves my chain breaker from bending the pin, and then use the Chain breaker to take the chain apart.

I simply fit the chain and adjust the wheel adjusters for the correct slack that is required for this ride.

The Chain looks great with gold and black and is a super strong set up I always use these chains.

Now I need to get the old front sprocket cover and clean all the oil, grime and snot from it, so it is clean enough for me to handle.

Then I drill the thing to a pattern I like and see where it takes me.

Now thats all polished up, she is ready to fit over the New chain and sprockets and add New stainless Allen bolts too.

This now looks way better don’t you think??

I have now sorted that out and now on to other things on this ride, this time I have bought New levers for the clutch and the front brake.

Now to fit to the NEW left hand side handlebar switch. Notice New adjuster too.

I will make some braided hoses up for the front brake set up and this will be a nice looking front end.

I like the way this is coming along now, not too much more Mechanical to do, then its body work and thats gonna be a Royal pain in the Arse.

OK, next is to get some braided lines for the throttles, Now, I cannot make these, simply because I do not have the tooling for it, but- a local company to me can make them for me.

The throttle cables, the clutch cable, the speedometer cable and the tach cable will all have the silver braided hose effect, this is cool and adds to the bike.

But beware, this is not a cheap option.

Your looking at over $500 for this set up, so you may want to just go with the stock black cables right now.

These really are cool pieces and am glad I went this route on the bike.

I have also added braided hose to the front brake caliper and up to the master cylinder.

Next up is electrical and of course Coils etc.

I have purchased Brand New Genuine HONDA coils and plug caps, as this is such a nice ride, I cannot go any other way to be honest.

So I am now fitting these to the frame, I usually run the throttle cables under the coil body and run the harness along side the frame rail.

Next up is to now work inside the headlight, as when you fit Clubman handle bars, and you have the stock switches, well, the wiring is way too long to use, else you will some how have to bunch all that excess up and see if it will fit inside the 7″ headlight bucket, and most of the time it will not and probably will pul some of the connectors from out of their holders if you try that route.

So what I do is simply shorten the wiring for the switches by about 10-12 inches, I snip them off with wire cutters and then I cut back the outer sleeve, and expose the colored wires.

From then, I simply strip the wires back and then fit the Honda Rubber sleeve and then I use the Honda male or female connector and crimp them in place, exactly the same as Honda used to do back in the day.

The wires are still the same color sequences and simply connect all them back together again.

Then the headlight will fit in the bucket with no issues.

I also then fitted a Brand New non- maintenance Battery, and a new Positive terminal strap that I purchased from japan, once that was completed, I fitted a rubber battery strap across the thing to make sure all is safe and secure.

I always use a battery tender of some sort on all the bikes I create, its always good to have a strong battery if you are going to use the starter motor and this set up will always give you a strong a responsive battery.

I also wire a temporary rear tail light and turn signals, and also made a new front headlight socket, of which I shall offer for sale soon on the parts page.

I hooked the headlight up and tested it with the NEW ignition switch I purchased, and all works well, I am a happy guy now thats out of the way.

I did the same with the rear tail light and that works fine, I also checked the Horn, and the starter button and as expected, all worked as it should do with no issues at all.

Brand new igniton switch thats a genuine Honda part from japan, as this is a must for me, .

The bike is coming together neicly now.

Try and treat your self to a battery tender, as once it is plugged in, it will only use maybe a penny a day, as it only charges when the battery needs topping up with power.

I use this strap on all the bikes these days.

The Gas tank is looking cool now.

The bike sits well and I  am happy with the end result.

The paint work really is a nice touch and in the sun it will really gleam on it and show the metalflake to its sharpest quality.

This is just a cool ride, what ever way you look at it.

This has turned out to be a really cool build and was fun to be a  part of.

it is now on its way to Australia where the New owner will have a Blast with the Revolver.

I notice many others into it and using my designs and techniques, but- they will be onto other things later and I will always build bikes and Hot Rods, its MY way of life, not just a job.

I have always dug older stuff, especially 50’s style Hot rods.

The Lunsford Honda CB750 Cafe Racer

Well, sometimes we get some cool rides to create for customers and this one is by no means any exception.

To set the scene, I was approcached by a chap on the ear trumpet and generally inquiring as to designing and building a super cool cafe style motorcycle for him but as he was not getting any younger, could we maybe use a different set of handlebars so as to not give such an aggressive rake to the motorcycle.

So, the seed was planted and away we went with a cool, unique machine that the customer was requesting, he then informed me he owns a HONDA dealership in Texas and is the biggest dealership around and has been there for 30 years, Holy Moly- this bike had better turn heads,else I shall be in trouble.


So, with a bunch of old donor parts, this machine had to be begun from scratch, and to be perfectly honest, I would rather do that, as then I can get right into the bike from the frame up and, below is just soe of the photos of things that we did to make Ronnies machine spring to life.

I cut the frame to as how I like it, so that you can attach the Rear sets and not show any of that ugly triangle framing that used to be the original exhaust and rear peg hangers.


Next up was to smooth the frame and then bead blast all the old paint from the bike and then hit it with a Hot Honda Red, although this photos shows its more Orange but it really is a deep and Hot Red and you will see that in other photo’s below.


We also ditched the Original rear swing arm and opted for one of our Dresda Style Boxed swing arms and with the new bronze bushings etc, this should stiffent the rear of the bike up and make it fun in the twisties.


We did spend a lot of time on this frame, I hate to rush things and wanted to be very sure that I was happy with everything beforew the next chapter of this build begins.


Now you can see the real Color, the red just pop’s and this is the way I had envisioned the machine and we are off to a running start.


We used New everything and the front fender was cut and sectioned then filled, painted and pinstriped and ready for clear coat.


What a difference and boy is this a striking set up and am so pleased at the way that this bike is taking shape.


This time I thought we would use our infamous Vincent seat base, this has a few cool set ups and one of them is that you get a nice size pocket to store anything from your registration to a battery and electrics if you so wish.

Once coated with Hot Red and pin lined, the base was clearcoated and this looks awesome.

The frame needed some chrome to offset the strong Hot red and I thought Chrome and Black was a really good combination.


The bike then had everything New from the Genuine Honda Horm, to New fork tubes and internals to headlight.


We used brand new Excell Alloy Rims and then I detailed the front hub and then laced with stainless spokes and put the tires on the Customer wanted.


Front Brake caliper was completely taken apart and I polished and rebuilt it, as well as drilling the front Rotor and detailing that and any hardware is stainless.

This is now starting to resemble a motorcycle and it is fun making something take shape and come to life.


The rear end now sports the dresda style swing arm and an 18 inch rear Excel alloy rim, we rebuilt the rear hub and painted it and then I did my signature drilling and polishing, New rear brake shoes, springs and actuater also fitted with New brake rod too.


Then some super Works Performance rear shocks were ordered and the pre-load set.

Oil tank was stripped and powder coated and new dip stick too.


I polished the top triple tree, then polished the handlebar holders and used stainless allen head bolts to secure everything, I also used a CB400-4 Super Sport set of handlebars and thottle cables. Then it was time to pull the gauges apart.

The gauges I removed and totally rebuilt and then I used NOS genuine HONDA Gauge Cluster lowers, New Rubber trim and then original Custom Chromed Cups and after re-modeling the faces, I painted and set the needles and put her all back together.


This was now starting to look very Nostalgic and I am happy to say that this was fun to create.


The look is what we wanted and once the top was all done it was time to get on with the many other details that this bike must have.


New cables though out as well as speedometer and tach cables.


We used one of our master cylinders thats brand new and then used Braided hoses for the front brake as this actually increses its performance by almost 50% believe it or not.


Many hours are into this bike and when you work on your machine, you will understand how much time needs to be spent if you want a show winning motorcycle.

We used New old stock 1974 Waffle grips and made sure all was good and tight.


I removed the original side stand and then cleaned it up, smoothed out the old welds and then chromed it and fitted new hardware.


Everything is now Rolling, I even stripped and chromed the engine bolts to give it that finished look.


I used NEW side covers of ours and painted them the same red as the frame, then ran a white pinline around them and added our 750 Decals.


Next up, I wanted to tackle the gas tank as we manufacture the Dunstall style 5 Gallon Manx style tank.  This was then sealed with sealer and tested, then it was painted red and pinstriped to the same style as the side covers, I then went ahead and applied our HONDA decal, using a credit card and a microfiber cloth and soapy water.


This can be a little tricky, but I have done many of these over the years and really sets off well once the clear coat is applied and buffed.

The Red really does jump out at you and I was stoked that the Color scheme I achieved looked fantastic.


We used own Flip top gas cap and this sets the scene off well.

All smiles now as Paint is always the hardest to get right and this bike is now starting to get together.

The Vincent seat base looks smashing with all the detail and the hidden pocket is a great addition for your swag.


This takes 5 gallons for many miles of smiles.

Test fitting all the time, we make the brackets for mounting the gas tank to the frame.


I took this shot as I wanted to show the Customer how his machine is looking, as its important to liase with your clientele.

I removed the oil tank and decided Black was ok but would rather Chrome it, so we stripped and cleaned it then chromed and fitted with new Hardware.


Our finned Alloy Stabilizer bar says it all.

I hand drilled the rear brake drum and then fited new parts for the actuater and the arm and rod , spring and nut are all New.


Everything is coming together and this looks really clean and sharp.


Brand New lower clusters, new internals and stainless hardware adorn this bike.

I also fitted our oil pressure warning light and Neutral and high beam lights to make sure all is well at any point in time.


The Rims looks great, I polished the speedometer drive unit and chromed the cover, and she is dialled in.


New 7 inch Tri-Bar headlight fitted to make sure he can see where he is going in the dark nights in Texas.

Brand New Works Performance shocks are not cheap but they work so well when they are set up correctly.


I spent a long time on this front end to look right.

We were always busy at the shop and had to build other Customers machines too, but it was all worth it and they came out just how the customer wanted them.


The front end has detail too and if you look you will see we used braided hoses for the caliper and I rebuilt the caliper as well as polished it, and also fitted one of our Stainless Steel pistons.

Of course, I managed to purchase brand New handlebar controls and master cylinder, as well as new levers and grips and I fitted these to New old Stock CB400 Super Sport handlebars to give the guy a more relaxed ride.


Its so nice when everything is New and such a change in look to the rusty and worn parts from previously.


Well, here she is in all her Glory, the Motor has so much work, it has a ripping 836 kit from Wiseco, it has Smooth Bore carbs and the head is port and polished, balanced crank and New clutch with Heavy Duty studs, send this bike down the rad effortlessly.

Back at the stable of the owner in Texas, he was super stoked with the machine.


I dont see Iron Bridges too much round here and Ronnie loves to ride this machine, so great to see it alive and used.

The bike looks and sounds awesome with our 4 into 1 system on it.


A fun build and was a pleasure to be involved in this creation of speed.


Now all it needs is good weather and Ronnie hauls off into his next adventure.


1979 CB650 comes out of our stable


A little while ago I had a bloke in the shop on a bog stock 1979 CB650 Honda Four- it was a classic little bike that you really do not see on the road these days, I myself have never seen any around our area, so when he cruised in, I was all eager to have a look at the bike.

Well it was a cool motor but I wasn’t a fan of the styling at all, and when he asked if we could Cafe it out a bit, I was more than happy to oblige.


He left us the bike and the keys and we got into this little machine and it turned out to be a pretty cool bike when we rode it today for the first time.


The 650 wasn’t a huge seller as it was an odd displacement for Honda, seeing as they had a 550 and of course the bigger brother 750’s were bountiful, so a mid range motor just didn’t seem to catch on and as I said, you rarely see these machines anywhere these days.


But the Honda motor is a great little powerhouse and you can rev the bollocks out of these rice boilers and you will surprise yourself at the grunt this inline four has.

I took the tank off and then went about beating the crap out of the sides, until I liked the amount of indentation that was occurring with my hammer.


The stock seat I actually stripped and powder coated and then re-shaped and upholstered it, but really was not happy at the way it looked, so that was poo canned and i wanted to try one of our best selling seat bases, the good old Rocket 4.

This was so much better and complemented the gas tank and really was a done deal, I simply painted the tank and seat in these cool colors and then chose one of our Chromed L.E.D. rear tail light assemblies and now it was bang on at the Arse end of the bike.

This 1979 Honda was taking shape, I was still not into the stock exhaust but thought a cool thing would be to remove the original Can and then make up a swooping Stainless steel end pipe that really would make the bike have a little more aggressive look to it and I think that we accomplished that look.

We upholstered the seat base in one of our traditional Diamond stitched styles as that screams the era that we are looking for, also to have the racing snaps on the seat base not only gives it the look of yesteryear, it is a handy place to use to store documents as you only have to unsnap the covers and there you go.

Also, we got rid of the stock coil overs and fitted some piggy back shock absorbers, as well as lifting the rear a little too as we like that style of stance in this machine.

That stainless exhaust swoop it really cool and we fitted our Yoshimura style Baffle and finished off with a cool steel end cap, then to complete that look, we riveted one of our badges to the pipe.

This bike also had a New set of turn signals as the stockers were as big as fully grown Oranges and needed to be gone, the new ones are brighter than a math teacher and look the era too.

To make the Yellow and White Checkers flow, I added one of our shock mounted license plate holders with a Moon eyes Yellow license plate cover.

You will also notice the Chain Guard that Dakota hand made and we chromed, looks pretty tight eh?


The side covers were stripped of the old badges etc and we pinstriped the Silver to gibe this a nice contrast.

We removed the old master cylinder as it was weeping like an onion peeler and this also looked better in Black too.

I hope to add a video of the exhaust system as she is no raspy and sounds so cool compared to the stock set up.

We hope you like what we did to this bike? I prefer to strip down to the frame to be honest, but this was a fairly clean machine and it didn’t really warrant it.

This is a fun bike, even with my podgy arse perched upon it and we hope you enjoyed us showing you this bike as we used our club man bars and grips, and many other parts to make this machine stand out from a stock bike you may see puffing around town.

This was a fun project and this really did change the look of the stock machine and I am sure the owner is going to have a blast on this 650 around the Southern Californian twisties.


Let us know if you need parts for your mean machine.

CB750 S.S. The Brown Beater

This poor old Super Sport was turned into a Mad max style cafe racer, but met an untimely dimize when it was hot by a car, so the chap bought it to the shop to see if I could at least get her back into some sort of ride able condition.


So the job began on my own to try and resurrect this old Super Sport and give it a cooler look than it had last time it was transformed.

The front end had quite a punch on the nose, but this was mostly cosmetic other than the forks and triple tree’s as I had to remove and check everything for alignment.


The poor old girl slid along the tarmac a wee bit and ended up with a bit of road rash but we can sort this baby out.

Taking her apart to see what we have here and where we can go to make this a head turner once more.


These had some weird set of handlebar controls on and were no good, so glad to 86 them to be honest !


Be glad when I have cleaned this front end up as she took a bit of a beating that’s for certain.

Took the triple apart and had to use another one as this was out of whack.


Now the repair starts and things will eventually look a little better than it did a few days before when she limped into the workshop.


Well, the tank got a good sorting out and I hammered the knee inserts, cut the top flap off and welded up the space, then fitted one of our Monza Gas caps.

The customers said he would like the color to change to a Brown, so I did what I was told and the bike does look good once finished but at first I thought it looked more like Colon Spillage when we first shot the color.


Added a little accent here and there to break things up and it starts to take shape.


Silver and Black checkers were the way to go on this particular ride and it worked out pretty good in the end.


I revamped the old exhaust system the best I could and was happy at how this actually came out.


Used one of our Rocket 4 seat bases and I have sold over 200 of these, as they just look awesome.


Removed the bent up stock rear swing arm and fitted our new box section set up.


The old oil filter housing was shot to bits, so we machined a new one out of 6061 and came out great.


Polished up the old brackets and Drilled the rear brake Rotor too and added the Scorcher exhaust tip.

Sure is changing shape now and the customer is going to be very surprised when they get this back to them.

Polished up master cylinder assembly and added original switches that we polished a well.


I actually hand cut this bracket and then polished it, added some holes for some cool indication lights and fitted to the triple tree.


See how much of a difference some polishing and cleaning and making new parts starts to change the machine?


I was more than happy at the way this bike was starting to look as it did look pretty sad a few days before.


Next up was to work on some of the electrical and see if it still works after the car hit it.

Next after that was to wrap the seat base in a classic race style cover.


Now we are getting somewhere with this Cafe Racer and the finish is almost in reach.

Buttoning this all up and now figuring out which rear light assembly to fit to the back of the seat base.


Now we are almost there and boy what a transformation compared to it before.


Before and now after!!!!!


This is way better don’t you think?  The Colon Brown actually turned out to be pretty good in the end.


I am happy at the way this turned out and thought that I would share this with you lot to show what can be done to something when it starts off in a bad state of affairs.


Needless to say, the customers was really happy with this machine and had a grin from ear to ear when I opened the garage door to show him his machine.


 This was a fun project and it turned out pretty well for a repair job as I prefer to take the whole machine apart down to the frame and start again.


So, if any of you lot out there think that there is no hope for your tired, rusty or battered ride, just think again as there is always hope.


Send pics of your machine in if you are not sure, as we will always advise on the best option for your buck !


I hope that these photo’s inspires you to at least have a go with your bike as it really can be fun.


A fun project that actually finished fairly quickly when you have a lot of the parts at hand and can make them there at the shop.


 The Tri bar head light we use on many f our motorcycles, not only looks cool, it’s Brighter than Einstein.


The top end of the bike when we got it at the shop was torn up like a paper cup and am so glad at the transformation as this looks way better than factory .


I am so glad that this came out OK as its sometimes hard to see the wood for the tree’s but this turned out just as I had hoped.


Here are some shots for you to have a look at and I hope you enjoy them?


The GOLDEN ARROW CB750

 Many people ask about some of the machines that I have built over the years and I like all the bikes that I have created, I know that these machines are very popular these days, but when I built this, it just stopped traffic, this bike was a great ride and inspired many people too, there are a few clones out there and I love seeing that.

So, I thought I would show this Cafe Racer that I created at home on the driveway around late 2006 and am sure you can enjoy the photos and relate to how ling something like this takes.

So sit back, have a brewski and just keep scrolling down to view the bike I built named……. The Golden Arrow !


Once More, here we are with one of my motorcycles that I turned into a Cafe Racer and built in my garage, this was a cool bike and had stretched the gas tank 5 inches to give it a longer look.

Below was how it was going to start off like but i wanted it way longer so I could go further distances.

The bike was a fun project to begin with and I knew how i wanted it to come out like, I even made the Ace logo up to say Cafe and used to sell them later on as decals for other peoples rides.

I was the first to make gauge faces up as I used to do these on my motorcycles in the UK in the 90’s and wanted to do the same here.


This came out well and went onto designing and using many on my machines.


Everything I did on this machine was hard work, but I persevered and she came out so well it was a shame when I was offered good money for it and I let it go to a new home.


The Motor ran strong and hard, the exhaust barked like a scolded doh as it was an older Yoshimura set up and the carbs were synchronized using the good old mercury stick.

As you can see on the tags, that was built 6 years or so ago on my driveway when I worked at home in my garage, those were the best days I tell ya.

I spent a lot of time on this machine and the Gas tank was stretched, I used 3 gas tanks to get the 5 inch stretch, but it paid off and thought that I would use my own Dunstall seat base t cap the whole thing off.


I did my usual signature drilling of the hub and I chromed the rear swing arm, Laced the polished hub to the good old Harley rim and slung a good old Spitfire on her.


That was my favorite Motorcycle I built and still love it today and would love to have it back at the shop.


I am not sure where she is in the world today but I know it is around as people send me a few photo’s from time to time.

Below, these were my Own decals i designed and have sold many to people all over the globe for their machines.


I hand drilled the front Rotor and rebuilt the front brake caliper too, as well as polish the deep dished Akront rim.

Oh yes, must have new switches when I can afford them as they set the bike off well.

Again, I was the First to use these lights and I have sold over 300 of these to people and are a super set up and last ages.


Original 1974 Speed equipment that I have had for many moons and I wanted it on this machine.

A little bit of creative drilling and polishing really does go a long way on anything that you create.

Rebuilt engine and polished valve cover is a must when you go all out on a full build and this worked out really well.

I was also the first to use this type of braided hose and I have sold over 1000 of these to builders.


I took all the crap out of this and then polished all the anodizing off and got it to a chrome finish and boy did it turn out well.

The Golden Arrow is a really nice machine and sits well on the driveway.

I used 3 gas tanks to get the 5 inch stretch to look right as all the underneath has to have the stock indentations to allow for the carbs to function and petcock too.

I designed this myself and this was the First time I had used it, I have sold many of these decals since and even met a few people who have had this tattooed on them.

I rebuilt the rack of four and then me and my Buddy Johnny Harper synchronized them with a mercury stick, this ran like a dream.


I loved building this machine and I think you will agree, it turned out pretty good.

My own Pedestrian slicer, I must of sold about 100 of these for owners I should think.

Back from its first ride and it was an awesome feeling to hit the corners with this bike but I noticed the weight increase when I put 5 gallons of gas in her.


I used the 750 con rod to make the license plate set up and this was something I made for many over the years.


The bike rolled out very well with all new bearings in the steering head and as much polishing as I could muster.

The Custom oil filter housing was one of my originals but I am now manufacturing new ones, but this was a unique one and I loved it.


I polished an old 10 inch Akront front wheel and that really did set off the front end.

Fun times that’s for sure and also made a good neighborhood watch guy as I was always in the garage building something for motorcycles.

I polished all them motor part at the side of the house using a harbor freight 3/4 Horse buffing wheel.

I used my Dunstall seat base and my LED tail light and of course had to pin line the bike as most of my machines are and this set the look I was after.


I polished the upper triple tree to a chrome finish and also made a display panel in alloy for the neutral and oil pressure switch, with old style lights.


Had some fun with the Gauges as I wanted to add some more to the face and thought that Bang would be appropriate on this machine.

 Rebuilt the front hub and has new bearings, as well as polished the body and powder coated the covers and used stainless bolts though out, used stainless spokes too.

Below, I thought I would do my signature drilling and polishing, now all I use is a cordless drill and I polish this on a three quarter horse harbor freight polishing wheel.


A super nice contrast with Black, Gold and of course Chrome and Alloy, sets the front end off on this Golden Arrow Motorcycle.

Sitting pretty but- this is no slow poke, it gets up and right into it when you open that throttle, don’t you worry about that.


Plenty of things to polish and detail on the good old CB750 and I am sure many of you have been there and done it? And can understand how long all this takes.

This is a 5 gallon Gas tank now and really took a bit of work to get it to lay correctly, but the end result looks great.


I hammer the inserts to the tank and have always done this to get that race look, you can tuck your knee’s into the tank better too.


The Oil tank got cleaned and then I boiled the inside with lemon and then coated with oil again after painting and is super clean inside.


The license plate sets off this cool and classic machine and it was fun to build this at home back then.


Some more Bling to look at on the bike, as i like to add as much detail as I can, but this is a personal preference and you don’t need to do it if you like blander styles.


Yes, there may be a few of these around now, but not when i was doing them and so cool to see these as a popular machine of choice these days.

More to see with, that’s always a good thing for motorcycles these days.

L.E.D. rear light set up really does let drivers know what you are up to.

My front driveway was always packed with my creations, just as well I got on with the neighbors though eh?


THE SPEEDMASTER I BUILT NOW LIVES IN AUSTRALIA


 OK, here we go with a Cafe bike that I created a little while ago here in Anaheim California, this CB750 HONDA was just a Rusty Hulk of a bike and needed some love, I was not sure what to do on this build but thought what would be cool is think of a name that I remember from back home in the UK when i was a Teenager and Cafe racers as well as many other Motorcycles were doing on the tracks and on the roads etc.

Now Speedmaster was a Tire brand that was synonymous with col bikes back in the day, be it Cafe racers or trials Bikes, so I thought that I would base this machine on them said tires and build the bike around that title, so, here is the build up of this bike that now resides in Australia and is on the tarmac there right now bombing about the curves of Melbourne, Victoria.


 I took the old rusty machine apart to see what I had, and what I did have was a bunch of corroded and rusty parts, so it was time to strip this right down to the skeleton.

 This bike took some time to dial it in, as I was always trying different set ups, this set up here was pretty much how I wanted it but I thought that I could use the Original Dunstall exhausts on another machine.


 The Motor was gone through and she seemed pretty good, the build up didn’t really take that long but I kept trying different parts to see how she would ride.


 I did a double drilled disc set up on this bike, using a few parts that I had in the garage and it seemed to work out good, but took some time to get the rotor just right.

 I went ahead and had a drilled Dresda style swing arm of mine fully chromed, as i think it would set the motor off well and I wanted to have a drilled swing arm to match the front Rotors.

 Obviously the Ace bars were a must and I think that I got the height of this machine to a good stance and was happy with it.


 Took some time to get good calipers and then strip all the old Black anodizing off them and then put the kit all together as the trick on these set ups is to get the off set bang on, else they would drag all the time.


 Original Dunstall headers here that I had in the original packaging, as i wanted to know how these fit and sound and boy did they look great.

 Looking at the rear tire you will notice that it is of course a Speedmaster which is from back home and Avon was a huge name in tires and racing when I was a teenager.

 The Chrome swing arm has Bronze bushes and I had a set of early Race shocks that I wanted to try on this puppy and i think I got the look I was searching for.

 I used a Harley rear wheel and laced it to a CB750K hub with new bearings and stainless spokes etc, I also make sure in New chains and sprockets too.

 You may notice that my signature sprocket cover gets the drilling and polishing look.


 I had a set of 29mm smooth bores that i wanted to try on this 836 engine and it ran pretty well, but can be a bare to set up sometimes.

 OK, here is the money-shot- as I love the way the rear end looks on this bike, should of made a poster of it.

 Of course, I went to town on the rear brake drum with new shoes and fittings this bike was like a new machine.


 Original finned speed parts I used as I had stored that stuff for some time for this bike and glad I managed to use it all on the bike.

 Original Beeston grips I have had for donkeys years ftted well and I wanted to start to detail the top end out, so I polished the master cylinder to a chrome finish.

 Nothing is better than polished aluminum or chrome, its just a fresh and clean look I believe.


 Oh yes, did I mention I polished the whole engine, not many people were doing this the and this took a long time.


 Plenty of lines to look at and I still was not sure if I was 100% into the overall look.


 Polished stainless steel Allen head bolts through out the bike, gave it some more detail and this sure was beginning to look sharp.

 I hand hammered and smooth the tank and then took the tank to a Radiator shop just to make sure it is all sealed and then had a coating laid inside and then pressure tested.

 A New Gas cap as well as a New Locking mechanism was needed for the freshly painted gas tank and sets it off nicely.

 I have lost count to how many of these I have polished in my back garden over the years but they sure look great when they are all buffed up.

 The switches had faded from the stock black to a dreary grey, so I had to polish these to look the best that they can, as originals are not cheap.

 The more I look at these photos, the more I sit back and say to myself, why did I sell this.

 Fun set of carbs once they were dialed in but a bear to get one of the throttle cables right but I sorted it out in the end.


 One of my New machined finned engine mounts set the right side of the motor off.


 The megaphones were a must and this did look reminiscent of the days gone by in London when speed to do the Ton was a must.

 I hand cut an alloy plate and drilled holes etc and made this rear engine mount, this was the first one I had made until I then got orders for them.


 I know, I know- Swiss Cheese, but I do get carried away but enjoy just making any pattern up and drilling by hand, takes some time and boy does it make a mess.


 Rebuilt front forks and the good old TRI-BAR headlight makes this stand out at the front end of the bike, as well as Alloy turn signals which are a must in California.

 New fork boots too that I bought from HONDA as I like gators, they kind of add Nostalgia.


 New cables of course are a must with any build as you want a smooth throttle when you take your bike out for the first time.

 I fitted a New horn and brackets to make sure that people know you are coming if for some reason you got to get on the loud button.


Original Cycle west Finned Points cover sets the scene for this Cafe Racer.


 Sat on the table at the shop for electrical and little bits and bobs.

 This time I went ahead and took the old megaphones off and fitted one of my performance 4 into 1 systems on and ceramic coated it Black.


 I changed the carbs as it was running a little rich for the 4 into 1 and it ran great, I added some old 1974 Velocity stacks that I had for years and like the look.


 Just chilling as now I have just sold this to a bloke in Australia and he too is English, so nice to have someone have this machine and enjoy it.

This was the last shot of the bike in the shop before we shipped it to Melbourne in Australia.


Well, here are some shots of the Speedmaster on the other side of the world in Australia and the Owner loves it, as he should. 

This is a great looking motorcycle that has gone through some guises but the bike looks tough and sounds even more.

Hope you enjoyed the pages about this Cafe Racer and it is still hard to comprehend that this is now on the otherside of the globe.

I am sure he will be bombing about the place and hitting them corners as hard as anyone here would be thats for certain.

Maybe one day when I get back out there, I will get the chance to sling my leg back over the machine and go for a burn up?


So, the Speedmaster has a New life in a new Country and I am glad its being used.

Another build, The WILD CAT !


Here we are with a small build for a chap that is out there in Arizona, he is the CEO of the Phoenix Zoo and dropped this old chopper down to see if I could try and make a Cafe Racer for him.

I wanted to try and come up with a name for the bike and he actually came up with Wild cat and I thinks thats going to be a fare representation of this little caged animal and will soon be tearing up the tarmac in that part of AZ.

Sure, as I know this could be turned into something fun yet classic and in not too much of a time, although, there is more than meets the eye here, as he bought this bike like it is and it has not run in god knows how many moons, but- we enjoy a challenge here and a challenge we shall have.

The bike looks great from 20 feet away but the closer you get you will see that all the chrome has pitted and the wiring is rotting away, the bike has no seat and has Shorty rear shocks with 10 inch over front forks, a poor mans chopper back in the day but Bert wants this as a Cafe Racer, so here goes…..


The bike is pretty much all there, just wrong proportions and some need of cleaning or replacing parts that have seen better days, and being that this is from a hot part of the country, there will be plenty dried out that’s for certain.

So the transformation begins and we are on our way to making somebody happy with their new machine very shortly.

I am now taking this apart to see what we have to deal with and then I can start to change the look of this bike and share it with you lot on here, as many of you ask about what we do here and you can see how this turns out.

The rear wheel is coming out and am going to have original Borranis and powder coat them Red, then polish the hubs and re-lace and then new tires, but also I am fitting new chain and sprockets.

The front forks are 10 inch longer than stock, more than enough to give you a nose bleed at that altitude, so they got to come off and I shall fit some stock forks but lower the front end an inch into the triple tree’s.

The Red is striking when you have a darker color against it, and this really will be a head turner that’s for sure.

But first I need to get the rims built and fitted right, and I drilled the rear brake hub with my Signature racing look and she came out great.

The front wheel gets a good treatment of new stainless spokes and polished hubs with the Spitfire tires to have the classic tread pattern for this machine.

The forks have now been lowered and this is bang on at the front, but- the rear shocks are too short, so will fit longer ones as I get a long with this Cafe Racer Machine. Also the front Rotor was removed and cleaned up then polished just to make everything look more uniform.

The bike came here with no seat at all, and lucky for me, I had an original old seat base , so I took the old foam off it, powder coated the seat base to a high gloss black, then new foam and re-upholstered with Diamond stitching and it looks great now and functions very well indeed.

 The tank was up next and I would give it the good old knee insert treatment and then figure I would have Black and Red checkers to match the rims on this machine.

 Wildcat was hand lettered with an air brush and this looks pretty cool now that it has the clear coating on the body work as all the detail stands out.

The rest of the body work got the same treatment and then it was the careful task of fitting this stuff to the machine and not damaging the paint.

This has turned out pretty darn cool, I got Dakota to Bob the front fender to give it a more aggressive look and then after some rewiring f the old harness, everything seems to function well.


Just some buffing and polishing and this will be as much as needs doing to the bike, but had to do a lot of electrical it was a nightmare.


This then had New chrome Diamond turn signals wired and tested and also we bobbed the rear fender and fitted out Beeza light and all works well.

OK, I thought as its a Saturday Morning I would take a few more photos of the WILD CAT and then you can have an overall look at this beast for your own eyes to savor and hopefully you will like the way the bike has turned out?

The tank turned out well and I like the look of the whole bike as this is my signature styled machine and it sits very well.

The bike has all new tires and the rims were Aluminum Borrani’s but thought I would powder coat them red and they are a good combination and offsets the bike well.

The bike has new rear shocks and are 14.5 center to center, that way it gives the rear end that higher stance, bit like a sprinter on the starting blocks.

The gas tank has been hammered and painted and the inside sealed, it also has brand new Genuine HONDA Chrome gas cap and lock, and a brand New genuine HONDA Petcock too.

This bike has many new parts on it and I am sure the owner will be over the moon as he opens up the computer and see’s his bike on the blog.

I thought I would put a few more photos on here as many of you email me to ask how certain parts look, and this is the best way of showing them to you.


This has been a fun creation and I look forward to photo of it when the owner takes it back to Arizona and has them great background area’s to show the state he is in.

The BLACK FALCON CAFE

Well a while ago I created this machine for a Customer from an old Snotter, the customer wasnt sure I could pull off the look with this motorcycle as it was in a right mess, but I assured him that I have no problems with the build and he will soon be riding the bike in his homes town.


This bike was rougher than sandpaper and even though the Californian Sun had weathered the crap out of it, I could see the potential in the ride.

My customer said he wanted me to make the bike Black and use the Fender ” F” somewhere as heis into guitars etc, hence the name the Black Falcon.

I stripped the bike in the back yard and got right into it as time was of the essence and needed this to be completed as fast as I dare go.

Down to the frame and smoothed all the old welds and checked for an cracks or imperfections, then off to be bead blasted and powder coated Black.

I Used aHarley rear wheel and laced to the 750 hub and used stainless spokes, and yes, the good old Spitfire tires is my choice.

Frame, swing arm and battery box are all high Gloss and wanted this to have a Stealthy look and think I acheived that.

Made the logo up and then repaired and painted the side covers and was happy at the end result.

I wanted to go the extra nine yards and cleaned up the gauges etc, I was the first to do CB750 gauge faces back then too.

Polished triple tree and new chrome 7/8 clubman bars look the part on this motorcycle, and I then used an old S.S. has tank, hammered the side and welded in the old gas flap on the top and filled and welded the arch at the rear of the tank, used a stainless gas cap and then sealed the inside before painting the tank with a deep black paint with checkers to break it all up.


Drilled the rear brake hub and fitted new shoes etc and a New 530 X-Ring chain, this is getting together rather nicely.


There is the Fender “F” the customer asked for .

I used y Duckbill seat base for this bike and am glad the way it turned out, all the lines seem to flow very well.

One of my Scorcher tail pipes that I make and this sounded awesome with a little over run and flame out at night.


Front and back shots to show you what she looks like in all her colors.

A nice looking bike with a rebuilt motor and some polished cases, sits really well.

I drilled the front rotor and polished the fork legs and then powder coated the brake caliper body to offset the rims.

Rebuilt carbs, custom starter cover and a drilled sprocket cover do the trick.

new 530 chain and sprockets make sure this bike gets along the tarmac smoothly.

Spitfire tire hugs the powder coated 19 inch front rim.

Cut the front fender as per customers request and painted it.

New chrome Diamond turn signals let people know where he is going and finned speed equipment on the cases from the 70’s.

new fork boots and clamps with rebuilt lowers make the front end handle very well in the corners.

I fitted a Neutral light and a Oil pressure light in between the gauges on a polished piee of aluminum and it really worked well.

Beeza tail light assembly sits in the back of the Duckbill and this bike is ready for the customer to take home.


A fun build and am glad the guy took a chance and we pulled the job off with time to spare.

Allen headed stainless bolts are all through this build.

Hope you like the way she looks, the gas tank was a last minute decision by me and I am really glad at the way she turned out.

Side covers tell people the name of the bike and I am glad at the look too.


ready to take the bike for a ride and this rode very well indeed as it was a fresh motor and all new wiring etc.

I will miss this bike, as everything went well on the build.


New rear shocks, prety much new everything adorns this Cafe Racer .


Thanks for looking at the Black Falcon Cafe, it was a fun time and the customer was really stoked to get the bike.


So now that was done, it was off to build more of the same model bike and something I always have fun creating on these 500 pounders.


Cheers for having a look at this Motorcycle and I hope to show more of my creations on my website.


Peace and Grease to you all.

CARPY

The Black Diamond Cafe Racer.

This bike I built out of a few parts that I had in the workshop and it came out pretty neat for what its worth?


Dunstall gas tank and one of my Vincent seats make this look like it stepped out of the mid 1970’s.


Original set of Borranis I took from a dirt tracker seem to fit the Bill quite well.


 BEEZA tail light, Clubman bars with original GT grips look the part and worked very well indeed.

 As always, new chain and sprockets and polished some of the old cases up.

I used a set of Spitfire tires front and back and I liked the Gold and Black checkers.

Of course, I drilled and polished the back brake hub and then added my finned spacer and stabilizer bar.


 The old pipe I cut and angled upwards to give it an old road race feel and it sounded pretty good.

 Shortened the front fender and drilled the rotor etc and fitted new fork seals to this Cafe.

 A couple of thoroughbreds, ready to hit the tarmac.

 This ran fine and the brakes were awesome when I really needed it, no fade at all.

 I had to fit rear sets to this bike and then it really did fit me well and loved the corners.


 Stainless steel Monza fitted into the gas tanks, well it just screams nostalgia.


 The bike was a good runner and as I had the flywheel machined to lighten it up and that made a BIG difference I tell ya.


Three bikes ready to ship from the shop here in Anaheim.

 The first one id Mike Dirnts of Greenda, the second is the Black Diamond and that went to England and the last is the KO Special and that went to Australia.

They were all fun to build and hope you got a little kick out of seeing them as well?