The time is flying her in Southern California, I am so busy right now, mostly with exhausts and making other parts for our beloved Machines, etc and I really appreciate you supporting me in these times that we are in right now.Volume is a little quiet but just wanted to say hello to ALL you out there.
Tag Archives: CB500
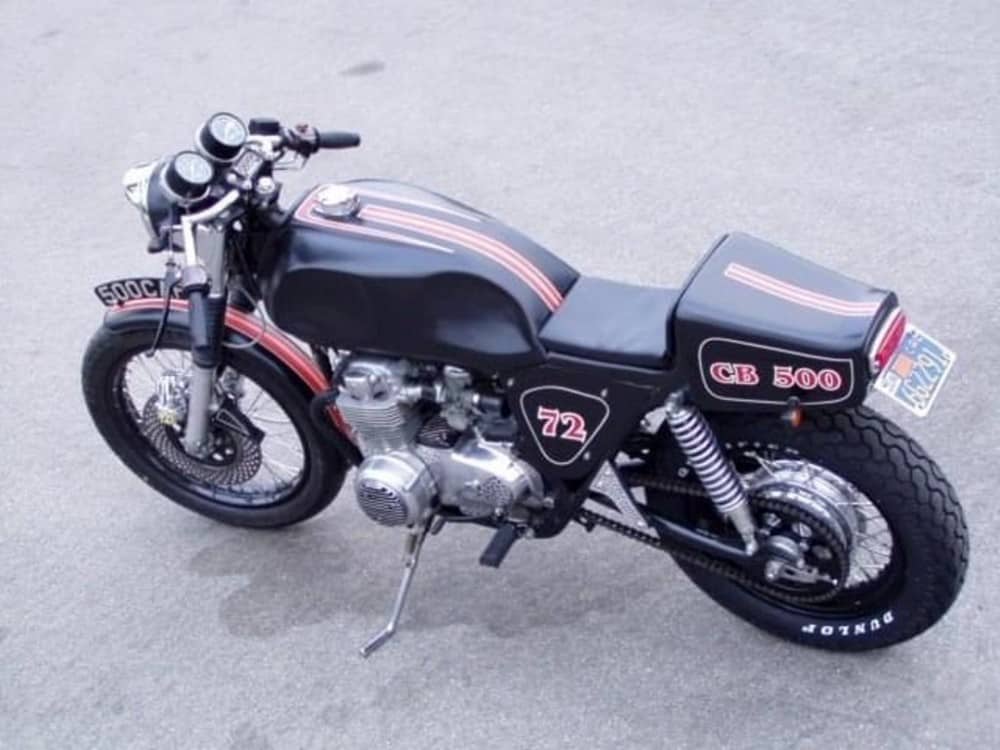
A CB500 Honda with a Tough Attitude
I sometimes have to kick myself to remind me that I have created all these Custom Motorcycles sometimes, its amazing that I still have a fluid creativity when it comes to two wheeled powered machines and the next bike i want to show you is a great stealthy bike that I sometimes wish I had kept.
I dont have the best pics of this machine as I had a shitty camera, but at least I got some pics that you can make out what I did to this old 1972 CB500 Machine. It needed a lot of work and was a non runner and missing a lot of parts but I was sure I could build something fun and affordable with what I had as spare bits and bobs scattered around the garage.
The old girl needed some help and I used what I could with parts I had around my garage, this was many years ago now and I had a few 750 parts in the rafters, so thought I may as well use some of them and see how this goes, but nothing ventured, nothing gained is my saying and it was fun to piece this little 4 banger back together, of course in bigger clothes than it had stock, but thats what I liked about this challenge.
The Motor kicked over, so I cleaned up the carbs and she ran quite well, so I thought that I may as well have some fun on a budget and see what I can create in a short amount of time. The engine was really responsive to be honest and as I had a 48 Tooth CB750 sprocket on the back, I knew she would boogie along as soon as the flag dropped.
I had an old beaten up 1982 CB750F Gas tank that had seen better days, so I cut out the flap and gas tank lock and welded it closed, drilled a 2 inch hole and fitted a Monza Style Aluminum Gas cap and then set about and hand hammered the tank for that old Manx look, I was pleasantly surprised at the outcome of this big old tank.
I Polished the forks and rebuilt the internals, then laced some 750 rims up and drilled the front brake rotor as well as rebuilding and polishing the front brake caliper too.
Braided hoses on the brake made sure this puppy would stop when you grabbed a handful of Anchor, I pressed out the Curved license plate as I wanted the old school British look.
Like I said, a mish mash of parts but cost nothing to put together to be honest and this was almost 20 years ago now too, time sure does fly when you are having some fun with Motorcycle parts.
I used a Harley 16 New rim for the rear and Shod both rims with Bridgestone tires as I like the handling of those boots. The rear seat tail piece is off an old Kawazaki Z1 race bike.
I used the stock shocks and swing arm to save some money and had an old Mac system that I never used and was sat up in the rafters, so I threw that on and it sounded ok with a shortened baffle and rejetted Carbs.
The clubman handle bars and the long tank, gave for a fun lay down cafe feel to it and was a blast to ride, it had a taller rear sprocket, so it got out of the gate real quick.
Even all them years ago, I was using Oil pressure gauges as its a quick way to make sure your heart beat is pumping in the motor, had to make an extension pipe to be able to connect under finned cover.
She sits nice and high for a 500 and boy was it snappy off the line, the first three gears and you were almost at 80 mph, what a fun machine to blap about town on.
Hazy pic but glad I still had some images left of this old 500 Honda and hope you like it too?
I sold it to a guy in Pasadena who then phones me to say a car ran over it and dragged down the road for a few blocks, it no longer exists, big shame as it was a great little Bar hopper Cafe Machine.
Corona Diaries- The year of the Mask
Well, here we are, the weekend is almost upon us, things are still bad when it comes to Covid-19, this is a crazy time for us all, but- We have to live life and try and work the best that we can with what we have these days, and I hear from many Customers of their way to get through some of the lockdown and boredom, by working on their own projects in their Garage, barn, Shed or back yard.
I must admit, working with a mask on is hard, but lucky for me, I dont have people coming to my workshop to ask about parts, most will call, text or email about the issues they have with their ride.
I sure hope we find an antidote for this as I do miss riding with people and having a chinwag in person about pretty much anything two wheel related these days, but I shall continue to write a few blogs as I go along in life and share what I get up to in the garage.
I receive many orders in the day time and night, I think people sometimes believe that I work 24-7, and if I could, then I would, but I need my rest too, but, I do try my best at getting your parts to you as fast as I can but- due to this Virus, many places that I use are either closed or part time, so that holds me up in ceramic coating or steel supply etc.
So, if you can bare with me until this gets a little more manageable, I will en-devour to get your parts out of the door in a somewhat timely manner.
Be safe out there and hopefully we can get this Virus beat and all go riding like we love to, so- stay safe, stay positive and stay in the garage Wrenching.
Thank you so much for supporting me in this tough times we are experiencing in life.
Peace and Grease
Carpy
Exhaust Orders going super strong right now
Hey you lot, wow! Is all I can say, so many exhaust orders plus tons of parts going out the door, trying to keep up all the demand for parts for you to complete your Motorcycle Projects, so you can get out on the tarmac and blow all of lifes cobwebs out of the New Exhaust system I am supplying you all with.
So many Negative things going on in the world right now and as many of you are locked down in your place, you are getting positive things done like completing your Custom machine, and once you get out of your dwelling, you can enjoy the freedom of the roads and breathe in fresh air at 100 mph.
I have sold so many over the years and continue to offer a super fun system thats easy to install and made right here in Southern California, many people ask about my systems and then they email me after to say how wickedly cool these sound.
I really enjoy my job and seeing people happy, I have been doing this for over 20 years and still ride every single day of the week, and I want to Thank You All for supporting me in what I love to do.
Thank you all for your Patience, it is so nice to know that you like my parts and, I continue to push the envelope with new products coming out all the time, I push hard at pleasing everyone but must admit I have been over whelmed with orders these last few weeks and thank you for all understanding that some of these things take time as only now are suppliers opening their doors.
Its always fun designing new parts and I will be bringing some New systems out soon for you to try on your inline four Honda machines.
The exhaust systems are affordable but function so well, you will love the Tone and over run and the mid range really comes into its own compared to others out there in the market.
If you want something that Fits, and works very well, and- Getting value for money, Look no further, I ride, many other companies dont even own a Motorcycle, what does that say about them? They are just in it for the money, to me this is my Passion and Lifestyle and I continue to push that proverbial envelope.
Have a Great week and look forward to hearing from you about your inline Four Motorcycle at carpy@carpyscaferacers.com
Peace and Grease to you all.
Saturday and busier than heck
Its the weekend and I am trying to get so many orders out, thanks for being cool about waiting as some things like chrome parts etc take a while as some of my own suppliers are closed still, due to the Pandemic, so I have to try and locate other companies, but thank you all for sticking with me and I am trying my hardest to get all your parts to you. So not a big blog today as I have to run to post office then make some more parts etc, just thought I would add a little video i did a while back, when I was at El Mirage Dry lakes for a TV show.
Working on Customers parts they send to me
Well, I have been really really busy as of late, many of you are at home and are now working on some long term projects, and this is the perfect time to catch up on them “Need to do” lists that you have mentally noted and tucked into the back of your skull, and I do get a lot pf phone calls, emails and texts asking how to repair this, service that or get them out of a pickle.
Nine out of ten times I can help them or at least steer them in the right area and get them on the road, but sometimes there just isn’t a way of completing the issue unless I can physically see it and this is the case with what I have been doing this weekend.
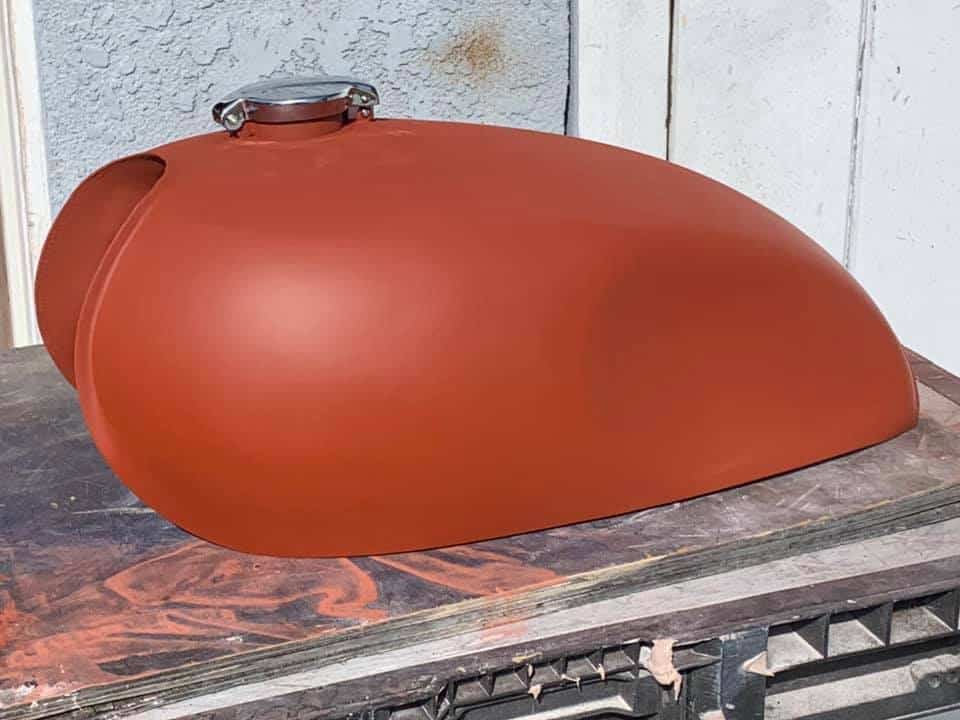
The Cafe Racer machine is synonymous with things like Clip on’s, loud exhausts, sleek designs and even some streamlining of the body work. And the other day a rather Large parcel turned up and on inspection I could see it was a Honda CB500 Gas tank, and it really did need some help. The Customer had seen my machines and noticed the knee inserts that I hammer and shape into the tanks and wanted to have a go himself- Nothing wrong in that but he went a bit too heavy and put a crease in the tank one side and tore a hole on the other.
This is a tough repair to be honest but I am here to help and over the weekend I am going to attempt to have a smooth hammered Cafe tank all in primer with gas cap and lock and can get him out of his proverbial pickle that he is in. he did a pretty good job to be honest but sometimes these can go pear shaped real fast once you have crossed a line of hammering.
But, nothing ventured, nothing gained is something I tell my self a lot and its time to resurrect an old gas tank and get it to the look that he wants.
I have looked at the gas tank and I am afraid its 86’d, it has too many holes, tears and had to grab another old gas tank to try and emulate the look he was going for, its not the same color but its going to be painted anyway.
Sometimes the gas tanks are bad inside anyway and can tend to have hair line splits, then when you stretch the steel the hairline crack opens up and you then end up with a lot of work to try and fix, sometimes the steel is so thin in places, it is super hard to weld up, even using a Tig, so the thing is to evaluate the time its going to take, and when I did, well, it is far easier to get another gas tank and just begin from the start.
So, another Honda Tank was located and now I am about to start on the knee inserts, but first, you need to remove the tank emblems and the plastic trim that has hardened like a rock and will easily crack off anyway, take out the petcock too.
People ask me all the time, “What hammer do you use to make the knee inserts?” And this is my personal choice of implement. I prefer the Egg shaped hammer as I can control where I want the metal to go to an extent, some people use other bodywork hammers, it’s Just personal choice.
As you may well be able to see, I tap and tap until I see the side of the tank stretching and then just take my time and keep hammering, it has a long way to go but you will see this change quite quickly and I guarantee to you, your arm will be aching thats for sure.
Take your time as it is way too easy to over hammer and get a crease in the side and that will be a bugger to pull back out, so just go slow, its noisy but its worth the effort of you want hammered knee inserts in your gas/petrol tank. there was a bunch of dents in the right side of this old tank anyway but I got that all sorted after some manipulation with hammer and heat.
As you can see, it is a slow process but dont give up, the more the do, the better it is, I can hammer with either hand now, but I have made many of these over the years but still find it therapeutic.
Well, almost there, just a little bit of spot filler and wet n dry sanding and we shall be ready to send to the customer.
The customer should be well happy with this, he will of course paint it what ever color he likes, this paint is just red Oxide high primer, but covers well and i like using it.
I am now ready to add a New Gas cap and locking mechanism of which will be Genuine Honda.
So, the New OEM Chrome Gas cap is now to be fitted, I prefer fitting these before main paint as when you remove it for final paint, the holes line up nice and the cap shuts good and snug.
I also fitted a Locking clasp mechanism which is stock Honda and these not only work well, it is a nice look against the tank.
I just make sure that the gas cap locks and unlocks and sits well, as if you fit these out of square, sometimes the cap will stick and you cannot get it undone, so just take some time.
So there you go, thats all fitted up and I am more than happy at the way this tank looks now, it took a little time but it was well worth it.
Have a go your self, I am sure that you will get a lot of self satisfaction from changing your old gas tank into a cool unique Custom style.
This is now ready to get packed up and shipped to the customer, thanks for following this Gas Tank conversion and hope that you enjoyed the coverage I have put on my blog this weekend.
Sunday and I am busy in garage
Well, no day of rest for me today as many people need parts for their rides, so I have been burning the proverbial candle at both ends, as I know what its like when you start on a project, you want to try and get as much completed as possible whilst you are still all fired up about the idea right?
So today not much of a Blog but a little tv show I was featured that you may or may not have seen, just thought I would share it.
Right, I got to get back into it as I am making Kick stands this afternoon.
Working in this Pandemic time of life
Well, as many of you are in the exact same boat as we are, this Pandemic is a terrible thing to happen to anybody, but, we are abiding by the safe distancing and I continue to try and make parts from home and in a timely manner, but, as so many people are now stuck at home, it is the perfect time for you all to be working on your projects etc.
I have had many orders already and wanted to let you know that I am working as hard as I possibly can and in the amount of hours available, to get your orders completed and off into the mail to you, I have customers all over the world and EVERY one of you is important to me.
Please could you have a little patience with me on special orders, ie Exhausts, as I have to get all the tubing, and bends, weld and sand and then send to the ceramic coater, this does take time even in normal circumstances, but I have so many Exhausts on order, I am trying to get everything completed as fast as I can.
I will be bringing new parts out soon too, and will post them on my website as soon as they are completed, so keep checking back from time to time.
I also appreciate all the orders and giving me the opportunity to make parts for you and keep my family going in these difficult times, being self employed has huge risks in times such as this and I cannot thank you all for the orders, no matter what the size of them are, they all add up.
Let me know if I can help you with any parts for your ride, as I have been doing this for over 20 years in Southern California and have so many repeat Customers, you are all like Family to me to be honest. Stay safe everyone and thank you for purchasing from me, love you all.
Quarantine – How I deal with the Lonesome Blues
Well, we are entering a new World right now, times are hard and quite scary to be honest, most of us have been Quarantined and have to stay at home, in Isolation from the world, but keeping safe, Healthy and away from that nasty Virus.
But, I am getting many orders for parts this month as so many people are at home and have decided to pull up their sleeves and got into their Garage, Shed or Cave etc and start or finish off their project they had started a while ago and ran out of time to complete. And now we only seem to have time on your hands, you may as well tick some of those jobs to do off the list and make this time in isolation a rewarding one.
I just received an order for a drilled rear brake hub assembly, I have made quite a few for Customers over the years and to be honest, I find it quite therapeutic doing the drilling on the hub and thought I would share some of my experiences with you lot and maybe you will want to have a go your self??????????
I’m about to go out to get a few parts as I had orders today, wont see anyone but I have to go to storage and grab some stuff so will be back in a tick.
Right, I am now ready to get myself situated to get some drilling done on a hub that a Customer has ordered from me and you too can do this if you have some time, a drill and some patience, as it really pays off in the and and gives a unique Custom look on your machine. So, have a look here, I have three hubs to create for Customers and I will show you what I do ok?
Strip your old hub down, just have to remove the 2 springs that hold brake shoes and the split pins that hold the swivel, remove brake actuator and arm and you will be left with a bare plate, once you have completed that task, which only really needs a pair of long nosed pliers, you will then need to secure the hub onto something sturdy, so the plate doesn’t move when you start to drill your lightning holes. I always use a piece of old plywood and secure the plate on top it by using a washer and a wood screw, easy as that.
I use an array of drill bits and to be honest, I just go for it, no set pattern, what ever I think looks good I just drill and change bits as and when I see fit, that way, not one hub is ever drilled the same.
I always have a shop vac at hand, as you are going to get a lot of swarf from the Aluminum and it gets everywhere to be honest, so every now and again, I vacuum the mess it leaves, else you will be feet deep in alloy shavings.
So here you go, this is the pattern that I like the look of and I can still add or make a few holes bigger to give a different pattern.
Looks a lot different when its polished eh? Also, I add New brake shoes and actuator arms etc to make this really look like a Custom piece and so easy to fit too.
So as I have plenty of home time, I thought I would show you how I make these great pieces out of old tired brake hubs for the CB500-CB550 and CB750 Honda’s.
I am sure that you may want to have a go and see how you fare? Its such a great feeling when you bolt it all back together and its therapeutic for me thats for certain.
See, the Patterns are always different, that way, each one is unique to any other out there, its a neat old school look and cools the brake too as it aerates as you ride.
A trifecta of hubs I am doing and this does take some time to complete , but I really like doing these and they come out looking very cool indeed, as you can see below.
So, once all together you can fit right away to your wheel, or, if you are building a Custom rim, just plop in into the hub, it sure dresses that part up so well.
I have built so many that I have lost count over these last 20 years but always fun to create and I still get orders for the custom hubs all the time and glad that you lot like what I do.
Thank you for reading my little Blog today, I have fun writing these and its always cool hearing from you all to see and hear what you lot are creating in your sheds or garages etc.
Drop me a line if I can help you at all, even if its just for advice, my Number is 714-598-8392, you can also TEXT me on that as well for a faster response.
Stay safe everyone and we shall all get through this and be back on the tarmac having fun with our creations.
Built a set of Custom forks for a Customer, thought I would share.
Many people have sent me their forks over the years to rebuild, polish or just hop up a bit as they get tired after 40 years of taking punishment from all road surfaces over time.
As the photo shows above, this is the old set that I am going to be working with, I strip these down, clean up and then what I do is machine some cool looking ribs into the stanchions to have that Custom look and then magnaflux it to make sure all is ok. Once that is done I polish the lowers and then get brand new fork tubes made for the uppers.
I like to use as much Genuine HONDA parts as I possibly can and these will look so clean when everything is put back together and then you fit to your inline four machine.
As you may be able to see, I have New Hard Chromes fork tubes fitted and I have just put the OEM Honda Fork seal in place, here is the trick that I use to fit these seals, also- Remember, make sure the lettering faces upwards not down.
I use a piece of UPVC tubing that I bought from Home depot for about $2.00, this slides down the tubing and sits snug on the seal, but it fits inside the aluminum stanchion perfectly.
I simply tap the Plastic tubing with a Rubber Mallet until the seal bottoms out on the shoulder and there you go, no press needed and no damage at all, I have been doing this method for over 20 years now and never ever have I had a fork that has leaked by using this tubing.
I use some Harbor Freight Circlip pliers to snap the Original 2 hole clip back into the recess inside the fork leg, you will feel it seat when you let the pressure off the pliers.
I use as much genuine Factory parts where ever possible, and in this case I use New old stock Dampner Bolt and Copper crush washer, just to make sure all is new and fits as it is supposed to.
I use genuine Honda Dust caps to make sure all the crap stays away from the forks, then- Just to add some super cool Custom finishing, I like the way these complete that Custom styling on the front end.
See what I mean? Its a nice Custom finished look that really does not cost a lot of money and it is chrome, no plastic crap.
I have always used ATF for forks, the old Pro Racers mechanics used it and I still do today, I also used stainless washers on top of the springs to set the pre-load.
That’s is how much I pour into rebuilt forks and people ask me “How do you know how much to pour in”?
This is one of my Bibles that I use on things like fluids, point gap, timing and the like, always served me well.
I also make sure that ALL the threaded holes are chased through with a tap, this makes sure that the refit goes smoothly and you dont scratch the lovely polishing I have done.
I make sure that I hand polish the lower clamps and use stainless nuts and lock washers, this set up is really a thing of beauty and I am so stoked when I complete a set for a customer, a lot of work and time, but boy is it worth it and changes the look of the front end.
A great looking set of Lowers that will turn heads where ever you go, not a five minute job and not made in China either, all done from right here in California.
These are now ready to ship out to the Customer, so he can easily fit them in to his triple tree’s.
Just take a look at them, what a cool set up these are and all New hardware, Hope that you enjoyed this blog about that what I do with the good old inline fours.
Let me know if I can help you with your Honda, I have been doing it here in California for 20 years and never tire of it, it is a passion of mine that I hope shows in my work?
Thanks for taking your time to read my Blog and hope it may of inspired you to work on your machine?