Time and Tide wait for no Man or Woman

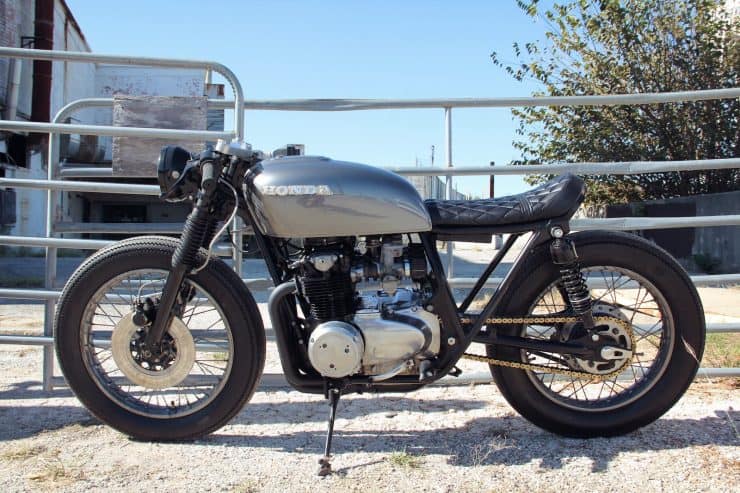
No matter what is going on in the world, one thing remands the same, and that is the ticking Clock, she will always continue to grind away 24-7 and I am vert aware at times of that as deadlines come up real fast when yo are a small business, but, there is nothing better than being your own boss, so that out weighs the stress and difficulties that we all endure at times in the trade that we are in. Time to get on my Bike and start to design some New parts for you all.

Things are changing for me and not long to go until I get my Own Brand New Workshop/Barn, exciting times for sure and look forward to spending some quality time in there and banging away at some projects that I must get completed my self. Sometimes I need to Police my self to get things finished, but a New Workshop is something to keep you Motivated that’s for sure.

I have just made up a bunch of Braided Hose Oil Lines and Braided brake lines, one piece and 2 piece front brake lines to cover any of your builds and continue to make and design more parts for the inline four, as well as other makes too. Have fun on your Machines this weekend everybody.


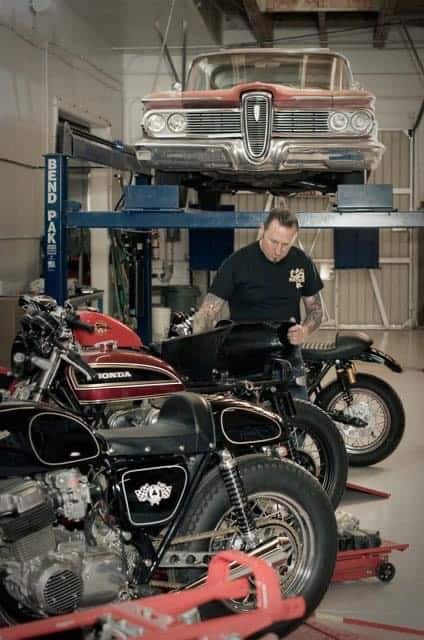
The things I enjoy doing in the garage.

Well here we are on a Monday, its hotter than a Jalapeno flavored ice-cream and I have been trying to catch up on a few things, so not a big time to do much on my Blog today., so forgive me for that.

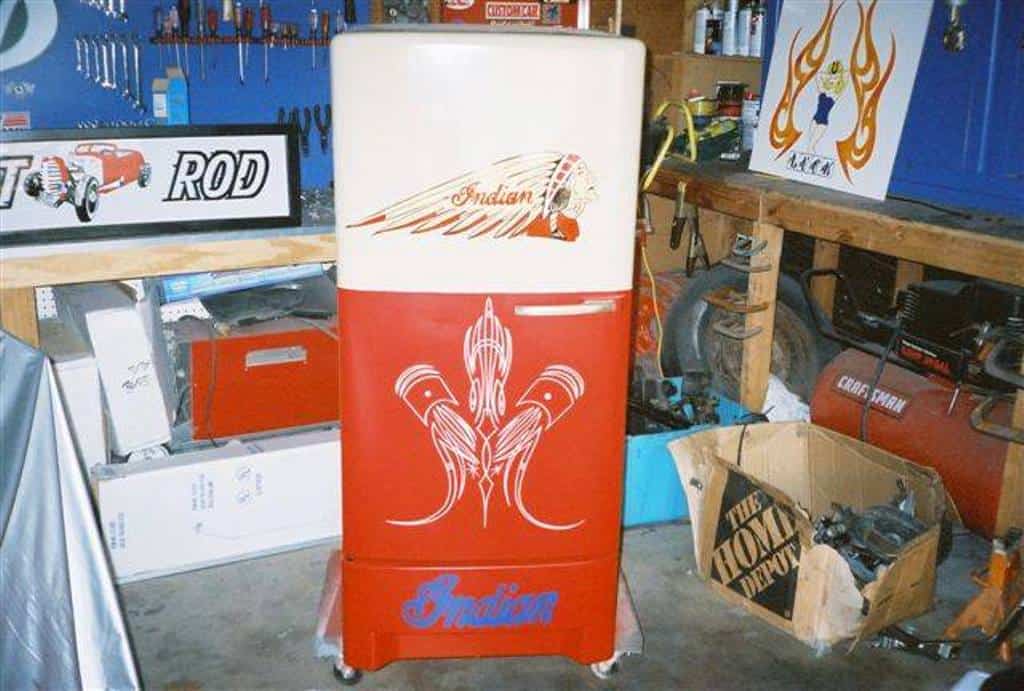
But I love all things old and a while back I picked up a 1935 Refrigerator, got it running and thought, what the heck I shall paint it as the normal White is as appealing to me as swamp ass.

Below are a few pics I found and thought I would share, it shows how cool you can change the look of a drab looking article and give it just a little wow factor. This was about 2001 I think.

I am sure that you have a fridge in the Garage or shed that looks kinda plain right this minute? So this is what I did with this old Frigidaire from 1935 that was put out on the side of the road.

I took this all apart, the cord was broken and once I rewired, this puppy fired right up and got cold, remember not to lay these down and, if you do, stand them up and dont plug in for a couple of days as the Freon all moves and it wont cool again. Anyway I removed the door, and also sanded the body of the old fridge with 600 wet n dry sandpaper.

I laid the door down on a old step ladder and table, then cleaned it and wet and dried hand sanded until I got this smoother than a babys arse, I also taped up the handle and seal.

I know these are not big photos but these are as big as I can blow them up before they pixelate, but as you can see, I have now painted the body an off ivory, I just liked the color to be honest.

Next up I masked it off halfway and by the way, this is Rattle Can paint for machines, so no HVLP spray guns, just make sure you rattle for 2 minutes and give even coats and you will be surprised at the finish you can get.

As you can see, I have painted the Indian Motorcycle Chief on the top part of the fridge, I used good old One shot enamel with a small brush and was stoked how this came out, next up was the lower half and I thought that maybe some good old pin-striping would be just the ticket. So what I did was draw a line up the middle and then drew some pistons and some flowing lines that were almost identical on the other side. I used a china graph pencil or any water soluble pencil will suffice as you can easily rub out any wobbly lines until you have it how you want.

Now this time I used some One Shot White and that offset really does stand out, I also painted Indian in Blue below to break everything up, it came out pretty good and I enjoy doing this, its just fun and to see something bland change to something cool is very satisfying and maybe cost me $40 to do all up.

Sorry the pics are so bad but I did this in my garage about 2001, as you can see I made a light box sign behind and some other art I was having a go at, just wanted to share this as I do not JUST do motorcycle stuff, although thats a huge passion, but sometimes you need a break to re light your fuse and art for me is a way of doing that. This now resides in someone elkses garage and still works today and the paint still looks great.

Thanks for looking at my Blog today, have fun with your Motorcycle, Hot Rod or what ever and enjoy life as it sure blasts by.


Custom Carburetor Lamp from a SOHC HONDA Four

Well, lots of you may know about the bikes and parts I make for these inline Four Motorcycles, I mean- I have been flogging my guts out over them for 18 years here now in Southern California.

But being a Leo, I enjoy many art and craft things in my life and I have been making Desk lamps for a few years now as a Hobby, I enjoy using broken no usable parts and create unique 110 volt lamps to be used in the Home, Shed, garage or in a shop etc, they make a pretty cool gift too.


So many people that have had Motorcycles have always had some broken or non usable parts laying about their Shed, garage or just in a Rubbermaid tub in the back yard, hard to throw away something you paid good money for years ago and even though it is not usable, be it broken, cracked or warped, there is always another life that the particular part can be reused for.

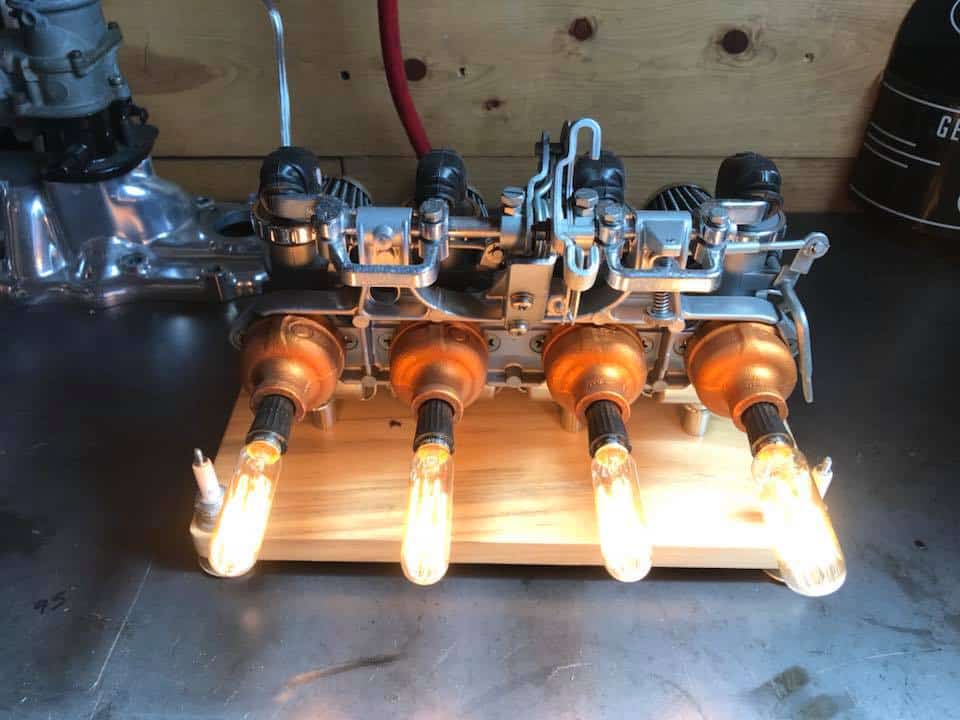
For me, well, I had an old set of broken Carburetors off of a 1974 CB750 Honda, S.O.H.C. model, I would loved to have saved these carbs but the posts inside were broken and the seats where the slide sat. had worn past its use and were no use to anyone on any motorcycle, but, I couldn’t bare to get rid of them and simply toss them away.

So, what I ventured to do with this rack of carbs was first to thoroughly inspect them to see if these were savable, of which they were not- then I wanted to take these all apart and wash them with S-100 to get oil deposits off, then put in the vapor Blasting cabinet and clean everything up, as Vapor honing will bring the aluminum back up to how it was when they first arrived into the Honda factory.

So, I removed all that I could and Vapor Honed the bodies and made sure everything was clean and ready to get transformed into this unique Desk lamp that I had come up with, I have made a few of these now and seem to be a hit, so continue to create these great Lamps for people as they tend to have them made for their Business, a birthday or at Christmas.

I put this together as carefully as I would if it was going to be used on the motorcycle, took me a little while to get the wiring done and had to drill some holes to allow the cable to run from one Carb body to the next.

I Polished the float bowls and the Knurled top rings, as I want the carburetor to pop when you see it and also gives the carb rack a nice contrast when its mounted on the wood base that I shall be making. I used Poplar Timber and cut to shape it, rounded the ends and then sanded and stained to give it that old timey look.

I mounted the carbs using some old Chrome spacers I had in my parts drawers and these seemed to work out just fine for the height of the carbs as I didn’t want them to sit too high up in the air.

You will also notice that just as an embellishment, I fitted a Spark Plug at each corner of the wooden base, to give some Status Quo, of course, it had to be a set out of a CB750 Honda too.

These plugs were pretty sooty and set the base off very well and indeed, as well as a good connection for the carbs as these are Genuine NGK units I have always used on CB750 Honda’s.

See, they look great lit up and give that warm glow and give to a new life now as something else but this is a real head turner and quite the conversation piece where ever it is located.

I also wanted to incorporate these Vintage filament bulbs too and these really set the whole piece of and am stoked the way these have turned out in the end.

So, let me know if I can help you create a unique lamp out of parts, it takes a little while but its so worth it in the end and of course, always good to recycle stuff right?

I have made a few different styles of these Lamps for people over the years and enjoy what I do, I throw myself into the design and love the outcome when it is completed.

Drop me a line if I can be of help to you at carpy@carpyscaferacers.com or drop a dime at 714-598-8392, you can even text me on that number too for that matter.

I make these parts starting with small lamps at $150 then go up as per intricacy.

Thanks for looking at my other creations, it makes my career a fun one.


AJS 7R – THE BOY RACER the Classic 350cc Road Racer

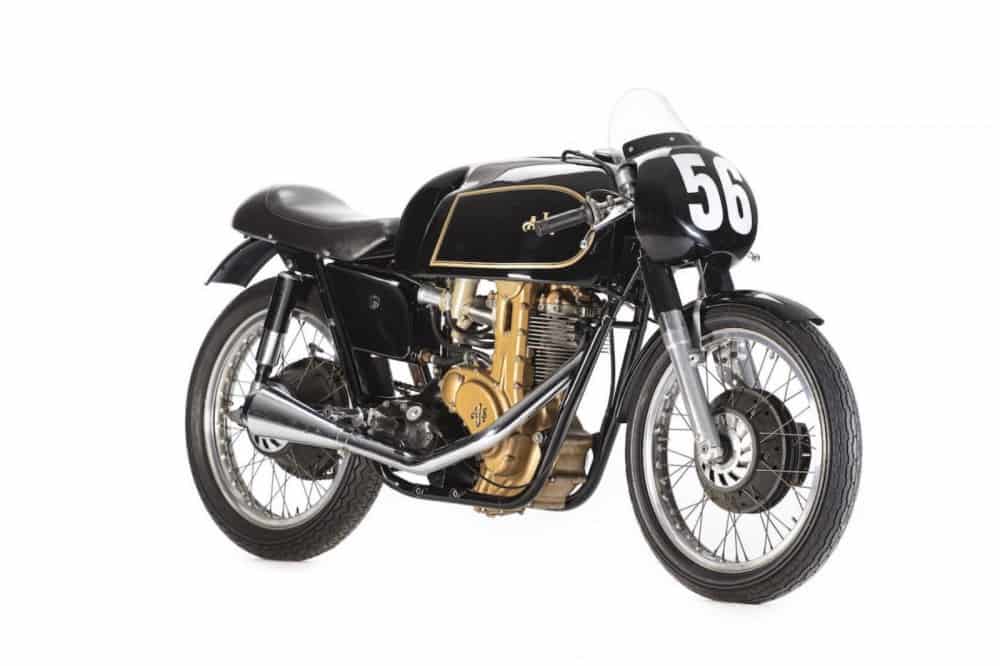
The AJS 7R was introduced in 1948, and was almost immediately nicknamed the “Boy Racer”. It would go on to be become one of the most successful over-the-counter racing motorcycles for sale in England at the time, and even today almost 70 years later the AJS 7R is a dominant force in the world of vintage motorcycle racing.

AJS-7R-Motorcycle-Right-Side-740x494

AJS was the name used for cars and motorcycles made by the Wolverhampton, England, company A. J. Stevens & Co. Ltd, from 1909 to 1931, by then holding 117 motorcycle world records. After the firm was sold, the name continued to be used by MatchlessAssociated Motorcycles and Norton-Villiers on four-stroke motorcycles till 1969, and since the name’s resale in 1974, on lightweight, two-stroke scramblers and today on small-capacity roadsters and cruisers.

AJS-7R-Motorcycle-Left-Side-740x493

THE STORY OF THE AJS 7R

Phil Walker designed the 7R with a single cylinder, single overhead camshaft engine – based on the lessons learned with the pre-WWII “cammy” engines. The chain driven overhead camshaft gives the 7Rs engine a distinctive look on the timing side, with an oftentimes gold-painted timing and cam cover sitting below the AJS fuel tank with its large knee indents on either side.

AJS-7R-Motorcycle-Tank-740x510

The air-cooled engine sits in a duplex frame, and suspension is handled with telescopic shock absorbers at the rear and Teledraulic forks up front. A small headlight fairing with a Perspex shield offers the rider a little cover when crouched down behind the dials on the straight.

AJS-7R-Motorcycle-Engine-740x688

The original AJS 7R had a relatively svelte kerb weight of 285 lbs (129 kgs), which meant its 32 bhp could be put to good use. Over the course of its production run the model was progressively modified in an effort to keep up with the advanced multi-cylinder race bikes coming out of Italy. The bore/stroke was squared a little from 74 x 81 mm to 75.5 x 78 mm to allow a higher red line, and the valves angles were narrowed.

AJS-7R-Motorcycle-Front-Brake-740x621

In 1951 an experimental derivative called the AJS 7R3 was built with a 3-valve head, and in 1954 the 7R was further improved – the engine was lowered in the frame to lower the centre of gravity, and further engine tweaks improved power to 40 bhp (at 7800 rpm). This newly improved 7R won the first two rounds of the World Championship and took a win at the Isle of Man TT – not a bad effort for a bike first introduced 7 years earlier – especially when you consider the pace of engineering advancement at the time.

AJS-7R-Motorcycle-Front-Wheel-740x725

Wins for the AJS 7R would continue right into the 1960s, with victories at the Junior Manx Grand Prix races in 1961, ’62, ’63, and a 2nd place finish in 1966. Interestingly the 7R also won the inaugural F.I.M. 500cc Motocross World Championship in 1957 – Bill Nilsson of Sweden modified a 7R road racer into a motocross machine and nailed a convincing victory. Not something Phil Walker ever likely envisaged for the model.

AJS-7R-Motorcycle-Rear-Wheel-740x615

Engine‎: ‎348cc single SOHC four stroke
Also called‎: ‎’Boy Racer’
Power‎: ‎37 bhp (28 kW) at 7500 rpm
Production‎: ‎1948 to 1954 (factory) up to 1963 …

AJS-7R-Motorcycle-Cowling-740x554

THE AJS 7R SHOWN HERE


The AJS 7R you see here is an original 1956 model, meaning it benefited from the performance modifications introduced in 1954, it’s also fitted with the high-performance works camshaft, and a light weight magnesium gearbox and carburettor.

AJS1

How cool would it be to own a stable of these Boy Racers, a very cool collection and would be fun to race the 350cc for sure.

ajs 7r

Sadly nothing is known about its racing history, but for those who’ve been looking to get into vintage motorcycle racing there are very few bikes better suited. Bonhams estimate it’s worth between £22,000 and £28,000, and it’s likely the bidding will be brisk when it rolls onto the auction block at the Spring Stafford Sale on the 23rd of April.

As a kid I would hitch hike to Snetterton Race track to watch the Clubman races, I loved the pits and the mechanics etc but the distinct sound of a Single also had that resonating tone I will always remember.

Unforgettable sound for me.

Have a Great weekend.

xmas banner2

Girls who Ride- A superb machine

Often I tell people that it is so refreshing to see many Girls- Women that are taking a very Healthy interest into the Two Wheeled fraternity, I have always had an admiration for female riders, as for me personally, I would think it would be quite boring sat on the back of a Motorcycle, whilst your partner is having all the fun.

jenn2

My Girlfriend Jennifer Sun has her Own T100 I bought for her and she rides all over the place and love seeing her ride, and when I heard about Jennifer bailey having a really cool  Honda CB550, well, I just had to share, as I really hope to see many more women on Motorcycles.

The past few events I have witnessed has been phenomenal when it comes to seeing more women riders, there are so many out there now that people are taking notice and Jennifer Bailey who I am featuring here is just one of so many that have as much as a passion for this hobby as anyone. Good on you Girl, love the bike.

exhaust jennifer bailey 550b


Jennifer and her husband Blake Bailey run the Motobailey Shoe Co. – known for their classically styled, Kevlar-lined leather motorcycle boots. Both Jennifer and Blake are avid motorcyclists, Jennifer started our a few years ago on a Kawasaki Ninja 250 but after becoming friends with Karly Kothmann and seeing her beautifully rebuilt Honda CB550 she knew it was time for her own upgrade.

exhaust jennifer bailey 550j

Jenns choice for this CB550 was quite easy really, compared to its bigger Brother, the CB750 is way more heavier, and more cumbersome to maneuver , also the 550 isnt much slower, probably about the same take off to 60 foot speed, it will lose out after that through the Torque and Horse Power of the Larger 750 but, that can be another bike further down the road.

exhaust jennifer bailey 550g

Road and riding experience is key in this area and the Honda CB550 is the perfect candidate to learn and hone new skills to give not just a safer over all perception of Motorcycling, but also the lighter weight will give you a little more confidence as this is a nimble and well balanced machine.

exhaust jennifer bailey 550f

The CB550 was the perfect Platform to create a new ride, something that you can custom build to your taste and budget, the sky is the limit as with a few modifications such as Smoothbore Carbs, a street race cam and Drive sprocket change can turn this smooth linear power inline four, into a Tarmac eating Mean machine.

exhaust jennifer bailey 550e

Just time, Money, patience and experience will engulf you and then your hooked.

CB750 Bikes are not as plenty ful as they were when I first started to create Cafe and Brat bikes, the 550 is slowly becoming that way now, as the wonders of the internet, Instagram, twitter and the like have made it so much easier and harder at the same time to find a really good deal on these Classic Honda’s.

exhaust jennifer bailey 550d

JENNIFER’S CB550 BUILD

Blake wasted no time in finding a 1974 Honda CB550 for Jennifer, it was a little worse for wear, running on two cylinders and needing a comprehensive rebuild. Work started immediately with a teardown, the rear subframe was chopped and a new one fabricated, with a new seat pan, seat, and low profile running lights.

exhaust jennifer bailey 550c

It took time, but once the engine had been sorted and was running properly, with the carburetors synced and re-jetted, the attention shifted to the aesthetics. The goal was to create a clean, minimalist cafe racer that wasn’t flashy – just functional and fun.

exhaust jennifer bailey 550a

New triple trees were sourced from Dime City Cycles, as well as clip-on handle bars, a new (smaller) headlight, and the tank and wheels were powder-coated in Black Chrome by Overland By Design. A Carpy 4-into-1 exhaust was fitted, with pod filters installed on the carburetors in place of the original airbox.

exhaust jennifer bailey 550

A new wiring loom was put together with significant input from friends Tyson Carver and Tanner Kothmann, powered by an Anti-Gravity lithium-ion battery, with all the important electrical gear stashed up under the seat in a tray supplied by Cognito Moto.


exhaust jennifer bailey1

So come on Girls, get into the Garage and finish off your creations as I love seeing you all out on the road, we all ride as one, we are a family, bonded by our 2 wheeled fascination.

Thanks for reading my Blog today, Busy weekend ahead but life is good in the fast lane and I feel I am still to young at heart to pull over and get in the slower lane.


The Rice Boiler – 1974 Honda CB750K

OK, for a long time I had been planning this build and now it is here and I am so stoked the way that the machine turned out.

I used a snotty old bike to create this head spinning machine and had already built it in my mind hundreds of time, so thus was really a piece of cake for me.

I had an old set of Henry Abe 7 Star rims back in the UK, these are at least 3 decades old and had them sent over the water from back home and wanted to take them apart and fit new front and rear bearings, as well as paint the stars and polish the outers.

Once I chose New rubber for it ( Bridgestones ) I then made sure I had the rear brake set up drilled and polished, as I want the bike to stand out in many places.

I had a S.S. tank and cut all the top flap out and welded that in with a flat plate, then fitted a Stainless Steel polished Monza style racing Gas cap in it.

I then used one of opur own designed “Razorback” seat bases, As I really do love the lines of thaat seat base and knew this would really flow and give that yesteryear look.

I bead blasted the old frame and then powder coated a high gloss full flow Black on it and love the look, almost an enamel look to it and very inert to many fuels and substances.

If you look, you can see our New battery boxes we now make and offer on our website, this is the ww2 style battery box made from 6061 Aluminum and has cool rivets in.


I removed the old Oil tank and we washed that about 7 times and then cleaned out with some simple green, then stripped the paint, had it copper-ed, then chromed and buffed. you can see i was also setting up the rear sets and polished the brackets to give a Chrome finish.

I designed this color scheme by drawing this out on graph paper and used water colors and came out with this design, the reason that I came out to this conclusion is simple.   My old man always ran down anything to do with Japanese machines, and as I was a teenager in the 1970’s,  Japanese bikes were predominant in all parts of the globe and the old man just looked down on them and called them “Rice Boilers” 

So That’s why I named this bike “Rice Boiler”

She was fun to build and I am so stoked at the reaction it gets from people when they first see the bike.

I had a few people just stand there and just keep looking at it, as this bike did not start off like this.


I really enjoy the putting everything together part as you see such a transformation.


The Racing number 74 is really just the year of the bike but I wanted this to remind me of days gone passed when I used to hitch hike to Clubman Racing at Snetterton track and getting a lift on one of these bikes.

There are so many things that I have done to this bike, I should of named it the Magician as it is loaded with tricks. the lower forks are polished to a Chrome finish and all rebuilt, etc., and we hand-drill these rotors at the shop, then surface grind and polish them, looks cool eh?

I hand-hammered the gas tank as I do on all my bikes and wanted to use the Rising Sun as the filler, and boy does it pop!

The finned covers are early 70’s ones I have kept for this particular bike build, I must of had them 12 yeas in my tool box and so glad i got to get them on the Motor .

The red is very bold and I chose an Aztec style gold for the pin line, the whole paint scheme was completed using House of Kolor and I chose a Candy Rootbeer Brown as that was a cool Candy Color that Honda had back in 1971 and wanted to try and get that old School feel to it.

I actually incorporated  the neutral light into the head stock nut and think that it will be a cool addition to this ride and make use of the new lights we sell.

New Old Stock handlebar controls were a must, we used one of our polished throttle embellishers and some very cool flake handlebar grips, as well as new alloy levers, etc.

You can see how many brand new or rechromed parts I have fitted to this machine, by just glancing at the photos on this page.

The Ggold flake on the grips really do make the colors blend with the gold of the bike and the shocks.

I wanted to have the race number on there, as well as incorporate the year of manufacture, and it came out really well.

 I fitted new old stock fork ears and made our front fork badges t0 fit the sides where the original ugly reflectors sat and it cheered the machine up.

Yes- that is our very own Boxed Swingarm that we drilled and powder coated and really does suit this machine well, as well as helps the cornering as it stops all the rear end stepping out, this is a copy of my Original Dresda swingarm.

Our Stainless Steel Yoshimura-style 4-into-1 exhaust is a very cool sounding and looking set up and is a must with the style of machine that I create, by does it hang well.

You can see the work it took to make the tank look great, also the GPS speedometer is a cool look, but the bracket and the bucket we had to make and polish, it all worked out fine in the end and even though this was not a cheap option, I think its the cherry on the cake.

The headlight is from an old Desoto truck and then changed a little, it looks great with the Candy Rootbeer brown on it and the bezel was re-chromed.

Pretty Much everything is new on the build and am so happy to have gotten this machine done to the way I originally imagined, it screams out to you that this is an old cafe racer from back in the 70’s and I hope you like looking at her!

I tend to use Bridgestones as my personal choice of rubber on the rims I use, as I have always had them and stuck with what I know.

I spent a lot of time getting this bike right and many, many hours taking things off that didn’t work that you will never see, but thats how it goes with bike building and at the end of the day I have a really cool looking classic that is bound to turn a head or two.

I took the old broken and cracked fins off the original oil filter housing and machined and polished it and this is how she comes out. I do this to a lot of my creations, it adds a unique look.

Fitted our Finned Aluminum Ton Up Stabilizer Bar and the whole rear end is new, Brake Spring, Rod and Adjuster, no expense spared on this build.

A fun machine that is something that was made from old snot, rust and cold steel, also so nice to be able to recycle this and get it changed into another form.

I have already had a lot of interest in this machine and will let it go for the right price – this is a unique motorcycle with many, many new parts and one off pieces.

Within two days of finishing this motorcycle, I got it featured in Japan’s Lightning magazine, what a honor that was.

This bike did take a long while to complete, but I changed quite a few things on this until I was happy with the end result. Sometimes that is what happens with custom bike builds- I like this, and some of you may not. But to me, this is a cool machine that just screams out the bikes of the 70’s when I was a teenager in the United Kingdom.


I drilled the brake hub, the rotor and (of course) the front sprocket cover, as that’s my signature style I like to do, but I also had a very cool license plate frame that I have had for donkey’s years and was so stoked to have the opportunity to use it on this bike.

If this does not say cafe racer, then I don’t know what does – it’s an original piece that I am happy I didn’t discard over the years.

The tank took me some time to hammer and weld, but I wanted to incorporate the Rising Sun in the knee inserts and I am glad I did as it really does add a great concept to the bike.

Quite a few coats of Candy Root Beer brown were applied over the Aztec Gold and the end result is exactly the color that I envisioned.

No stickers, this is all real paint you see and I think you will agree, this really does stand out from many that just have decals.

A good stance for this tarmac eating machine.

I used rear sets which gives the bike a well-balanced feel, as the stock pegs are too far forward.

Our Boxed Swingarm and one off Chromed Chain Guard is a good component that i wanted to use on this bike. the Boxed Swingarm was made at the shop using 2X1 steel and it looks and works really well.

All the cases are hand-polished, the starter is rebuilt and the carbs are like new now. This bike runs smooth as we synchronize them using a Mercury stick.

The carbs have to be right on this machines, if you do not sync them they will pop and backfire, something you don’t want to have happening.

The front brake caliper was stripped and polished and our machined stainless steel piston fitted. We also have new side stands to stop the bikes from laying over too much. The originals had a tendency to bend over time. The DeSoto headlight and cool Chromed Diamond Signals, tell people what is going on in front of them.

Stainless Steel Flip-top Monza-style Gas Cap we sell was used on my tank, as well as our own ‘Ton Up’ Fork Badges.

New cables throughout (throttle, tachometer, speedometer and clutch cables) and new adjuster and stainless bolts all over the machine make this a long lasting ride.

I used a Ford big block connecting rod to use as an exhaust hanger. Once it was the right size and fitting, we chromed it and added this nice custom touch to the build.

I didn’t like the stock oil tank dipstick, so we machined a col finned cap for it and boy does it look trick, we shall be making more now to offer to you lot.

See how that cap makes everything flow that has fins on it, I really am happy how this came out, we used 6061 T6 Aluminum and then polished it.

The bucket below we made from a solid piece of  7075  and it came out so nice, tig welded the base and polished it, the bucket attaches by 3 small Allen head screws that sit at the front of the plate.


I wanted to combine new and old components to clean the top of the steering area up and it does look really tidy and clean now.

This was a fun build and I hope that you liked looking at the good Old ” Rice Boiler ” I can hear my Grumpy old man moaning about it right now!

I have already been featured in Japans’ leading Lifestyle magazine and have just had an Italian magazine come over to shoot it and hopefully a brit mag the month after, so I must be doing something right! Interested parties, please contact us for details.

HONDA CB500 “The Bikini” Built by Kyril Dambuleff

Some times there is a Cool Motorcycle that has been redesigned and contoured into something of beauty, and if seen, would make you stop in your tracks, I have seen many creations made here and over sea’s and when I saw this CB500, you had no choice but stop and admire the countless hours of perpetration and grazed knuckles to get something as aesthetic as this Machine named- The Bikini. By Kyril Dambuleff of New Jersey.

Today I wanted to feature this ride as being a Motorcycle builder myself, I can see the hours put into this and it sure turned out really well, no way you cannot appreciate the time and effort that has gone into this ride, the amount of scraps of paper with ideas on, the Sharpie idea’s scribbled on the work bench when Inspiration suddenly dawns upon you- the array of coffee cups – crushed beer and soda cans that kept you going where others gave up- the snippets of electrical wire and heat shrink for those frustrating electrical issues- And finally – An empty space on your Motorcycle Table!!

Kudos Kyril, so impressed with what you have created on the East Coast mate. So enough of me rambling on about this bike, here is all the details and photos Below that explains this mans creativity and craftsmanship. Enjoy…………

This motorcycle is the antithesis of the LOTUS C-01.  Conceptually, of course. When looking at Daniel Simon’s design, there isn’t much you could see other than the motorcycle’s gorgeous overall shape.  Most of the components are completely hidden from view.  Here, on this motorcycle, just about everything is in full view.  Like a “skeleton watch”.  Those bare-bones timepieces in which the watchmaker has left only what is essential and revealed as much as possible of what makes a watch tick.  Since I’m not too crazy about skeletonized watches, I prefer a different analogy: a tall, skinny, platinum-blond fashion model scantily clad in sky-blue bikini.  Where everything is in full view except the little that is hidden and subject to the imagination.  Hence the bike’s name: BIKINI.

2

Kyril Dambuleff has no barrow to push. He doesn’t run a workshop or sell parts or posters or scarves or t-shirts. He only builds motorcycles to keep himself happy and make the rest of us plonkers look bad. And he’s doing an admirable job of it with this exceptional 1972 Honda CB500 he’s dubbed ‘Bikini’. Photos by Kyril Dambuleff 

3

The rivet counting brigade will be quick to point out that while the frame is from 1972 the engine itself comes from a 1976 CB550. And that’s how the bike started, with just an engine that had been rebuilt by Kyril from the ground up. ‘It sat on my workbench for months, taking up much needed space,’ he says. ‘I thought about displaying it somehow, perhaps in my office. But what could be better than an original frame?’

4

Well, not much. Unless it’s nestled in a bike trimmed to perfection like this beauty. So Kyril went about accumulating all the parts over the coming months – the frame, wheels, exhaust pipes, forks and tyres and all the other sundries that come from assembling a ground-up bike. But the focus was to remain the powerplant.

5

‘The idea was to showcase the engine and have all of it in complete and unobstructed view with nothing hidden,’ he explains. ‘Everything else had to conform accordingly. Hence the asymmetrical tank and all the other exposed components which shows what makes a motorcycle tick. It’s like one of those skeleton watches in which the maker has left only what’s essential and tried to reveal as much of what makes the watch tick as possible’

6

It’s a little like that, but Kyril has an alternate slant on the bike. ‘But I prefer to think of the bike as a tall, skinny, platinum blonde fashion model scantily clad in a sky blue bikini. Where everything is in full view except the little that is hidden and subject to the imagination. That’s where I got the name from.’ As much as I prefer the name ‘Blue Balls’ I’ll grant him that ‘Bikini’ has a much classier ring to it.

7

Kyril fabricated the aluminum tank himself, which slopes up hard on the right hand side to expose the spark plug leads and the coil. On the left it retains something close to the original lines but that completely asymmetrical design is certainly something I haven’t seen before.

11

It’s also interesting to note the finish used on the exhaust headers. It’s not polished stainless steel but Cerakote applied with a mirror finish. Cerakote is actually a polymer-ceramic coating that’s usually applied to firearms – often in camouflage or flat earthen colors. It’s a neat process that’s very heat and distortion resistant and should ensure a mirror-like finish for years.

8

Those headers were fitted to the rebuilt CB550 engine – and unlike the frame, and maybe like it’s bikini-model namesake, many of it’s best features aren’t visible. While the engine was blasted and polished the cylinder was bored out to 59mm and new Wiseco pistons installed. Compression was taken up to 10:1 and displacement is now 553cc’s.

9

And then it was time to fit it to the frame, which Kyril found to be the only part of the build frustrating. ‘Modifying the original tail section was easy,’ he says, ‘but grinding, filling and smoothing the original welds took a lot of time and effort and, in some cases, required tools that one would expect to find in a dentist’s office.’

10

All told the bike is an incredible twist on the traditional cafe racer – and like an original caff this one is considerably lighter than stock. Kyril’s target weight was 350 pounds (158kg) and with the antigravity battery, aluminum parts and tricky things like the adjustable foot peg positioner he nearly managed to hit that with the bike weighing in at 357lbs. ‘I think I could have hit 350,’ he explains, ‘but I had to replace the front single disc with a twin disc setup that was irresistible’.


More from the Builder.  Kyril Dambuleff New Jerseys Finest Motorcycle Builder.

It all started with a HONDA CB550 engine, which I’d bought a year earlier and which I’d rebuilt completely from the ground up with the idea of keeping it as a spare for the BLACKSQUARE bike.

Then, the rebuilt and detailed engine sat on my workbench for months taking up much needed space.  I thought I’d display it somewhere somehow, perhaps in my office, and what could be a better “cradle” for it than an original frame?  So, I bought a frame.  And then, I bought a set of carburetors.  And then… it occurred to me that one way to display an engine is to build a whole motorcycle around it.


One thing led to another.  The principal idea to showcase the engine itself called for everything else to conform accordingly.  So, by extension, almost everything else had to be fully exposed too, perfect as I can make it and as simple as possible.

Ultimate simplicity leads to purity.

This succinct phrase by the Japanese food critic Masuhiro Yamamoto had been stuck in my head for some time and I thought it was appropriate enough as the motto for the build.   I printed it in poster size and nailed it to the wall in the workshop.  As much as I felt I knew what Yamamoto-san meant, I wasn’t sure I could fully comprehend this piece of wisdom.    So, I “translated” it for myself in layman’s jargon and printed another poster:

Nothing half-assed!


I personally benefit from having a “guiding principle” when working on a project.  It makes life easier as it eliminates “what-if’s” and “should I or shouldn’t I”.  So, when the concept of showing what makes a motorcycle tick dictated shaving off the majority of the right side of the tank, off that portion went.  It didn’t bother me that, consequently, the tank became fully asymmetrical and that seemingly people just don’t do that (motorcycle tanks are always fully symmetrical).  It had to be done and so it was done.

A lot of the rest of the bike is, of course, conventional. It is a motorcycle after all.  And it is a fully functional, street-legal and registered bike. You could take it anywhere.Another interesting and relatively rare feature is the 3-position rearset bracket.  It allows the rearsets to be positioned up and down as well as forward and back to suit the rider’s size and preferred riding style.

The most difficult part of the project was, completely unexpectedly, the frame.  Modifying the tail section was easy, but grinding, filling and smoothing the original welds took a lot of time and effort and, in some cases, required tools that one would expect to find in a dentist’s office.  Next was the question about color.  The first choice of color was totally inappropriate, but I could only see what a big mistake that was after the bike was fully assembled.  So, everything had to come apart again.  The frame was stripped, re-blasted, re-powder-coated, and clear-coated.  And then everything had to be put together for the second time.  Luckily, the sky-blue color came out alright.

In addition to the main concept of exposing as much as possible of what makes a motorcycle “tick”, another objective was to lighten the bike as much as prudence and safety would allow.

Yet a third objective was to avoid the use of plastic components as much as possible.  There is hardly any plastic on the bike.  Other than the battery casing, the fuse box and the tail light’s rubber-like elastomer, I can hardly think of any.

COMPONENTS:

ENGINE, FUEL SYSTEM, IGNITION & EXHAUST

ENGINE: 1976 HONDA CB550.  Bead-blasted, completely rebuilt from the bottom up, bored +0.5 mm to 59 mm (the original cylinder bore is 58.5 mm) and fitted with WISECO pistons (kit model number 40059M05900).  Compression increased to 10:1 from the original 9:1 and displacement increased from the original 544 cc to 553 cc. Cylinder boring and valve job by TSI Competition Engines.

CARBURETORS: original KEIHIN, model 087A, completely rebuilt.

VELOCITY STACKS: one-off custom design, by STEEL DRAGON PERFORMANCE.

TANK: asymmetric, one-off, in-house design, all aluminum, custom-built and polished by BCR DESIGN, capacity = 2.0 US gallons

PETCOCK: by PINGEL, 6000 series

EXHAUST: modified original headers, ceramic-coated with CERAKOTE High Temperature Glacier Series coat.  (When polished, the appearance is that of polished aluminum.)

IGNITION COILS: Dynatek Dyna Coils 5-ohm Dual Output DC8-1; Black DW-200 Wires

POINTS: new, original HONDA

FRAME & SUSPENSION :

FRAME: 1972 HONDA CB500, modified tail section, all original welds ground smooth.  Powder-coated in sky blue and then clear-coated by TRICKED OUT CYCLES.

FRONT SUSPENSION: original HONDA, rebuild with new tubes and springs.

REAR SUSPENSION: custom-built by WORKS PERFORMANCE gas shocks, 13.5″-long, Dual-Rate Springs.  (The question about correcting the length of the kickstand when custom suspension is installed comes up a lot, so, in anticipation that it would come up here again, the answer is yes.  The kickstand was lengthened by 1″. It was then polished and chromed.)

13

WHEELS, TIRES & BRAKES

RIMS AND SPOKES:  by Buchanan’ Spoke & Rim Inc.  “Sun” rims in polished aluminum, stainless steel spokes.

TIRES: MICHELIN Pilot Activ.  Front 3.25 – 19.  Rear 4.00 – 18.

FRONT BRAKE: dual-disc, drilled rotors, original HONDA calipers, stainless steel lines, banjo fittings and 3-way splitter by GOODRIDGE

REAR BRAKE: original HONDA

14

CONTROLS & INSTRUMENTS

CLIP-ONS: Vortex, 35 mm, 7-degrees, all aluminum

THROTTLE TUBE: G2 Ergonomics Quick Turn Throttle Tube 50-150D, all aluminum

GRIPS: by ARIETE, model 02631-ALL, Alu-Rub Grips (polished in-house)

HAND CONTROLS: by Eurocomponents, model: De Luxe Retro, all aluminum

15

REARSETS: by JOKER MACHINE, model 09-800S, all aluminum, fully adjustable in all imaginable positions.

3-POSITION REARSET BRACKET: in-house design, allows 3 different positions for the rearsets depending on rider’s size and riding style preference.  CNC-machined from 6061 aluminum. The brackets are approximately 12″ x 5″ x 2″ overall (roughly 300 x 120 x 50 mm). There are two curvatures which offset the mounting points by about 1/2″ (12 mm) and the three circular foot peg positions are themselves some 3/4″ (20 mm thick) allowing the brake pedal and clutch lever to clear the exhaust pipes.  It took a big chunk of aluminum to CNC-machine these.

16

CLUTCH AND THROTTLE CABLES: custom-made by BARNETT

TACHOMETER: SMITHS Digital Chronometric CHR-R10; 0-10,000 RPM

17

ELECTRICAL:

HEADLIGHT: restored antique spot light (the bucket was chromed, the reflector was nickel-plated) fitted with a STANLEY lens.

HEADLIGHT RELAY: common latch relay incorporated in the headlight’s bucket.

TAIL/STOP LIGHT: 30-LED TruFLEX by Custom Dynamics.

BATTERY: 8-cell 240CA Lithium battery by Antigravity

REGULATOR/RECTIFIER: by RICK’S MOTORSPORT ELECTRICS, model # 10-100

HARNESS: custom 3-part harness terminating in aluminum aviation plugs; all bullet-socket connectors by VINTAGE CONNECTIONS

PUSH-ON MOMENTARY MINI SWITCHES for the headlight and starter button.

18

SEAT, SIDE COVERS & FENDERS:

SIDE COVERS: perforated aluminum, designed and built in-house.

SEAT: designed and built in-house, aluminum pan, 1-inch foam, marine-grade semi-perforated black vinyl.

EMBLEM: in-house design, 3M epoxy domed decal on black background with chromed letters, custom-made by CHROMED HOG

19

OTHER:

All laser cutting by Keith Gayman.

All spacers and other specialty parts were machined by “uberacer” Gene at S&S General Services LLC

All welding by master welder Tim at Classic Cycles

20

SPECIFICATIONS:

OVERALL LENGTH = 80.5 inches (2,045 mm)

OVERALL WIDTH = 28.5 inches (724 mm)

OVERALL HEIGHT = 39 inches (991 mm)

SEAT HEIGHT = 29.75 inches (756 mm)

FOOT PEG HEIGHT: Position 1 = 12.25 inches (311 mm), Position 2 = 13.00 inches (330 mm), Position 3 = 13.75 inches (349 mm)

DRY WEIGHT = 357 lbs. (162 kg)

NOTE: The listed dry weight of an original 1976 HONDA CB550 is 423 lbs. (192 kg).

21


TON UP GARAGE HOT ROD TRIUMPH – Awesome Machine –

Daniel and Pedro are the names behind Ton-Up Garage, one of Portugal’s leading custom bike builders, two guys who consider themselves total petrolheads, loving anything with an engine. Being able to draw influences from all aspects of motoring allowed Daniel and Pedro to come up with the ‘Hot-Rod’, a truly fantastic custom Triumph Bonneville.

TONUPGARAGE_TRIUMPH_HOTROD_11

A Classic Twin finding it’s influences in the “crazy years between the 30s and 50s, the golden era off Hot Rodding”. A refreshing custom born into a scene which could be described as a little stagnant – though no sports bike, this air cooled Triumph embodies a need for speed, fast acceleration and hold on tight thrill seeking.

The Hot Rod’s side-on profile is something to behold, low and beautifully sculpted. It’s clear the frame has been shortened and looped, tightening up the Bonneville’s lines. The air/battery box has been removed, as have any redundant brackets, leaving behind the desired exposed frame – now finished in silver, visually lightening this hot rodded Triumph Twin.


TONUPGARAGE_TRIUMPH_HOTROD_12 (1)


Many agree that the early carb model Hinckley Triumph Twin is the pick of the bunch, technically simple and tuneable with the most basic of tools. That simplicity allowed for the swopping of the tank for a much lower and more streamline custom item, which not just hugs the cam cover of the 865cc engine, but envelops it – a tank finished in a classic paint scheme, described as creating a sensation of movement.

TONUPGARAGE_TRIUMPH_HOTROD_3

The custom seat cowl is upholstered in black leather and grey trim, and continues the lines to the rear of the Triumph, enveloping the new frame loop before culminating in a small stop and tail light. Under which is the new custom made battery box containing a lithium battery, and the Twins minimal electrical system, which now includes a RFID keyless ignition system.

TONUPGARAGE_TRIUMPH_HOTROD_4

Usually the unsightly rectifier can be found strapped to the Triumph Twins bottom yoke, on display like some sort of homage to half arsed design. Many relocate the rectifier to the frame rail where it can stay cool, but isn’t as unsightly – but here on the Hot Rod the unit has been upgraded and moved to under the seat cowl, protected from what the 18” rear wheel, wrapped in Firestone Deluxe Champions throws up by a custom made mudguard/numberplate holder suspended millimetres off the rear tire.

TONUPGARAGE_TRIUMPH_HOTROD_13

At the front is a matching 18” wheel, again wrapped in retro Firestone rubber, with the dust being kept off the classic bottom mounted 5¾” headlight, and out of the riders face by a custom bobbed mudguard. Up top is a Motogadget Tiny speedo, telling the rider all he need know at speed, which leads us on to the handlebars, a specific choice as Daniel and Pedro dint want “to use the most common models…”These were fitted with custom CnC’d grips, capped with Motogadget M-Blaze indicators.

TONUPGARAGE_TRIUMPH_HOTROD_17

Switches on this build have been kept to a minimum, with the stock items being replaced by micro switches, with a big red start button being fed through the steering stem, finishing the controls are a set of retro cable brake and clutch levers, with the brake lever operating the hydraulic system hidden under the tank.

TONUPGARAGE_TRIUMPH_HOTROD_15

The rear brake also operates differently, rather than being fed under and along the swing-arm, its being fed through the swing-arms hollow spindle bolts, located just forward of the new rear sets and serrated foot-pegs, and out the other side and down to the rear brake calliper. “We’ve tried to have a lot of technical details different from previous models, we’ve built and have the bike as clean as possible. These are new challenges we give to ourselves to go further on the builds we do”.

TONUPGARAGE_TRIUMPH_HOTROD_16

The Air-Cooled 865cc carb fed engine hasn’t missed out, being fitted with a classical styled stainless steel exhausts system and velocity stacks painted white to match the tank and seat cowl. The stock sprocket cover has thankfully been replaced by a custom item featuring a cut-out Ton Up logo. A much needed suspension upgrade finishes the Hot rod off, being fitted with a set of Öhlins shocks and springs.

TONUPGARAGE_TRIUMPH_HOTROD_14

A fantastic and attractive build by Daniel and Pedro, demonstrating that custom builders on the continent are leading the way when it comes to modifying the Hinckley Triumph Twin!

From Bonnefication.


Just a chin wag whilst on my Motorcycle.


Seeing as it is now Feb 1st, I thought that I would try and start a little more blogging as I go along, not sure how they will come out but may be entertaining for you.

Trying some different media’s here as everybody seems to use their phone to talk, take photos and now live chat at times, so- to try these things out I have used my I-phone but its not the best- as my gyroscope is out of wack so sometimes the camera will jump, soon to get a new phone though.

This was about a month ago, may not be the best clarity on you tube but something to watch, as I  fitted New megaphones to the Triumph Scrambler and she sure did sound throaty when I took it out for a little spin.

scrambler siamese megaphones1

A great sounding bike now it breathes and I am contemplating purchasing a Scrambler for my own use as they are bags of fun to ride.


Merry Christmas Everyone!

I want to take this festive time of year to thank all MY customers for ALL their support this year, been a fast 12 months that’s for sure and am looking forward to see what 2017 brings to my doors.


I am looking at making more parts for more models, from exhausts, to seats, to lights and some clothing too, so keep checking back with me for all the cool Motorcycle and Hot Rod parts for 2017.


Also I shall be adding more Blogs and hopefully more video to, and it will be quite an epic year I think and look forward to sharing it with you too.

Remember to check often on my blogs and New parts pages as I will be adding quite a bit as I get the New year rolling.


You can also follow me on instagram @59club or on Twitter @750racer also on face book under @carpyscaferacers @steverichardcarpenter or @carpyscafe


A Very Merry Christmas to you ALL and many thanks from the bottom of my heart to each and everyone one of you for using my business to supply you with the parts you needed.