The Harlequin Honda CB750F Custom Bike

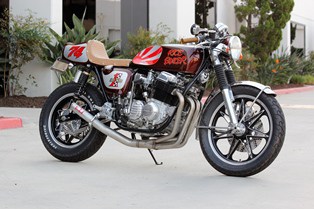
Been playing around with this build for a while but it is now starting to get into a good looking Custom Machine, so thought I would add these pics today to show you where I am at on the Super Sport. Its a 1975 SS and was stock but needed some help along the way and its turning into a cool Custom.

9

The steel seat I made and rolled the rear on the Plenisher at home, it came out well and am happy with this, its sturdy and I recessed a tear drop for a Custom Tailight I shall use.

10

Plenty of clear coat on this so when the final buff happens it should really dazzle in the sunlight.

2a

Sitting in the Garage, as I am working on the exhaust this week, I have ceramic coated it already but will be using the Titanium 2 inch DEI heat wrapping on the header and the Tail pipe is wrapped up on the table as I chromed that part.

Harlequin2

I have put many things on this machine and when completed will do a full Blog and what was done and changed etc, just wanted to make this a great Custom with 70’s metalflake candy paint.

7a

It is coming along nicely and am coming to the end of this build, still a few bits and pieces like electrical things and so fourth but it is worth the effort to see this completed.

8a

Still changing a few things around but I think that we are on the home straight away now and can see the finish line around the next bend, been a blast though so far. But stay tuned as I will show more when all completed.

Just doing some Electrical work on the Honda and Triumph .

The weekends seem to be busy but I managed to get some time to get out in the garage and first off I had to charge a new lithium Battery for Jennifers Triumph Bonneville, her old one was not holding its charge and over 2 years old, so- A new Lithium EarthX Battery was ordered and its ready to fit.  Also, I had some New LED Turn Signals that I made brackets for and then fitted these to the Harlequin Honda, but, they would not flash, meaning I had to make up some resistors to get these puppies working correctly.


This was a relatively easy job and think I may offer a little kit to sell to help people out in the same dilemma. Now, sometimes things happen and people ask me how I fixed the issue, so I thought I would add this video to show you what I did to over come the problem with the turn signals, I hope it helps you lot too.

I will be making the brackets soon and offering them on the website as well, it helps you from blowing fises or having to run to far off connectors in the harness.

wire extender

Here is the extenders I made for the job and I made sure the wires were the correct color with factory fitted ends that I crimped to keep in uniform to the stock wire harness, You can see the resistors i made up and wired and shall be offering these on the list of parts you can use on your motorcycle too.

wire resistor kit

Might look a little messy right now but once all made sure everything works, I shall shorten and tie up under the frame so nothing really seen, I will be fitting Colored Heat Shrink to match the wires, keeping everything uniform and easy to locate later if needed.

brackets1

Cut some Aluminum flat bar up and made some brackets, of which I shall later water cut and offer on the website as these are always a hand set up for turn signals on any bike.

brackets2

There you are, still in it’s Raw mode but now polish and will be ready to fit up to the bike on the top of the rear shock absorbers.

brackets4

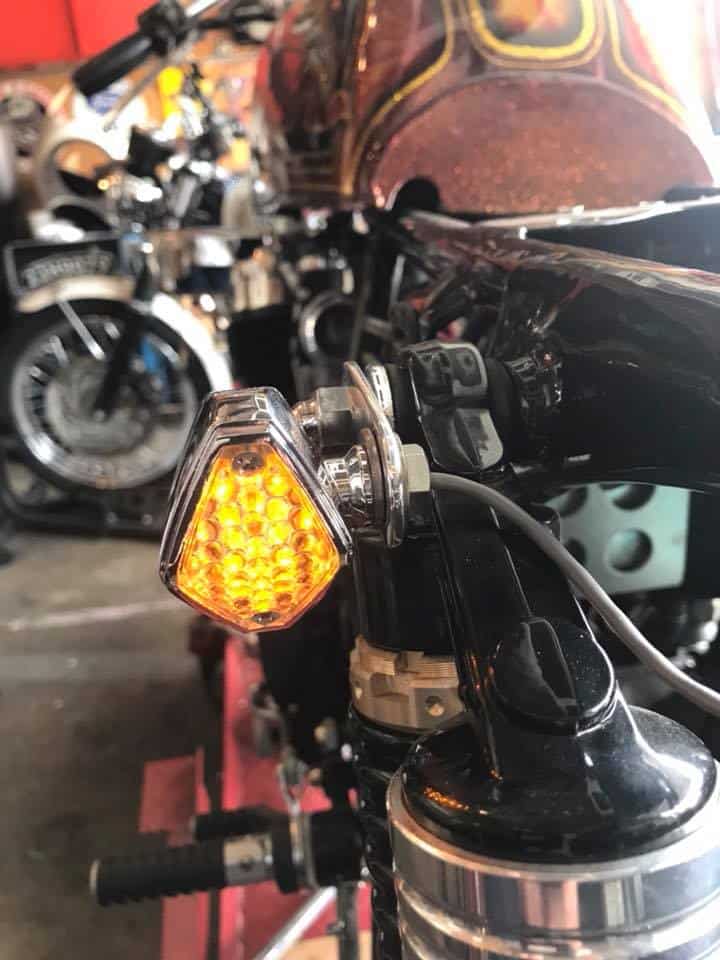
Now these are polished to a chrome like appearence and I can now go and fit these onto the Harlequin Honda and then I can mount the New LED Diamond Turn Signals to the Brackets.

brackets5

Fitted to the top of the shock absorbers and now I can insert the wires from the signals and then fit the signal into the bracket and simply tighten the nut.

diamond LED signals2

Nice sturdy Diamond Signals that these LED’s will allow for other people on the road to see you, they are in a nice Polished Chrome body and will tuck nicely to the side of your motorcycle.

Diamond led signals1

These are a 3 wire system, I personally only use 2 of the wires, as the third wire allows you to use your signals as cruising lights if you need to.

diamond led signals3

Easy to fit and a real nice custom touch to your motorcycle, I have sold the Bulb versions for over 15 years but the LED ones are way brighter and will last longer at the end of the day.

diamond led signals4

There you go, all bolted up and another job completed on this harlequin Honda Custom cafe Motorcycle, its been a fun bike to build.

All wired up and functions great, so Glad I chose to go this route and have the reassurance that these turn signals can easily be observed from anybody at the rear of me when I am on the road.

Thanks for looking and I These great looking signals available but am just going to be making some wires kits on offer as well as the resistors so you can get the bike all dialed in in one go.


Costa Rican Aeronautical Cafe machine is right on the money.

Nowadays, thanks to the rich volcanic soil, Costa Ricas well-known for its gourmet coffee beans with the famous Tarrazú considered among the finest beans in the world. Along with bananas, coffee might just be the most famous Costa Rican export. As well as exporting many farm grown fruits, there are small pockets of this part of the world that from a Motorcycle building perspective, that are absolutely mind blowing.

So, if you have a map and you want to know a very cool place to visit in Guanacaste, well there is an international airport located in this Tropical Paradise and not far from Gian Maria Traversone, where this  man of many talents and interests is planted.

When Phileas Fog decided to circumnavigate the world in 80 days, he missed out one of the many wonders of the Motorcycle world when he took that trip,albeit over a hundred and 30 years to early, this would of been a fantastic stop in the Golden beach Blessed area of Guancaste.

1982-moto-guzzi-le-mans-5

If you are lucky enough to stumble across  GMT Atelier, you will see a workshop that has a Plethoria of engineering skills and samples of epic proportion of Restored Classic cars and of course Motorcycles. With his talented crew  Esteban and Robinson It’s also where he race preps his Lancia Delta S4 for vintage rallies. Yip, Gian’s a rally driver too…

Gian has many strings to his bow and I am sure he could play many Harmonic tunes to the sound of success in his long learned experience as a Builder, Designer, Rally driver and of course a pilot too.

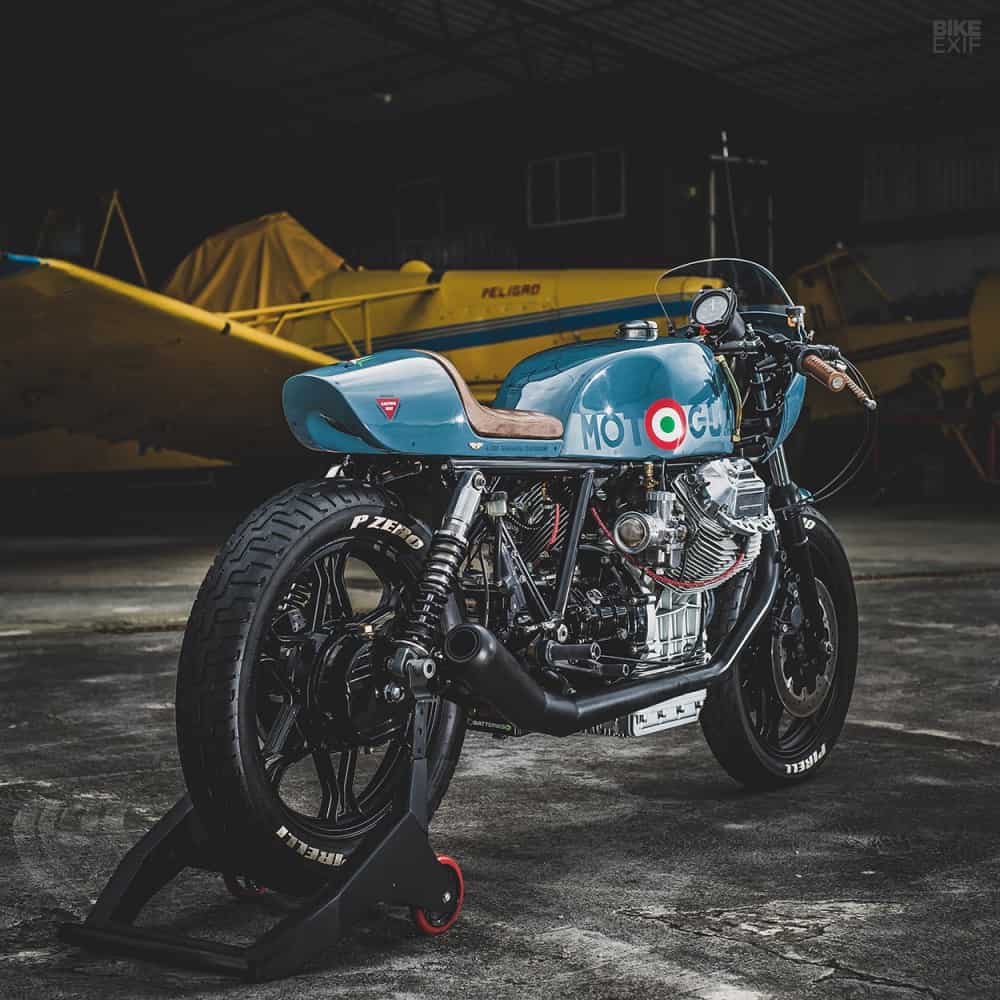
So, we begin with the ride, and as Gian is a Mad aircraft aficionado- he wanted to create an aviation-inspired 1982 Moto Guzzi Le Mans Cafe bike and use all his experience in creating a eye catching machine that even I would love to have back in my Garage here in La Mirada California.

There has been ton’s of Aircraft inspired Motorcycles, some are pretty awful, but many have great design and style, but this machine is on another level, and I mean at 30.000 feet.

This bike has Attitude and Altitude and I love all the work that has gone into creating such a eye pleasing mode of transport and, if you cannot see that this guy is a Pilot, or at the very least, loves planes, then I am afraid its a lost cause for you.

1982-moto-guzzi-le-mans

The rear seat Cowl was hand made using high quality Resin and Fiberglass matting and this has some lovely lines to accent the Gas tank too.

Take a look at the seat upholstery, not the standard Flat seat you see so many of, time and creativity paid off big time as that Worn look is not Faux, it is the real thing, using an old Leather jacket for the Medium, Bravo Sir! Bravo!

1982-moto-guzzi-le-mans-2

The subtle lines are just really flowing and take a look at the Gas tank, this was hand formed  to made the Knee recesses just right and follows the lines of the bike and tapers in a streamlined fashion, to the same contours as a planes fuselage, thats no easy task and I for one know how hard it is to get this right, many hours of nail bleeding arm aching bashing with a hyde hammer to get anywhere near, then to Plenish it with an air tool l to get anywhere near this complex form, is just great to see.

The bike is a good looking Platform anyway to create as a Caff Bike, I have only owned a couple but back home in the UK the parts were Bloody expensive so I chose to go with the Honda’s for affordability but- all that said the Guzzie is such a smooth riding machine, its a brilliant bike to ride and takes no real strength to ride, so understand Gians interest in this Italian Stallion.

Some New 14.5 inch aluminum and Black rear coil overs with a stiffer preset were chosen and then the Original Rims looked cool anyway, Gian decided to just change the Tires, this was done using some stock Michelin tires and then lettering they’re sporting Pirelli P Zero logos, as that goes back to the Racing days.

1982-moto-guzzi-le-mans-6

To give this machine a little more aggressiveness, Gian changed the Rake of the frame at the front by cutting at the neck, changing the degree and then gussetting and strength welding back again, this gives a way better look and will fall into the Corners a little easier as well. That’s a time consuming job and done correctly as geometry is key to any motorcycle and remember, Moto Guzzi spent many many hours in the RNR room getting the right angles for this machine for a Road ridden machine, so Kudos to Gian for having a go and getting it right on the money.


The brakes were all replaced, Calipers rebuilt and the use of Aircraft brake lines make sure this Aeronautical Twin Disc Caff machine stops in a short time when needed.

Now onto the Power plant, The V2 Four stroke motor was removed and this was then boxed up and taken to  Team Guzzi Motobox—specialists in Spain who prepare Le Mans engines for endurance racing. They treated it to a head job, and rejetted the carbs. Back home, Gian Fabricated a set of Old School free breathing new mufflers,Then Coated them with high temp paint in Traditional Black, then added  a pair of velocity stacks with built-in filters to the Carbs etc.  He also modified the intakes to get the carbs to sit at a better angle aesthetically.

Once back together, Gian and the team re configured the wire harness, as the stock version has so much spaghetti, that it needed to be changed for a more easy to understand set up and also to keep everything basic and what is only needed, no fancy buzzers and whiz bangs here, then the New Lithium Lightweight Battery was added but this time it was moved from the stock location to be hidden behind the bulky transmission.

1982-moto-guzzi-le-mans-4

Having a closer inspection, I only notice on the electrical side that there is a front headlight but I do not see a tail light or turn signal location, so maybe a back to basics set up but If I do see anything else I shall add it n the blog, but take a look at the cockpit area, its very minimal with a couple of Custom micro switches to get this Motorcycle functioning as he wants it to.

The speedometer is a classic all the way, an actual Air Speed dial in Knots that was from an aircraft and to make this work it correctly the team fabbed up an old air speed style conical Nozzle to allow the correct CFM to enable the speedometer to read the correct amount of flow to give the correct amount of speed, no easy calibration task but the gang pulled that one off and it is as Aeronautical as you can get.

As you can see the uncluttered top end is great, using modern master Cylinder, some cool Clips on and new grips to follow the seat style and of course on the gas tank a New Monza cap was fitted to make sure it shows a little more Italian Racing.

1982-moto-guzzi-le-mans-7

Now, bring me onto the gas tank-Gian looked to the Italian Navy’s acrobatics squad—Pattuglia Acrobatica Nazionale—for the Moto Guzzi’s final finishes. The Navy insignia in the place of the ‘O’ in the logos on the sides of the tank is an obvious hit, but the paint job’s also littered with warning messages and markings you’d find on planes.

Take a closer look at the tank, and you’ll notice that it’s adorned with some pretty unusual graphics—the maneuver diagrams that PAN pilots keep in their cockpits while performing. A tattoo artist friend of Gian’s applied these using a transfer process. Boy did they pull off a superb set up, this just screams Aircraft and so nice to see a different graphic style to the many out there, making this a unique paint design that you will not see in many places I am certain.

1982-moto-guzzi-le-mans

I am not sure on what the time scale was on the creation of this 1982 Italian Road hugging caff machine but I tell you, it was worth it all, and with a New Set of rear sets added, the riding stance is now bang on to math the raked front end, I would dearly love to ride this around and I am Jealous in a good way to have seen this motorcycle build.

The bike was taken to an old crop Dusting hanger to give that whole Aircraft feeling and boy does it catch the moment.

Thanks to Bike EXIF for the photos and maybe one day when we head out to Porto Rico, we can drop in on the Crew at GMT Atelier and see this Motorcycle and all the other great Nostalgic bikes and vehicles as well as old planes etc. Great Job mate I loved it all.

Merry Christmas to all my Customers and friends around the world, I hope you have a fun time at Christmas and maybe even get out on your Motorcycle to get the tinsel and  Christmas wrapping out of your hair.

xmas banner xmas banner2

Old Commercials I remembered as a kid in the 70’s

Lets go back- Way Back, when Flared jeans, huge cuffed shirts and Wide Collar shirts were all the rave, Not me then as in 1978 I left school and already had my leather jacket.

Some fun things I look back on and laugh now is the old TV Commercials for things like Pepsi Cola, some were filmed in the UK as you can hear the accent and some in the states.

So Corny yet so cool, I loves these Adverts on the box, check em out and see if you remember these.
This one Below was right in 1978 , this is the first episode trial but still great to see.

Below, a little earlier in 1973 Eddie was banging some cool moves. This was filmed back home in the UK. And I loved it.

In 1973 this took me so long to memorize but I did it.

I remember this well too.

The Rice Boiler – 1974 Honda CB750K

OK, for a long time I had been planning this build and now it is here and I am so stoked the way that the machine turned out.

I used a snotty old bike to create this head spinning machine and had already built it in my mind hundreds of time, so thus was really a piece of cake for me.

I had an old set of Henry Abe 7 Star rims back in the UK, these are at least 3 decades old and had them sent over the water from back home and wanted to take them apart and fit new front and rear bearings, as well as paint the stars and polish the outers.

Once I chose New rubber for it ( Bridgestones ) I then made sure I had the rear brake set up drilled and polished, as I want the bike to stand out in many places.

I had a S.S. tank and cut all the top flap out and welded that in with a flat plate, then fitted a Stainless Steel polished Monza style racing Gas cap in it.

I then used one of opur own designed “Razorback” seat bases, As I really do love the lines of thaat seat base and knew this would really flow and give that yesteryear look.

I bead blasted the old frame and then powder coated a high gloss full flow Black on it and love the look, almost an enamel look to it and very inert to many fuels and substances.

If you look, you can see our New battery boxes we now make and offer on our website, this is the ww2 style battery box made from 6061 Aluminum and has cool rivets in.


I removed the old Oil tank and we washed that about 7 times and then cleaned out with some simple green, then stripped the paint, had it copper-ed, then chromed and buffed. you can see i was also setting up the rear sets and polished the brackets to give a Chrome finish.

I designed this color scheme by drawing this out on graph paper and used water colors and came out with this design, the reason that I came out to this conclusion is simple.   My old man always ran down anything to do with Japanese machines, and as I was a teenager in the 1970’s,  Japanese bikes were predominant in all parts of the globe and the old man just looked down on them and called them “Rice Boilers” 

So That’s why I named this bike “Rice Boiler”

She was fun to build and I am so stoked at the reaction it gets from people when they first see the bike.

I had a few people just stand there and just keep looking at it, as this bike did not start off like this.


I really enjoy the putting everything together part as you see such a transformation.


The Racing number 74 is really just the year of the bike but I wanted this to remind me of days gone passed when I used to hitch hike to Clubman Racing at Snetterton track and getting a lift on one of these bikes.

There are so many things that I have done to this bike, I should of named it the Magician as it is loaded with tricks. the lower forks are polished to a Chrome finish and all rebuilt, etc., and we hand-drill these rotors at the shop, then surface grind and polish them, looks cool eh?

I hand-hammered the gas tank as I do on all my bikes and wanted to use the Rising Sun as the filler, and boy does it pop!

The finned covers are early 70’s ones I have kept for this particular bike build, I must of had them 12 yeas in my tool box and so glad i got to get them on the Motor .

The red is very bold and I chose an Aztec style gold for the pin line, the whole paint scheme was completed using House of Kolor and I chose a Candy Rootbeer Brown as that was a cool Candy Color that Honda had back in 1971 and wanted to try and get that old School feel to it.

I actually incorporated  the neutral light into the head stock nut and think that it will be a cool addition to this ride and make use of the new lights we sell.

New Old Stock handlebar controls were a must, we used one of our polished throttle embellishers and some very cool flake handlebar grips, as well as new alloy levers, etc.

You can see how many brand new or rechromed parts I have fitted to this machine, by just glancing at the photos on this page.

The Ggold flake on the grips really do make the colors blend with the gold of the bike and the shocks.

I wanted to have the race number on there, as well as incorporate the year of manufacture, and it came out really well.

 I fitted new old stock fork ears and made our front fork badges t0 fit the sides where the original ugly reflectors sat and it cheered the machine up.

Yes- that is our very own Boxed Swingarm that we drilled and powder coated and really does suit this machine well, as well as helps the cornering as it stops all the rear end stepping out, this is a copy of my Original Dresda swingarm.

Our Stainless Steel Yoshimura-style 4-into-1 exhaust is a very cool sounding and looking set up and is a must with the style of machine that I create, by does it hang well.

You can see the work it took to make the tank look great, also the GPS speedometer is a cool look, but the bracket and the bucket we had to make and polish, it all worked out fine in the end and even though this was not a cheap option, I think its the cherry on the cake.

The headlight is from an old Desoto truck and then changed a little, it looks great with the Candy Rootbeer brown on it and the bezel was re-chromed.

Pretty Much everything is new on the build and am so happy to have gotten this machine done to the way I originally imagined, it screams out to you that this is an old cafe racer from back in the 70’s and I hope you like looking at her!

I tend to use Bridgestones as my personal choice of rubber on the rims I use, as I have always had them and stuck with what I know.

I spent a lot of time getting this bike right and many, many hours taking things off that didn’t work that you will never see, but thats how it goes with bike building and at the end of the day I have a really cool looking classic that is bound to turn a head or two.

I took the old broken and cracked fins off the original oil filter housing and machined and polished it and this is how she comes out. I do this to a lot of my creations, it adds a unique look.

Fitted our Finned Aluminum Ton Up Stabilizer Bar and the whole rear end is new, Brake Spring, Rod and Adjuster, no expense spared on this build.

A fun machine that is something that was made from old snot, rust and cold steel, also so nice to be able to recycle this and get it changed into another form.

I have already had a lot of interest in this machine and will let it go for the right price – this is a unique motorcycle with many, many new parts and one off pieces.

Within two days of finishing this motorcycle, I got it featured in Japan’s Lightning magazine, what a honor that was.

This bike did take a long while to complete, but I changed quite a few things on this until I was happy with the end result. Sometimes that is what happens with custom bike builds- I like this, and some of you may not. But to me, this is a cool machine that just screams out the bikes of the 70’s when I was a teenager in the United Kingdom.


I drilled the brake hub, the rotor and (of course) the front sprocket cover, as that’s my signature style I like to do, but I also had a very cool license plate frame that I have had for donkey’s years and was so stoked to have the opportunity to use it on this bike.

If this does not say cafe racer, then I don’t know what does – it’s an original piece that I am happy I didn’t discard over the years.

The tank took me some time to hammer and weld, but I wanted to incorporate the Rising Sun in the knee inserts and I am glad I did as it really does add a great concept to the bike.

Quite a few coats of Candy Root Beer brown were applied over the Aztec Gold and the end result is exactly the color that I envisioned.

No stickers, this is all real paint you see and I think you will agree, this really does stand out from many that just have decals.

A good stance for this tarmac eating machine.

I used rear sets which gives the bike a well-balanced feel, as the stock pegs are too far forward.

Our Boxed Swingarm and one off Chromed Chain Guard is a good component that i wanted to use on this bike. the Boxed Swingarm was made at the shop using 2X1 steel and it looks and works really well.

All the cases are hand-polished, the starter is rebuilt and the carbs are like new now. This bike runs smooth as we synchronize them using a Mercury stick.

The carbs have to be right on this machines, if you do not sync them they will pop and backfire, something you don’t want to have happening.

The front brake caliper was stripped and polished and our machined stainless steel piston fitted. We also have new side stands to stop the bikes from laying over too much. The originals had a tendency to bend over time. The DeSoto headlight and cool Chromed Diamond Signals, tell people what is going on in front of them.

Stainless Steel Flip-top Monza-style Gas Cap we sell was used on my tank, as well as our own ‘Ton Up’ Fork Badges.

New cables throughout (throttle, tachometer, speedometer and clutch cables) and new adjuster and stainless bolts all over the machine make this a long lasting ride.

I used a Ford big block connecting rod to use as an exhaust hanger. Once it was the right size and fitting, we chromed it and added this nice custom touch to the build.

I didn’t like the stock oil tank dipstick, so we machined a col finned cap for it and boy does it look trick, we shall be making more now to offer to you lot.

See how that cap makes everything flow that has fins on it, I really am happy how this came out, we used 6061 T6 Aluminum and then polished it.

The bucket below we made from a solid piece of  7075  and it came out so nice, tig welded the base and polished it, the bucket attaches by 3 small Allen head screws that sit at the front of the plate.


I wanted to combine new and old components to clean the top of the steering area up and it does look really tidy and clean now.

This was a fun build and I hope that you liked looking at the good Old ” Rice Boiler ” I can hear my Grumpy old man moaning about it right now!

I have already been featured in Japans’ leading Lifestyle magazine and have just had an Italian magazine come over to shoot it and hopefully a brit mag the month after, so I must be doing something right! Interested parties, please contact us for details.

RPM NATIONALS SANTA MARGARITA RANCH WAS A BLAST

Well, what can I say, I had no idea what this place looked like, other than a few internet pics, but Jenn and I loaded up our Van and headed off to Pismo Beach, as that is where we would hook up our Van in the RV park, pull out our Triumphs and ride to Santa Margarita ranch, where they are holding the RPM Nationals.

Now this was going to be a place I had hoped to drive my 1928 Model A Roadster to, but it has so many teething issues, it just would not of made the trip, so this year I wanted to at least attend and support this great Nostalgic Drag race event.

Originally used for the Four Banger Fords, they thought they would extend this out to the flatheads and boy am I glad that they did, as what a joyous sound.

So, after 3 and half hours, we pulled up to Pismo Beach and plugged the Coffee Maker in and had a Brew, unloaded bikes and whilst I was amazed how foggy it was, it did not deter us in the least.

To be honest, it reminded me of home and I wanted Jennifer to experience some colder riding conditions and we got some big time, the Fog was indeed Pea soup, Thicker than Anderson’s Soup thats just down the road from Pismo.

But I had a Fog light and we were all set to go first thing in the morning, sure enough, the Mist rolled in and stayed longer than a relative you dont like.

We jumped onto our steeds and rode to the Madonna Inn and had brekky, great place and so much history, if you get a chance, pop in as they have so many cool things to see, from hand carved doors and ceilings in wood, to Themed rooms from a Stage Coach room to a Rock room, all very cool not cheap but what an experience.

14

So after having breakfast, blocking their crapper, we hastily headed North to Rancho Santa Margarita Ranch, we rode though the fog and then after a few miles the Sun was out, the roads were smooth and a smile on both our faces as we cruised around 75 MPH with open faced skid lids, what a great day already I muttered to myself.

3

Before too long we had gotten off the main road and into a few country roads, with Trees changing color as Autumn took an abrupt hold over this way, we cruised into the start of this Great Big Ranch, that was out of some Bonanza Episode, well it looked like it to me.

17

Cattle grids, Bridges, Old rail Road Lines were all over this place, we slowed right down along the road on the Ranch as there was a herd of Cows just sat by a tree and across the old rail Road lines, fearing we would get stampeded on, we rode past as quiet as could be, hard to do on 2 Triumphs though but we got passed and to our surprise, they just stayed their grazing, as if we were not even there.

44

We pulled up at the Parking area and I could smell that wonderful internal Combustion engine aroma, then I could hear some Flatheads revving then letting go of the clutch and banging on down the Drag strip that was laid out.

23

There were vendors along one side of the track and on the other was the swap meet, what cool stuff to see.

29


Here are a few pictures I took with my Iphone, I did take more with my SLR but will blog that another day.

Some very cool stuff to look at, what an awesome event and was stoked that I attended the RPM Nationals, looks like it will be the start of bigger things to come.

I sure wanted to bring My 28 Roadster- but it was not running right and its a 4 hour drive but next year I hope to make it.

34

An assortment of cool rides to look at whilst in between rounds, this was up at the end of the strip where the Pits were.

35

Above, I loved this 3 window just bloody gorgeous in its Drab attire, killer machine for me right there.

36

Above- How tough is that, what is not to like about it and so many great vehicles here and everybody was brilliant to talk to and had time for you.

38

Flatty Powered 29 Roadster with Q/C and Zoomies, it was quick too.

39

Simular to my 28 but a way cooler built version, high Boy with its 4 Banger and this was quick, the Bangers were faster than the flatheads, it was a solid built Hot Rod for sure.

40

Everything was so cool on the A-Bone, loved the louvered panel, the Q/C and the Tonneau cover too .

41

Our Mate Jay Dean from Nostalgia Ranch with his Flattie powered Modified, was a fun and period built machine.Hop Up Magazine Special.

43

Jenn met up with Skateboard Pro, Steve Caballero, he has a passion for Hot Rods, Art as well as Skateboarding, super cool bloke.

46

Me and the Girl I love to Bits, Jennifer Sun, an amazing Woman


Below are the Videos that I took with my Iphone, what a blast it was to see.

Below Diane Branch in her Roadster having a go and doing well.

Loved it all and so many cool people to chat to as we are all into the same stuff, no attitudes just miles of Smiles.

How can you not like all this and away from the main stream too.

Loved these 2 Roadsters, The Guy tried to sneak his kid in the car too, I think we all wanted to see that, but still A FUN race none the less.

OOH- A tasty 5 window against a Roadster, just like back in the day.

Diane Branch taking on a chopped and channeled Coupe on the strip.

Model A’s a plenty, these were so fun to watch and no change since back in the day, sure wished I had mine here but next year we shall attempt to drive it there.

How about this, 2 Drop Belly Tank Racers, Both running V8-60 flatheads, I had one of these I love them but great to see 2 running and racing.

Loved watching this 34 Coupe and Flatty Powered Fully Fendered A Bone.

How about this, two Roadsters, One 4 Banger and One flathead, man such a great sight and sound, period looking rides too, awesome.

Our Buddy Jay Dean in his hop Up T Modified goes up against a Roadster, jay had a blast, what a Neat rig too.

Chin in his Original Model T Roadster, running against an A Bone, Chin ran well all weekend right up to the semi’s, consistent Ride, loved this Hot Rod.

Wow- How about this 36 Coupe, what a sweet ride and glad to see a couple of these on the strip today.

I shall Blog over the next few days as these take ages to load, but I thought you would get a kick out of this one today and I sure hope to see some of you next year as I loved this so much, all fun, No attitude and all period machines, very cool indeed. BRAAAAAP!

Life behind Bars

Well, 17 years seems to have flown by and here I am, still playing with two wheeled contraptions.

As a kid , I was fascinated with Motorbikes and at any opportunity I would drop everything to watch , hear or just read about these mechanical machines.

I have lived all over the world and seen some fantastic motorcycles and knew that one day I would be lucky enough to reside in the United States of America .

So, in 2000 I entered California and the first Motorcycle I created was a 1976 CB750 of which I gave the Cafe Racer styling.

carpys vw

The livery was in the style of the 1970’s Formula 1 John Player Special Team of Gold and Black.

carp 750 carp7501

This motorcycle caused a huge stir in the American Motorcycle community and put me on the map as as Motorcycle designer and builder.

Carpa1

17 years later and my 50th creation is almost completed , I wanted to build another CB750 and this time use some crazy Candy flake colors of which covered most of the Hondas of SOHC guise.

1

This time I chose a 1975 CB750F model Super Sport and went with a Black Wrinkle Finish Engine, Dressed out with Stainless Steel Allen Head Bolts throughout.

3

I also designed a Brand New 4 into 1 Exhaust System that made the Header pipes swing out to the right hand side and then tightly under the chassis and a unique short turn out tail pipe.

2

I took the stock gas tank and cut out the filler neck and welded it flat, then welded a Harley Gas Cap bung in its place to give this tank a cool smooth appearance .

20

Next up I took some 18 Gauge steel and hand bent the seat base to the style I was looking for, then I cut another piece of steel into a half circle and hand pounded it on a sand bad and then used my Air Plenisher and shaped it into a cowl, then tig welded to seat base, once that was done I then cut a teardrop shape out of the rear of that cowl, to allow for a unique Tailight for the bike.

11

I upholstered this seat base with Brown Naugahyde and did tuck n roll design.

12

I rebuilt the front forks and machined the  lowers to have finned grooves in them, rebuilt the front and rear wheels with polished Hubs and stainless Steel spokes and shoved New Rubber on them.

19

With 14.5 inch New Shocks makes sure the rear end keeps smooth and some Italian Rear sets clamp tightly to the frame. But still More to do and wanted to show you some progress photos, Hope you like what I am doing here, a little out there but, that makes it more fun. Stay tuned to my Blogs on more as I will ALWAYS be messing around with 2 wheeled Machines.

carpyz1


Just a chin wag whilst on my Motorcycle.


Seeing as it is now Feb 1st, I thought that I would try and start a little more blogging as I go along, not sure how they will come out but may be entertaining for you.

Trying some different media’s here as everybody seems to use their phone to talk, take photos and now live chat at times, so- to try these things out I have used my I-phone but its not the best- as my gyroscope is out of wack so sometimes the camera will jump, soon to get a new phone though.

This was about a month ago, may not be the best clarity on you tube but something to watch, as I  fitted New megaphones to the Triumph Scrambler and she sure did sound throaty when I took it out for a little spin.

scrambler siamese megaphones1

A great sounding bike now it breathes and I am contemplating purchasing a Scrambler for my own use as they are bags of fun to ride.


I have a special on all 4 into 1 Exhausts $100 OFF!

Grab these great deals on All 4 into 1 exhaust systems, I am knocking off $100 and now is the time to take advantage of this great deal and get back into building your bike.

adverts3

You can use the $100 you saved on other parts, right now it is pissing down with the old H2O right now and I am sure that you lot will be trying to keep warm someplace and start to collect parts and begin wrenching on your machine.

advert4

Many people are now in their Shed, garage, workshop, back yard or in the garden, putting together parts to start or finish their build for this season coming up.

advert 1

So if you need any parts, here is the place for you as I ship 6 days a week and am a real business, not some over sea’s supplier.

Carpy9-008

I am here to help for ALL your motorcycle needs, from batteries to complete builds, I am a one stop shop.

carpy shop 172

Guy Martin & David Coulthard F1 Special

For those like me, are interested in the antics of infamous Brit racer “Guy mad man Martin” Then this is a cool little show for you to watch where he puts his motorcycle up against David Coulthards F1 Special, A must watch for your day to cheer you up.

A fun bit of entertainment by two very cool people.

This was a great show and wanted to share it with you lot today, hope that you enjoyed this?