The B.B. Cafe

I have lost count of the Motorcycles that I have created here over the 18 years in business, some I have been lucky enough to take some photos of but many I have not, but I try and take pics where ever I can as many people ask about projects that I am creating.

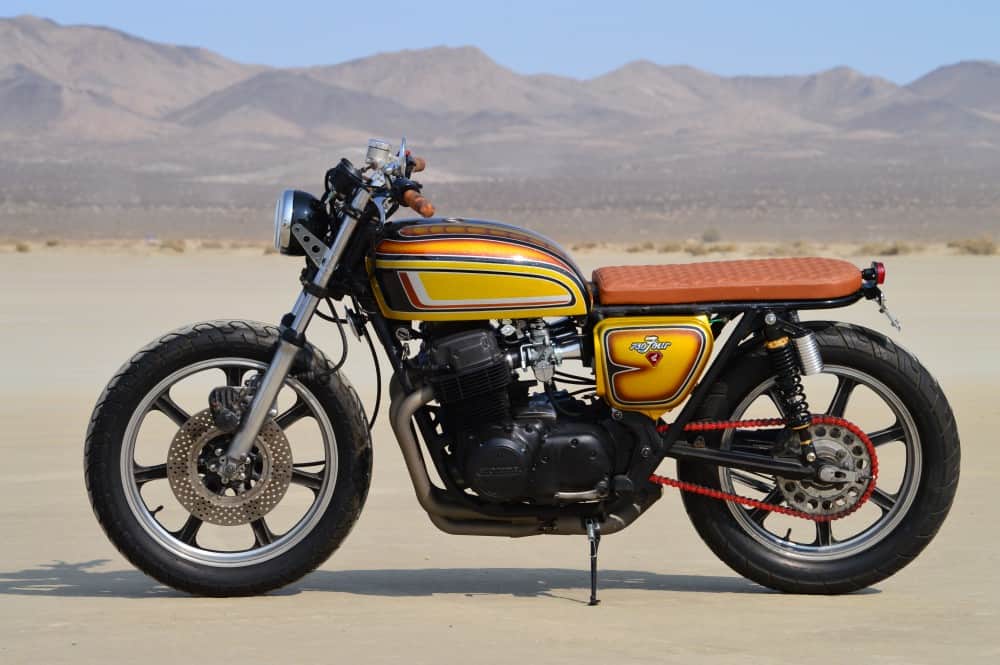
I enjoy building bikes out of old rusty hunks of steel and this one is no exception, it was a non running machine and I am glad that I have resurrected this Classic 1974 Honda CB750K, as you can see, it had an old custom seat and a beaten up old Kerker exhaust, the desert does take a toll on any machine thats been parked up for a long time, but- iy can all be fixed and this was the start of the BB cafe project for my Customer in Australia.

It was a solid old machine but had had a hard time over the 40 years of its life and these get neglected when stored out of the way, so- a perfect opportunity to turn this old girl into a Thoroughbred once more.

I had a Customer fly in from Down Under as he wanted to discuss commissioning me to create a Cafe style Motorcycle to his requirements and then once built here, I will ship it off to Australia thats about 7,194.45 mi  from our house to his.

So this is how she came out, I have built this just as he wanted and I am stoked with the way she looks, a Thoroughbred of a machine and ready to open up on the Tarmac.

Plenty to look at but I shall try and explain some of the things that I did here at www.carpyscaferacers.com so you will be clear on the parts used to create this great machine you see.

I used many of My own parts that I have designed over the years and of course offer on my website, the headlight with the built in LED turn signals that Glow up Amber when used is a great addition to any machine, I was the First to ever go this route many years ago, have sold over 1000 of these units and still going strong, also has a Halogen bulb to help you at night.

I painted the bucket, Gas tanks, side Covers and the seat and fork ears a Gloss Black, as well as the head light Bucket, the Rims and some parts of the wheel hubs too. You can also see I removed the Original side reflectors that came from the factory and made my own screw in badge embelishers. New gators and Holders too, no expense spared on this build.

New cables as well and the whole frame was stripped, cleaned and coated with high Gloss Powder coating.

Motor was pulled apart and rebuilt, stock but new guides and internal cam chain etc, I then painted the engine in my own mix of High temp Engine paint and I too offer this product on the website, I put together with Stainless Steel Allen bolts to give a nice offset to the black. Made up my Custom Oil lines as well.

I have always loved the finned speed equipment as I am a Hot Rodder too, so machines a Finned cap for the oil Dip stick, I think it sets the bike off from the many out there.

Keeping with the Classic era, Brand New gauges added and my Custom Alloy Mount, I also added a neutral light in the middle of the steering stem nut and fitted my polished aluminum Bar clamps to hold my own set of Clubman handlebars, with new cables, adjuster and master cylinder.

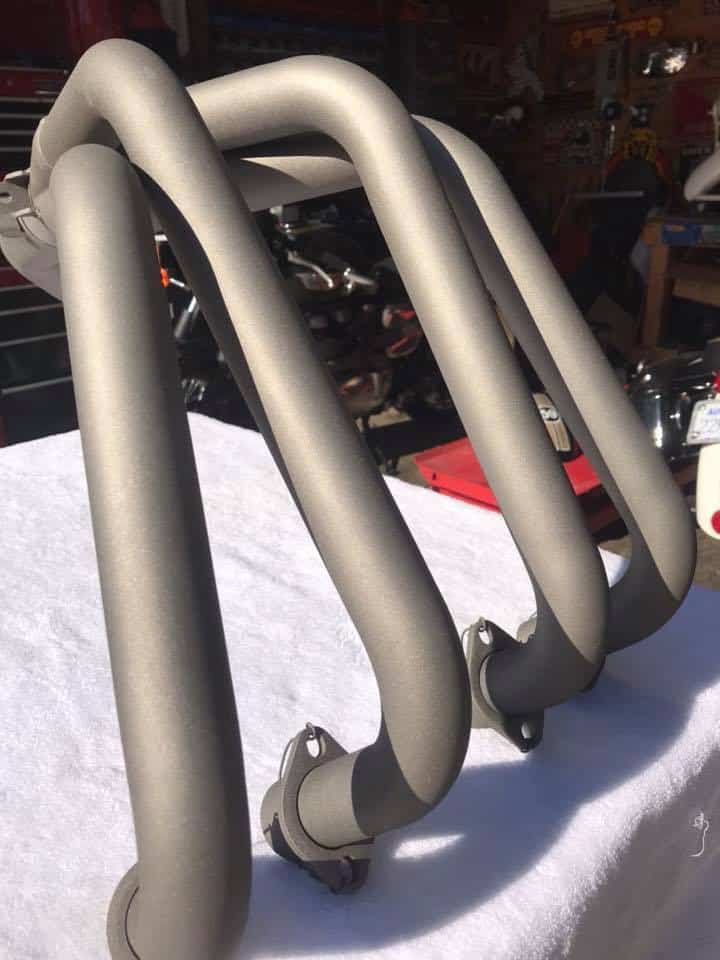
A lot of attention to detail as you can see, I fitted Tarozzi rear sets, I sell them on my website too, I always fit one of my Custom Oil Pressure Gauges on the motor, that way you can see if you are getting good oil pressure all the time, finned covers and of course, my 4 into 1 Exhaust system that I have been selling for over 17 years now. The rear brake was rebuilt using non Asbestos EBC brake shoes and new springs with a polished outer hub, looks great as an offset to the black rims.

Rebuilt front forks and painted lowers, with New tires and front mudguard, this really has that Classic look of Cafe bikes back in the day when I rode them in the UK as a teenager, tearing up the streets with all my mates on various brand machines.

Totally rebuilt and tuned carburetors were fitted and these are fully detailed to match the motorcycle, then used Steel Dragons set up for Airbox and this runs great and smooth.

For show only, this kick starter was drilled and chromed, the rear sets prevent you from a full kick but this has an electric starter and I supplied another solid kick starter if he needs it, but this was for show and it does look very cool indeed, you can also see I fitted a breather filter to the bike with the chrome cap that runs from the valve cover.

I hand letter the tank, B.B. is for Black Beauty as thats what the Customer named it and I pin Lined around an old SS gas tank, I removed the original gas tank flat and filler and then used one of my Stainless Steel Aircraft gas caps for better styling, the tank was hammered by me and smoothed before adding the Gloss Black enamel paint.

Custom rear shocks that are also raised 2 inches with Finned Piggy backs help the bumps and my Clubman seat assembly that I make and offer is sat upon the frame that hides the battery etc, I used snaps on the Tuck n Roll cover, that way you can easily get to the battery and of course you can put your insurance card under the foam for easy access if needed.

Hand pounded tank and New wire harness, handlebar controls and new cables through out make sure that this bike is always on point in its life on the road in Australia.

Drilled front brake Rotor, rebuilt and polished front Caliper, custom parts all over the bike makes this a great head turner and the Customer is stoked to finally see the finish of the dream.

It turned out really well and runs true and strong, looking forward to showing some photos later when it is in Australia in a few weeks time, as I am getting ready to take this motorcycle to the shippers and let it get loaded up on the boat to take across the waters to the other side of the world.

Thank you for all your kind words and encouragement, means a lot and once again, another old bike is saved from the junk yard.

If I can help with a build or just parts for your inline four, just drop me a line carpy@carpyscaferacers.com or a dime or even a text at 714-598-8392 and I will do my very best to get you what you need.


Service today on 1981 DOHC HONDA CB750F

Well the weekend is almost here, people want to sling their leg over their steed and head out on the tarmac and enjoy the Summer weather, so I have had plenty of Service work to do as of late, this morning I had this DOHC Brat turn up needing a little help.

It needs a New exhaust system and something I can help him with later on but right now it just needs the fluids changed, New plugs and Filters, Cables Lubed and chain oiled and set as well as checking tire pressures etc.

These bike is not fun when trying to just remove the spark plugs as the 2 center plugs are sat in low and the Gas tank and sat have to be removed to be able to gain access to that area.

It does to be a task sometimes, as on Custom builds, the stock hangers are not there, it may take a little time to figure out how to take Custom seats off, and in 100 degree heat, you want to do it in a timely fashion as it gets so hot in this part of the State that you sweat buckets simply by walking to the tool box.

Anyway, managed to get the seat and big arsed Gas tank off the bike and place out of the way, now I can get to the plugs with no problems at all and see whats going on if there is anything else showing signs of wear and tear etc.

She is running Rich too and has the incorrect heat range plugs for this model, but no worries as I have the correct spark plugs in stock and the new ones are gapped and set ready to fit back into the cylinder head once more.

I always have used Anti Seize on any spark plug as these can get stuck in the head pretty easy over time and you either end up stripping a thread or snapping a plug trying to get it undone.

The only pain in the ass on this one is that as the bike has an oil cooler, the Oil Filter sits out more and this guy has Exhaust wrap on his headers and if I left the exhaust headers on the bike and attempted to remove the oil filter, oil would drip all over the collector and then the bike would smoke for days, didn’t want that, so the best option was to remove the exhaust system.

As you can see, I had to remove the crush gaskets, something you should do anytime you remove the exhaust, and the ones I removed were after market version and were an utter pig to get out, but after removal I cleaned the ports out and fitted Genuine Honda Copper crush gaskets before I refitted exhaust system after fitting New Oil Filter and O-Rings.

All seems good, I replaced the old oil with Castrol High Mileage 10-40 and have used this Viscosity oil for these bikes for decades.

So everything is back together and took it for a test run, just to make sure oil level was fine and the bike ran good, adjusted chain and lubed etc.

So, another Motorcycle serviced and he is back on the road a very happy chappy, and I am glad to see another Motorcycle on the road once more.

Thanks for watching my Blog today and if I can help you with Service, parts or complete creations, just let me know. carpy@carpyscaferacers.com

I added a video I did with my phone but you will need to turn the sound up as its super quiet for some reason.

Have a Great weekend and hope that you get time to work on your machine.

Engaged to Death 1957 Movie

“I fidanzati della morte” is a movie shot in the motorcycle racing world by Romolo Marcellini, famous for his Oscar nomineé 1960 documentary “The Great Olympics”. The film has been forgotten for nearly 60 years. After its first release in 1957 it literally vanished without leaving a trace, except from some books and articles reminding of it as the “first great motorcycling movie”. “I fidanzati della morte” is a tale of love, rivalry and passion set in the 50s madcap world of motorcycle speed races, shot on the occasion of the main competitions of that time, such as the real Monza’s MotoGp and the last edition of the legendary Milano-Taranto road race. It also features some very rare footage of the Moto Guzzi wind tunnel and factories in operation. Furthermore, in the movie it is possibile to enjoy images of the Italian 50s wall of death, of motocross competitions and of crazy sidecar races on dirt tracks. Most of all, the movie features, alongside popular actors Rik Battaglia and Sylva Koscina, many of the most important champions of those years: Geoffrey Duke, Libero Liberati, Bill Lomas, Enrico Lorenzetti, Reg Armstrong, Stanley Woods, Ken Cavanagh, Dickie Dale, Thomas Campbell, Pierre Monneret, Albino Milani, Walter Zeller, Bruno Francisci, all of them riding amazing Moto Guzzi, Gilera, Mondial and Norton bikes with the so captivating and dangerous dustbin fairings that ended up being banned in 1958.

It’s as if nowadays a director shot a feature narrative film, starring Marc Marquez, Jorge Lorenzo, Valentino Rossi, Daniel Pedrosa and Andrea Dovizioso as background actors! “I fidanzati della morte” is able to bring the audience back to the real atmosphere and colors of motorcycle racing, motors engineering, looks and fashion of the 50s, when Moto Guzzi and Gilera ruled the MotoGp with their so uniquely creative and performing machines.

A movie like no other in its genre, recovered and now restored for the first time by Rodaggio Film, an italian film distribution company working with motorcycle themed movies, thanks to a successful crowdfunding campaign with thousands of supporters from 22 countries and the precious help of authoritative testimonials such as the 15 times world champion Giacomo Agostini, Paul d’Orleans aka The Vintagent, the french artist Lorenzo Eroticolor (who created the art for the new poster and DVD cover), the writer and Moto Guzzi lover Melissa Holbrook Pierson and many others. “I fidanzati della morte” bears unique witness to the international motorcycling’s golden age and to an exceptional season of Italian excellence, innovations and challenges in the thrilling world of two wheels.

The project took almost three years to be completed. The restoration process was based on a positive copy coming from the main Italian film archive, the Cineteca Nazionale. After some time the precious original negative, once thought lost in a fire, was found in a laboratory in Rome. Unluckily the film material was partially burned, but most of it was in good condition and has been used as the main reference for the restoration process. The film has been first physically repaired and digitally scanned, then cleaned frame by frame and color corrected. The sound has been digitally restored and improved as well. All the restoration work was carried out by the world famous Immagine Ritrovata Laboratory, in Bologna, Italy.

The movie is now available for festivals, public screenings in cinemas, motorcycle events, and for purchase on VOD and on DVD, coming in a precious case along with a book containing articles about the 50s motorcycle racing world, by some of the most prominent Italian motorcycle journalists. The DVD also features some extra contents such as rare footage, found among discarded film materials, from the now lost English version (titled “Tornado on Wheels”!) and the testimonial videos and interviews to Giacomo Agostini, the 9 times world champion Carlo Ubbiali, Paul d’Orleans, Melissa Holbrook Pierson, Livio Lodi, curator of the Ducati Museum, Paolo Sormani and the world famous moto customizer Roberto Totti.

The movie is available with English, French, Spanish, German and Portuguese subtitles on DVD on the Rodaggio Film Online Shop at this link: http://www.rodaggiofilm.com/prodotto/fidanzati-della-morte/

Director Biography – Romolo Marcellini, Restoration management by Rodaggio Film

The Bike Shed Show 2018

The Bike Shed started back in November in 2011, really as a blog about Anthony “Dutch” Van Somerens Journey as a modern Sports bike Rider into the newer wave of Motorcycles and the scene such as “Cafe Racer, Brat, Tracker etc and wrote about New Bikes and builders new on the scene to show what is getting so very popular these days and of course, creating an interest into building your own machines or getting the Bike Shed to create one for you.

The Blog attracted a Crew of mates and of course contributors who shared the same passion for these 2 wheeled manifestations. Such as  Tim & Kev from the Spirirt of the Seventies. Adam from United Motorcycles, and art Director Barry, from Two Wheels only and Deluxe Motorcycles.

First bike show was a little later in 2013 and from then on it has grown and grown and here is a video of todays show.

Always great to have a look at and seeing as I am a brit, you can see that us Europeans live and breathe this stuff, what surprises me is that there is always a number of bikes that blow you away, I mean, you think that there is nothing left to do custom wise any more, but bugger, you always get gobsmacked by something every-time.

So sit back today as its Tuesday, put ya feet up when you get a break at work and watch this on your PC or phone, plenty of snippets of cool Motorcycles that I know you will dig as much as I did.
Need boots or Gloves? Check these out.

Few more little vids for you to watch to make your day go by a little easier.

Different videos from different people, that way, you get to see different creations and views, hope you enjoy?

Another Build in Mock up stage, the CB750 Street Tracker

Well, I have a few old frames and parts laying about and pulled some stuff out of my storage and decided it was time to build another bike, as of course, thats what I like doing.

So, this time I want to build a street tracker style machine, just something tough looking but functional as well, I grew up with Motorcycles as a kid with my brother and we had old Dirt bikes and road bikes we turned into dirt bikes and this takes me back to that very time we rode around and around the back garden, just having time in the saddle when we were teenagers.

This old Honda is a Bone shaking Rusty 1978 K model that had been sat for over 30 years in the desert, so what better way to resurrect something and at the same time make something fun, as well as a part of my life back in Great Britain when my brother Mick and I would go out in any weather and I mean any weather, we even rode in deep cold snow with just jeans and a jumper but loved it.

So, there is this old carcass that I shall be using to try and at least make something that will at least turn the corners of my mouth up and have fun again, no idea what I am doing exactly for now but we shall see how this old inline Four progresses as and when I put time into it, its not a paying job, so will be just spare time here and there and a test of patience and money to see where this goes.

First off, I will get it running first, hasn’t run in decades and has seen a sorry life sat out in Palmdale out in the Desert with Sun, Wind, Rain and Frost invading its chassis , so I feel I must do something with this old Girl and she will run once more, I can promise you that.

This Machine is a Big heavy Lump, the 78K was the last of the SOHC models, along with the Super Sports and boy were they heavy, with a bigger exhaust, bigger Gas tank and seat, these were mammoths of their time, so all the old stuff like tank and seat were rotted away, I managed to mock the bike up to how I hope to have it later on, albeit I am sure things will change but I shall be keeping the Old School Lester Rims.

I got these off an old CR750 Race Bike about 17 years ago and have kept them in storage until now, so I will of course change the tires for Knobby versions to give that European Tracker look and see where we go.

Quite exciting really as it will be a look back at Yesteryear and something I and my Brother Mick will look at and remember the struggles we had as kids with bikes when all your mates had new stuff, we had Motorbikes that either were not wanted or left by the way side, but – Makes you a better person for it I feel.

This bike will rip along quite well and I am sure will be fun to take anywhere to be honest, as they have plenty of grunt and no worries green laneing, if you have good Enduro tires, then I see no real issues on here, so thats the style that I am going with and want it to look a little 1960’s.

Sp the adventure of building and recreating something begins, I had an old Alloy Gas tank and hope to use this as well as a Alloy Seat , they look kinda cool together and like that Sammy Miller set up, so hope that I can use these as it will be great to use up some old parts that were just sat on a shelf for Donkeys years collecting dust.

Will make the exhaust system up as I go along and it could change a few times, but we shall see, I do like the way it is going now though and I have some frame chopping and changing to do.

I will most probably run a Disc Rotor up the front too, not a fan of bikes with only half a braking system to be honest, it may look cool but not so cool when you got to stop at 70 Miles an hour with no front Anchor eh?

Parked up next to my old 1928 Model A Ford Roadster, 2 Classic bits of iron on the driveway.

So, there it is, in the garage, on my table and when I get spare time and a bit of loot, I shall begin trying a few things out to see what I can do to first of all, get this old girl to run again.

Once that is done, I can then go about and get the proportions right and start to create a fun Street tracker, Better get some liquid refreshment to get me in the mood with this 70’s Classic.


New ceramic Bronze Exhaust systems now available

Well, I have now added this great Custom Burnt Bronze metallic ceramic Coating color to the 4 into 1 Exhaust systems we make, this is a superb Custom application that really enhances the look of your two wheeled machine and wanted to show you how great this looks.

Its almost a Metallic look and I love the way it looks and this is a New look for Exhaust systems and wanted to offer this color on the systems we manufacture here in California.

We ship Globally and this is a 2 piece set up so easier to fit and cheaper to ship as well.

I am glad to offer this Color to you and you simply go to the exhaust page and chose the Ceramic Color you would like, be it Burnt Bronze, Black or Silver, as well as Raw Steel or a show version of Stainless Steel.

These also come with a Chromed removable Baffle and what is good about my systems is that if you wanted to, you could cut the tail pipe down to the length you lie and the baffle will still fit.

So if you are looking for a Custom Exhaust for your inline four from 1969-1978 SOHC Honda or even the DOHC version, we make them here and offer them to you in different finishes.

Our systems flow and Perform, over 1500 systems sold around the globe and over 18 years in business, love doing this and we get great feedback and many repeat customers too.

Thanks for looking, I love this Color and look forward to seeing it on other Customers machines, let me know if I can help.


Moto Guzzi Service today

I get all sorts of machines in from time to time that need a service or other little jobs, I like these as it changes the day and keeps you updated on other machines. it is always nice to sample opther Motorcycles and these Moto guzzis are gracious machines that have a ton of History, unless you have ridden one of these, V twin opposed motors have their own transfer when you down shift and will feel strange at first as you feel the torque of the motor go from right to left as you accelerate and decelerate.

Today was the turn of the Italian steed, this 2013 Moto Guzzi V7 needed new tires and the fluids changed and I got right into it, seeing as it was a fantastic day here in La Miirada.

Fun thing is, the service manual is all in Italian, so after a little research from everything to Moto Guzzi website, you tube and forums, I had enough information to get this done in a timely fashion too.

Similar to an automobile set up, nothing easy on this, to drain the gearbox, you have to make a paper funnel shoot, else the oil will just pour out under the bike and over the frame, so I made a funnel and all was well. Albeit a little fiddly, but after a while, gravity helped me out.

Then there is no sight glass, you check the level from the side bolt and as soon as oil starts to seep out, then thats the level. Same goes for the drive shaft too, very antiquated but does the job and  this is now all buttoned up and ready for a test run. These are fun machines, and have Linear power, a great center of gravity and smooth transition in gear shifting.


HONDA 1978 SUPER SPORT Lives to fight another day, Resurrection from Dereliction.

Well, this was quite a test for me, when this bike turned up, nothing worked, you could hardly push the damn thing to get it to move, this was sat for almost 8 years in Asuza Canyon by the River, it was left to bake in the Sun, then the rain and wind got to it and the bike was covered in mud and oil.

Been a long time since I have a totally messed up Honda as bad as this one and it was quite a challenge to get this girl to be back on her on two wheels again.

But I took the job and needed to get this old inline Four back up and running once more, but I sure had my work cut out thats for sure.


Never give up is the Motto here and, although this is no show bike, it was gratifying to be able to get to ride it a few miles today and make sure all is well, the top end rattles a lot but its adjusted, just bad maintenance in the years before, but- saying that- the Motor pulls hard and No smoke, thats why I love these inline Four motors, they are so strong.

I still want to put a few more miles on it as I have 10 miles so far, all the gears work fine and the clutch, signals function now as well as a horn and lights, so a quick check of oil level, chain tension and go round all the bolts and re-tighten, then I shall be happy to cal the customer to come and pick the bike up. I Ceramic Coated the exhaust and then used titanium heat Wrap to give it a more Rugged look, , but dont panic when you first fit heat wrap, as when you first get the exhaust hot, the wrap will smoke until its cured, like bacon in an oven LOL!

The headers do not smoke any more after 10 miles, but wanted to show you what the smoke looks like, that way you dont worry about yours and rush to gab a fire extinguisher.

Just goes to show that if you are persistent, then good things can happen, this was no easy task I tell you, the rear brake was totally seized, the master cylinders that are good are really hard toi find, I fitted new piston and seals to it and was glad to get it to function once more.

The fronts were frozen and they took a long time to get to work right, albeit a New master cylinder was needed for that, but now works well, it now has a Halogen headlamp with LED turn signals inside, lower handlebars and a comfortable Brat style seat that the Customer requested.

Sits well as it is lower at the rear just a tad, the seat I made from scratch and is comfortable with high density memory foam and of course you can carry two people as well.

I think the old man above gave me a little help as for some reason the neighbors could hear me shouting his name at the top of my voice. LOL!

So one more saved from the junk pile and hopefully if the guy keeps his routine maintenance, this will see many miles of smiles.

Thanks for reading the Blogs and following what I am up to, its great hearing from you all.

If I can help you can always email me on carpy@carpyscaferacers.com or if you want to you can text me on 714-598-8392 Have a great day you lot and have fun with what you do.

1978 Honda CB750F Super Sport Snotter- Revamped

Well, here we go with a Customers bike that has been sat outside by a river for about 8 years, the Customers asked if I could help him out and well, you know me, I said OK.

The say that a Picture paints a thousand words, well, this aint no oil painting and there is not enough words in the the English Language that came to mind when they dropped the bike off at my place.

There it was, 500 pounds of old cold, rusty and Muddy Honda, looking to have a new lease of life, some how I think I have scrapped the bottom of the Barrel, then another rolls in, but I am a man of my word and help out I shall indeed.

This was a complete mess, I mean it had been rained on from every corner of the bike, then wind blew the tarp off and rotted everything that was rubber or plastic, then to rub salt in the proverbial wound, it got wet again and covered in mud.

The bike has had a tough hard life, there was Oil everywhere, of which probably saved a lot of the bike from rusting to be honest, but everywhere I looked, this Motorcycle needed help, it was a sad state to see and I knew that I could some how get this running again, the only issue was the poor chap was on a limited budget, and I know how that feels, been there many times.

But there is a point where I must stop and say No, but the Leo in me tells me to have a go and help this bloke out, so, with a shaky handshake and sweat coming off my brow from pushing the thing up the driveway, I sat there and took in the whole sorry life that this inline four must of endured to get into the condition it is now in.

1a

Even the handlebar grips were so thrashed from the elements that half of the grip glues itself to my hand, not even lacquer thinner would remove that tar like substance from my fingers and was marked for life I think, but this is just the start of something that I really should of said, no thanks mate I cannot help you. Story of my life with things I guess but I have always pushed the envelope and this needed a Caterpillar truck to move it. The rear chain was rustier than the Titanic’s Crapper door, I shall be changing this Big 630 chain and sprocket system to a 530 set up.

5


The tires were torn up, and would hold air for about 2 hours then go as flat as a pancake, my Compressor got plenty of overtime keeping these things up for sure, but the amount of dirt, grime and Spiders nests was just unbelievable. I really have my work cut out here and as everything is knackered, I have to clean stuff before I start replacing parts etc.

2

I was never a fan of the Comstar rims to be honest but this bike has some sentimental value to him and I will do the best that I can, to bring this old bird back up to speed once more.

4

Not only was the seat all torn up, the foam had hardened and was starting to fall apart as soon as I moved anything, and as the Customer wants a Hoop welded to frame and a flat seat set up, this thing can get 86’d into the bin.

7

As you may know, the 77 and 78 Models had these Keyhole carbs, and when they have been left for such a long time, these buggers are so hard to get back to running nicely again, they have an accelerator pump that plays up all the time, the choke is on a cable and up on top of the triple tree and the sun dried the knob, of which it breaks as soon as you touch it, lastly, this bloody things are a royal pain to work on.  Just to change the jest, you have to remove the rack from the bike, as the float bowls do not have clips on like the earlier SOHC models.  So what I do is if these carbs are goosed, I inform the customer they would be way better off if I fitted earlier carbs, as you can change the jest with the carbs still on the bike and, it has a choke lever on the left sode of the carb body and way easy to use.

8

The sprocket cover tells a tale right there, covered in oil and road grime, as well as spiders webs, this is going to be scary when I remove the 2 Phillips screws in a minute, so stand back!!!!!!!!!!!!

22

Holy Moly, just look at this, the bloody sprocket doesn’t even have a securing Bolt and washer on it, there is nothing to keep this sprocket from literally, falling of the drive shaft, now the 77 and 78 sprocket set ups are different, the earlier versions have a little clip with two holes for bolts that sit in the recess in the drive shaft. Where am I going to find a CB750F Bolt and washer ????

23


I looked in my parts drawers in the garage and bugger me, will you look at that, still in the sealed packet and, I had even written in sharpie CB750F Sprocket, what were the chances?

25

Think its a fair assumption that this chain is Royaly Fecked, so I shall be glad to cut this 630 version off, but there is so much Oil and grime all over this bike, things are going to be messy for a while.

12


There seems to be oil all over this bike, and I mean everywhere, I need to see whats occurring here as thats an insane amount of Oil deposit and the guy said the bike used to run before he parked it, I checked the tach hole in the Valve cover but thats OK, the Valve cover seems OK as well as the  Cylinder head, which I think could be one of the oil lines, but what a mess this is going to make, just to take that apart.

26

That looks like the issue, Oh yeah- I will just put electrical tape around the leaking oil line, that will fix it-Not! So I now have to make a new oil line, but at least I have found out where the majority of excess oil must of been leaking from to get all over the bike like that.

29

All fixed and I cleaned the other hose up and oil tank and I feel a lot better about putting this back on the Super Sport once more and hopefully no more issues in that department.

19

Well, its at this point you think to yourself. “Why am I doing this”?  But its a challenge, the customer is on a low budget and this motorcycle is of sentimental value, so a no brainer but there are so many things wrong and not working on this bike, this will take me some time to get dialed in.

20

Time to remove the carbs and boots and clean the frame up, I shall then fit New intake manifolds from a 1975 CB750K model, rebuild some early Carbs and fit new cables too.

36

I cleaned and painted up the motor with High Temp Wrinkle from PPG I get made up in cans, and that helped big time. I then fitted the earlier intake manifolds and, using a flat edge, made sure that the intakes were all even and flat, this makes fitting carbs back on the bike so much easier than trying to force a rack on when the intakes are off slightly.

37

I have always used New Stainless Steel, Rolled edged Hose clamps, as these will not dig in and cut your hoses with traditional clamps and of course, being stainless, they will not rust or corrode.

41

Well, I pulled an old set of inline four 1975 CB750K Round tops out of my pile and these need to be gone through but when they are completed, and then synchronized, these run like a top.

104

All clean and ready to go straight on the bike and, these will fire right up no worries at all, these are cleaner than a cats arse and will make a huge change in this motorcycles life.

46

These are now all in place and have fitted New Genuine Honda Boot covers over the linkages to keep crap out, many do not do this, but I want these to stand out as they look and function so well, plus you can change main jets is minutes with the carbs still on the motor.

30

I try and use as much of the original parts as I can, but these coils were losing voltage and not repairable, unfortunately these are not cheap to replace, I had no choice but to use Brand New ones but, so glad that I did, these new ones I will be fitting will last many years.

31

All bolted in, this bike will have a new life for sure, but it just goes to show by leaving a bike for 6 years with no cover and let mother nature belt the hell out of it, is not a very good idea at all.

39

The old cables were all torn up anyway, but, on the earlier carbs you must use the earlier cables, but thats a good thing as you know everything is new and will function real nice.

40

New cables going in, now we are starting to make some very good progress, make sure that you use WD40 and lube these cables as they will keep these operating smoothly.

49

The aluminum hangers were oily and needed a bit of a revamp, so I removed these and began to clean them up, think I shall polish these to make a difference on the bike.

50

Now that is way better and I feel a lot better putting something clean back on, this motorcycle will sure look different and for the better.

52

New cables through out, the clutch cable was actually seized up, so a new one was purchased, I always use New adjusters too .

57

The points cover looked like it had been in a bad way for a long time , but- it wasnt too banged up to be honest, so, using my special Formula High grade restoration Polish, I jumped into action as I love polishing old stuff, it took me about 90 minutes but it was well worth it and looks as good as new now.

58

Now that is a lot better and used New stainless Allen head bolts to give this Points cover a New lease of life, it sure looks great on the motor now.

59

The Clutch cover was in the same shape as the Points cover, so, back to the polisher, some more secret sauce and a polishing mop and then I will refit to the engine.

60

Now this looks a whole lot better once polished to a super high luster I used Allen head bolts which are all New, as is the clutch cable too, so a smooth clutch at long last.

44

Look how bad the muffler is, its had bad gas welding, then an old screw held this together, sort of, I will keep the stock header and will make a new up-swept tail pipe for this bike.

47

Getting to it with a piece of 2.5 tubing, as I want this to look cool and sound pretty strong too, this will be a fun part of the process on the Super Sport Bike.

63

There is the tail pipe, complete with a Removable baffle, this is way better than what was on there, the old muffler even had a mouse nest in it, so glad to change this set up.

64

Next up, the Customer wants a flat frame with a hoop, so what I am going to do is cut the rear frame horns off about the middle of where the old cross brace is.

66

I have cut the frame rails off to where the customer wanted, this will then have my frame inserts put in and I will cut one of my special frame hoops to fit to the bike and give it a new look.

67


Now- I use a de-burrer to remove any inner tubing, I want to make sure that the inside is hollow and smooth so the inserts will slide in tightly, that way there will be no issues.

68

The inserts are in and they are really snug, I go in about an inch and half both sides, it is double walled on this part of the frame, so the hogging out does take a while and may annoy your neighbors if you have to use an air compressor and a die grinder to open this up.

69

As you can see, I have laid the hoop on top of the frame, this way I can figure out how much I want the hoop to be placed at, I then mark the hoop by the end of the chassis, as this is where it will butt up against so you can then weld it.

70


Once you make the cut, you simply cut the other side, take any burrs off the inside and then you are ready to attach this to your bikes frame and this will change the look of you machine right away.

72

As you can see, I fit the hoop into the inserts and then I simply just tap the end of the hoop with a Rubber mallet, until the ends are almost touching the frame, as I want just a tiny gap to allow for good penetration of the Mig welder to secure this to the frame.

So the little Video above shows you how I first attach the hoop to the frame, I then mig weld the ends all around and you can drill into the frame and insert and spot weld there too if you want a more secure weld too.

78

I have Mig welded this in place and am happy with the end result, next up is I have to make a seat base for this, you do see some on the market already made but many times you want to make the length of your frame to your dimension, so- I always make mine for each frame and its pretty easy.

83

Use what you have around you to make a template, I had a packing box handy, so traced the outline of the frame and cut it out, a little trim and I am ready to now make a seat base.

84

I may have gone a little over the top on thickness as this is 18 gauge but I had a sheet in the garage and may as well use it, its strong as Hercules but obviously the down fall is its harder to cut and shape, but this will work fine and be a great sturdy base for the seat I am going to make.

85

There you go, its done, now to check on the frame, grind any adjustments that need doing and drill some holes for the bolts to be able to fix to the frame, as I shall upholster over the bolts so the studs are the only thing sticking out underneath.

86

There you go, I am happy with that now, simply need to use high density memory foam and choose the material and stitching and that will be upholstered and look so different.

96

Still a long way to go on this Super Sport but- It is finally taking shape and looking way better than it did when it was dragged into my place looking very sorry for itself.

88

The Gauges were shot, one of the needle drives was not working and I wanted to clean this area up quite a bit, so came to the conclusion that this can look a lot better with all this clutter removed and different bars fitted too, as well as removing the upper triple tree and polishing it to a chrome like luster.

89

The stock fork ears have to go and the turn signal housing as they were rusted out and looked pretty ugly, customer wanted a Brat style bike and these tend to be removed, I shall also add one of my custom headlights that have internal LED turn signals inside the light, so there is nothing protruding.

91

Removed the handle bars and gauges, as well as the ignition switch as the plastic connector and dried and crumbled up, due to being sat out in the California Sun for 8 years.

92

Now, that is a lot better, as you can see, I removed the old paint from the triple tree and polished it, I also removed the stock fork ears and fitted some Custom alloy versions in Black.

93

New ignition switch also added as the stock one was worn out and now all new once more and of course, functioning too.

94

Had to make up a new pig tail for the lights as the old harness had dried out, but this will work great and, reduce the amount of wiring thats inside the headlight.

99

As ypu can see, what a transformation, my LED turn signal headlight set up is the way to go, Halogen bulb and the LED signals actually do light up Amber, a neat custom touch.

100

Starting to get some where, still have to foam and upholster seat, as well as pulling front wheel out and fitting new tire and sorting the brakes out and these are all seized up.

105

I removed the rear wheel, I need to clean all this up and thought that i would take a photo and, below I have done a quick video on my phone, to show you how I undo stubborn nuts or bolts when they have been on many years and have seized up and you cant for the life of you get them undone with just your wrench.

I try and show videos where I can, as many of you ask me on the phone everyday, so thats why I do things like this and hope that it helps some of you out that may be out in the sticks and nowhere to ask.

Hell yeah, this is slowly getting better everytime I work on the bike, the Customer came and visited and loves the way the machine is now looking, but I tell ya, it has even tested my patience on more than one occasion, just take a step back and do something else, but- as you can see, I have now upholstered the seat, and did it in the Nostalgic Diamond stitch and added silver trim to break the seat up.

I kicked the front a little to try and hide the arch in the stock gas tank, usually I weld up that area, but this customer is on a budget so this was a good way of over coming this issue, I used High Density memory foam and I tell ya, it is super comfortable.

The seat will be Bolted down so it sits nice and tight onto the frame, I still have to smooth the chassis and paint Gloss Black, but also as you will notice, I have fitted an LED strip at the back, this will function as a Running and Stop light in Bright RED.

The Turn Signals are Chrome and LED too, so this will be sure to get a drivers attention and inform them as to what they are doing ahead of them.

The New 2.5 Gauges that I sell on my website were just the thing needed to tidy the top of this machine up, I vapor blasted the master cylinder but its beyond repair, so shall be fitting a New version tomorrow.

The old 630 was totally rusted and, falling apart, so opted to change this set up for a 530 chain and sprockets, this was so messy, I was glad to change all this and have it look at least a little cleaner, thats why I prefer to usually strip the bike to the frame and do it right, but sometimes that is just not in the Customers budget, so do the best I can for them.

Looks so much better and I am glad I went this route, plus the Customer was over the moon with the look, so a double whammy there. Now onto the Exhaust system.


As you can see above, the exhaust is so so but underneath its a mess, the rear muffler was so badly welded, they needed to fit a screw into it to keep them together, so i thought that it was time to set up the good old Heat wrap, I like that Hot Rod look and so does the Customer.

There you go, all wrapped and ready to go back on the Motorcycle, remember to replace your Copper crush Gaskets too when you re-fit an exhaust system.

Looks so much neater now and I like the way that the Honda is slowly taking shape, I mean, a few weeks ago this was in a terrible state from all angles, so right now I am quite stoked.

Right, now onto the rear brake Caliper, as it is seized up beyond belief, what I normally do is remove the caliper and stick a towel in a bucket and simply put an airline into the caliper and leave the bleeder in, that usually pushes the piston out pretty fast, hence having a bucket as there is 150 PSI from the airline going into that small cavity.  But this time the Piston refused to exit, so that tells me there is a small rust ring around the piston.So what I do in this situation is go back to old school ways of getting things resolved.

So, now I have the piston out, using an old set of handlebars and a master cylinder to bleed it out, I can now get onto rebuilding the caliper, the O-Ring seal usually gets nasty and this one had too, but the Piston was rusted in and lucky for me I had a New Piston and rebuild kit at the ready. Below, Old and New, always replaces seals, especially in Brakes.

I use a pick to pull the Seal out, and then I was glad I had a New piston as the original one I removed from the Caliper Body was seized in and pitted up quite badly.

So, before I fit the Piston, I need to clean up the old caliper, as it has a lot of Oxidization in the body, as the carcass is a cast aluminum, so what I do is use a Rubber wheel to clean the body up, I sell these kits on the website, whats coo is that it does not hurt the caliper at all , although it will remove the oxidization pretty easily.

This is what I do t clean the body up, been doing this over 18 years here and always makes the brakes work really well and smoothly, I sell the kit on my website.

So, thats now clean, all blown out with an airline, a little brake fluid in the Caliper body to make sure all is smooth, Seal is in and Piston slides right inside nicely.

So, all rebuilt and ready to fit back onto the Super Sport, Bleed through and hopefully we shall have a brake now as before- this was seized solid from years of inactivity and parked outside for 8 years.

The rear brake is now a success and functions very well on the pedal, a lot of work but worth it in the end, as this brake caliper was seized up solid, am happy now.

I also didn’t like the strip light set up that I fitted to the frame, so removed that and fitted an LED stop – tail light and fitted the License plate to it and looks so much better I think.

I removed the Red LED turn signals as they were not functioning bright enough, so replaced them with some Classic Alloy 12 volt Bulb versions and tested, worked really well.

The front fender was a mess, but I wanted to still use as the front end needs bracing, so I though what I would do was cut it down and remove 11 inches off each end to make wheel look bigger.


I then elongated the mounting holes in the brace, that way the fender will hug the tire, not touch it , but give that appearance that it was.

The Customer will paint it Black when he gets the Gas tank and side covers painted, but this sits nice and tight and stiffens the front forks up and stops crap flying in your face.

Next up is to clean the rear frame up and paint it Black, tidy the wiring, fill the gas tank, add new fuel line and see how this bike runs.

OK, I have managed to do all that and can now take this for a shake down run around the Block, the petcock bloody leaks, so have ordered a new one and will change that when it arrives.

Did a good run around the block and wanted to make sure that all is well, I knew that the headers would smoke for a few rides until they have cured, so no worries there, but the top end of this old Super Sport is rattly as hell and all adjusted, these can stay like that for a long time and thats how it is going to stay for a while.

OK, so now the Customer changed his mind about a few things, so I have changed the rear tail light and made a License plate mount to sit off the bottom of the shock and used a Ford Model A LED rear Tail light.

The Bike now runs, all the gears work, Turn Signals function as does the rear Brake light and Running light, I have put a lot of time into getting this thing running again.

Virtually a different Motorcycle now, it runs well, albeit the top end rattles like some old nails in a can but they will go on like that for a long time and the customer can do that later, it pulls hard to be honest and the exhaust of mine is just Killer sounding.

I am not going to paint it, I sealed the gas tank but he can paint it as the Customer is on a budget, so when he takes it next week, he can get a painter to do their thing to her.

So there you go, pretty much done, this bike had not run in 8 years, all the brakes were seized and needed so much cleaning before I could even work on it, it is amazing it runs to be honest.

The Customer can add mirrors if he so wishes, thats just cosmetics, but at least I got this to run and drive, many would of given up and, I wouldnt of blamed them, but I continued and won through.

I am going to play with My Hot Rod thats in the back ground and look forward to this leaving my garage during the week, thanks for watching this build, hope you liked what I have done?

The Harlequin Honda 1975 CB750F Super Sport

Well, here we are with the Harlequin Honda that I have created, its been a long build as originally the Motorcycle was bought down from Washington on November 4th 2015, Edwin Cooper was not well, he had Cancer and wanted to try and revamp his trusty old Steed that he had had for many years, he wanted me to do something cool with it and loaded this Motorcycle up in the back of his pick up and came down with his daughter and dropped the bike off.

I helped him unload the 1975 CB750 F Super Sport, it was heavy, the brakes were sticking and it really did need some love, but- thats what I do and was more than willing to bring this motorcycle back to life and breathe fire once more.

This would prove to be quite a challenging creation, as there was a lot of time and weather that had passed over this machine, I have been there many times but I am amazed at how many Motorcycles that I have built that were all in this condition, some a lot worse too.

He had started to Cafe the bike out a little, many moons ago, hence the Shortened Headlight ears and the Italian Tarozzi rear sets and an old 2 Four seat that dates back to the Mid 1970’s.

Have a look and you can see that there is a lot of stock parts still on the bike, like the chain guard Gas tank gauges etc and of course the old wiring, and that had seen better days for sure, the weather can totally destroy a wiring harness in just a few seasons, especially if the temperature gets hot then col, it dries the wires out and makes them fragile.

This also has an Old Yoshimura 4 into 1 system on it, seen better days but nice to see none the less, that is now fitted onto a AHRMA race bike and gets used all the time.

As you can see, the Birds nest wiring will need to be completely stripped out, soon as I see toggle tops and electrical tape, I know that it needs to be removed right away, else it will be a headache that you do not need.

You can see where Mother nature has taken a firm grip of this Motor, Oxidization is a mean Culprit by the look of it, the Plug caps were so weather beaten, as I tried to remove it, the cap cracked and fell into many pieces.

I wonder what sort of critters over the years had chosen this 1975 inline Four as its home? Nothing really surprises me these days but intrigue always does and if this bike could talk, well, I think we may have a fun movie in the making.

The Carbs were locked up, seemed to have dirt and grit from everywhere and a little wasp nest in the Carb body itself, Mother Nature really took a hold of this one.

I loved the 1960’s Hot Rod Stewart Warner Mechanical Oil pressure Gauge, I am also a Hot Rodder, so this made me smile when I clapped eyes on it, poor motor has a lot of oxidisation on it though and will take time to remove and clean all that up.

We have a multitude of issues here, the rear brake caliper is seized up, piston is stuck and seals are shot, Rear rim is toast, the same goes for the rear shocks too, the swing arm looks like it has come from the bottom of the Baltic Sea, this will be a down to the frame build for sure.

Low miles too but the weather makes it look a lot worse to be honest, nothing that cannot be fixed though and this Super Sport will see a Brand New life and Look forward to sharing the photos when she is completed.

Front Brake caliper is also seized up, the front forks need rebuilding, Rotor needs to be skimmed and New rim built.

Unfortunately the rims had rusted right through, so all that I shall use is the front hub, Rotor and Caliper body and will refurbish all that I possibly can to this grand Old steed.

All the wire harness was Rock hard from being baked in the Sun, the rectifier and the regulator will be discarded, and I shall be using a New Harness, along with a solid state rectifier module, as I use them on ALL the builds that I create, cant trust 40 year old electrical anyway.

I know that this will have a different look by the time I have finished, not sure how just yet but- It will look pretty cool none the less and of course, Function well too.

So there she sits, before getting transformed into a cool Custom Machine and I am looking forward to tearing into this to transform into some cool eye candy.

So it is time to push this 500 pounder, into the garage and start to take this motorcycle apart and figure out what I am going to do to this 1975 CB750F HONDA.

And so we begin, this will be a long Journey with some hiccups along the way , but I know that it will look a lot different by the time this comes back out.

I started to go the route he wanted, to go with his motorcycle, then all of a sudden from out of the blue, I had an awful phone call informing me that he had just been in a Motorcycle accident on his Harley and did not make it, I was gobsmacked, and, the family were too, they didn’t want another Motorcycle in the family and I understood that, so they gave me the bike and said do something cool with it.

Above, I hand bent Raw steel and then Rolled the rear, welded it and then began to do a little more to this seat base as I want it to be able to take a passenger, as all you see are single short seats these days.

So the transformation began, slowly and I am happy at the end result, I named it the Harlequin as it has so many Colors and my Favorite Candy Bar is TWIX, so you can see that too right?

A lot of flake and detail but wanted that old school Low Rider flake that was about when I was a teenager back in the UK in the 1970s, when the Sun hits the Gallon of Clear coat, you will discover why metal-flake was so popular back in the day, a Kaleidoscope of Candy colors pleases the Cornea.

I have created over 50 Custom HONDA based Motorcycles since moving here in 2000 and every time I start a creation, I have to sit and ponder for quite some time, I am glad that I had no deadline, so the pressure was off and as and when I thought of something cool, I would just do a little bit to the bike and then back to work on other customers parts etc.

I fitted My Sidewinder exhaust system to this build but wanted to try my other sets ups as well, just to get the look and later, hear the different tones of my exhaust systems and decide which one I will like, this is ceramic coated but think I may end up using DEI Titanium Wrap on the header and maybe triple coating the tail pipe in Chrome, we shall see. Below is the Hot Rod tail pipe that fits to the Sidewinder header, a crisp and Velvet bark and as you can hear, very responsive to the throttle.

I have sold many Hot Rod, Side Winder and Razor systems through out the world, all made right here in California, none of that made in china crap.

I fitted a small 5-3/4 Chrome headlight to my Custom Fork Ears, and wanted to create a different look to the front end, so I went with a Biltwell Bubble Visor from their Helmet catalog and this worked out great as a mini nose fairing, even threading the clutch cable through the Plexi Glass.

I wanted to mix Old School with New and decided on using a GPS speedometer but with that old school Smiths looking gauge face and needle that still sweeps, this worked out so well.

Here is the old bucket I used and Tig welded to my custom bracket, just needs polishing and I shall also be fitting small LED Amber display lights for the turn signals to plug into.


I used a old Bucket and welded a bracket I water jet cut and it seemed to go right in and the great thing with this is that it has just a power wire and an anttena wire, you are all set to go, even has a LED red back light too.

This was the right look that i wanted and am glad that I chose to go this particular route, gives the machine just a little more character and style.

Here is the Harlequin outside out Home, so cool to see it in the sunlight and I am super stoked at the way the bike turned out in the end, a long but rewarding Project that really does turn a few heads.

Plenty of eye candy to look at on the bike, the Paint alone is super cool, and as the saying goes, “The Devil is in the Detail”

I am proud of this Build and being a steel tank and seat, this is a sturdy machine that is no light weight for sure, it stands tall too, many do not do that.

The Harlequin sports my Custom 4 into 1 Exhaust system, The Side Winder, I Ceramic coated the header, then wrapped DEI Titanium Heat wrap onto it, to give that Hot Rod styling, then I triple chromed the rear tail pipe and it sits nice and snug and close to the bike, this turned out so well and a system that I offer on the website for all SOHC Models.

A fun machine that was a real joy to create and will be on the show circuit around Southern California this year, hope you can come and check it out some time, be glad to see you.

I removed the old Super Sport Gas Tank Flap that used to hide an old tin cap, I then welded a Harley Bung and fitted a Custom Gas cap, looks so much smoother now.

I also did a few other changes to the bike by machining the forks and making a Brace bar out of 6061 T6, and of course a 1971 Rectangle fog light to show the European Spirit here.

So many New parts, this is like a Brand new Motorcycle now and the more you look, the more you see a little more custom touches throughout the ride.

Photo Credit: #RahoulGhose

This is a cool shot at the Outliers guild show in Down Town LA last week, stoked to see it on Display with other cool machines from around the state.

Photo Credit #RahoulGhose

Here she is sitting loud and of course proud to be representing, at the OG show in LA, a very cool event and I really enjoyed it.

A classic look of the Custom years back in the 1970’s when I was a Teenager, this came out so well and super stoked at the response I received at the Outlier Guild show.

The 1939 Ford Lincoln Mercury tear drop LED tail light set off well in the frenched pocket I created, I also had made the steel cowl and seat base.

Photo Credit #RahoulGhose

It has been an amazing year and to get the Harlequin completed is another notch in the post of creativity, I strive to do the best I can and hope that you liked the build?

Like I said, I had a great response for the bike and even the band that was playing loved it. Band- WOOLY BANDITS- Singer- Christa Collins.

Thanks you for everyone that came up and spoke to me, I was super stoked, this is a great creative family and super glad that I was a part of it, I look forward to attending more.

In Memory Of Edwin Cooper, I am sure he is smiling from above.

Below is  a list of of things done to the Harlequin.

  1. Machined and Polished Front Forks.
  2. Machined Aluminum Fork Brace.
  3. Polished Hubs.
  4. 19X40X1.85 Chrome Front Rim.
  5. 18X3.5×40 Chrome Rear Rim.
  6. Stainless Steel Spokes.
  7. Hand Drilled Rotors.
  8. Custom Piggy Back 14 Inch Shocks.
  9. Polished and Rebuilt Rear Caliper.
  10. Braided Steel Brake lines.
  11. New Chromed front Fender.
  12. 5 3/4 Chrome Headlight.
  13. Biltwell Helmet Visor.
  14. Custom filled and smoothed S.S. Gas tank with Harley Cap.
  15. Hand made Steel Seat with leather Tuck n Roll.
  16. Metalflake paint.
  17. Hand Made Clubman Bars 7/8.
  18. Biltwell Grips.
  19. Rebuilt Motor with Polished Covers and Wrinkle Paint.
  20. Restored Carburetors and synchronized.
  21. Drilled and Chromed Kick starter.
  22. Wrapped Sidewinder 4 into 1 exhaust with Chrome tail pipe.
  23. GPS Speedometer.
  24. New master Cylinder.
  25. New levers.
  26. Tarozzi Rear Sets.
  27. New Challenger tires and Tubes.
  28. 1939 LED Tear Drop Tail Light.
  29. LED RED rear Turn Signals.
  30. LED display lights.
  31. Polished upper triple tree.
  32. Powder Coated frame.
  33. Lithium 12 Volt EarthX Battery.
  34. New side covers.
  35. Chromed Center stand.
  36. Chromed Side Stand.
  37. 530 X Ring CXhain.
  38. New wire Harness.
  39. New handlebar switches.
  40. Oil Pressure Gauge.
  41. Battery Tender.