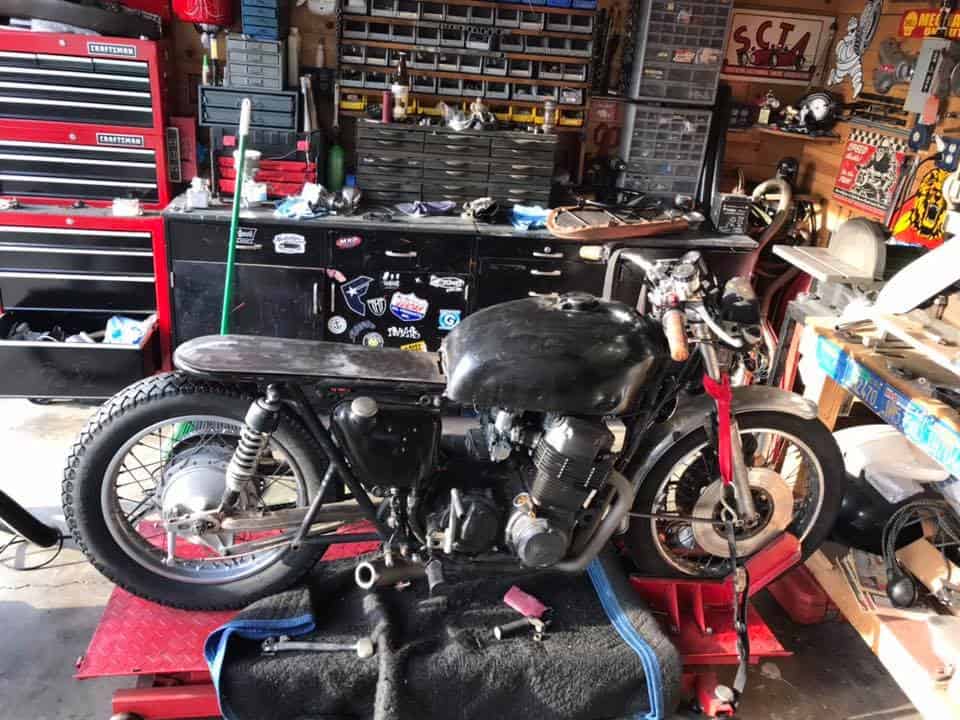
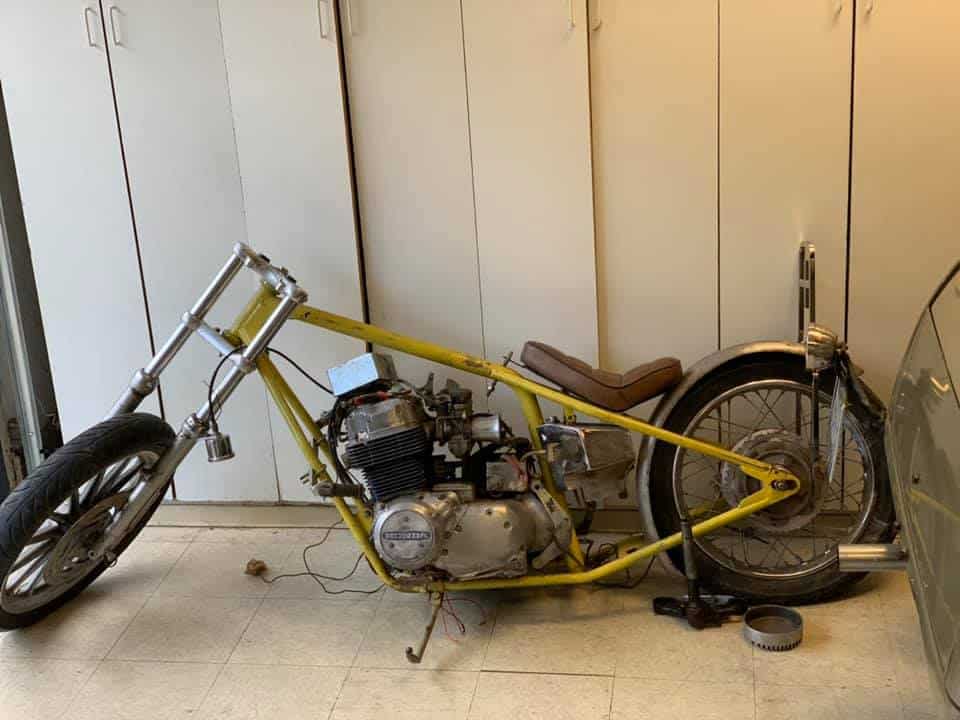
The VESCO HONDA CB750 Brat Bike

Well, many of you have followed the Blog on this machine, right now I am just enjoying the build as its running pretty darn good, so will keep it as a runaround until such time as if it either sells, or I get some time and I can strip bare and make a full custom project from this Motorcycle. But it sure was a great find, I purchased the bike though a contact and headed just a few miles down the road to the city of Orange here in Southern California to check this 1974 CB750K Honda out that had  been in storage for many Many years and had not even run since the mid 1980’s.

I have purchased so many CB750’s in the past but, its always great when you have the unknown ahead of you, most of the times they are so badly damaged or neglected, that you need to take a foot pump with you and a Mallet, as the tires are usually flat and the front brake will always stick due to some corrosion inside the caliper and the Rubber mallet will release the piston so you can push the bike into your van or trailer.

Found out that the family’s last name was Vesco, I inquired not related to Don are you? “Yup sure am” he tells me about it and this bike is actually his lads and he ran out of time, money, patience and enthusiasm on this machine and has been sat a long while. And now it was time to make some room in the garage, so it has to go, I made an offer and after a little bit of haggling a price was agreed upon and there it was, this old snotter that had a hard life but for the last 30 odd years had sat used and abused in all sorts of places, and now it was coing home to my shop to see what I could do to at least resurrect this vintage piece of tin.

It sure was hard work loading it ion the van as everything was corroded or semi seized up, but managed to get her up and into my van and then we were on the way to its new abode- my place.

Back home in 20 minutes and took the bike out and placed on a wheel chock so I could have a look at what we got, it had good potential but many people go in head strong and then kind of lose their drive in completing their dream and I purchase many machine in this guise and much worse too.

Brakes were seized and it took sometime to be able to get the bike onto the driveway on my own, the kick stand would not function as it was too long and kept getting in the way, I knew I had my work cut out but needed to know if I could get this old girl to run, as I didn’t want to strip this right away, always best to see how the motor is first before you dive in. You can see the plug caps have electrical tape over them, a warning sign that this had issues back in the day right away.


The carburetors had seen better days, not only were the bodies of this rack of four corroded, the slides had stuck inside, so another issue to sort out, but it did have compression when I kicked it over and thats a great thing to know.

Old Mac exhaust wouldn’t of ran well as the underneath of the header was squashed flat, must of hit a speed bump years ago and no way would it run that well with a restricted collector.


I wanted to just have fun with this bike, as I said, not sure how I was going to go until I got her running, but to get to that stage there was a few things that I thought would be cool so I could at least ride it once I figured all the issues out on this honda, and as you have probably experienced, there were many issues, but, whilst I had her in my shop, i wanted to change the seat set up and make a fun Brat style machine just because, well I can.

OK, so I made a steel seat base and tried another gas tank too, as I needed to clean the inside of the other one as I always do when I get tanks that has sat for many years, I had to change out the wire harness and the handle bars and controls and glad that I did as the old ones were so badly corroded, they would of caused a fire for sure. And then with a New set of intake manifolds and rebuilt carburetors this machine w\was almost ready for a fire up.

Below is a little iphone video I did on Face book, not sure how the motor would go but I had compression and now spark, so, with gas, this should in theory fire up.

So, as you can see, I had the bike on my work table and I used an old lawn mower tank as an iv to feel the motor, I was pretty sure she would at least back fire but as I re-jetted it and cleaned bowls out, I was certain that with new coils, battery and plugs and of course New oil and filter, that this puppy would run, and was pretty stoked with the end result.

Carbs redone and all clean with new intakes and my stainless steel clamps too, fitted some spun aluminum Velocity stacks with gauze for that old style look and re-jetted once more.

To make sure all is well, I need to be physically able to take this bike for a little ride, as no idea how the clutch is, the gears etc and the general running of this bike, I fitted another headlight and then whilst I was there at my storage, I removed some Old Lester wheels I had, I had taken them off a Vintage CR750 AHRMA race bike and simply stored them, tires were a little hard but thought what the hell, lets bung them on as the wheels on this bike anyway were toast.

I also had to make some sort of tail light assembly up as riding up the road, I still want people to see that I am braking etc, so put this set up together and it works really well being LED.

As you can see, I fitted the Lester rims, 19 inch front and 18 back, I also upholstered the seat in a soft brown leather with Diamond stitching and its sure comfortable I was surprised, the gas tank needs some work but I shall address that no worries, I also cut my 4 into 1 down that I ceramic coated titanium color, as I wanted an aggressive look to it and think that this does come across quite well.

As the sun goes down I managed to fire this up and it felt good to hear the bike run and run quite strong, I fitted a 530 O-Ring red chain that I had and it looks pretty tough, as you can see, I made one of my side stands and now the bike sits up nicely, so many dont or need bits of wood under them.

I also fitted an oil pressure gauge kit to make sure that I had good pressure, and it did, it fired up to about 70 pounds, so am more than happy about that, exhaust looks really cool.

OK, now it is time to address that gas tank and it needs some love, i think I shall go all out 1970’s Candy Custom style on this one as it needs some color for sure, but I noticed it had pin holes, so- went back to the original tank that came with the bike and decided to cut off the neck and weld in a Harley Bung instead.

So, the best thing I do is use a sawzall and cut the neck as far down as I can first as this needs to be flush on the tank for the bung to weld in nice and smooth.

As you can see, it takes some time and of course, I made sure that there was no residual gases exiting from the tank, be careful and make sure you wash your tank out before emmiting any sparks near this thing. LOL

So, with the neck sanded smooth to the tank, I used a Harley gas tank bung, I sell this kit on my website, and wanted to use it for this build to be a little different as the original locks always break on the Honda and knew that this would like quite trick once finished.

This is perfect for the Honda Gas tank and there is enough room to be able to TIG weld the bung in place with no distortion to the surrounding areas of the filler neck.

Now all Tig welded and cooled down, this is ready to attach the screw in gas cap, I did this a long time ago on the Cobalt Special Honda I built, so was eager to see how this looked.

Well, that looks so much better than the stock configuration and once painted will really set off the gas tank from the others out there and a neat Custom touch to this machine.

With New rear shocks and a comfortable seat, this is taking shape as a cool little Muscle style Brat bike that will turn heads where ever it sits and the paint will make you need Sunglasses.

Here we are at El Mirage at a SCTA sanctioned meet, last races of the year – so wanted to attend and take a few photos of this Vesco Honda and I am so glad that I did.

There is still a lot more to do to this but right now it just needs to get a few miles under its belt, I always say the first 100 miles will tell you how the bike will perform, so a ways to go as I only have 14 miles on it so far but of course shall do many more on it.

Don’t want to take this apart yet anyway, i mean its fun right now, no show bike but easily could be if I took her down to the frame and started from scratch, but right now I want to have fun with it and what better place than El Mirage Dry lake.

She sits real well and is a blast to ride, she got plenty of looks as you cannot miss the paint job, no matter how fast you drive.

So I am happy with the way she is and looks to be honest and I love riding the bike around to be honest as it sits so well and not too low as many are these days.

Jennifer my Girlfriend loves it too, she has a triumph of her own and loves all Motorcycles, love seeing Girls with bikes too and we go out riding a lot together to be honest.

Final look at El Mirage before we head home, it is only 100 miles from our house so always fun to come out here and view world speed time trials record attempts

Gas Cap sets off the tank nicely and the paint job is so reminiscent of them Customs days of the 1970’s back home and around the world, I think its a nice balance in color.

Fish Gills and shadowing are becoming a lost art but this really came out well, using house Of Kolor Candy paints and Pearl bases with light flake added.

The bike sits well, I like the smaller headlight, they have L.E.D’s inside it for turn signals, so keeps everything neat and out of the way, the Lester Rims gives it that Old School period right away.


Added 2.5 inch mechanical Gauges to tidy top end out, of course my Hand Made and chromed Euro Bars really make this comfortable for your shoulders and Cole Foster grips soak up any Vibration that you may have.

I think the Man above digs it too, No thunderbolts when I stopped outside his place, Phew!

I really enjoy riding the bike around my Town, the roads are smooth and its a joy to blap about on and even though I want to do way more to it, I need to sit back and have fun riding it for a little while as it was and still is a super fun project.

Slowly clocking the miles up but amazing that this runs and hasnt since the mid 1980’s, and its a joy to jump on and take for a spin around town.

I used a Biltwell Mirror for legal reasons and it works pretty well to be honest, Id love to paint the frame later but not right now, The motor runs strong, the gear transition is really smooth.

Eventually the Motor will be painted and tricked out but as I am having so much fun on this, I will wait until later, unless someone buys it of course.

Thank you for following me and purchasing My parts for your projects, it means a lot, this is my Passion and life, so I really do appreciate all your business.

So, until next time I work on this, I will leave you with a list of things I changed, just in case you are curious as to what I did on this machine through the build up.

This was the Very First ride after it had not run since the mid 1980’s, so stoked to be able to experience great moments like this, unless you are a bike builder, you really wont understand the Euphoria that you feel when you click into first gear and ride off down the road.

Peace and Grease to you all.


Carpy


  1. Lester Rims 19″ front 18″ Rear.
  2. Drilled Front Rotor
  3. Euro Bars I made 7/8
  4. Cole Foster grips
  5. New Handlebar Controls
  6. New Throttle Cables
  7. New Clutch Cable
  8. New Speedo Cable
  9. New Tach Cable
  10. New Wire Harness
  11. New Coils and Caps
  12. New Iridium Spark Plugs
  13. New Battery
  14. New Red 530 Chain.
  15. New Custom Side Stand.
  16. Custom Gas Cap Kit.
  17. New Side Covers.
  18. New 2.5 Mini Gauges.
  19. New 4 into 1 exhaust Shortened and Ceramic Coated Titanium
  20. Rear Frame Hoop
  21. Rear LED tail Light assembly
  22. New Finned Piggyback Shocks.
  23. Rebuilt Carbs.
  24. New intake Manifolds
  25. Stainless Hose Clamps
  26. Braided overflow pipes.
  27. Custom 5 3/4 headlight with internal LED signals.
  28. New Horn.
  29. New Flat seat in Leather with Diamond Design.
  30. New Brake and clutch levers.
  31. New Biltwell Mirror
  32. New Chrome Fork Ears.
  33. New Oil Pressure Gauge kit.
  34. Chromed Rear Stabilizer bar.
  35. New Foot pegs and Rubber.
  36. New Custom Weld in Gas Cap Bung and Screw in Cap.
  37. Custom Candy Flake Paint.


Little bit more work on the Old Vesco Honda

Well, here we are, been away on the East Coast but now need to play catch up as I have this Vesco bike to get up and running, and then I have to plan a build for a Customer all the way in Iceland, so that’s kinda cool.

But, as I was away I had time to collect my thoughts on this machine, it needs tons of work but will be fun and I have gone with the concept of getting the bike to run and see how reliable the engine is, maybe take it for a blap across El Mirage Dry Lakes in a few weeks and then, if I am happy with the old snot Monster, then I can strip her apart and build a nice Custom machine out of it for someone to have fun with.

The Motor runs as we all know now and I am happy about that, but now its time to clean out the gas tank and get some paint on it, so I have used an old knackered gas tank as a mock up as I still need to make a seat base for this ride, and as it is going to be a Brat style machine, I need to get about and cut some of the frame to allow me to fit my special Steel Hoop Inserts and then I can set about making a flat seat base for it once the hoop is all cut and welded in.

I make sure I drill a hole through the tops of the hoop and the frame, then- when I insert the slugs and tap the hoop to Butt up against frame, I will be able to spot weld the holes first and then weld the Butted join for more strength.

So, just some Gloss Black paint for now so it doesn’t rust, later on when I am happy about how the bike rides, handles and sounds, the whole machine will be taken apart and I shall bead blast the frame, smooth the welds and then modify the frame a little more before I go for a Custom paint job, but this is the length of the frame I am looking for and can go onto make a seat base.

As you can see, it looks pretty good, I used Automotive paint to spray the tail end, but I have so much more to do, its taking shape a little bit each day and that’s what I like.

I used an old piece of 1/8th inch steel plate and this is more than ample enough to support my fat arse and will be good to upholster too, yes of course I will clean the surface rust off when I am ready for Upholstery. I was lucky to have some old steel plate in the garage, so no cost involved at all, thats always good right?

OK, the steel is now cleaned up as it was only surface rust and a quick going over with my Air sander sorted that out, when you see the base it looks pretty long but, it is just the length I am looking for as you can easily sit your arse on the bike, and you have enough room to strap some parts or luggage on the rear if you so need, I mean, Motorcycles are still supposed to be practical right?

Now the seat base is done, I just need to weld some studs underneath, as I am going to have them go through the cross brace behind the battery box and can then plop the seat on and add some flange nuts underneath to tighten, I will also add a bolt at the back of the seat to keep everything secure, as well as a small half moon plate on the inside of the hoop, just in case I want to add a tail light or license plate there later. You wont see it as its hidden, so if I chose not to use it, no harm done.

Up front I chose to go for some cool Custom 7/8 Grips, this time I liked the look of the Marble effect that Cole Foster makes, they really are comfortable, so a good choice, you will notice New handlebar control switches as well as New clutch lever and cable fitted to this machine.

This bike didn’t have any gauges at all, so I chose to go for the good old 2.5 mini Gauges, to keep everything neat and tucked away up front, eventually I will polish the triple tree and fit new front forks.

The old carbs needed going through and re-jetting as I am running my Exhaust system, I also fitted new throttle Cables and Bell Mouth velocity stacks for that yester-year look, I made sure that I also fitted brand new Air intake manifolds and used stainless hose clamps with rolled edges. The over flow lines are braided hose and at $4 a foot, they aint cheap but work great, the rubber ones you usually see dry out in the California Sun, so want something to last, ad these Aircraft hoses are just the ticket

Well, thats as far as I have got done today, will take more pics tomorrow, enjoy your weekend everyone and thank you for following me on the Vesco Honda..


HONDA BRAT 1976K FOR SALE $5000

Here we have a 1976 HONDA CB750K Model for sale, this Brat style machine runs really well and is a strong machine for sure, Located in La Mirada, this 500 pounder is not a show bike but a bike that is meant to be ridden.

1976A


This bike has had some work done to it and it a fun Motorcycle to ride, a linear power machine too.

  1. Rebuilt CARBS.
  2. Rebuilt Top end
  3. 4 into 1 Mac wrapped.
  4. New solid state Rectifier
  5. New Lithium Battery
  6. 2.5 Speedometer and Tachometer
  7. 7/8 Black Drag bars
  8. Black rims
  9. Brat seat
  10.  Custom rear tail lights
  11. New intake manifolds.

This is a fun machine thats pretty reliable and is an ideal platform to take on and do what ever you like to it. $5000 Takes it home.

1976g


Fires right up and runs pretty hard too.

1976b
If you are looking for a solid machine that you can ride right out of the gate, then this is a good ride right here.

1976c

These are getting harder to locate these days and to fond a decent running one is even harder, so this may be just the ticket for you.

1976e

I will be selling a few bikes on here and it is always great to see new owners have a CB750 and enjoy their power and reliability.

1976f

This runs strong and had great tires that hold the Tarmac very well indeed, brakes work really well and is fun to ride. Thats actual mileage since the top end rebuild.

1976i

Also it has recently had New shocks fitted too and still has the passenger pegs attached if you want to go ride 2 up.

1976j

So easy to change about and make it your own style with a paint job and a few different accessories, but by it and have fun on it this year and maybe make changes after the Summer?

1976k

New headlight as well and functions admirably, have a look and see what you think of this inline Four Motorcycle.

1976l

It has a hooped rear end and is pretty comfortable to ride, Rims and Hubs were powder-coated and re-laced too.

1976n

So there you go, a great runner and you can own this and change it to your style and color pretty darn easy.

1976m

If I can help with more photos or a video, let me know on 714-598-8392 and I can text you or email you, my email is carpy@carpyscaferacers.com

bannera1

Many thanks for taking your time to have a look at this 1976 CB750K model Honda.

Rice Boiler


Have a great week and I appreciate your time.


HONDA CB750 BRAT BIKE

Well, here we are with a 1974 Honda CB750 SOHC model that was turned into an old Land Speed dry lakes Racing bike many many moons ago, but have no real history documentation of what it achieved back in the day etc, but- you can be sure that someone thought long and hard as to what they may do with it.

Last year this was a total mess, it was too dangerous to even attempt to ride, so, it sat for some time in the corner of the shop of mine, until such time as I thought that it needed to have a new lease of life and restyle this inline four 500 pounder into something a little cooler.

As you can see by the photos below, it was not much of a looker but- it did intrigue me to see to what lengths people would go to with these iconic Honda Fours, and I just let this bike sit until I decided it was indeed time to resurrect this sleeping giant. I removed the Old wheel and Built 2 Brand New Rims, with Polished Hubs and Stainless Steel Spokes, Both 18 inch rims.

18

So, time has gone by and over the past few weeks I have changed a number of things and I am sure that you will notice a difference right away, this is NO show point for sure, I just went ahead and changed a few bits and bobs as I pulled the old rusty and non usable parts off and either refurbished, remade or purchased New parts to slowly transform this inline 4 into a cool looking Bar hopper Brat style machine.

Below is the bike with another Gas tank, fitted with a New OEM genuine Honda Petcock, then I have totally rebult the old carbs, vapor blasted and rejetted them to the pipe, the parts taken off were zinc plated, polished and re-assembled.

20

Some of you may not even like what I am creating here, that’s fine as we all have our own tastes, but, if you are reading this, then of course, you must be into seeing what is becoming of this Single Over head cam Motorcycle. I wanted a Brat style machine and every few days at a New part, some of the work I have created has taken many hours and sometimes days to get it right.

22

Just have a look at the front forks compared to the old ones, as I took them apart. cleaned everything internally, then Polished the lowers, fitted New genuine Honda Fork seals and then Brand New Chrome Fork upper tubes, with New springs and caps etc, I also set the pre-load with stainless washers, just like back in the old days of racing.

sling shot1

I also cut the back of the old frame rails as they were not good anyway, and then I made my Own steel Hoop and shortened the chassis to give the bike a lower looking stance, Whilst I was at it, I also fitted a Custom Oil Tank that I sell on my website, this Oil tank holds 3 Quarts and has a battery Compartment where I have fitted an Anti-Gravity 8 cell battery pack and managed to fit some of the electrical in there too.

slingshot 5

Also you can see that I made a seat pan and upholstered it with cool Old School style Diamond Stitching, this looks pretty cool and am surprised how comfortable the seat is, and just have a look at how much this bike has changed since I first acquired it, I have fitted new Diamond Treaded Firestone Tires to match the seat and both Rims are 18 inch and make the bike sit so much better than the stock configuration.

sling shot9

Now, As you can also quite clearly see, this bike has a TON of New or refurbished parts, the carbs alone are like New, has a super cool New polished Air-box that makes this Motor breathe right.The Motor has Black wrinkle High temp paint on it and is embellished with stainless Allen head bolts through out and Brand New Honda valve caps on the cover.

sling shot7


This Brat Bike now has some cool parts, like my Newest Prototype exhaust system, the “Sling Shot” This is a great set up that produces power through all the range of motion and sounds incredible, later I will add a sound byte for you to sample the Motorcycle Running. I have many parts now added to this machine and here is the list below of things that I have either rebuilt, changed or refurbished.

  1. Throttle Cables
  2. Clutch cable
  3. New Rims
  4. Polished hubs
  5. Stainless steel spokes
  6. New Firestone tires
  7. Polished hub
  8. Custom Stabilizer Bar
  9. Drilled and chromed rear brake pedal
  10. Drilled and chromed Kick starter
  11. Custom seat
  12. Hooped frame
  13. My own hand made bars -Chromed
  14. Biltwell grips
  15. New levers
  16. Custom headlight Chrome
  17. Polished Front Rotor
  18. New handlebar control switches
  19. Custom oil tank with internal Battery box
  20. Solid state regulator and rectifier
  21. New wire harness
  22. Finned engine covers
  23. Stainless Allen head bolts through out
  24. Wrinkle painted motor
  25. New master Cylinder
  26. New upper fork tubes
  27. New Fork cap
  28. Polished and rebuilt fork lowers
  29. Custom lower Fork caps
  30. New ignition switch and Bracket
  31. New Honda coils
  32. New spark plugs
  33. New oil and oil filter
  34. Anti gravity Lithium gel battery
  35. New chain
  36. Custom Airbox
  37. Completely rebuilt and vapor blasted carbs
  38. 1974 Gas tank
  39. New OEM Valve caps in valve cover
  40. Custom 4 into 1 exhaust with DEI  Wrap and Chrome


sling shot6

I am still working on this and not sure on a price, No title for it but will come with a Bill of sale when completed, I also will be adding a few videos for you to look around later and also then I will have another Video of the bike running, that way you can hear this amazing exhaust system.

A few months ago I got this running and I loved the sound when I had the raw steel exhaust on, this now has a high performance exhaust system and is look really cool.


Just a little Nostalgia today

Friday already- where does time go? it is crazy how quick the minutes tick by and before you know it you are almost in your grave.

So today as i have a lot to do, I thought I would add a little video i took with my Phone one day at my old shop 5 years ago almost, sure had plenty of CB750 honda’s to work on.

Hope you enjoy this, and have a great Friday Y’All.

Next is about 6 or 7 Years ago so not good quilty as it was my phone but at least you can get an idea of what I did and still do, Motorcycles are MY Passion.

Peace and Grease

carpy wall

Carpy