Honda Santee Chopper, replacing worn out engine covers

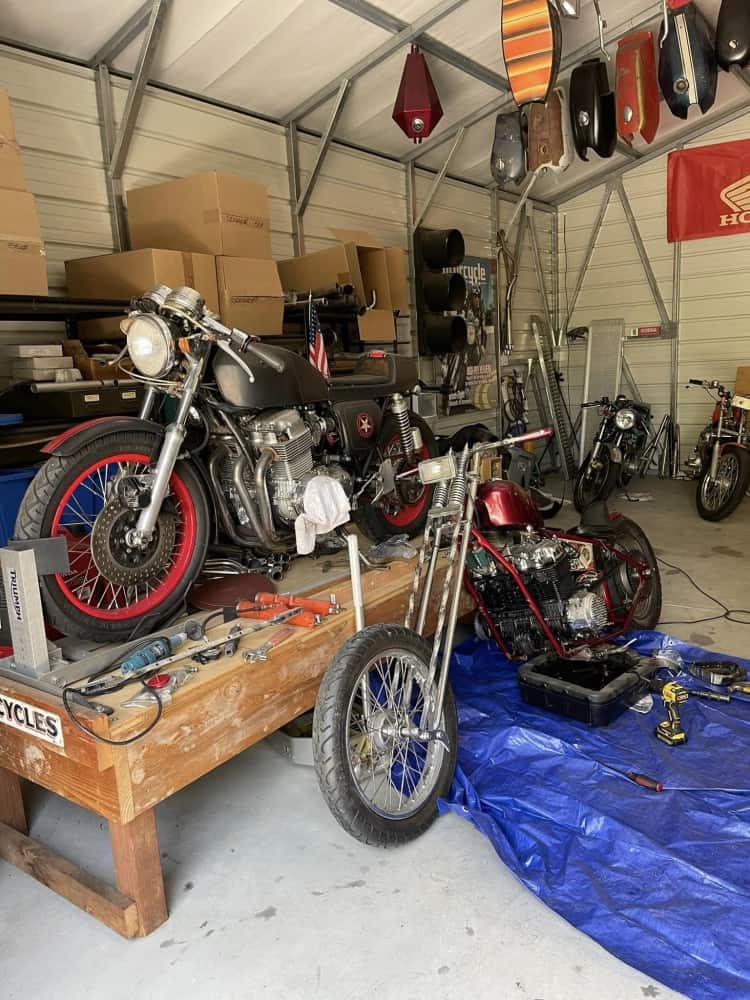
As you may know, I picked up an old Santee framed Honda Chopper in a Local Garage a while back, progress has been slow as I am making parts for it to offer to the Chopper builders that are all around the globe, but i noticed that the engine case covers were looking bad.

The covers had been chromed, and as these are aluminum, the material gets hot and then cold and sweats, causing the chrome to bubble as it can’t expand like aluminum does, so it had bubbled, peeled and then started to corrode the aluminum, so I thought I would try and repurpose some old spare covers I had by polishing them to a chrome finish . As you can see from the photo above, the transmission cover was removed and the old gasket was toast, so luckily I had a New one in my cupboard as well as other parts needed to refurbish this area of the bike.

I removed the stator cover, but it took me a while to get this sorted as that round dark blue plate that is on the starter collar, fell off and hid behind the crank sprocket, took me a bit to fish that puppy out but never lost hope and now it’s time to remove the coil winding and the infield coil that are screwed into the case, I also leant the bike over and placed a blue tarp on the floor, as I did not want to drain the New oil that’s in the bike that I put in when I got the bike running for the first time, I knew I would lose a little bit of oil, so placed a catch tray under the chassis to save any catastrophes that could occur on jobs like this.

Make sure that when you remove any Factory Phillips shaped screws on your Honda- That the screwdrivers are JIS models. ( Japanese Industrial Standard) as regular Phillips screwdrivers will most like round the screw heads off.

What is the difference between JIS and Phillips?
JIS, or Japanese Industry Standard screws are just different enough in shape that Phillips drivers will not fit well and slip/strip them. The difference is in the leading angle of the point of the driver. Phillips bits have a larger angle and therefore don’t bottom out in the JIS screws, causing slippage.
Also, make sure that you use OEM Factory Gaskets, as the aftermarket versions not only fit badly, usually the holes do not all line up and the gasket seems to be inconsistent in thickness, I did learn the hard way, thinking I would save a few bucks on the cheaper brand, only to find I had to take the case all apart and fit OEM ones to stop the leaks.
Glad that I managed to get some time to work on this old girl today, she was left in an old garage in La Mirada for many years, sat on a pile of dirt and then covered with years of hoarding, so I will be happy to have it running and use it for a bit, before I put her up for sale, its a good looking rig now and I am sure when I have the New Stainless exhaust system on, it will find a new home ok.
I have lost count of how many SOHC motorcycles I have built, let alone worked on but in the hundreds for sure and always something different to find on some, I love what I do and continue to offer service for customers all over the world.These inline four Motors are fantastic machines and have given me many miles of smiles once they are tuned right.
Covers are on now on this side of the bike, still got to add a finned cover on the stator and fit another gear shifter as the old one is a horrible welded thing that I do not want to use, then I need to turn the bike around and remove the clutch cover and give that the same treatment.
On closer inspection of the front drive sprocket, I see a couple of issues here, the offset is out a little as the sprocket is wearing against the side of the chain and secondly, the sprocket that is fitted is an earlier version 530 and 77 and 78 Motors had 650 chains, I will fit a 540 but will address the issue here and have a sprocket on the way as I do not want any dramas of the chain breaking and destroying the cases.  Also, Chops have super long chains so need to count the links so that I can buy a custom one to replace this tired version.
The Old girl was looking tired, dirty and in need of a good clean up before any polishing can take place on this part, I always like to vapor hone these, that way the material is super clean and ready for some serious polishing, using some good old Jewelers Rouge.
Time to change the look of this 40 year old girl and turn it into something fresh and clean and to be honest, look like a brand New factory part, now I could refit the part in its OEM look but want to polish the piece to a chrome finish seeing this is a Chopper and not a restoration bike.
Now you can see how different that the Clutch cover looks after a process of vapor cleaning and now this part is ready for another transformation and get it polished up for that Custom styling that is so popular.
I am going to try and vapor many parts before I polish, as it makes everything so much easier to buff with no oil residue or grime in the way when I begin the Polishing stage, I am sure that you agree that this way is way better than the old school way? Now, the stator cover that’s on the bike is chromed and all peeling off, I want to use a spare old Stator cover I have and will vapor hone it to make it clean before trying to polish it.
This  spare old stator cover was just as tired as the other parts on the inline Four, and I am sure that yours looks in the same way too???? This Chopper will not be a show winning machine but a traditional Custom bike that was created back in the day and want to try and show what was in the magazines in the 70’s and 80’s when these were seen all over the place.
There is a bunch of old dings and scratches in the stator cover but many will buff out luckily and then it will have an old Finned cover going on the outside to embellish the engine as I have other finned covers on the bike, also these parts are getting harder to locate and finding some parts in my boxes of old stash came in handy but of course, still needed a lot of work, but the other one on the bike had been chromed and was peeling off and oxidizing badly, so this is the better way to replace it i think?
There is still a ton of stuff to do on the bike but wanted to share this with you today as it’s almost the weekend. Here are a couple of little videos that I took with my phone to show you what I am doing as the weather was raining outside, hope you enjoy?

New Products Coming Soon

Well, its been over 23 Years now since I first started this and I have always enjoyed the journey, anything to do with 2 wheels is a plus for me and I am sure it is for like minded folk like you lot, who have followed me all this time and repeatedly purchased my products for your ride or friends etc.

I think I am now going to push the envelope a little more and start to offer parts on a wider range of Motorcycles as well as different brands too, making this a One Stop shop in a way, I always like to help people complete their ride and this will be a bigger website with a faster load capability.

I am pushing as hard as I can to continue to help everybody out, as I now have my Very Own Barn/Workshop now, I can start to slowly increase Products and offer them to you direct from my place, I am going to be trying a few different Exhaust systems and on slightly different models, as I want to cater for many cool rides that we all enjoy.

I will be visiting with a few well known Manufacturers of other parts too, so hope to cover an array of two wheeled Motorcycles and get you the best price for your hard earned buck.

My exhausts systems are still going well as I have $100 off them right now and as gas is so expensive I thought I would leave them at that price for a while and give you a great deal.

From completely rebuilt front forks that are polished, new uppers and new seals and springs etc, ready to bolt on and go for your ride, to OEM parts for your 500 -550 or 750 Big 4 Honda.

I hope to help you all and also I may start to make videos like I did years ago to see if I can help any of you when you get stuck on a project, you can always email me at carpy@carpyscaferacers.com with any questions and I will always get back to you, failing that, you can call or text me on 714-598-8392 for a faster response, I am here to help.

Thanks for looking and pass the word, I love what I do and hope that you do too?

Rebuilding Old Set of CB750K forks 1974 HONDA

For many years I have rebuilt my own forks, and the transformation is so abundant, I wanted to share what I do in the Barn with you lot and maybe you can have a go at resurrecting your own set?

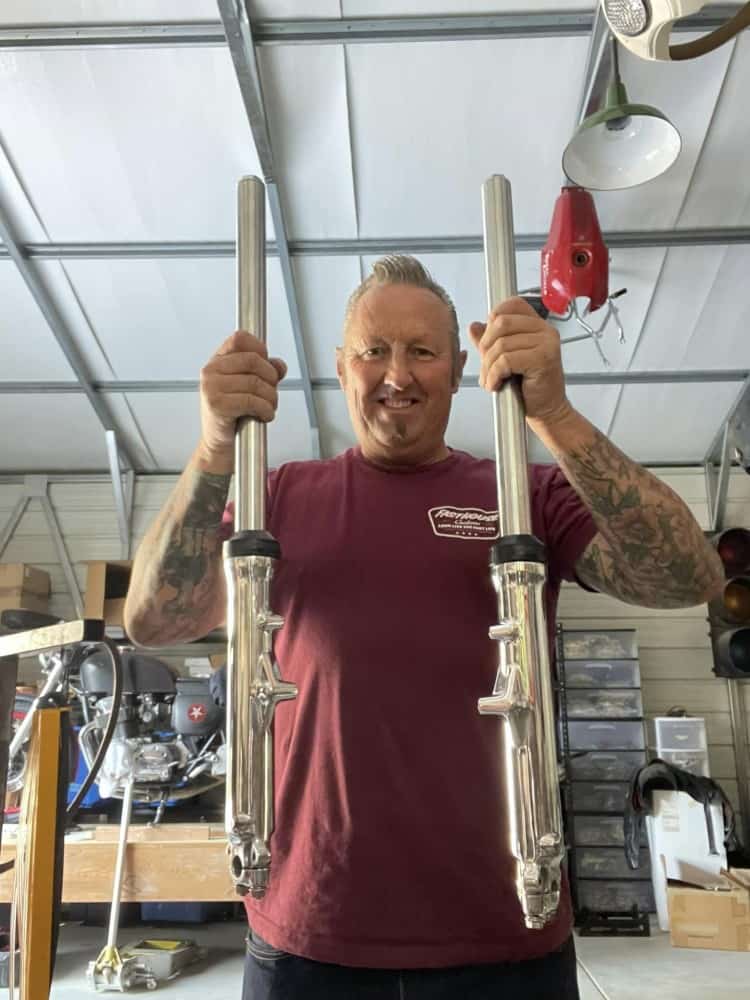
These tired front forks came off a 1974 CB750 K and Customer wanted Rebuilt and Polished suspension, so this is what I did to these old girls you see here.

The Lowers needed to be stripped apart and then sanded and cleaned then I will polish them to a Chrome finish for that Custom look, lucky Honda cast these quite thick so plenty of meat to polish by hand.

The upper tubes are toast, this is a common issue with the forks as originally Honda fitted fork covers and the  condensation in different heat simply left water droplets sit here and slowly rust the chrome away and into the tubing, you would not notice at all until you took the fork ears off the bike.

I have taken these apart and bought replacement Chrome tubes, then I sanded and buffed the lowers to a mirror finish, I covered in cling wrap to keep clean whilst I assemble these so as to not scratch the surface.

I slid the dampner into the fork tube and then inserted the upper tube into the lower stanchion, this is secure by a Bolt with a Copper washer right under the fork leg, secured with allen wrench and began the rest of the rebuild of these forks.

I have fitted so many of these Fork seals over the years and people always ask me, which way up do you fit these, I tell everybody that when you fit Honda seals, the ID Numbers should be facing you when you look at the seal seated in the fork lower.

Also, many people ask me how I fit my seals into forks, I have seen people use scary tools or hit with a screw driver, usually ending up tearing or making a hole in the seal, so what I have always used is a piece of PVC that I bought 20 years ago from Home Depot, this is the perfect size to insert oil seals .

I simply slide the PVC tubing down the fork leg until it sits on the seal, it fits perfectly and will not bind up as this makes sure that it is level when you tap the seal into the fork leg.

Personally, I use a Rubber Mallet and tap the tubing until I feel the seal bottom out on the inner shelf the fork has and then I know she is all the way home as you will feel the resistance right away and you can see the recess in the fork where the snap ring goes.

Some Honda’s have these snap rings, or as we call them in England ( Circlip ). But some early models had a spring clamp, but this is a snap ring that sits in the bottom of the cup of lower fork and secures the seal into the stanchion.

I use a set of Circlip Pliers but long nose pliers will do as you need to squeeze these together to slip into fork lower then release to lock seal in place.

I then slide the New Dust cap that I sell many off from the website, over the tube and down to the lower, it simply pushes on and sits tightly over the end of the fork and dresses it well.


There you go, nice and snug over the lower fork and easy to fit to be honest, and this job can be done pretty much by anyone with minimal tools.

I used New Stainless Lock Washers and Stainless Flange nuts for the bottom cups to finish them off nicely and its ready for Fork oil which is 5 ounces, I use Automatic Transmission fluid, always have and I throw in a couple of stainless washers on top of the spring to set the preload that I like.

And there you go, ready for the customer to fit back onto his Motorcycle and have fun on the tarmac, just thought I would do a little blog on what I do from time to time as many ask me for tips etc, thanks for watching.

The transformation is so cool to see, I often stop and look at what I have accomplished and you will do the same thing for sure.

So have a go at your ones, you may surprise yourself and save some money at the end of the day too.

Any info you may need about anything bike related, email me on carpy@carpyscaferacers.com or text me on 714-598-8392 I am here to help.


Little bit more drilling, but this time, the Front Sprocket Cover.

Another day and some more Therapeutic drilling to do, this time I thought I would show you how I drill the Front Sprocket cover, just to give it that Custom look from the standard plain version.

It is totally up to you, how far and wild you want to go with your sprocket cover, but I love doing this as it is calming and I enjoy making pieces like this, not one pattern the same.

I always secure my covers onto an old piece of ply wood, using a drywall screw and some washers, this holds it fine, then simply get the drill out and an assortment of drill bits. make sure you wear gloves and goggles as you will get plenty of shavings everywhere, so keep a Vacuum handy too.

Yeah I know, Swiss Cheese, but I really like the look of this and having the Lightning holes is a reminder of yesteryear of the old racers etc.

This takes about an hour, but all depends on how intricate the pattern you are going for, I simply fire the drill up and just go for it, no plan really, just see where it leads me.

Looks a lot different when its all polished up eh? and I always smile once I have completed one of these pieces and boy does the Sun catch the Aluminum.

I have made about 50 of these over the years and they are always a different pattern, its fun to do and once you start, you will be happy that you did this.

Another one I did, these are like Jewels when polished up and really do change the look of your Custom Ride, so if you are bored at home, dang it- have a go at this.


Fitted on my CB750 and changed the look of that area right away, I get many comments on the drilling, so it must grab people attention.

Let me know if I can help you with yours , as I drill many of these and really do enjoy the task of changing them from boring solid plates, to Custom pieces.

Thanks for reading my little Blog and maybe I have inspired you to have a go at home whilst you are in lock Down.


Summer is here and time to get back on 2 wheels

We are so lucky here in Southern California, we are blessed with Sunny days most of the year round, albeit the price we pay is we get Earthquakes and we got a couple of big buggers on July 4th and 5th, with a few aftershocks on their way.

But other than that, we are fortunate to have year round riding weather, but thats not the case for most of the other parts of the USA and the world etc, especially places like Canada etr.  They have a very short riding season and its this time of year that many riders are slinging their legs over the two wheeled creations and pounding the tarmac.

If you need parts, well I am here for you all, as well as any enquiries as to how to hopefully come up with an answer to a frustrating system on the bike, maybe Carburettor issue ? Bad coils? or what oil and plugs do you recommend etc.


My job is to help you get your machione on the road for the first time or, for the millionth time again, its all good and this really is the best time of year for the two wheeled industry.

I love what I do and if I can help you get you back on the road, then I am a happy Bloke, I can help you with many parts, I have been doing these cool Vintage Stke Tuck n Roll seat assemblys for the K series Honda’s for many years and they turn our great, fit well and are comfortable, but more than anything, made by me right here in California USA!

So, have a great Tuesday and if you need help you can email me at carpy@carpyscaferacers.com or even Text me on the same number for a faster response. I ship out the same day if I have the part in stock too.

I make parts for Triumphs too, so stay tuned to the website if you have a Twinline Motorcycle and need help with that as well, this seat style I make for the HONDA and the TRIUMPH and was the first to do this style many years ago and continue to push the enevelope in making new parts for the bikes out there .

Thanks for reading my Blog today, I try and keep you up to date with whats going on, if you have a 350 to a 1000 I can usually accomidate you and get you back on the road fast, but i also have a passion for Motorcycles, been into these bkes for decades and thats where I get a lot of experience from as I have ridden them for so long.

Have a fun Tuesday and hopefully you get some time to wrench or ride on your favorite machine out there.


Love what I do here in my Garage

Been doing this for close to 20 years now here in Southern California, always fun and challenging to say the least- I have lost count of the thousands of orders I have managed to be lucky enough to generate, through you people, I am stoked that you enjoy my blogs and my parts, as well as builds and my reply to emails when you are stuck with your bike.

I continue to push the proverbial envelope in this great and very competitive market that has now emerged in the two wheeled lifestyle, and its great to receive word from well known companies that let me know that I in some way have inspired them not to give up and keep trying.

I am trying to make more parts and stay tuned to my website as as soon as they are ready i shall do a quick Blog to show you have they fit and look etc and then put on the website to make available to you right away.

Thanks for all the great emails and texts etc, I am busy with a number of things, from Vapor Honing parts, to polishing and chroming, as well as making new parts, drilling hubs and working on my Vintage Hot rod too, never a dull life here in La Mirada thats for sure. Thank you again and as we enter into the 243rd year of this Great Country- I wish you all the very best and look forward to helping you any time.  Have a super week everyone.


Custom Drilling and Polishing Service

I probably have built close to 60 motorcycles over these 19 Years in Southern California, and many people have asked me about the detailed parts that I have created on the many Custom machines that I have completed.

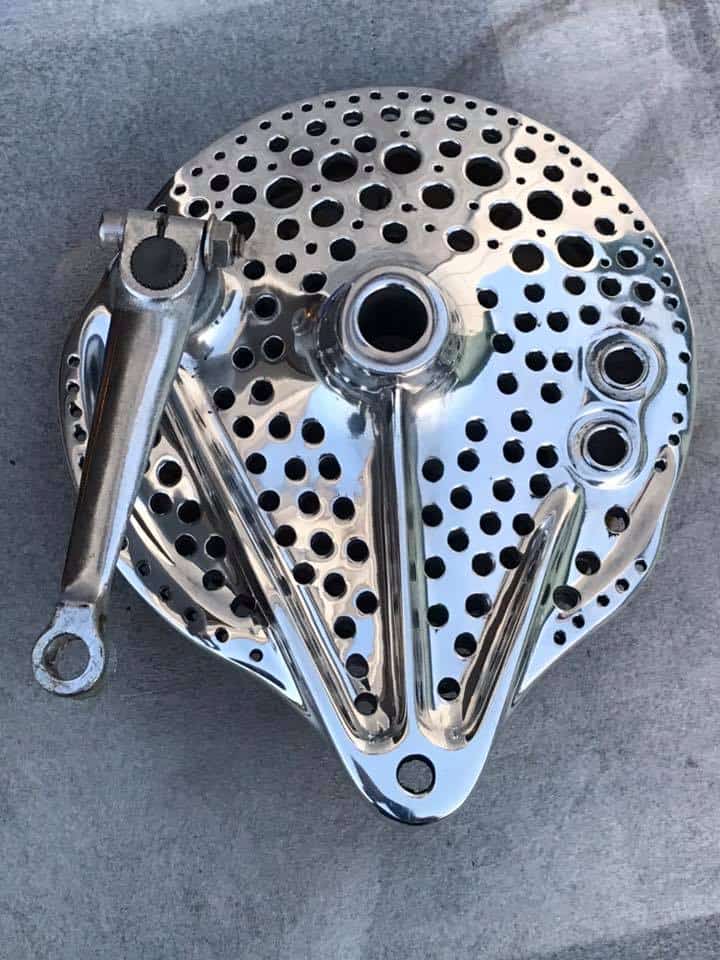
I also have been drilling the rear brake hub for many years and have always liked the look when they are polished and fitted to the hub of the bike, they of course help with Heat Dissipation, and of course, gets rid of any brake dust.

So, after a few years I thought that as people kept on asking me about these rear brake hubs, I will offer a service to Customers for their bikes and i am happy to say I have drilled over 40 of these for Customers all over the globe.

No two Hub patterns are the same, I do not have a set pattern, I just go with my flow and see what happens and they always come out really well and get many comments about how the set the rear end off so well.


Also, Me and my Brother, were trained as polishers for Rolls Royce back in England in the late 1970’s and I have always enjoyed Polishing, something about ” You Can polish a Turd”.

Of which Right now i also offer my very own “Turd Polish” Of which has taken me 40 years to refine and have now sold quire a few cases of my product and they all contact me, informing me how awesome the magic past is as polishing Aluminum and Chrome, as well as Brass and Copper etc.

But, I had three orders for Drilled Brake Hub Covers this week and wanted to show you what they look like on here, just so you can see what I do.

If you need some inspiration with your machines rear brake hub, drop me a line as i can change the look of it and of course fit New brake shoes and springs, as well as New actuator arm too, just fit back on and you are ready to go.

Let me know if I can help?  The service is already on the website, so go check it out and if you like it, order one from me, takes about a week from the order but- You will be glad that you did thats for sure.

Other Parts that I offer to customers is a Custom Drilled and Polished Front Sprocket Cover, as the stock ones always look so drab, plus I enjoy doing this service.

Below, I take my time and just start as I mean to go on and over the years I have done over 50 of these covers for Customers and shipped all over the Globe.

Once I have go the pattern I like, well its time to take off the Block and then clean it and prepare it for polishing up to a Jewel finish.

So, this is the last you see it as a Dull color, time for my Turd polish and some good buffing and off we go.

like I said earlier, every one of these that I drill, is always a different pattern, that way, none are the same.

So, just let me know if there is something that I can do for you and your inline four machine, as I really enjoy making these Custom parts for people.

Thanks for looking and I shall be adding these services and more on the website, so keep checking back from time to time.


CB750 Creation ” The BRATSTER”

Over the years I have built a number of inline Four machines as you may well know, I have always liked these Motorcycles because I used them as a Courier Bike back in the UK, they were Affordable and reliable and lastly they were an awesome Platform to be able to adapt to how you wanted the machine to look.

1

Beauty is indeed in the eyes of the beholder, but with this bike when I first picked it up, it was in a bad way and needed help, but, trying to change something on a shoe string budget is some times almost impossible, so when I pushed this bike onto the Concrete and saw the potential, well I had to at least give a go eh.?

2

This old Girl was a 1974 CB750 and many many Moons ago it was Created to be a Land Speed Racer, I have a little or know information on if it ran, where it ran or what speeds, it was very poorly made and to be honest, too Bloody dangerous for me to sling my leg over and have a go up on the dry lakes for any record.

6

It had no title and was leaking oil and looking very sorry for itself when I parked this 500 pounder up, but once I had made a Brew, sat back and thought for a bit, I knew I could at least resurrect this CB750K Model in to some sort of head turner.

9

So, with pen and paper in hand I jotted down a few ideas and came up with the idea of building a fun little Brat style Bike that would have a Chunky look and feel but real fun to ride.

7

After a day of Mulling around , I decided that I would get the Motor running first and if that runs I will then go from there as this may take some time as it was not a commission for a build but a cry of help as I bought a few bikes off a buddy who needed space in his Garage, so this would be an on going bike and Not at all a show bike, just a tough Motorcycle that would probably suprise a few motorcycles at the lights as it buggered off into the sun set whilst you are watching it disappear into the distance..

8

The bike had a terrible set of gas tanks made from old alloy Cylinders that were Bolted to some old Nuts that were welded to the frame, there were parts hanging off that shouldn’t even be on there, so I decided that this would be a Brat style and I am going to change oil and plugs, add some coils and Battery and rebuild a set Carbs to see what we have hear, as there are no carburetors on this bike at all. So off I went in search of some carbs, and took an old blocked up set I had as spares apart, cleaned, re-jeted and fitted to the old Dry lakes Bike.


Below I have fitted Carbs and a exhaust to see how she runs and it is now tuned and am happy about the sound and crisp response that my 4 into 1 systems make.

My ears were ringing and actually Blew the Sub-woofer out in the workshop because the bass not was so strong, but a minor price to pay to now know this motor runs hard and true.

20e

So, as the rear end of the bike was missing, I thought I would massage one of my rear Hoops I make onto this frame and create a Brat style bike that will be so much fun to ride around on.

20h

An easy job and looks great, so I can later make a Flat seat with New Foam and Diamond stitching to give it that Brat look that is so popular right now over here.

10

The old 16 inch rim had a massive sprocket, I think 170 or 200 teeth, erm, not for the street for sure , else it would wheelie everywhere ha ha, so removed the rims and rebuilt a new set but Polished the Hubs from this bike and laced with stainless spokes.

19

Now that looks a lot better and now ready for the Rubber to go onto the outside, this time I thought I would spare no expense on the tires as they are an important part to make sure these keep you on the tarmac, so opted for a Set Of Cokers Tires and I am going to make a Diamond stitched seat later so wanted tires to match in a way.

20d

I also removed the forks, rebuilt and fitted New upper tubes, as well as Rebuild brake caliper and refurbishing the old rusty brake rotor too.

20a

A lot cleaner that it was when it first limped into my hands and am real happy at the way this is coming along, as I said, no show bike so not removing the motor and painting a frame, this will be a fun bike with a few new parts or refurbished ones at the very least.

112

Above, I repainted the Motor and detailed it with Stainless steel Allen bolts and I wanted wrinkle paint this time to help dissipate the heat when riding.

99

Getting there, Rebuilt Carbs, new boots and a cool Aluminum Airbox made this Motor breath and respond so well, its the devil in the detail or carboration that wins the race.

20ab

Now the job of fitting Headers and so many choices from the styles that I have created for these 500 pounder machines, but the bike is taking shape now and I really like the way it is going.

20aa

The Motor looks great, I also added a cool Oil tank with a Battery Box already inside it, so this will really look trick and can hide some of the electrical in it too and clean the frame up some more.

26

I wanted to use my Newest design exhaust system, the Side Winder, this breathes like a New Nose and wanted to also Hot Rod it out by wrapping the headers in Titanium Heat wrap, it sure came out well and this will look great perched in front of that inline four engine.

27

Now, that is a lot better and glad that I went this route, I have sold lots of this heat wrap and this is the first time that I have used it and as its Titanium it doesn’t fall apart like that cheap fiberglass stuff thats out there does.

28

On the Arse end of the header I wanted to fit my New Sidewinder tail pipe with the Yoshi style Baffle, and boy does it look great and super stoked that I did go in this direction.

24

Next up I need to make a seat pan to cover the Battery tray and oil tank up and will go simple with some 18 Gage steel and then will add foam and upholster in a Light Tan Naugahyde material with Diamond stitching.

25

Simplicity is the name of the game for this machine and I am now cutting the foam to fit the seat pan that I just made, this is almost there, maybe another half an inch of foam then upholster.

22

I am now happy with the thickness of the Foam and am looking forward to seeing this with a Light Tan seat ontop of the frame, I feel it will be a good contrast. so lets go and see.

53

Way better now, I also added a Blue frame to go with the old 1970’s painted gas tank i found and think its a good combination for this creation, it is a tough machine for sure.

49

The Brat sits well and with the Custom Oil tank that I now offer on the website, it runs well and uncluttered like man I see.

Added some NEW Handle Bar switches to make sure that all works well and stays like that, no faded grey crap like you see on so many on the internet these days.

37

My Custom made license plate frame with Hot Rod stop tail light assembly looks great and another thing I produce and sell on the website.

Tail light tells you when you need to stop too, neat eh?

81

This bike runs hard and strong and was so good to see it back up and running again, after years and years of neglect, if she had a face she would be smiling, that I am certain of.

52

The Bike also has my Own Handlebars that I designed and had mandrel bent and chromed, and gives that bike that Period look of the day, it sits well and rides so comfortably too.

59

A strong machine and this has already been sold to a customer and is now residing in Canada, my fruits of labor paid off and the new owner is super stoked to get this bike from me.

90

My Bulldog Bailey standing guard as I get some snaps, before it heads of to Maple Country.

82

Hope you liked this little resurrection? I sure had fun creating this Motorcycle and Glad somebody is enjoying it right now.

96

Added a Fog light for that European look and something the New owner is going to need up there in Canada, so just another cool touch to show this motorcycle Bratster off a little more.

DSC_0056

A tough little Machine with plenty of swag, and I am sure that it will get many looks in the warmer months.

110

Big transformation and I did more work than I thought I would do and sold it way too cheaply but hey, its all fun at the end of the day and I enjoyed creating this bike.

DSC_0005

If you want a Motorcycle created, or just parts etc, drop me a line carpy@carpyscaferacers.com I am always glad to help or just advise, and you can also call or text me with questions on 714-598-8392 and I will do my very best at helping you with your own creation.

DSC_0030

Thanks for reading my Blog on building this machine , and many others I have created and still continue to.

DSC_0040


I fitted 2.5 Analog gauges and also made a Neutral light that is fitted into the steering stem nut, plus New master cylinder, New levers cables and Grips.

DSC_0020

Another thing I did was add my headlight ears that I sell on here as well as the cool headlight with the internal LED Turn Signals, as that cleans the front end up, I fitted my Fork Brace too to stiffen the frnt end as I removed the fender, many dont do this and have floppy forks.

DSC_0049

The heat Wrap I now sell on the website too, in Black or Tan, both look great and clean up your old headers to revamp them, 50 feet is enough for your headers and I used two inch wrap.

DSC_0042

Thanks again and another Build leaves my place and I am now looking at another creation, appreciate all the cool comments whilst i was building this, have a great week.

DSC_0071