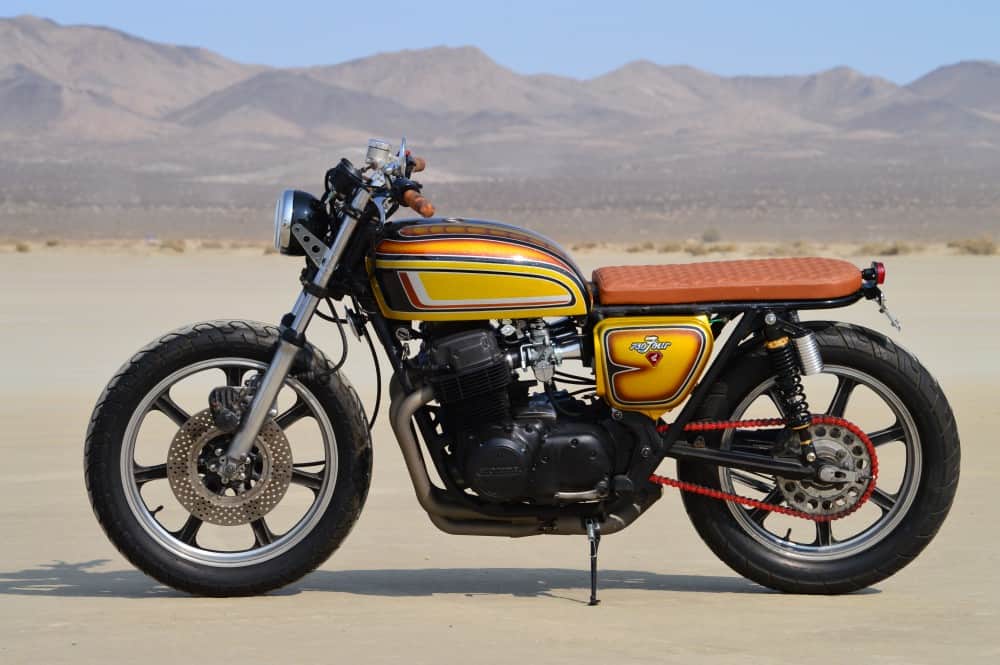
Today was a good day, you know what its like when eventually things start to go to plan, albeit around the houses a little but I did get the end result that I was seeking and today I want to share with you how far I got on with the Vesco Honda CB750 Today.
Tag Archives: cb750k
Vesco Honda build so far.
Well, I was lucky enough to get a call from a film Producer, they are doing a TV Commercial this weekend and needed a couple of bikes to use, so I let them take my Sportster Cafe and this Vesco Brat, as its not finished yet but pretty much altogether now.
But wanted to share a few photos of how she is right now as its getting closer to be able to ride, that will be quite exiting as it had not run since the 1980’s, I have fired her up a few times now and happy with the idle and the oil pressure, so this week I shall be able to fire her up and take the bike for a quick run around the block and see what happens.
This gas tank needs painting and I have side covers for it now, just need painting etc, thats why you can see all the electrical and the oil tank, but once it is painted and side covers fitted, the bike will look a lot better.
What then? Well not sure, depends on how the bike runs and handles to be honest, but this coming weekend, Jennifer and I will load the bike up and go to EL MIRAGE, to watch the races, meet some friends and to ride this about a bit. Sure it will get covered in dirt and dust but, if I am to strip and rebuild this into a show bike, thats not going to matter as dirt wipes off right?
The gas tank and side covers later will be painted a Yellow color, just wanted something really different, so we shall see how that goes.
I changed the front headlight from a 7 inch to a more compact 5.75 version, and to be honest, i really like the look of this on the bike, so will be keeping that on there.
I fitted New foot pegs too, as the old ones were so bent out of shape, this will make for a fun ride, the Brat seat has soft Leather and memory foam, so another bonus there to ride on the dry lake.
I also used my Own brand of handle bars, these are the Euro-Tracker Bars I have had hand formed, then triple chromed and I do love the way they lay on the bike and give the whole machine a different look and feel for that matter.
Yes, its not a finished bike, but- you have to get a bike going to see what the issues are before pulling it all apart and throwing all your time, money and hard effort into a project.
I also pulled the old rusty rims off and had a set of Original Lester wheels that came off a CR750 Honda, the front wheel is dated 1978 and the rear is 1977, the front is a 19 inch and rear is an 18 inch set up, these are getting harder to locate these days and wanted to use them.
I did change out the swing arm as the old one had been chromed back in the day and the elements had gotten to it and it was as rusty as the Titanic’s Crapper, but I am thinking of remaking some Boxed swing arms again and will offer them on my website when available.
I had noticed that the Kick stand on the bike was an old 70’s Chopper one and it did not sit well, you had to push the side stand all the way forward for it to stay, I looked closer and noticed that some of the frame bracket has broken off many years ago and that is why the side stand would not stand upright.
My trusty Miller Mig welder helped me out and I built up a platform again and used one of my own kickstands, and now it sits right, and am happy with the look of it now.
The shocks were pretty knackered on the bike, so i chose some aftermarket SRC piggy backs, they work fine and are Liquid Nitrogen filled and sets the stance where I want it to be honest.
My 4 into 1 I had fitted great but, this time I wanted to cut the tail pipe right back and fit the baffle just before the turn out, for a more aggressive look and I really do like the look of this system and it sounds pretty tough to say the least.
Later on when I strip the bike down, I will clean up the Lester Rims and re-paint them and add some Knobby Tires, but I am in two minds whether to change the front end for a CBR or, stick with the traditional fork set up and just rebuild the fork lowers and add New Upper tubes that will be 2 inches shorter. The front brake works and thats surprising for how many years it has been sat, its functioning but will of course totally rebuild that or fit newer brakes as I am a dealer for Beringer and may fit their set up, but all depends on funds etc.
It is all to easy to let a Custom build get away with you, financially, I have created some awesome machines for customers but, if you start to add a modified engine, you will be into $5000 in a flash just in the engine itself, these bikes are fun and fast enough, you really do not need a big cam and heavy duty head studs but if you want response, just port and polish the head and go no bigger than a 3/4 street cam.
I love the stock ignition system as they are dependable, I am not a fan of electronic ignition systems and points take very little maintenance, if you keep it simple, you disperse any issues with modified stuff, most of the time its a waste of money as many that have bigger displacements have over heating issues or head gaskets blow and for what? 10 MPH? Just have fun with your bike, a good pipe and jetting is more than enough for many roads here, of course if you are on a race track, thats a different game all together , but just watch your budget on these machines, as it can easily get away from you and you then tally all your receipts up and have a small heart attack when you add it all up at the end of the build.
So for right now, I will run this old bugger around with a painted gas tank and covers but the rest as she is, as I want to put a few miles on her to see how the motor responds to daily life, then- when I am ready I shall pull back off the road and strip the bike and create a cool Brat bike thats fun to ride and easy on the eye.
Of course I offer these for sale, as thats what I am in business to do, its hard to let them go but I have a New Scrambler I use for riding about and it makes it a whole lot easier to let another creation go off into the sunset and then, the fun begins with another creation.
So, its a Sunday and I have taken a couple of photos and blogged on here today, she is looking pretty fun now and YES of course if someone wanted to Purchase this machine from me as is I would probably sell it, as I love create machines from junkers that have not run for years, but I shall still add more bits and pieces to this machine until I am ready to tear it all apart once more.
This Vesco Brat has a really cool ride stance and I am glad I took a chance and grabbed this inline four, its a fun ride and more to come too.
Hope you enjoyed my Blog today and of course I put the build up on my face book too. steve richard carpenter or carpys cafe racers or carpys garage you can look at any of them pages too.
Thanks for reading and have fun with your project.
Little bit more work on the Old Vesco Honda
Well, here we are, been away on the East Coast but now need to play catch up as I have this Vesco bike to get up and running, and then I have to plan a build for a Customer all the way in Iceland, so that’s kinda cool.
But, as I was away I had time to collect my thoughts on this machine, it needs tons of work but will be fun and I have gone with the concept of getting the bike to run and see how reliable the engine is, maybe take it for a blap across El Mirage Dry Lakes in a few weeks and then, if I am happy with the old snot Monster, then I can strip her apart and build a nice Custom machine out of it for someone to have fun with.
The Motor runs as we all know now and I am happy about that, but now its time to clean out the gas tank and get some paint on it, so I have used an old knackered gas tank as a mock up as I still need to make a seat base for this ride, and as it is going to be a Brat style machine, I need to get about and cut some of the frame to allow me to fit my special Steel Hoop Inserts and then I can set about making a flat seat base for it once the hoop is all cut and welded in.
I make sure I drill a hole through the tops of the hoop and the frame, then- when I insert the slugs and tap the hoop to Butt up against frame, I will be able to spot weld the holes first and then weld the Butted join for more strength.
So, just some Gloss Black paint for now so it doesn’t rust, later on when I am happy about how the bike rides, handles and sounds, the whole machine will be taken apart and I shall bead blast the frame, smooth the welds and then modify the frame a little more before I go for a Custom paint job, but this is the length of the frame I am looking for and can go onto make a seat base.
As you can see, it looks pretty good, I used Automotive paint to spray the tail end, but I have so much more to do, its taking shape a little bit each day and that’s what I like.
I used an old piece of 1/8th inch steel plate and this is more than ample enough to support my fat arse and will be good to upholster too, yes of course I will clean the surface rust off when I am ready for Upholstery. I was lucky to have some old steel plate in the garage, so no cost involved at all, thats always good right?
OK, the steel is now cleaned up as it was only surface rust and a quick going over with my Air sander sorted that out, when you see the base it looks pretty long but, it is just the length I am looking for as you can easily sit your arse on the bike, and you have enough room to strap some parts or luggage on the rear if you so need, I mean, Motorcycles are still supposed to be practical right?
Now the seat base is done, I just need to weld some studs underneath, as I am going to have them go through the cross brace behind the battery box and can then plop the seat on and add some flange nuts underneath to tighten, I will also add a bolt at the back of the seat to keep everything secure, as well as a small half moon plate on the inside of the hoop, just in case I want to add a tail light or license plate there later. You wont see it as its hidden, so if I chose not to use it, no harm done.
Up front I chose to go for some cool Custom 7/8 Grips, this time I liked the look of the Marble effect that Cole Foster makes, they really are comfortable, so a good choice, you will notice New handlebar control switches as well as New clutch lever and cable fitted to this machine.
This bike didn’t have any gauges at all, so I chose to go for the good old 2.5 mini Gauges, to keep everything neat and tucked away up front, eventually I will polish the triple tree and fit new front forks.
The old carbs needed going through and re-jetting as I am running my Exhaust system, I also fitted new throttle Cables and Bell Mouth velocity stacks for that yester-year look, I made sure that I also fitted brand new Air intake manifolds and used stainless hose clamps with rolled edges. The over flow lines are braided hose and at $4 a foot, they aint cheap but work great, the rubber ones you usually see dry out in the California Sun, so want something to last, ad these Aircraft hoses are just the ticket
Well, thats as far as I have got done today, will take more pics tomorrow, enjoy your weekend everyone and thank you for following me on the Vesco Honda..
Weld in Gas Cap Bung Project
Howdy all
Well my task this week on the old Vesco Honda was to try and get rid of the ugly gas cap and spring lock that the stock Honda’s have, for a start, this one was corroded beyond any help and I had to literally force the bloody thing open if I need to get gas into the tank and then, I could not snap it shut.
So I though I will go ahead and cut the old gas cap and neck off and use one of my own Weld in Bungs that I sell on my website, when in Rome right?
So, with gas tank in had, I placed it on an old old table and then proceeded to get the grinder with a cutting wheel on it, now, make sure that the gas is well and truly vacated that vessel, else you may be like one of Spacex Rockets and heading out of the ionosphere if you put any spark to it.
Lucky for me I had washed it out and aired it for some time, I still used an old BBQ Lighter on the end of a pole and lit it, just in case any fumes were lingering, usually you may get a pop, but nothing this time, so I knew I was good to start cutting away.
I removed the gas cap by simply using a metal dowel and tapping the holding pin out, the same as the clasp too, and now I am ready to bung on my Goggles and start the grinder up with a metal cutting disc inserted. many a spark I must admit but all good, just took my time and went in both sides and she came off pretty fast.
So – all that was left to do was to use a Flap wheel and grind the neck flat and any old paint must be removed to allow me to weld a bung in later.
With that all cut off, I test fitted the bung and it was perfect, so stoked to get it to fit snug and now with a little more metal cleaning around the top of the tank, it was time to weld it up.
Then, using a Sincrowave 200 Tig Welder and Bronze rod, spot weld the bung into place, moving opposite to disperse heat evenly and not cause any warping etc.
Once spot welded it is then welded slowly and bit by bit until the whole edge of the bung has been covered and is uniform, that is now done and looks so good to how the stock one was.
The next after it has cooled is to start to get rid of the old paint, I was not going to use paint stripper, that stuff works well but is so messy, I thought this time I would use a DA Palm Sander with 80 Grit paper and take the paint off the old way. There was Green Primer, Blue, Maroon and Black paint in layers on here and that sure would of made a mess with Aircraft stripper thats for certain, so sometimes the more traditional way is the best and to be honest I enjoyed the challenge.
Took less than 2 hours all told and now I am ready for paint, just got to decide how I want to go with color and design but I wanted to share this gas tank project with you lot on my website so you can see how it is done. it gives you a little sense of achievement when you get to this stage and I am now ready to sit down and see if I can come up with some paint color schemes to change the look of this 40 year old Gas tank.
I sell the kit on my website complete with Screw in gas cap too, so if you like me, are finding CB tanks hard to locate these days, try and make do with one thats damaged and simply change the neck and give the tank a brand new life too.
Of course this will have a little bit of Bondo on the tank to smooth it all out but, today’s mud is awesome and you wouldn’t know, even if you put a magnet on it, as the stuff I uses has metal particles in it.
So there she sits, I will put the New Gas Cap back in, I use a Vented Screw in style and this still looks Classic in a way and achieved what I wanted, this will look pretty cool when it has paint on it and will add photos later when I refit the gas tank back on the bike.
Still a while away from paint but thought that Ii would share what I have done as a blog and maybe it will get you motivated to have a go on your project?
I still have so much more to do to this old ride but it will be a fun journey and will keep everyone posted as to its build as I do more things to this 750-4 Motorcycle.
The Weld in Bung really did work out well and changed the look of the tank completly and I am looking forward to applying Custom paint to see how this turns out.
Thanks for watching.
Working on an old snotter that came from the Vesco Family
I pick bikes up from time to time that some owners just cannot get going, other shops have had a go and no joy, and I picked this old bike up a long time ago from the Vesco Family, Grandson of Don Vesco, I left it in storage for a while and wasn’t too bothered as this has not run since the early 1980’s.
Don Vesco was an American businessperson, motorcycle racer, and multiple motorcycle land-speed record and wheel-driven land speed record holder. He set 18 motorcycle and 6 automobile speed records during his life.
This bike is a real mess, no idea if it will run but am determined to get this inline four running again, need to know how the motor is before I begin to rebuild it into a cool ride once more.
It has had a hard life and has been from pillar to post and no luck getting this old 500 pound SOHC machine to run again, but I know I can get it sorted, just takes time and patience.
There seems to be leaks all over the Motor, the kick stand has seen better days and there is oil and dirt all over the bike, would love to know what life it has led.
Has a weird set of clip ons that wont stay clamped on it and the wiring harness is old and brittle as well as the usual repair using different colored wire etc, this is going to be a pain.
The tach cable looks like it ended its life a few years ago and the end cap drive unit is still stuck in the valve cover, thats a good thing else the oil would come out of there when it ran.
Some funky wiring going on with horrible plastic sleeve covering, thats all gotta come off right now, so strange what some people will do to their bikes in the shed.
Top triples had seen better days and someone had ground the handlebar clamps off so they can use some later clip ons, but they are about a millimeter to wide and wont clamp down hard, I shall go back to a standard triple tree and fit some scrambler bars I think, just to get this bike as a runner for a while and see how she fares, then- I can decide a little later to strip and build into a Custom Machine.
Everything seems to be covered in oil or grime and crappy clamps etc, its had a hard life, but my main objective is to first remove the shitty wiring and connectors etc and then fit a new harness, battery, coils etc and see if I can get this old girl to fire up again.
The coils had decided to crap them selves and the wire harness was as solid as a rock, the California Sun had dried it all out and this has to all be removed right now.
As you can see, there are different gauge wires that have been added to this harness, the Fuse box is knackered and temporary connectors all over the place, just really bad work.
The carbs will need tearing apart but for now I shall pull the bottom end out and fit New main jets and Idle jets and see where we go with a new battery and plugs etc.
So now its time to do what I like doing and will see if I can figure out all the bad things that have happened to this inline four over the years, hopefully I can resurrect this 70’s iconic machine.
And we begin, it does take a lot of patients but its worth it in the end, I have to see whats up with the Motor first as that at least gives me an idea at the cost involved to turn this into a great looking Custom Motorcycle and it sure warrants that, seeing it was in the Vesco family.
12 interesting facts about land speed racer Don Vesco
Don Vesco doesn’t fit neatly into a specific category of motorcycling, but the one thread that runs through his career is the quest for speed. He became famous for his land speed records in the 1970s and continued racing through the 1990s.
Here are a dozen facts you may not know about Vesco, who was inducted into the AMA Motorcycle Hall of Fame in 1999.
1. Vesco was born in 1939 in Loma Linda, Calif. During his lifetime, he was a dirt tracker, factory road racer, drag racer, motorcycle dealer, race-team owner and land speed record-holder.
2. He was mechanically inclined from a young age, tearing apart model airplane engines and making them faster by the time he was in third grade.
3. As a teenager, Vesco parlayed his mechanical skills into cold hard cash. He would buy old Cushman scooters for $20, fix them up and sell them for $25.
4. In his teens, Vesco fixed up a Triumph twin and entered his first official race, a local drag racing event. Then he took that same Triumph and started racing scrambles, TTs, and eventually road races on an old military airport outside of town.
5. One of Vesco’s riding buddies, and his archrival on the track, was future AMA Motorcycle Hall of Famer Cal Rayborn.
6. Vesco won a lot of local road races in the late 1950s and early 1960s. He caught the attention of Honda, which was just coming into the U.S. market. Honda hired him to race its rare and very expensive RC161, a 250cc, four-cylinder racer, to promote the brand.
7. Vesco’s relationship with Honda lasted until 1963, when he took an offer from Yamaha, which was also just getting started in America, to race at the United States Grand Prix (a non-points-paying international race) at Daytona International Speedway. He rode a works Yamaha RD56 250cc GP bike and won the 500cc class. Also loved his Norton Motorcycles too.
8. By the late 1960s Vesco had already been a factory rider for Honda, Yamaha and BSA. He was even a factory rider for the little-known Japanese maker Bridgestone in the 250 GP class for a short time.
9. In September of 1970, Vesco set the motorcycle land speed record of 251.66 mph at the Bonneville Salt Flats in a streamliner powered by twin Yamaha engines.
10. In 1975, Vesco broke the 300 mph barrier in the Silver Bird Yamaha (powered by twin Yamaha TZ750 motors). Then in 1978 he broke his own record, turning 318.598 mph in a twin Kawasaki turbo rig. That record stood for 12 years.
11. Vesco lost an eye after being hit by a rock while watching a sprint-car race in 1996.
12. He died on Dec. 16, 2002, after a long battle with cancer.
New Ceramic Coating Colors for the exhausts now available
Wow- hard to believe that I have been selling these systems for over 18 years now and still going strong, so this time I thought that I would offer a new Ceramic Coating Color, as many people ask me about these things.
So what I now offer is the New Titanium Coating and it looks really cool, its a Gray but a metallic gray and really covers well.
Here’s how they work—Ceramic Coatings and Exhaust Wraps help contain the gaseous heat within your exhaust pipes. This causes the gasses to heat up and expand. Since the exhaust gas is trapped within the system, it expands the only direction it can—out of the tailpipe. As a result, exhaust flow is boosted, allowing a rush of fresh air to enter the engine’s cylinders, increasing horsepower. Both ceramic coated headers and Exhaust Wraps improve horsepower, so let’s go over their pros and cons and see which one is best for you.
Ceramic Coated Exhaust Parts
This is a spray-on finish that’s infused with heat-insulating ceramics. It is not a DIY solution, these exhaust parts are coated at the factory, or sent to a facility with the proper equipment.
Pros
-
- Provides the biggest horsepower gains when compared to other exhaust insulation methods
- Reduces under-hood temperatures better than other types of exhaust insulation
- The ceramic coating is applied evenly on both the inside and outside of the exhaust pipes, preventing “hot spots” that can cause metal fatigue
- Improves the laminar flow of your exhaust gasses
- Prevents rust and corrosion of the ceramic coated parts
- Looks great—some coatings resemble chrome plating.
Plenty of great colors now available and I offer.
The New Titanium which is what you see here.
This is a great look and changes the look of your machine instantly than just the Black you see. But I also offer these colors too.
Black- Silver- Burnt Bronze, with more options coming soon.
Wanted to show the New Titanium as this is a old school look and I really like the way these came out to be honest.
Just go on the exhaust page and on the drop down box, simply choose the color that you would prefer for your system, its as easy as that.
If I can help you with any of these options you can simply email me at carpy@carpyscaferacers.com or drop a Dime in the slot at 714-598-8392 and if you need answers fast, then Text them to 714-598-8392 and I will get right back to you.
Custom Carburetor Lamp from a SOHC HONDA Four
Well, lots of you may know about the bikes and parts I make for these inline Four Motorcycles, I mean- I have been flogging my guts out over them for 18 years here now in Southern California.
But being a Leo, I enjoy many art and craft things in my life and I have been making Desk lamps for a few years now as a Hobby, I enjoy using broken no usable parts and create unique 110 volt lamps to be used in the Home, Shed, garage or in a shop etc, they make a pretty cool gift too.
So many people that have had Motorcycles have always had some broken or non usable parts laying about their Shed, garage or just in a Rubbermaid tub in the back yard, hard to throw away something you paid good money for years ago and even though it is not usable, be it broken, cracked or warped, there is always another life that the particular part can be reused for.
For me, well, I had an old set of broken Carburetors off of a 1974 CB750 Honda, S.O.H.C. model, I would loved to have saved these carbs but the posts inside were broken and the seats where the slide sat. had worn past its use and were no use to anyone on any motorcycle, but, I couldn’t bare to get rid of them and simply toss them away.
So, what I ventured to do with this rack of carbs was first to thoroughly inspect them to see if these were savable, of which they were not- then I wanted to take these all apart and wash them with S-100 to get oil deposits off, then put in the vapor Blasting cabinet and clean everything up, as Vapor honing will bring the aluminum back up to how it was when they first arrived into the Honda factory.
So, I removed all that I could and Vapor Honed the bodies and made sure everything was clean and ready to get transformed into this unique Desk lamp that I had come up with, I have made a few of these now and seem to be a hit, so continue to create these great Lamps for people as they tend to have them made for their Business, a birthday or at Christmas.
I put this together as carefully as I would if it was going to be used on the motorcycle, took me a little while to get the wiring done and had to drill some holes to allow the cable to run from one Carb body to the next.
I Polished the float bowls and the Knurled top rings, as I want the carburetor to pop when you see it and also gives the carb rack a nice contrast when its mounted on the wood base that I shall be making. I used Poplar Timber and cut to shape it, rounded the ends and then sanded and stained to give it that old timey look.
I mounted the carbs using some old Chrome spacers I had in my parts drawers and these seemed to work out just fine for the height of the carbs as I didn’t want them to sit too high up in the air.
You will also notice that just as an embellishment, I fitted a Spark Plug at each corner of the wooden base, to give some Status Quo, of course, it had to be a set out of a CB750 Honda too.
These plugs were pretty sooty and set the base off very well and indeed, as well as a good connection for the carbs as these are Genuine NGK units I have always used on CB750 Honda’s.
See, they look great lit up and give that warm glow and give to a new life now as something else but this is a real head turner and quite the conversation piece where ever it is located.
I also wanted to incorporate these Vintage filament bulbs too and these really set the whole piece of and am stoked the way these have turned out in the end.
So, let me know if I can help you create a unique lamp out of parts, it takes a little while but its so worth it in the end and of course, always good to recycle stuff right?
I have made a few different styles of these Lamps for people over the years and enjoy what I do, I throw myself into the design and love the outcome when it is completed.
Drop me a line if I can be of help to you at carpy@carpyscaferacers.com or drop a dime at 714-598-8392, you can even text me on that number too for that matter.
I make these parts starting with small lamps at $150 then go up as per intricacy.
Thanks for looking at my other creations, it makes my career a fun one.
The B.B. Cafe
I have lost count of the Motorcycles that I have created here over the 18 years in business, some I have been lucky enough to take some photos of but many I have not, but I try and take pics where ever I can as many people ask about projects that I am creating.
I enjoy building bikes out of old rusty hunks of steel and this one is no exception, it was a non running machine and I am glad that I have resurrected this Classic 1974 Honda CB750K, as you can see, it had an old custom seat and a beaten up old Kerker exhaust, the desert does take a toll on any machine thats been parked up for a long time, but- iy can all be fixed and this was the start of the BB cafe project for my Customer in Australia.
It was a solid old machine but had had a hard time over the 40 years of its life and these get neglected when stored out of the way, so- a perfect opportunity to turn this old girl into a Thoroughbred once more.
I had a Customer fly in from Down Under as he wanted to discuss commissioning me to create a Cafe style Motorcycle to his requirements and then once built here, I will ship it off to Australia thats about 7,194.45 mi from our house to his.
So this is how she came out, I have built this just as he wanted and I am stoked with the way she looks, a Thoroughbred of a machine and ready to open up on the Tarmac.
Plenty to look at but I shall try and explain some of the things that I did here at www.carpyscaferacers.com so you will be clear on the parts used to create this great machine you see.
I used many of My own parts that I have designed over the years and of course offer on my website, the headlight with the built in LED turn signals that Glow up Amber when used is a great addition to any machine, I was the First to ever go this route many years ago, have sold over 1000 of these units and still going strong, also has a Halogen bulb to help you at night.
I painted the bucket, Gas tanks, side Covers and the seat and fork ears a Gloss Black, as well as the head light Bucket, the Rims and some parts of the wheel hubs too. You can also see I removed the Original side reflectors that came from the factory and made my own screw in badge embelishers. New gators and Holders too, no expense spared on this build.
New cables as well and the whole frame was stripped, cleaned and coated with high Gloss Powder coating.
Motor was pulled apart and rebuilt, stock but new guides and internal cam chain etc, I then painted the engine in my own mix of High temp Engine paint and I too offer this product on the website, I put together with Stainless Steel Allen bolts to give a nice offset to the black. Made up my Custom Oil lines as well.
I have always loved the finned speed equipment as I am a Hot Rodder too, so machines a Finned cap for the oil Dip stick, I think it sets the bike off from the many out there.
Keeping with the Classic era, Brand New gauges added and my Custom Alloy Mount, I also added a neutral light in the middle of the steering stem nut and fitted my polished aluminum Bar clamps to hold my own set of Clubman handlebars, with new cables, adjuster and master cylinder.
A lot of attention to detail as you can see, I fitted Tarozzi rear sets, I sell them on my website too, I always fit one of my Custom Oil Pressure Gauges on the motor, that way you can see if you are getting good oil pressure all the time, finned covers and of course, my 4 into 1 Exhaust system that I have been selling for over 17 years now. The rear brake was rebuilt using non Asbestos EBC brake shoes and new springs with a polished outer hub, looks great as an offset to the black rims.
Rebuilt front forks and painted lowers, with New tires and front mudguard, this really has that Classic look of Cafe bikes back in the day when I rode them in the UK as a teenager, tearing up the streets with all my mates on various brand machines.
Totally rebuilt and tuned carburetors were fitted and these are fully detailed to match the motorcycle, then used Steel Dragons set up for Airbox and this runs great and smooth.
For show only, this kick starter was drilled and chromed, the rear sets prevent you from a full kick but this has an electric starter and I supplied another solid kick starter if he needs it, but this was for show and it does look very cool indeed, you can also see I fitted a breather filter to the bike with the chrome cap that runs from the valve cover.
I hand letter the tank, B.B. is for Black Beauty as thats what the Customer named it and I pin Lined around an old SS gas tank, I removed the original gas tank flat and filler and then used one of my Stainless Steel Aircraft gas caps for better styling, the tank was hammered by me and smoothed before adding the Gloss Black enamel paint.
Custom rear shocks that are also raised 2 inches with Finned Piggy backs help the bumps and my Clubman seat assembly that I make and offer is sat upon the frame that hides the battery etc, I used snaps on the Tuck n Roll cover, that way you can easily get to the battery and of course you can put your insurance card under the foam for easy access if needed.
Hand pounded tank and New wire harness, handlebar controls and new cables through out make sure that this bike is always on point in its life on the road in Australia.
Drilled front brake Rotor, rebuilt and polished front Caliper, custom parts all over the bike makes this a great head turner and the Customer is stoked to finally see the finish of the dream.
It turned out really well and runs true and strong, looking forward to showing some photos later when it is in Australia in a few weeks time, as I am getting ready to take this motorcycle to the shippers and let it get loaded up on the boat to take across the waters to the other side of the world.
Thank you for all your kind words and encouragement, means a lot and once again, another old bike is saved from the junk yard.
If I can help with a build or just parts for your inline four, just drop me a line carpy@carpyscaferacers.com or a dime or even a text at 714-598-8392 and I will do my very best to get you what you need.
Another Build in Mock up stage, the CB750 Street Tracker
Well, I have a few old frames and parts laying about and pulled some stuff out of my storage and decided it was time to build another bike, as of course, thats what I like doing.
So, this time I want to build a street tracker style machine, just something tough looking but functional as well, I grew up with Motorcycles as a kid with my brother and we had old Dirt bikes and road bikes we turned into dirt bikes and this takes me back to that very time we rode around and around the back garden, just having time in the saddle when we were teenagers.
This old Honda is a Bone shaking Rusty 1978 K model that had been sat for over 30 years in the desert, so what better way to resurrect something and at the same time make something fun, as well as a part of my life back in Great Britain when my brother Mick and I would go out in any weather and I mean any weather, we even rode in deep cold snow with just jeans and a jumper but loved it.
So, there is this old carcass that I shall be using to try and at least make something that will at least turn the corners of my mouth up and have fun again, no idea what I am doing exactly for now but we shall see how this old inline Four progresses as and when I put time into it, its not a paying job, so will be just spare time here and there and a test of patience and money to see where this goes.
First off, I will get it running first, hasn’t run in decades and has seen a sorry life sat out in Palmdale out in the Desert with Sun, Wind, Rain and Frost invading its chassis , so I feel I must do something with this old Girl and she will run once more, I can promise you that.
This Machine is a Big heavy Lump, the 78K was the last of the SOHC models, along with the Super Sports and boy were they heavy, with a bigger exhaust, bigger Gas tank and seat, these were mammoths of their time, so all the old stuff like tank and seat were rotted away, I managed to mock the bike up to how I hope to have it later on, albeit I am sure things will change but I shall be keeping the Old School Lester Rims.
I got these off an old CR750 Race Bike about 17 years ago and have kept them in storage until now, so I will of course change the tires for Knobby versions to give that European Tracker look and see where we go.
Quite exciting really as it will be a look back at Yesteryear and something I and my Brother Mick will look at and remember the struggles we had as kids with bikes when all your mates had new stuff, we had Motorbikes that either were not wanted or left by the way side, but – Makes you a better person for it I feel.
This bike will rip along quite well and I am sure will be fun to take anywhere to be honest, as they have plenty of grunt and no worries green laneing, if you have good Enduro tires, then I see no real issues on here, so thats the style that I am going with and want it to look a little 1960’s.
Sp the adventure of building and recreating something begins, I had an old Alloy Gas tank and hope to use this as well as a Alloy Seat , they look kinda cool together and like that Sammy Miller set up, so hope that I can use these as it will be great to use up some old parts that were just sat on a shelf for Donkeys years collecting dust.
Will make the exhaust system up as I go along and it could change a few times, but we shall see, I do like the way it is going now though and I have some frame chopping and changing to do.
I will most probably run a Disc Rotor up the front too, not a fan of bikes with only half a braking system to be honest, it may look cool but not so cool when you got to stop at 70 Miles an hour with no front Anchor eh?
Parked up next to my old 1928 Model A Ford Roadster, 2 Classic bits of iron on the driveway.
So, there it is, in the garage, on my table and when I get spare time and a bit of loot, I shall begin trying a few things out to see what I can do to first of all, get this old girl to run again.
Once that is done, I can then go about and get the proportions right and start to create a fun Street tracker, Better get some liquid refreshment to get me in the mood with this 70’s Classic.
New ceramic Bronze Exhaust systems now available
Well, I have now added this great Custom Burnt Bronze metallic ceramic Coating color to the 4 into 1 Exhaust systems we make, this is a superb Custom application that really enhances the look of your two wheeled machine and wanted to show you how great this looks.
Its almost a Metallic look and I love the way it looks and this is a New look for Exhaust systems and wanted to offer this color on the systems we manufacture here in California.
We ship Globally and this is a 2 piece set up so easier to fit and cheaper to ship as well.
I am glad to offer this Color to you and you simply go to the exhaust page and chose the Ceramic Color you would like, be it Burnt Bronze, Black or Silver, as well as Raw Steel or a show version of Stainless Steel.
These also come with a Chromed removable Baffle and what is good about my systems is that if you wanted to, you could cut the tail pipe down to the length you lie and the baffle will still fit.
So if you are looking for a Custom Exhaust for your inline four from 1969-1978 SOHC Honda or even the DOHC version, we make them here and offer them to you in different finishes.
Our systems flow and Perform, over 1500 systems sold around the globe and over 18 years in business, love doing this and we get great feedback and many repeat customers too.
Thanks for looking, I love this Color and look forward to seeing it on other Customers machines, let me know if I can help.