The California Motorcycle show at Santa Anita

Well, Cinco De Mayo is upon us, where many people are still sleeping, we were up finishing packing the Van up with 2 Motorcycles and our Vendor Booth, we then headed out to Santa Anita Race track, where we set about unloading the van, Jennifer sorted the vendor booth out whilst I puffed and panted , walking the Motorcycles into the park, as you well know, Horses are not happy with Thundering loud megaphones and Million Dollar horses at that, so we had to walk everything into the Race Track area.

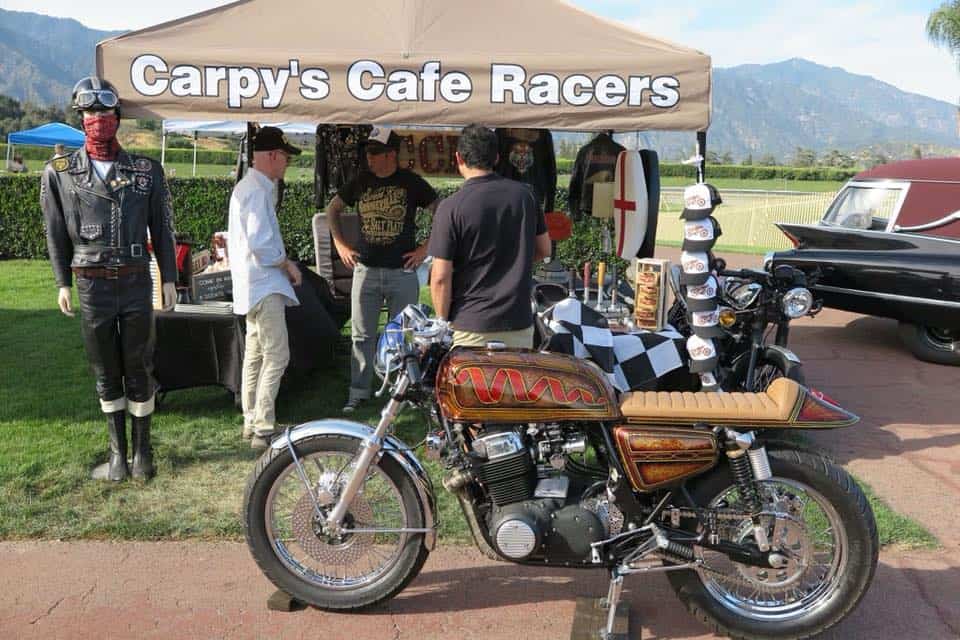
I Registered my Harlequin Honda and maneuvered that beast into the infield, where upon I parked it and spent the next hour, sweating my gonads off, trying to clean the dust off that had accumulated from our garage since the last show we were at. Not an easy task as the needle on the Thermometer was at 97 degree’s, I was melting.

But, once all set up, I went and sat in our Vendor Booth with Jennifer and tried to stay out of the heat, and the Eazy Up helped big time on this Kentucky Derby day event and was happy that we had some sort of cover over us.

Many people arrived all dressed up to the Nines in their Horsey attire, a big deal here and everybody seemed to enjoy the Motorcycles that was on Display at the event.

I spoke to many Customers of mine as they made sure to come and at least say hello, we sold our Moto Caps and Vintage Grips, whilst Jenn was selling her Moto Scented Wax melts, that seem really popular.

Plenty of cool Motorcycles on Display at the event and it was nice to see so many different styles of machines turn up on this Hot Day in May. Loved the Tracker.

Jay La Rossa had his Triumph Tracker there, and it looked pretty tough I tell ya.I hung out with him for a while, always great to chew the fat with like minded bike builders.I loved the Step side with the Two Trumpys in the back, these were top class built Custom Motorcycle, with the paint flowing from the trucks roof to one of the bikes was a neat touch.

Just have a look at some of the detail on these bikes, I loved them both and hope to see more of these on the road, I never see them ridden though these days.

BSA was well represented and would of taken any of these Classic steeds, from the Tracker at the front and the DB at the back, all bloody awesome to see.

The traditional 750 Commando is such a timeless taste of Real Ton up machines from back in the day. Always great to stop for a second and take it all in at these events.

I loved these Trench diggers, rode a few as a teenager and they scared the hell out of me, in a good way, love the twin shocker Dirt bikes, my era to be honest.

The good old CB750 SOHC unit has been put into everything you can imaging, this is a buddies of mine and a lot of work gone into creating the 750 Scrambler.

I dont think many people will appreciate the time and effort to get this old 530 Pound machine to look like it can handle the whoops and Burms of California’s MX tracks.


The good old 400 4 Super Sport Honda, its been Cafed and Raced for so many years, that people really forget how fast and fun they are to ride.  A great Powerhouse !

I would sure love to sling my leg over this AHRMA machine, reminds me of the old JPS Bikes of the day when British tracks had these and (Forgive the pun) were the Dominator.

A great Racing bike that is built so well and I am certain would holds it own and more on the race track, love the stainless exhaust headers and short reverse cone megaphones.

New meets old, a colorful array of machines and background to be honest, other than the heat, this was a really great looking part of the Race Track as its part of the infield.

I would really love to own this Honda Flat tracker, I bet its fun getting in the corners on the track and would have a blast on it and its nice to see its still being used.

Like I said, there was plenty to see for everyone, many different era’s of Motorcycles were on Display on the infield and around the race track, making it an eye candy store of the 2 wheeled variety and I was admiring them all.

This Honda Scrambler was cleaner than any cats arse, it was a super machine, nothing I didnt like about it, just gaze your peepers on this Classic machine from the Land of the Rising Sun.

Baking was not the word, it was so bloody hot I was hoping a bunch of Horses would belt by to cause a little air flow and cool us down, Summer came early here for sure.

Love seeing the old Honda’s as these were more available back home in the UK in the 1970’s when we were kids and for about 25 Quid you could pick one of these up, pull the mudguards off and headlight and go and blast along the Forrest fire roads, such fun back then and great to see them still around today.

The worldwide distributor of Hodakas was PABATCO, for Pacific Basin Trading Company. Its headquarters were in the rural town of Athena Oregon.  PABATCO designed and engineered a majority of the motorcycles, and Hodaka in Japan was responsible for the engine and manufacture and assembly. Pabatco was owned by Shell Oil Company from 1965 to 1978. The name Hodaka comes from a mountain near the factory and means “To grow taller”.

I have owned 6 of these over the years, anybody could learn to ride on the 175, and it was a superb platform for many styles of bike, loved seeing this example and being used too.

Different combination, the sohc cb750 and a Panel wagon, both very cool. Not sure who owned either buy glad it was there to be seen.

This won best of show, it was nice but still missing parts but each to their own and a nice motorcycle none the less.

Shinya bought along his CB750 with much Custom Body work that was all hand formed, Loved the front end and I believe a grimeca front brake too.

Another great Custom build that took many hours of massaging of alloy to get it the way it is, the more you look, the more detail you will notice from front forks to exhaust.

So much work going into this, removing One cylinder isn’t easy and this is one awesome Custom and love the whole concept.

Seems that Honda were really out in force on Saturday and I loved it all, one of the girls was riding this, great job.


Killer build, I dont usually like Green but this bike popped and a really nice BSA to be shown at Santa Anita, just looks so right.

A plethora of bikes and styles, and was glad to be a part of it on the weekend, it seemed to attract many people and raise a few eyebrows too, all great Motorcycles.

OMG thats all I can say with this Stable of Beeza’s, just awesome Historic value, real Ton Up machines.

Dustin Kott builds some bad ass machines, it was nice of him to purchase one of our Moto caps we sell and Jennifer designed.

Biltwell were there and Bill had his Harley Desert racer on show, fresh from doing thousands of miles in some pretty rough parts of the desert and, it survived.

My mates from Moto Chop were there, we are all like a big family when it comes to Motorcycles and custom created things, cool people.

British Customs were there too, showing what they do and manufacture, it had many cool vendors and we were all glad we had Eazy Ups as the weather was so hot all day long.

Thanks for coming by and saying hello, we had a fun time and hope to see you again at another show, I strive to help you in your quest for parts, service or advice, this is my Passion and my life, thanks for supporting me, it means a lot.


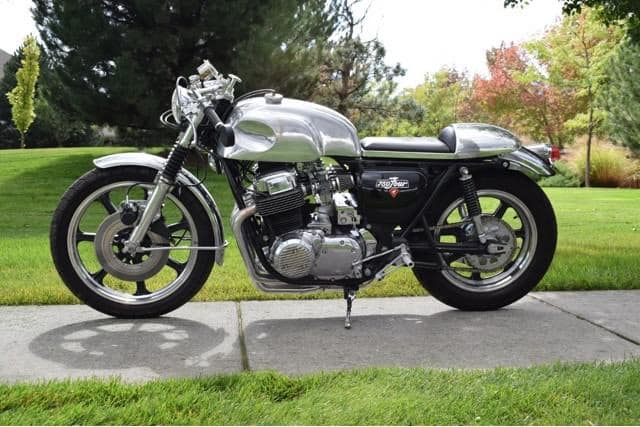
SONNY’S Oh So Sweet – Alloy SOHC Machine

Welcome to Readers Rides, I started to do these about 15 Years ago and think I should return to these, so people can get inspired from many peoples own creations, they can see their machine and what it consists of parts wise and many have my parts on their Motorcycle, so if you have time, drop me a line with as many cool photos with good angles and maybe some great back drops, ie- Bridges, River, castle, Pub, Water fall, Bricks etc and lets feature your Machine. Show the world that we have very similar tastes and look forward to opening the Global book of our readers Rides.

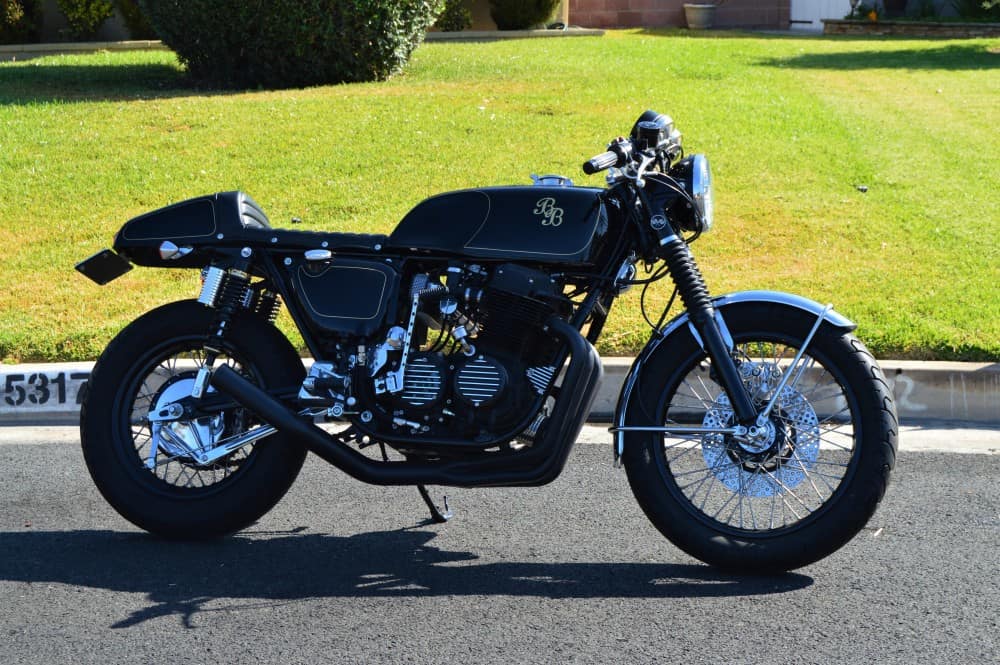
Below is the first cool bike that I hope to receive more pics but- a Good taster to get you lot going, how about Sonny Morrisons CB750K Model Cafe Racer, Sonny is from Rancho Cucamonga in California and about an hour from me.

OK, I am still awaiting some more information on this build but will feature it and add when I get more input from the owner, above is Sonny Morrison’s SOHC Honda and its a Cracker.


What a great looking Cafe Racer Machine, right up my alley, or as you look at this photo, right next to a Rock wall, this machine is tough and and enjoying the 19 inch front Lester Rim and either a 16 or 17 inch rear.

Sonny used one of My Custom 2.5 Speedometer gauge Brackets that I manufacture and it certainly looks at home on top of that Polished triple tree, love the dampener set up on-top too.


Hand Rolled Alloy Gas Tank and Seat really suits the bike, not sure where he found this set up but will let you know when I have a build or spec sheet from him but it sure looks nice.

Has my 4 into 1 Exhausts system and the Rear Sets I sell, this CB750 is built for getting around the twisties on any day of the week.

Loving the Manx Tank, I am guessing its from India, the front forks look to have been rebuilt and polished, that 5 Gallon Tank will get him a long way too and love the fact he used hos original rear Mudguard for that Classic look.  Clip one and minimal controls really does make this SOHC stand out.

Thought I would share today and hopefully will be receiving more photos and spec sheet soon. get out in the shed and start building your two wheeled Machine and hope to see some photos of your garage soon.

You can send photos and Spec sheet to: carpy@carpyscaferacers.com and i will feature on the website for all to see, spread the word, lets see your Rides.


Sonny Just sent me this, so thought I would add it on here.


Up here in the Great Northwest Territory of Idaho one has to be creative when building a motorcycle. Finding parts locally is like finding gold. This is my story on my 1973 Honda CB750 SOHC Café Racer build.

After finding Carpys Café Racers online and drooling over his incredible builds I decided to give it a go. I purchased my bike as an old 70’s chopper, I had to drive 140 miles round trip but once I got the bike home I started the stripping process, everything I couldn’t or didn’t want to use came off the bike,

First to come off was the rusty chopper forks and the 21inch brakeless front wheel, I then found a new fork assembly with the inner parts I needed to bring the bike back to where I wanted it,  the donor bike was half buried in the dirt and had been there for decades, the old guy wouldn’t sell it to me unless I took the whole thing, no rear wheel, gas tank, seat, controls or gauges, it was just the frame that was cut up, the forks and a crusty frozen motor.

I pulled the forks and carbs off then placed an ad on Craigslist advertising it for free, a guy came and hauled the sickly thing away! after polishing the fork tubes and triple tree upper I started the rebuild, new seals were installed as well as new fork boots, I bought some progressive lowering springs for the front and I then purchased a set of short shocks for the rear, this completed the lowered stance I was looking for.

I met a chap online who lived quite a distance from me but he not only had the front brake caliper and front fender I needed, but also a set of New Old Stock Lester wheels, So off I went to pick them up, when I got there he offered me a better price on everything seeing that I drove so far, he also threw in a rear fender and some misc parts for free, A really nice guy!

I ordered a new stainless shorter café front brake line from Carpy’s Café Racers which made the install a breeze, I had the front brakes stopping on a dime in no time!, I then moved onto the controls and speedo, since everything stock was missing I bought aftermarket clutch, brake and throttle mechanisms along with all new cables, I then ordered Carpy’s Café Racers lowering bracket for the Drag Specialties Speedometer.

I installed a set of clubman bars and bar end mirrors and the whole front end finally came together, from there I moved onto the engine, I installed new Dynatec electronic ignition along with new matching Dynatec coils and wires, it made a huge difference when starting the bike, just a slight push of the button and it starts immediately. Then I ordered a set of Carpy’s Café Racers Yoshimura style Ceramic coated 4 into one exhaust, although it came with a baffle, I decided not to use it, I like the raw open exhaust sound and wouldn’t change it for a thing.

By the way, it’s been a couple years now and the Ceramic coating has held up great, they still look new! I just love rolling on the throttle and listening to her ROAR ; )… I found a place in India selling the aluminum Manx style tank for the CB750 Sohc, HOWEVER… it did not fit and the fuel petcock mount was an odd thread and I could not find a pipe thread type to fit, I basically ground it down and made an aluminum block, I drilled and tapped it to fit an original factory Honda dual outlet petcock, then I had to cut off the tank mounts, reconfigure everything and have an aluminum welder fix me up, it added some coin to the price of a tank that was supposed to be bolt on and go!

{P.P.S.}  That Singh guy from India has made some good parts but many parts do not fit, just be aware.

Buyer beware of anything from India!.

I decided to get an aluminum café seat pan and seat, but this time from a maker in Florida, this to was an issue as I waited months to receive it, seems they lost my order! the quality and polish was excellent though once I received it. I then bobbed the rear fender and added a Triumph tail light. I ordered new aftermarket side covers, mounting rubbers and factory emblems then painted the side covers gloss black with a clear coat.

I ordered Carpy’s Café Racers Billet Aluminum Rear Sets for the CB750 and love the fit and finish, the bike shifts like a champ and is comfortable to ride even on extended journeys, one of the best purchase’s I made, well other than the Yoshimura exhaust!, I rebuilt the carbs and jetted them to what Carpy runs on all his bikes running the Yoshimura exhaust, I started with Pod filters but have now changed out to a custom made one piece billet aluminum air cleaner. I’m sure I am forgetting a lot of stuff I did during the build but it has been a couple of years now. Having multiple bikes means the Café Racer doesn’t get ridden as much as I would like but I have to share my time among them or the other bikes will get jealous…LOL.

One thing about using Carpy’s Café Racers web store is the parts are tested and always excellent quality, shipping is fast and if you have any questions, Carpy himself will answer them. It was a fun time building the Café Racer and it draws attention everywhere I go.  It’s fun to come out of a store and have 2 or 3 guys standing around the bike admiring it. All I can say is….I don’t have a witness and I can’t prove it, but this is my story and I’m stickin to it…..


The Harlequin Honda 1975 CB750F Super Sport

Well, here we are with the Harlequin Honda that I have created, its been a long build as originally the Motorcycle was bought down from Washington on November 4th 2015, Edwin Cooper was not well, he had Cancer and wanted to try and revamp his trusty old Steed that he had had for many years, he wanted me to do something cool with it and loaded this Motorcycle up in the back of his pick up and came down with his daughter and dropped the bike off.

I helped him unload the 1975 CB750 F Super Sport, it was heavy, the brakes were sticking and it really did need some love, but- thats what I do and was more than willing to bring this motorcycle back to life and breathe fire once more.

This would prove to be quite a challenging creation, as there was a lot of time and weather that had passed over this machine, I have been there many times but I am amazed at how many Motorcycles that I have built that were all in this condition, some a lot worse too.

He had started to Cafe the bike out a little, many moons ago, hence the Shortened Headlight ears and the Italian Tarozzi rear sets and an old 2 Four seat that dates back to the Mid 1970’s.

Have a look and you can see that there is a lot of stock parts still on the bike, like the chain guard Gas tank gauges etc and of course the old wiring, and that had seen better days for sure, the weather can totally destroy a wiring harness in just a few seasons, especially if the temperature gets hot then col, it dries the wires out and makes them fragile.

This also has an Old Yoshimura 4 into 1 system on it, seen better days but nice to see none the less, that is now fitted onto a AHRMA race bike and gets used all the time.

As you can see, the Birds nest wiring will need to be completely stripped out, soon as I see toggle tops and electrical tape, I know that it needs to be removed right away, else it will be a headache that you do not need.

You can see where Mother nature has taken a firm grip of this Motor, Oxidization is a mean Culprit by the look of it, the Plug caps were so weather beaten, as I tried to remove it, the cap cracked and fell into many pieces.

I wonder what sort of critters over the years had chosen this 1975 inline Four as its home? Nothing really surprises me these days but intrigue always does and if this bike could talk, well, I think we may have a fun movie in the making.

The Carbs were locked up, seemed to have dirt and grit from everywhere and a little wasp nest in the Carb body itself, Mother Nature really took a hold of this one.

I loved the 1960’s Hot Rod Stewart Warner Mechanical Oil pressure Gauge, I am also a Hot Rodder, so this made me smile when I clapped eyes on it, poor motor has a lot of oxidisation on it though and will take time to remove and clean all that up.

We have a multitude of issues here, the rear brake caliper is seized up, piston is stuck and seals are shot, Rear rim is toast, the same goes for the rear shocks too, the swing arm looks like it has come from the bottom of the Baltic Sea, this will be a down to the frame build for sure.

Low miles too but the weather makes it look a lot worse to be honest, nothing that cannot be fixed though and this Super Sport will see a Brand New life and Look forward to sharing the photos when she is completed.

Front Brake caliper is also seized up, the front forks need rebuilding, Rotor needs to be skimmed and New rim built.

Unfortunately the rims had rusted right through, so all that I shall use is the front hub, Rotor and Caliper body and will refurbish all that I possibly can to this grand Old steed.

All the wire harness was Rock hard from being baked in the Sun, the rectifier and the regulator will be discarded, and I shall be using a New Harness, along with a solid state rectifier module, as I use them on ALL the builds that I create, cant trust 40 year old electrical anyway.

I know that this will have a different look by the time I have finished, not sure how just yet but- It will look pretty cool none the less and of course, Function well too.

So there she sits, before getting transformed into a cool Custom Machine and I am looking forward to tearing into this to transform into some cool eye candy.

So it is time to push this 500 pounder, into the garage and start to take this motorcycle apart and figure out what I am going to do to this 1975 CB750F HONDA.

And so we begin, this will be a long Journey with some hiccups along the way , but I know that it will look a lot different by the time this comes back out.

I started to go the route he wanted, to go with his motorcycle, then all of a sudden from out of the blue, I had an awful phone call informing me that he had just been in a Motorcycle accident on his Harley and did not make it, I was gobsmacked, and, the family were too, they didn’t want another Motorcycle in the family and I understood that, so they gave me the bike and said do something cool with it.

Above, I hand bent Raw steel and then Rolled the rear, welded it and then began to do a little more to this seat base as I want it to be able to take a passenger, as all you see are single short seats these days.

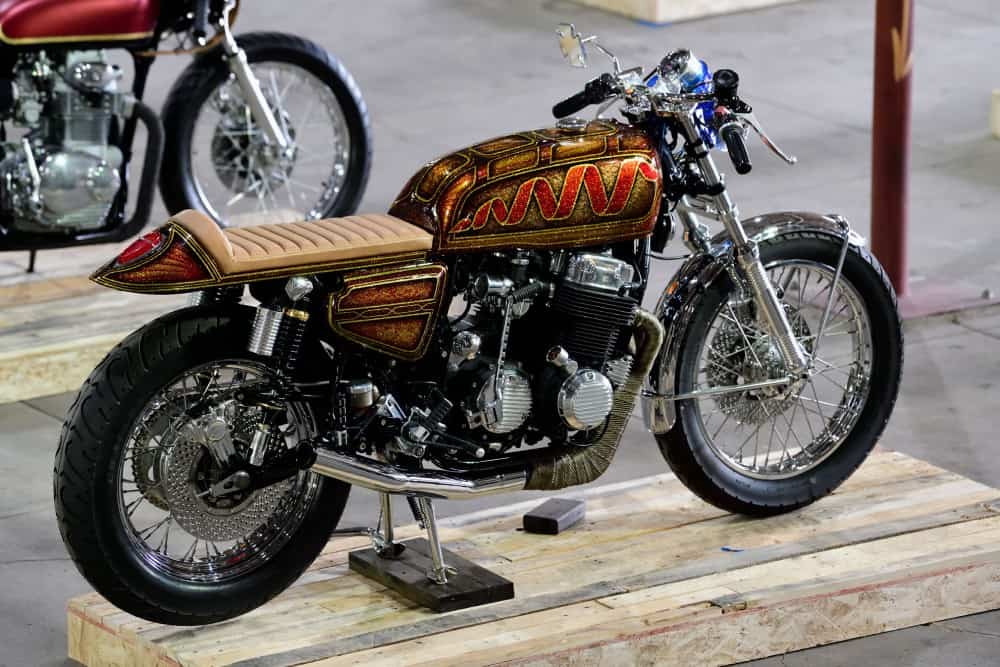
So the transformation began, slowly and I am happy at the end result, I named it the Harlequin as it has so many Colors and my Favorite Candy Bar is TWIX, so you can see that too right?

A lot of flake and detail but wanted that old school Low Rider flake that was about when I was a teenager back in the UK in the 1970s, when the Sun hits the Gallon of Clear coat, you will discover why metal-flake was so popular back in the day, a Kaleidoscope of Candy colors pleases the Cornea.

I have created over 50 Custom HONDA based Motorcycles since moving here in 2000 and every time I start a creation, I have to sit and ponder for quite some time, I am glad that I had no deadline, so the pressure was off and as and when I thought of something cool, I would just do a little bit to the bike and then back to work on other customers parts etc.

I fitted My Sidewinder exhaust system to this build but wanted to try my other sets ups as well, just to get the look and later, hear the different tones of my exhaust systems and decide which one I will like, this is ceramic coated but think I may end up using DEI Titanium Wrap on the header and maybe triple coating the tail pipe in Chrome, we shall see. Below is the Hot Rod tail pipe that fits to the Sidewinder header, a crisp and Velvet bark and as you can hear, very responsive to the throttle.

I have sold many Hot Rod, Side Winder and Razor systems through out the world, all made right here in California, none of that made in china crap.

I fitted a small 5-3/4 Chrome headlight to my Custom Fork Ears, and wanted to create a different look to the front end, so I went with a Biltwell Bubble Visor from their Helmet catalog and this worked out great as a mini nose fairing, even threading the clutch cable through the Plexi Glass.

I wanted to mix Old School with New and decided on using a GPS speedometer but with that old school Smiths looking gauge face and needle that still sweeps, this worked out so well.

Here is the old bucket I used and Tig welded to my custom bracket, just needs polishing and I shall also be fitting small LED Amber display lights for the turn signals to plug into.


I used a old Bucket and welded a bracket I water jet cut and it seemed to go right in and the great thing with this is that it has just a power wire and an anttena wire, you are all set to go, even has a LED red back light too.

This was the right look that i wanted and am glad that I chose to go this particular route, gives the machine just a little more character and style.

Here is the Harlequin outside out Home, so cool to see it in the sunlight and I am super stoked at the way the bike turned out in the end, a long but rewarding Project that really does turn a few heads.

Plenty of eye candy to look at on the bike, the Paint alone is super cool, and as the saying goes, “The Devil is in the Detail”

I am proud of this Build and being a steel tank and seat, this is a sturdy machine that is no light weight for sure, it stands tall too, many do not do that.

The Harlequin sports my Custom 4 into 1 Exhaust system, The Side Winder, I Ceramic coated the header, then wrapped DEI Titanium Heat wrap onto it, to give that Hot Rod styling, then I triple chromed the rear tail pipe and it sits nice and snug and close to the bike, this turned out so well and a system that I offer on the website for all SOHC Models.

A fun machine that was a real joy to create and will be on the show circuit around Southern California this year, hope you can come and check it out some time, be glad to see you.

I removed the old Super Sport Gas Tank Flap that used to hide an old tin cap, I then welded a Harley Bung and fitted a Custom Gas cap, looks so much smoother now.

I also did a few other changes to the bike by machining the forks and making a Brace bar out of 6061 T6, and of course a 1971 Rectangle fog light to show the European Spirit here.

So many New parts, this is like a Brand new Motorcycle now and the more you look, the more you see a little more custom touches throughout the ride.

Photo Credit: #RahoulGhose

This is a cool shot at the Outliers guild show in Down Town LA last week, stoked to see it on Display with other cool machines from around the state.

Photo Credit #RahoulGhose

Here she is sitting loud and of course proud to be representing, at the OG show in LA, a very cool event and I really enjoyed it.

A classic look of the Custom years back in the 1970’s when I was a Teenager, this came out so well and super stoked at the response I received at the Outlier Guild show.

The 1939 Ford Lincoln Mercury tear drop LED tail light set off well in the frenched pocket I created, I also had made the steel cowl and seat base.

Photo Credit #RahoulGhose

It has been an amazing year and to get the Harlequin completed is another notch in the post of creativity, I strive to do the best I can and hope that you liked the build?

Like I said, I had a great response for the bike and even the band that was playing loved it. Band- WOOLY BANDITS- Singer- Christa Collins.

Thanks you for everyone that came up and spoke to me, I was super stoked, this is a great creative family and super glad that I was a part of it, I look forward to attending more.

In Memory Of Edwin Cooper, I am sure he is smiling from above.

Below is  a list of of things done to the Harlequin.

  1. Machined and Polished Front Forks.
  2. Machined Aluminum Fork Brace.
  3. Polished Hubs.
  4. 19X40X1.85 Chrome Front Rim.
  5. 18X3.5×40 Chrome Rear Rim.
  6. Stainless Steel Spokes.
  7. Hand Drilled Rotors.
  8. Custom Piggy Back 14 Inch Shocks.
  9. Polished and Rebuilt Rear Caliper.
  10. Braided Steel Brake lines.
  11. New Chromed front Fender.
  12. 5 3/4 Chrome Headlight.
  13. Biltwell Helmet Visor.
  14. Custom filled and smoothed S.S. Gas tank with Harley Cap.
  15. Hand made Steel Seat with leather Tuck n Roll.
  16. Metalflake paint.
  17. Hand Made Clubman Bars 7/8.
  18. Biltwell Grips.
  19. Rebuilt Motor with Polished Covers and Wrinkle Paint.
  20. Restored Carburetors and synchronized.
  21. Drilled and Chromed Kick starter.
  22. Wrapped Sidewinder 4 into 1 exhaust with Chrome tail pipe.
  23. GPS Speedometer.
  24. New master Cylinder.
  25. New levers.
  26. Tarozzi Rear Sets.
  27. New Challenger tires and Tubes.
  28. 1939 LED Tear Drop Tail Light.
  29. LED RED rear Turn Signals.
  30. LED display lights.
  31. Polished upper triple tree.
  32. Powder Coated frame.
  33. Lithium 12 Volt EarthX Battery.
  34. New side covers.
  35. Chromed Center stand.
  36. Chromed Side Stand.
  37. 530 X Ring CXhain.
  38. New wire Harness.
  39. New handlebar switches.
  40. Oil Pressure Gauge.
  41. Battery Tender.


HONDA BRAT 1976K FOR SALE $5000

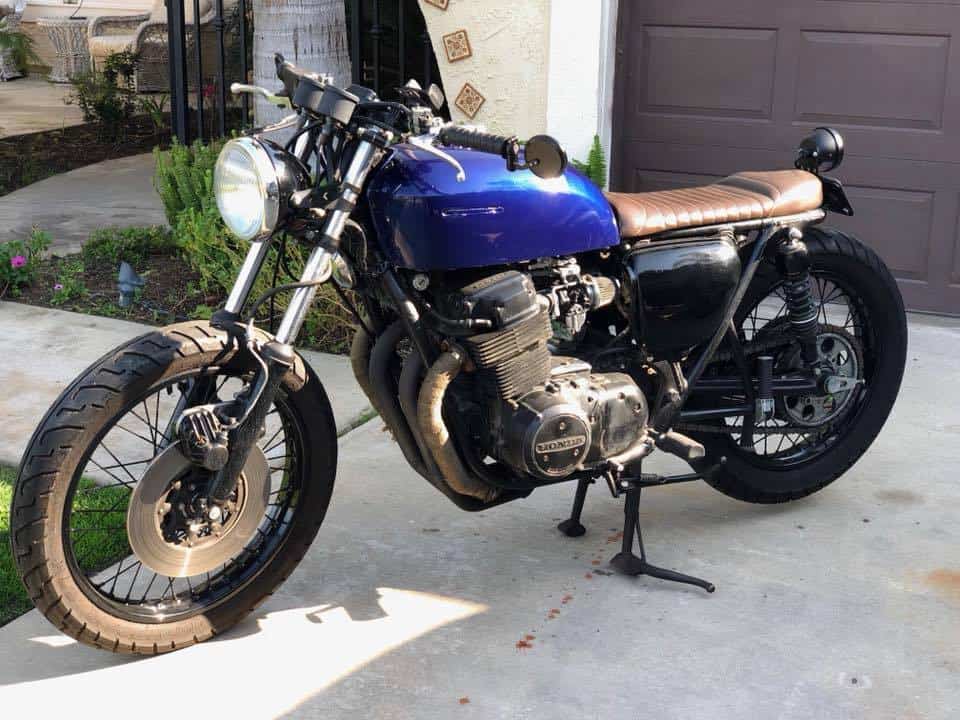
Here we have a 1976 HONDA CB750K Model for sale, this Brat style machine runs really well and is a strong machine for sure, Located in La Mirada, this 500 pounder is not a show bike but a bike that is meant to be ridden.

1976A


This bike has had some work done to it and it a fun Motorcycle to ride, a linear power machine too.

  1. Rebuilt CARBS.
  2. Rebuilt Top end
  3. 4 into 1 Mac wrapped.
  4. New solid state Rectifier
  5. New Lithium Battery
  6. 2.5 Speedometer and Tachometer
  7. 7/8 Black Drag bars
  8. Black rims
  9. Brat seat
  10.  Custom rear tail lights
  11. New intake manifolds.

This is a fun machine thats pretty reliable and is an ideal platform to take on and do what ever you like to it. $5000 Takes it home.

1976g


Fires right up and runs pretty hard too.

1976b
If you are looking for a solid machine that you can ride right out of the gate, then this is a good ride right here.

1976c

These are getting harder to locate these days and to fond a decent running one is even harder, so this may be just the ticket for you.

1976e

I will be selling a few bikes on here and it is always great to see new owners have a CB750 and enjoy their power and reliability.

1976f

This runs strong and had great tires that hold the Tarmac very well indeed, brakes work really well and is fun to ride. Thats actual mileage since the top end rebuild.

1976i

Also it has recently had New shocks fitted too and still has the passenger pegs attached if you want to go ride 2 up.

1976j

So easy to change about and make it your own style with a paint job and a few different accessories, but by it and have fun on it this year and maybe make changes after the Summer?

1976k

New headlight as well and functions admirably, have a look and see what you think of this inline Four Motorcycle.

1976l

It has a hooped rear end and is pretty comfortable to ride, Rims and Hubs were powder-coated and re-laced too.

1976n

So there you go, a great runner and you can own this and change it to your style and color pretty darn easy.

1976m

If I can help with more photos or a video, let me know on 714-598-8392 and I can text you or email you, my email is carpy@carpyscaferacers.com

bannera1

Many thanks for taking your time to have a look at this 1976 CB750K model Honda.

Rice Boiler


Have a great week and I appreciate your time.


My Custom Armadillo seat assembly all hand made and available here.

Here we are, Friday already, time sure does fly by and sometimes I just do not get enough time to compile a Blog, so forgive me for that but many fingers in many pies right now.


People have been purchasing my steel Armadillo seat base and are enjoying the look, style fit and of course quality of these set ups, took me a while to get the seat how I want and I made them long, so that you can cut them down to fit the ride you are currently working on.

IMG_2606

The Cowl piece I cut by hand out of steel, then I pound away at it using my hammer and sand bag until I get the shape I am looking for.

IMG_2607

Once I have that done I shake my fillings out by using the Planisher and smooth out the hammer marks and stretch the material to the curvature that I am trying to create.

IMG_2351

Prototypes always take time, but, if you want it to fit correctly and have the look you are after, then you must be prepared for hours in the saddle and this is no easy task to tell the truth, I had made three templates until I got to this stage and then I was happy, just trimmed the Card and then it was time to make a steel version.

IMG_2609

Cowl is the curve I need and now its time to make the base and then weld together for a cool Old style cafe look seat base.

IMG_2369

Just a little trimming and I will almost be there with the seat base and then cane fold up a few of these in one go, as I get many requests for this seat base.

armadillo9

A long seat base is great for a builder who is not quite sure how long he needs his seat, so can reduce until they are happy. 

armadillo11

Tight fitting, this will be a great fit to the frame and sturdy too.

armadillo12

Just need to be welded up then smoothed and thats it for you lot you can fit and cut to length the seat base that you require to be able to fit your motorcycle.

armadillo14

Once I had made a jig for these, they were great and fun to make, and I enjoyed creating this as you can shorten the seat base, as well as curve the back of the Cowl if you so wish.

armadillo16

I made mine for the good old CB750 and this time this was a Super Sport but will fit other models too.

armadillo20

But I wanted to incorporate my own tail light, so set about to do that as I would like to recess this LED tail light to flow with the Cowl itself.

IMG_2513

Cut the hole out I needed to make the recess pocket, then welded that in and smoothed the welds around the edges.

IMG_2675

Fits in the pocket and looks great, this is a Running and Brake Light LED and is brighter than a Harvard Professor and so pleased at the way this came out.

IMG_2681

So now that is where I want it, its time to make the securing holes to fit to the frame, paint and upholster this to finish it off.

armadillo23

Tons of clear coat and yet to buff, but its looking great with all the Candy Flake on it.

armadillo24

The LED has to be Bright as possible, this is a brake and a Running light and there is no way you cannot see this.

armadillo25

Soft Leather with high density Foam underneath, this will be great one or Two up.

armadillo26

This will be a fun machine and am almost completed in the build, no time limit but I want to finish this now and take it to a few shows.

armadillo22

So there you go, the Armadillo seat is completed and you can purchase the Raw steel version up on the website, it also comes with a insert to upholster too.


armadillo1

The Armadillo has a very tough shell and is close to armor plating.

And my Newest Seat design is aptly named “The Armadillo”

This is my ALL STEEL seat pan that I hand bent and folded the sides , to give extra strength.
Also this is 16 Gauge , no light weight overseas model- Mine is the real deal, made right here.
Weighs in at just over 5.6 pounds alone.
Perfect for many motorcycles , although I created this for the Honda CB750 model.

armadillo8

This can be used on many brands .
The advantage is I have made this seat base long, that way, you could trim the base to what ever length you require for the motorcycle you are creating.

30 L
8.5 W front
9.25 W Rear
Hump is:
9.5 W
4.5 High
Total Weight 5.5

armadillo2

Buy From a real motorcycle business , these are made here in the USA 🇺🇸 .

I am very proud of these Armadillo seat bases. Check them out and at $220 each- Very affordable indeed.

These will fit Honda CB750 CB650 and CB550 and CB500.

armadillo3

I ship all over the world, 6 days a week.
These seat bases are hand bent and tif welded to cowl and make a very very strong unit.
But with confidence .

armadillo5
Thanks for looking.
carpyscaferacers is the place to buy your Cafe, Brat, Tracker, Scrambler, Custom , parts from.

18 Years has Flown by.

18 years has flown by since I first started building bikes here in California and people remember the Black K5 Honda Cafe I created and for quite some time I had emails from customers informing me that they have had my bike as their screen saver at home or at work.  I will never forget that and my passion has always been with Motorcycles and parts.  I strive to continue is offering more parts for the bikes I create as well as a few other brands too.

Below is the old K5 I had from bits and pieces and wanted to create a cool Caff bike to ride around on whilst I built other bikes and my Hot Rod.


carpyk

Below: As you can see it turned out so different than the bikes that were out on the road at that time and boy did it turn heads.

carpy K5

This was a fun bike, I rode it to many places and took it to over 30 shows, later on making the cover of Motorcycle Classics Magazine, I still love that bike. It sure was a blast to ride.

canyon Carpy

So thank you for supporting me for all these years, I am thinking of building something similar for my 20th anniversary, so will start to collect parts as the Original is in Canada.

I shall continue to make parts like Exhausts and seats etc as well as offering bars, mirrors, lights and all the other goodies that you may want for your project.


I love what I do and enjoy helping customers out with their builds, this is a fun time in my life and I look forward to designing more Custom parts to offer.

Cannot believe that this time has gone so fast, over 1000 exhausts sold, 4000 turn signals, 200 Swing arms, 600 headlights, 2000 handlebars and continue selling.

Rice Boiler


I have always helped people and enjoy talking on the phone or by email etc and offering everything from parts to complete builds.

The Cyclone was a fun CB750 Honda I created for a gentleman in Texas, and still has it today.


Another old video I did at the shop with the GCR cafe Bike I created.

poster honda


How I tune the Carbs on sohc 750- 4 models.

Here is one of my Razor exhaust systems.

book2

Here is the 550 I built and has my side winder on it.

Little Brat bike, motor had not run in over 30 years, this was the first time it had started up.

So drop me a line or a Dime and I will help all that I can.

book

Another of my exhausts.

Thank you so much for supporting me, even if it is just to read the blogs.

Queen

Just to wake you up, an 8 CB750 I built into a fun Brat bike.

The HTML bike with one off exhausts, have a Great week everyone.

Enjoy your two wheeled machine and have fun with your build.

exhaust bird2

Below are a few of my favorite machines I have created.

anvil

The Anvil was a tough Motorcycle that ran really hard and what ever you did to it, the bike just carried on and on.

Road Warrior

The Road Warrior was a great bike I created for Captain jack Schuller who was on the USS Nimitz, I got to go out twice on that aircraft carrier and will never forget that experience.

Road warrior1

Next up is, My Royal Enfield, that was a tough little 535cc bike that had a great sound with my unique exhaust.


RE9

Below is the Tenacious Ton Alloy Honda cafe that took me many years to get it how I wanted and boy the hand made 4 into 2 Dunstall style cans sounded awesome.teardrop1a

Next is the Revolver, this was a wicked machine that had all the Bells and Whistles and I sent to a Customer in Australia, she owned a Hair Salon and sure loved Motorcycles.

inline4b

Another is the Brushed Steel 550 Brat Bike with my Side winder exhaust system, this ran hard and true.

CB550 exhaust Yohi 4

I could put more but I have a bike to work on this morning, but thanks again for ALL your support, and look forward to helping you again.

I will finish off with the Bike I built for MIKE DIRNT of the Band GREENDAY he saw my Black and Gold bike and came to see me and he still has the bike to this day.

51

Peace and Grease to you all.

22

Custom Exhausts for your Motorcycle

Hey there you lot

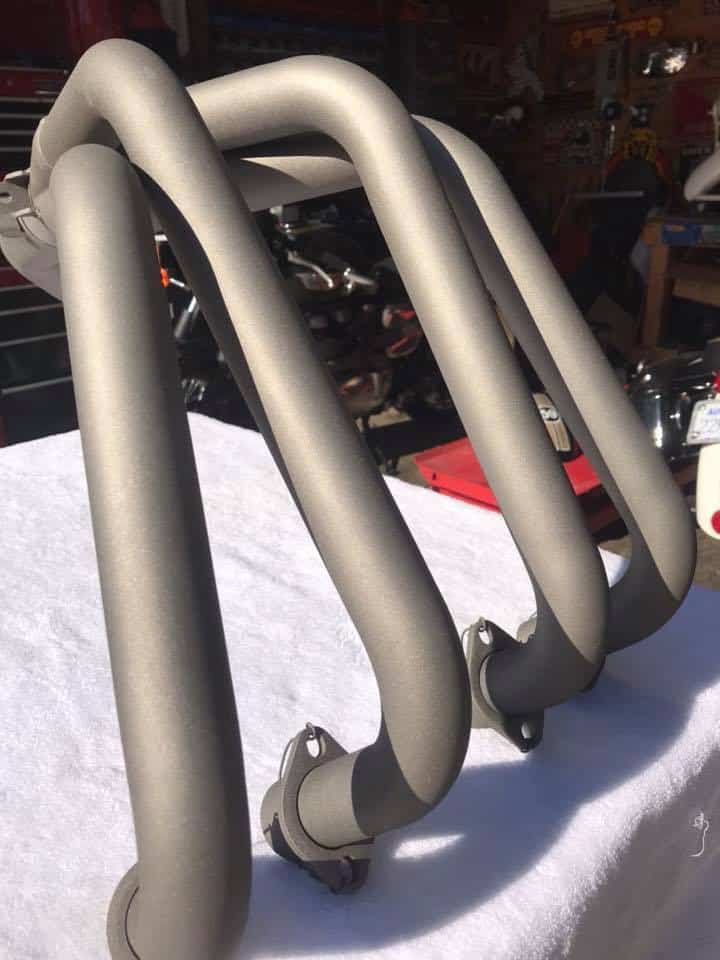
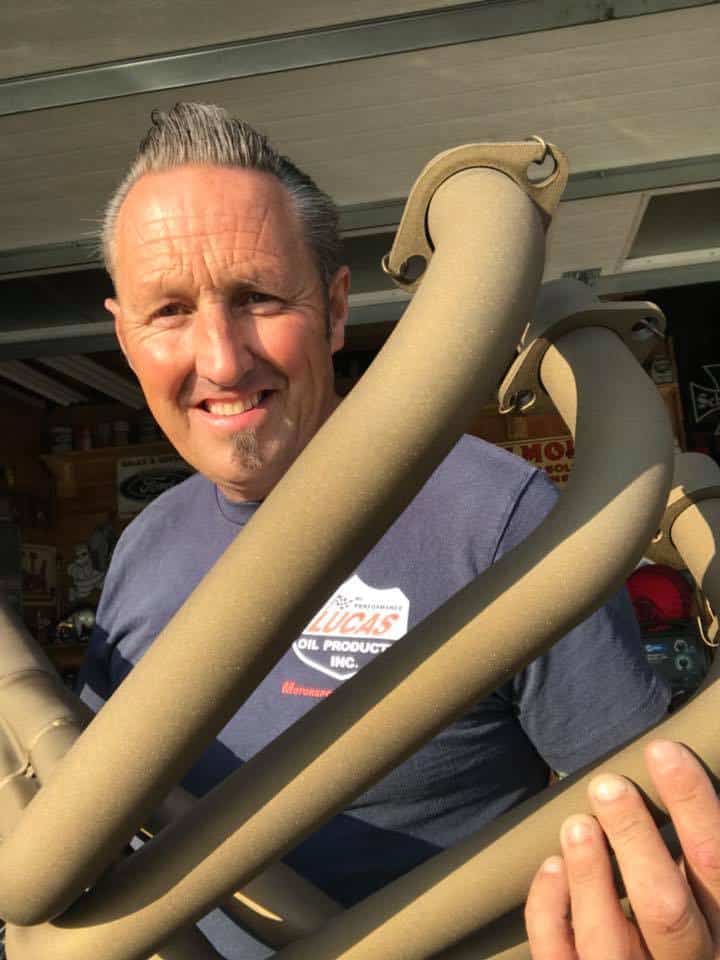
Here we are on a Monday, been busy lately and wanted to show you another exhaust I make, this time I sell this Kit for the SOHC Model, Chrome tail section thats triple chromed and a choice of a Tan or a Black DEI heat Wrap kit to give that system the Hot Rod style thats very popular.

predator2


I have been making these exhausts here for almost 18 years and things are going well, selling over 1000 units of the SOHC model to date and to all over the globe.

predator15

All made here in California, keep the Made in America Flag waving , this has been a fun journey with more things in the making too, stay with us for this great ride in the two wheeled fraternity.

sohc chrome1

These exhausts fit as they are made and checked in a Fixture, not like others, these also perform to and the way the New baffle is designed it flows so smoothly.

sohc chrome6

Available for 1969-1978 SOHC Honda Motorcycles, you will love the look, the fit, the sound and of course the power, we love these set ups and so does many other builders of my products.

sohc chrome2

Thanks for looking, I ship worldwide and help with all the Custom forms so you do not get hammered with Silly Duty bills, I have been here since Feb 2000 doing this and love what I do.

poster honda

So if you are looking for parts, service or a complete Build, you know where to come, with great sales, Customer Service, I really get things done in a timely manner. Thanks for looking and if you need anything just drop me a line or a Dime, I am here to help.

Rice Boiler

Parts for CB500-CB550-CB650-CB750 SOHC & DOHC


ELECTRICAL SYSTEM BASICS

Many emails over the years ask about electrical issues on their Honda’s, I thought that today I would try and add some information on here today to try and help you out a little.

The vintage bikes from the 1970’s, such as the HONDA CB550, have a simple electrical system consisting of approximately 40 components altogether making it possible for anyone with some basic skills and tools to build their own electrical harness.

Here are all of HONDA CB550’s electrical components:

HONDA-CB550-ELECTRICAL-COMPONENTS

Even though such a set-up may be as basic as they come, to be able to work on any electrical system and/or to make a new harness, a clear understanding of the essence of the electrical system is a must.  For me, anyway.  I am not very good at simply following instructions like purchase these components and then do this and that.

I like to know how things work.

So, here is my take on what is going on in any electrical system that is employed in any motorized vehicle.

The heart of the electrical system is the battery.  It powers everything.  But its power diminishes with use and so it must be replenished.  Exactly like the battery in your phone or the battery in any of your power tools. To recharge a battery, we need a source of electricity.  At home, it is easy.  Plug your phone into the wall outlet and it all happens automatically.  In a vehicle, a different source of “battery recharging power” is needed.

Enter the alternator.  The alternator (and all electricity generating devices that send power to your home) operates on the same principle as the one first, reportedly, employed by Michael Faraday nearly 200 years ago in the 1820’s when he observed that rotating a magnet inside a stationary coil of wires (or moving a “magnetized” coil in and out of a stationary coil to be precise) produces pulses of electricity.  The electrical current so induced alternates from + to – and for this reason it is called alternating current, and hence the name of the device that produces it.

The take-home lesson here is “a magnetic field rotating inside a coil induces electricity in the coil”.

In the HONDA CB550 engine, the “rotating magnet” is a combination of a rotor bolted to the crankshaft and a coil called a“field coil”.  The stationary coil is called a “stator coil”.

Neither the rotor nor the field coil are magnets themselves and so they cannot generate a magnetic field.  In order for the alternator to work, the field coil must be magnetized.  When electricity from the battery is sent to the field coil, a magnetic field is generated, which, through the rotor, is effectively rotating inside the stator coil.  This induces electricity.  (Like the old adage “you have to spend money to make money”. ) Exactly the same kind of electricity that Michael Faraday observed in his experiments mentioned above.  The electricity produced in this way is then used to recharge the battery.

Fair enough.  But, there is a problem.  An alternating current cannot charge a battery.   We need direct (a constant + and a constant –) current for that.  So, a way must be found to turn the alternating current (AC) into direct current (DC).

Enter the rectifier. The rectifier is essentially a bunch of diodes inside a housing.  Diodes are “filters”.  They allow only positive or negative charges to go through.  So, the AC goes into the rectifier, the positive charges go through one set of diodes, the negative charges go through another set of diodes and as a result DC comes out.  Job done.

But, now, there is another problem. What happens when the load on the battery is low (you are riding on the highway in daylight and the only electrical current consumed from the battery is going to the coils, which fire the spark plugs and that is not much at all)?  The DC current coming from the rectifier will charge the battery completely and if that current is uncontrolled, the battery will eventually become overcharged.  That’s not good.

Enter the voltage regulator.  This gizmo is placed between the battery and the field coil.  When the battery is low, the voltage regulator sends plenty of the battery’s electrical current to the filed coil, which produces a strong magnetic field and consequently a strong current is induced in the stator coil, which then goes through the rectifier into the battery.  When the battery is fully charged, the voltage regulator reduces the electrical current going to the field coil consequently reducing the current that goes to the battery.

Lets’ put this into numbers to make it a little clearer.  When the battery’s voltage is below 12V, the voltage regulator sends plenty of the battery’s power to the field coil.  When the battery’s voltage is around 14.5V or so, the voltage regulator sends very little power to the field coil and the induced electricity is essentially like you battery charger at home going into battery maintenance mode.

Here is a very basic schematics showing how the alternator, voltage regulator and rectifier are connected.

Basic-Electrical-Schematics


Looking at that, a seemingly obvious question is, “Why are there three yellow wires going from the alternator to the rectifier?” That is because the alternator is designed to produce three separate “pulses” of alternating current called phases.  All 3 go into the rectifier and all 3 are turned into DC.

The two thick black vertical lines to the right of the alternator represent a connector.

Now, let’s find out what these things actually look like.  Once the left side cover is removed, here is what we are going to see.

Electricla-box-with-rectifier-and-starter-relay-identified

The labeled connector in the photo is where the harness coming out of the engine is connected to (i.e. the connector mentioned above).  The three yellow wires coming out of that connector carry AC from the alternator.  That AC goes into the rectifier and DC comes out via the red (+) and green (-) wires.  The red wire is directly connected to the battery.

Taking a look at the back of the electrical components box, we can see the voltage regulator.


Voltage-regulator-identified cb550f

Power to it comes down the black wire once the ignition is switched on.  Power to the field coil is sent via the white wire.  The green is ground.

That’s all there is to it.

Let’s recap: When the ignition switch is turned on, power from the battery arrives at the ignition coils and the voltage regulator.  The ignition coils are energized.  The field coil is magnetized. Kick the kick start and the engine fires, the alternator starts producing electricity (AC), the rectifier turns it into DC, which goes to charge the battery.  Once the battery is fully charged, the voltage regulator makes the alternator produce less electricity so the battery is always optimally charged.  Cycle complete.  And we are back to where we started when we said, “The battery is the heart of the electrical system.  It powers everything”.

What this teaches us is that all that is needed for the machine to run is: ignition switch, battery, voltage regulator, alternator, rectifier, ignition coils and points.  None of these components can be eliminated without negative impact on performance.

Everything else is, more or less, optional.  A fuse or fuses are a prudent addition.  A headlight, tail light(s), brake light(s) and turn signals (as well as their associated switches and relay) may be required by law. If the electric start is to be retained, then the starter relay and a start switch will be needed.

And then come the “conveniences and luxuries” such as neutral gear switch, neutral gear light, oil pressure sensor and associated light, etc.

With this in mind, a brand new harness can easily be put together.  If the original components are not available or desired, many quality aftermarket parts can be used.  These days the rectifier and voltage regulator come in a single unit, which is the preferred solution for café racer and custom builders since it saves a little bit of space.

Thanks to: Kyril of Black Square Motorcycles, very informative.

Below are some Schematics I have added to help you on your Honda CB750 Models. First is a KO-K1-K2

CB750k1

Then a CB750 Automatic Schematic.

CB750auto

Below a CB750F 1977-1978 Diagram.

Honda Cb750 Wiring Diagram Honda Ca95 Wiring Diagram • Wiring Articles and Images - Automotive Wiring Diagram
Honda Cb750 Wiring Diagram Honda Ca95 Wiring Diagram • Wiring Articles and Images – Automotive Wiring Diagram

Little bit of work on Customers CB750F today

Had a customer come in with an old 1975 Super sport, just wants a few little things changed so he can ride for a while and then sell it, these jobs sometimes can get out of hand as you are dealing with unknown history and previous issues. Knackered exhaust, no side covers JB Weld on things, ugh! Some of these things do become a big task and would of been better if they left it alone, but, we all have to start somewhere and I know I can help this fella out and get this bike running and looking to how he wants it.  Working on a small income is hard, I have been there but this will be a fun machine and he will get miles of smiles once I have completed the tasks at hand on this Super Sport.

27459479_10156000263276760_4650784936631111679_n

Above is the before and after as you can see the bike had an old Chromed Kerker Muffler on the unit but, it had no Baffle at all and was so loud, it would let off peoples car alarms every time you fired the thing up, so I made a smaller custom one from steel and added a kick up and baffle, it now resonates nicely and looks a whole lot better I think.

27545115_10156000263216760_8008564208194141516_n

Above, you can see that I also changed out the rear shocks, as his ones were rock solid and rusty, so now he has some comfort on his machine that will soak any bumps up from the tarmac.

27654462_10156000263076760_4210414310045140770_n

Removed the rear Master Cylinder bracket and Polished it to at least clean the area up a bit as well as polishing the reservoir cap too, makes a difference I think.

cb750

Above is before and below is how it is now but still more to do as I need to make a steel seat base and then cut some high density foam and upholster it, not sure what color material he wants but will call him once I get to that part of the work that is needed to be completed. I also have to figure out his tail light and turn signal situation as well.

27657427_10156000262971760_2537322673623165422_n

Next up was to remove the stock headlight and fit one of my LED versions that has the internal turn signals, this, not need the old bog ugly stock ones. be seen, be safe, thats the most important thing on a Motorcycle and with the halogen bulb and super bright Amber LED internals signals will make sure people know your intentions on the road.

27658082_10156000263241760_5938053602242579240_n

So there ya go, just a few little things I did, am now going to re-route the throttle cables as they said when they fitted them they tended to bind, so will address that next, I made some side covers and they are now on, just need to be painted to match tank when he repaints the stock tank later but so far I have got a lot of the issues out of the way.

book2

Seat next so hopefully I can do that soon and will keep you posted as to how that looks, if you need any parts, just drop me a dime or text us on 714-598-8392 and we hope to get you fixed up and back on the tarmac as fast as possible. I am here to help and love what I do its been a passion of mine since I was a Kid in Great Britain.

cARPY TURBO

Have a Great Wednesday everyone and thanks for reading my Blog.


Carburetor Rebuild Service

Offering a Complete Carburetor Rebuild service for ALL of the SOHC HONDA CB750K Models and what you get is a Jewel in the crown of carburetors.

Not cheap at $600 but take a look at the finished set up from the ones you send me and make your own mind up.

carpy alloy bike

Send me your snotty, grimy and oily carburetors, and I will take them all apart, replace any worn parts, clean and vapor blast the bodies, Zinc plate hardware and of course fit New Jets and set the air mixture etc.

carb 1

Then Fit to a Motor and synchronize to make sure these are right on the money for your machine, all I need to know is what exhaust set up you are running so I can set the jetting.

carb2


Also, all the Aluminum Float Bowls and Carb tops are Polished to a chrome finish, these Carbs will really stand out against many and I am sure you will be over the moon with the Quality.

carb7

carb8


Been doing this over 17 years and offer this service to anyone around the world, we ship Globally and I know that you will love the refurbished set up.

carb 3 carb 4


See Below, these are Messy and need totally going through.

inline rough

Below, now all cleaned, rebuilt and synchronized and ready to bolt on and go.

inline finished

If you are building your Honda this year but the Carbs are really letting it down, then send them to me and I will send them back ready to fit, just hook your Throttle Cables up once pushed into your intake Manifolds and you are ready to go.


See the Difference when these are completely taken apart and cleaned out, then put back together with new parts, you will love the way these look.

carb3

carb4

Take the No nonsense approach and get these to me ,and watch how your bike performs with these on rack of Four performing as they did from the Factory.

carb 9

You can see the Difference, some of the Carbs people have sent me have not been touched in over 3 decades and are covered in all sorts of Nastiness.

carb 10

Have a look at all the re-plated parts, the finish, the fit, the look and the cleanliness here, this isn’t just sprayed with a bottle of Carb cleaner.

carb 11

Most people spend all their time on the rest of the Motorcycle and forget about the Carbs, these are all set up right and the air mixture screw is set too, literally push carbs on Manifolds and you are set, your bike will love you for it too.

carb 14

Needles are set accordingly and parts are stripped and Plated for a show look and you can be sure of a head turning Rack of carbs, they will no longer resemble the ones that you sent in the mail to me.


carb 13

So treat yourself to a magnificent set of inline refurbished Carbs sending me yours, not cheap but, look how much work goes into getting them to this stage.

carb 12

I ship all over the Globe, so no worries with that, I also tick the Gift Box and low value for over sea’s Customers, so you dont get hammered with sill Duty charges.


DSC_0006 (2)

I also offer a Black version of these as well for all the Custom fans out there, the choice is yours.

sohc5

Thanks for looking and I hope that I am of some Help to you.

sohc4

OK, back into the Garage as I have many things to get on with on the good old SOHC Honda’s.

carbs2

www.carpyscaferacers.com   714-598-8392  Call or Text for any help I can give you.

carbs