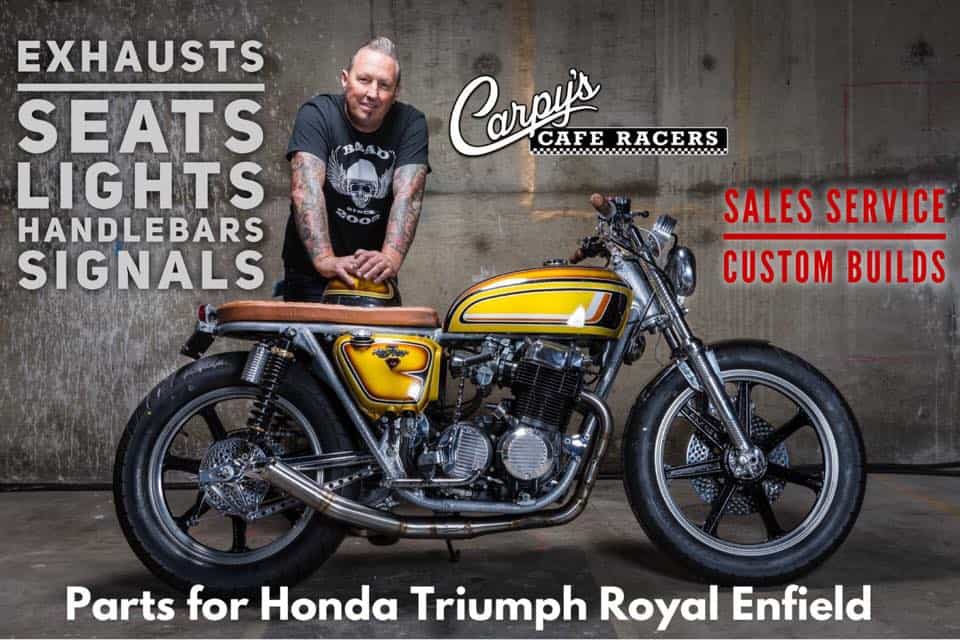
The Vesco Honda Custom Machine fires into Life

For many years this bike was left dormant and looking in a sorry state, I completely stripped this old 74 Honda and Custom worked on the frame to give it the opportunity to remove parts of the chassis if you need to get to the motor.

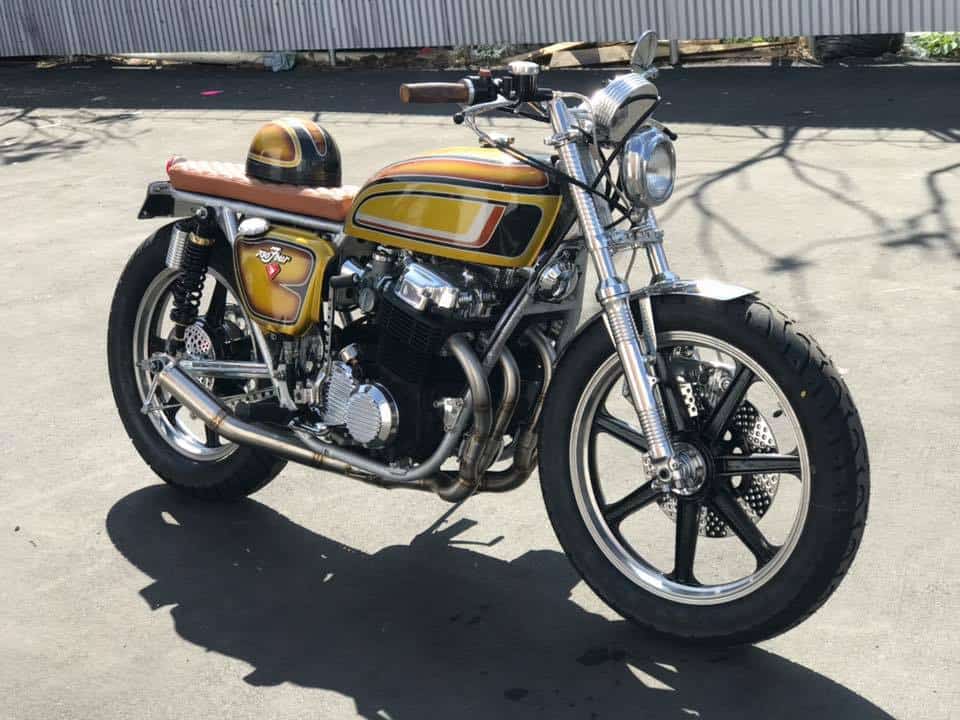
This bike is kind of a 1970’s Street Muscle Machine for the want of a better description and I am so happy I went the way of a Metalflake Silver frame and a Candy Pearl bodywork design, this screams mid 70’s and the ole 750 sounds tough as old boots.

I have custom welded the gas tank and now it uses a screw in Harley cap and is smoothed over and the seat is one of the most comfortable I have made, using memory foam and expensive Quality Leather, I hand bent the handlebars and triple chromed them and the stance is bang on and really nice to ride around on , and Love this bike and am so happy at the end result.

Obviously, originally belonging to the infamous Vesco Family and now they have a 428 MPG record with their Streamliner, they have shown interest in the machine once more and love the way it has turned out.

The 4 into 2 into 1 Stainless Exhaust system Growls nicely and suits the bike as the headers hug the inline four motor, it now has that old school Gold tint to the headers now she has been fired and it is a tough looking Motorcycle which ever way you look at it.

From every angle you can see detail and I am happy that I put a lot of hard work in detailing this inline Four, these sure are good solid bikes to use as a Platform for any guise of style.

The Original Lester Spoked Rims I removed from a CR750 Race bike that was being parted out and glad I got to use them, as I have had these in storage for about 15 years and nice to re-use parts from back in the day.

Here are just a couple of lists of some of the things I have done to this motorcycle.

The OG Moto Show was a Blast this weekend.

Well, finally I managed to get the old girl put together in time for the OG Moto show in LA this weekend and only by the skin of my teeth, but it was all worth it in the end.

The Bike came out really well and I received so many congratulations from people that saw the bike, it was fun showing it and many people taking photos etc and made for a fun weekend thats for sure.

Plenty of cool machines there this year and the weather could not of been better, although for three weeks before this, it rained all the bloody time, no idea how I managed to bang this out in less than a month but I pushed hard and got there in the end.

There were so many details on my machine, I am sure not many people even took note, but one thing they loved was the color set up and the way it all flowed and of course sparkled, due to all that metalflake paint.

I am super Stoked at the way the bike turned out and happy to of got the bike to the show, as a lot of people wanted to come and check it out and it sure has a lot going for it.

She sits well on the Lester Rims and I made my own Handle bars and chromed them and they are so comfortable, nothing like your own Custom Handlebars.

The Bike looks great in the Sun and I am glad that I came up with this Classic 70’s styled Flake, it just needed to be like this and it is pleasing to me to look at.

Still ant to do a little more to the bike but it turned out as I imagined it would and it will be a lot of fun to ride around Orange County, this is a strong Motor and will run great.

The 40 year Old Rims look good with New brakes and tires etc and, these are Genuine Lesters off a CR750 that I purchased a few decades ago now and I knew that eventually I would get to use them on a build, very strong rims and gives that 70’s era the right look on this machine.

I went ahead and did the quick realse system on the frame rails on the side and the top, that way, if I need to work on the top end I can keep the motor in the frame, Or if I need to remove the whole engine, getting to it is a whole lot easier with the side rail off.

The Exhaust is Stainless and the bends are right on the money for the exit, a crisp look that you dont often see these days and am pleased at how this turned out.

Well, you cannot get much wilder than the paint and I wanted it to scream Flared pants and wide Collar shirt and it sure does, I cut the old gas cap and neck off and welded a harley version for a more crisp look to the petrol tank and am happy that I went this route in the end.

The Matching helmet i thought would be a good effect and many people commented on the skid lid which is a British 1950’s style Davida piss pot.

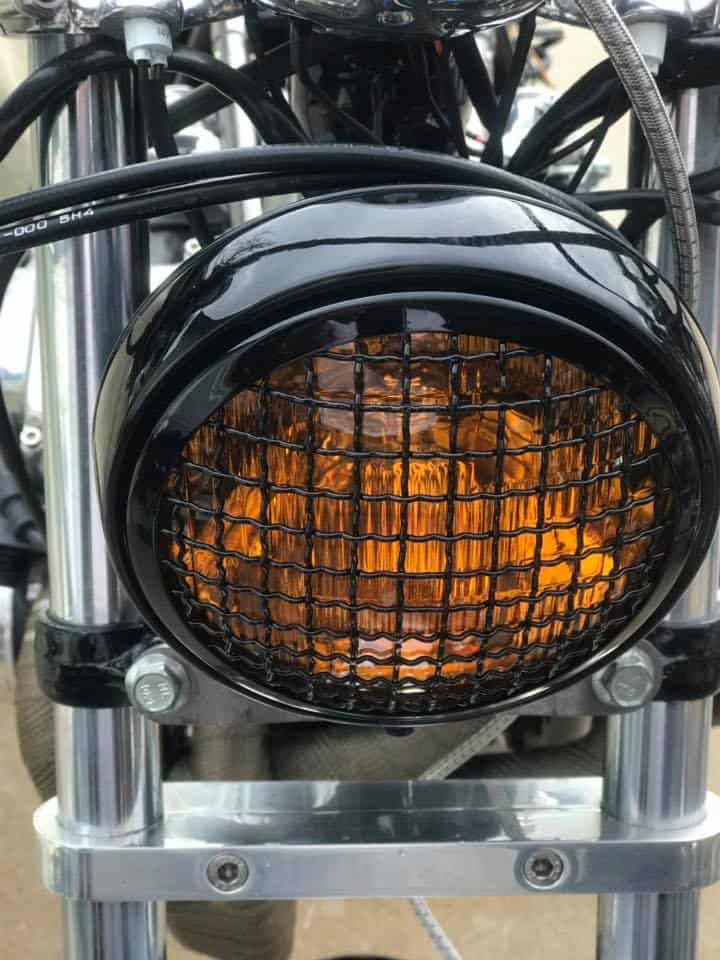
Of course, I really wanted to make a statement on the bike here and went the whole hog by creating some machined forks and uppers for the Vesco bike and machined a piece of 6061 Billet to make the finned bucket to house the GPS speedometer, the finned headlight came out pretty cool too.

I wanted a Stainless 4 into 2 into 1 system this time, let the Old Girl breathe and a unique look that you really dont see these days, its a nice free flowing stepped set up that will work very well all the way through the curve of power and will sound pretty unique too.

Having the right stance was important to me and she sits really well on the tarmac, I have a 110X19 on the front and a 140 by 18 on the rear nd they fill the rim out nicely .

Available soon: My Bobbed front fender all made right here, I wanted something that would really hug the tire and this sure does and does not rub at all.

The Polished rear Hub was drilled by me, I don’t make the pattern up on a template, I just go with the flow and they always turn out really cool, they get rid of heat and any brake dust too.

This Vesco Honda started off as a non running bike and I knew that I would get this thing back on the Tarmac, its a great feeling to get to that stage as many of you have and will understand the Euphoria that goes through you when you hit first gear and let that clutch lever out.

This really sits well and I am glad that I had a go at a full Custom machine for this show, it is a fun motorcycle that really does turn a lot of heads.

I fitted slightly over-sized tires to this bike as I wanted the Custom Brat to have some thickness all over and it really does give that effect, plus for me, more Rubber on the Tarmac, better the grip right?

The weather was great for a Motorcycle show too and LA is a really great place to put on such an event, so glad that I got invited to this again.

Thanks for following this build, it was a tough one as I had a month to do this but we got there, even with 3 weeks of rain, it was a task I really didn’t think that I would finis in time for the show but, persistence paid off this time and cannot thank you all enough for the encouraging words you gave me to keep going forward and not give up.

The 4 into 2 into 1 Stainless Steel Exhaust system came out just how I wanted it and a nice aggressive kick out with a Chromed Baffle, the Chrome Swing arm sets it all off too.

I have had built a lot of these bikes over the 19 years here but this one was a challenge and sure hope that you like what i have done to the bike and it is a different look but I like some things that are Unique and believe that this was the style it should end up as, fresh look with a lively Metalflake Uniform, makes this stand out for sure.

So, what next? hard to say to be honest, next year is my 20th Anniversary of creating these machines, I have no idea what to do yet, so my mind is racing away, LOL!

This has so many cool touches to it and where ever you look I have tried to change things up, surprise myself sometimes and this makes me smile every-time I look at it.

If you need parts, service or a complete build, I am here to help you, feel free to call or even Text me on 714-598-8392 and I shall do my best to help you out.

Thank you for everyone that spoke to me or emailed me, letting me know they like what I have done, Motorcycle building should be fun, this is a great industry and everyone’s bike is different in some way- The bike you ride is an extension of your Character and I look forward to seeing progress photos of your machines as you go along this build.


New Stainless Steel Exhaust for the Vesco Honda Creation

Well, the Rains are here again tomorrow, so had to tear into many projects to try and get ahead of the storm, as it will restrict me to many things I need to do to create this Custom Motorcycle, the Exhaust I originally tried out was pretty Bad Arse- But I wanted something really trick, so for a few days I sketched a couple of Idea’s and came up with my Latest design.

This is my latest system and I have called it the “Y-Block” And this system breathes like a man with Three Lungs.  Seriously, this is a great bit of Kit and hand made from 049 Stainless and not only does it perform, it is light weight yet sturdy. This is so much better in Stainless and wanted to show the Globe that cool stuff does indeed come out of sheds and Garages.

A lot of time and effort went into this system and I am happy at the end result, this will look great on the Vesco Honda and am sure many will ask about all the details that the bike has on it, there is so much to do and have to do all I can in the short amount of time to get this machine back up and running- no easy task and still quite a way away from completing this build.

The system will fit ALL of the 750 Motorcycles from 1969-1978 in the SOHC Range and will fit the CB750K, CB750F and CB750A models too, the design took some time to create how I drew it but it is bang on and I cannot be more happier than how the “Y-Block” free flowing System has turned out.

All quick release springs, this is a slip on system just like the old race bikes and wanted to give a little more Hot Rod look to this set up and I feel that I have accomplished that style and look. This has a Nickel Plated Removable Baffle and sounds just like a deeper version of the Yoshimura style system.

The fit and finish is superb and great ground clearance too, wasn’t sure if this was even possible a few weeks ago but after many drawings of concepts etc this is the end result and it looks so good, I am super happy that I went this way and it sure does look Custom. Sat on the workbench and rwady for it to be fitted to the Custom machine when I get it up to assembly.

This is my design and its a 4 into 2 into 1 set up that really lets the gases flow hard and escapes at the end through a baffle at a faster pace than many out there, and I really wanted a trick looking set up that not only looks and sounds great, but performs pretty well too, and this sure does meet the bill.

Of course I will offer this as a line for the HONDA CB750, CB550 and CB500 a little later on but first i want to see how it performs on the bike and will give a full run down when I have all that completed, but this New System really is a unique set up that I will be happy to offer to all of you soon for your inline Four Motorcycles.

I will weigh it later as its so much lighter than the steel versions and when it is in its brushed Stainless guise, its a real head turner with the welds turning that nice Bronze color.

A fun looking Exhaust that I am proud to put my name on and I am sure will get quite a lot of interest for other peoples rides, so today turned out a great way to bring the week to en end.

This will be easy to fit to your very own inline four, even if you are on your own as it weighs nothing and comes apart easily for assembly etc and the springs are way easier to remove than undoing bolts .

I wanted to have something different out there and to show that I also love Hot Rods too, it’s all a cool lifestyle that I have always been into and now have a great system for the inline Four Honda’s.

When the Vesco Brat bike is completed, I shall take a lot of photos of it, as well as some sound bytes of the exhaust system, I will still use the Yoshi style baffle as I love that tone.

So with that- I shall bid you a fond farewell and get back into the Garage, as I have a million more things to do and as the storm approaches, I need to get in there fast.  Thanks for stopping by and reading my blog, let me know your thoughts, as input is so important from My Customers.


The Vesco Brat Bike Honda CB750 SOHC Rebuild Report

Well, the weather has been fighting me this month, worse Month since 1962 for the amount of H2O we have received and again today as we head to the end of February, we have more Rain coming down this week, so I need to try and use my time wisely and get as much done on this machine as I can.  Lets start off with the Triple Tree on this bike, as I wanted to change the Cable Tach and Speedometer and make something more Custom.

So, have a look above and you will see that I have started to make a start on the fabrication on the triple tree, first off I ground off the Original Factory outer tabs that housed the stock gauges, then I hand cut an Aluminum Holder out of a small sheet of Aluminum and made sure that it would be able to fit the stock location tabs that the Ignition switch used to fit into, and it looks great, if you look to the right, I already made a start on the Speedometer Bucket.

Not an easy task this but a block of 6061 T6 Aluminum was chucked up on the Lathe and turned down to the size I need for the Speedometer to sit snug and tight in the housing, also reliever three areas for the set up to really fit snug as a bug with no rattling about.

I wanted to incorporate fins into the casing as the front forks have this look as well as a few other features on the bike to make the whole concept flow and I am quite a big believer in that, I also need to grind a little more on the top triple tree and then smooth and polish to give the whole set up a look of chrome, no easy task too.


Now I am happy as its all Polished and the GPS Gauge set up looks really Custom, I machined Three 7/64 locator holes to allow the gauge to Clock right in the Location I wanted and have to say I am super stoked at how this now looks on the polished Triple Tree.

The bike I am creating is a 1974 Model Honda CB750 But I am using a later upper and lower tree to allow me to have the small tab brackets in the center and glad I went this route.

I wanted to create something that is different from the norm and I do enjoy what I call ” Newstalgia “, New parts with a feel of Old, and I believe I have created that with this.

I really like the look, the Gauge is 4 inches and the bucket is 5 ” and a strong solid appearence, I think it blends in well with the style of bike I am building.

So just a final clean up and then I need to pick the lower tree up from the Chrome shop, this should really set the whole top end off on the bike and glad I took the extra mile.

I will Clean up once more and add some polished Handlebar clamps that I make and she will be all ready for when I start to bolt all this together again, so in a week or two I can start to assemble the frame, it is still at the painters but not for long and thats going to be Silver Flake, should be a good contrast to the rest of the bike.


Thanks for reading my blog today and hope I have inspired you to get into the Shed, garage or lock up and have a go with your ride?


My Hot Rod 4 into 1 Exhaust system for the CB500 and CB550 Honda.


Well, Colder weather but had to continue and get a few things completed as a lot of Rain was on its way here and I worked as fast as i could to get a set of HOT ROD Exhaust system ready to Ceramic Coat as a Customer in Australia is eager to have them on his bike,. I just sent a set to the UK and he is really happy with they way they look and fit, as well as the way they sound.

This exhaust came out well and the Customer wants this one Silver in Ceramic Coating, so this is how it looks when it is coated and fitted to the CB550 Honda Motorcycle.

It bolts up so easy and stand out in the crowd, an aggressive style that shows your Engine off well too, it barks like a scolded dog and lets your engine breathe all through the curve.

Another with a Raw header and a ceramic Turn out and these are very popular for many bike builders, order one today from me and choose weather raw steel, Ceramic Silver, Black, Titanium or Bronze.


Worked on rebuilding the Vesco Bike front Forks today

Well, pushed hard today as Rain is forecast for later on this afternoon and needed to start and b rebuild the old front forks for the Vesco bike, as they had seen better days over the last 40 years and it is now time to make them stand out in the crowd as I am trying to get this bike done in time for the OG show in march.

I am super stoked to have got these done and, as I put these away in the garage, the rain started to fall, so great timing on my behalf and feel pretty accomplished today.

Had to fit New Fork seals, and lucky for me I had a spare New set that I could use for these Machines fork lowers and I always fit with the Numbers facing up on Honda’s.


I also use a piece of UPVC tube to act as a drift and tap the seal in bit by bit, its an easy way of fitting seals and many people do this if they do not have a press handy.

I fitted the New Rubber fork Caps onto the top of the Lower fork leg and then slid down my Custom Chrome outer cover over the top of that, just to finish it off a little more Classic.

Now its all dressed up and I am really happy with the end result, these forks now look so different now that they are machines and polished to a Chrome finish.

I love the look and the finish and its the devil in the Detail that I am into and these certainly have a really cool look to them, rather than just stock ones.

I have always machines these fins into the forks so that the whole bike flows from the front to the rear and I get many comments on my fork set ups, which is great to hear from other builders.

Still more to do to the bike but other than adding about 7 ounces of Automatic Transmission Fluid into each tube, but another tick off the long list of things that I must try and complete.

A seriously cool bit of kit for the bike and glad that I took today and spent some time getting these right on the money, they sure look great and finished just in time before the Rain arrived.

So, these will now be bagged up and put away until I start on the rebuild of the frame, the frame is now at the paint shop and getting ready for some serious Metalflake Silver.


Time to head inside now but wanted to share how much I have managed to get completed today and hope that you enjoyed what I have created for the Vesco Honda Brat Bike.


The rebuild of the Vesco Brat Bike for a show

Well tomorrow will be 19 years since I have been doing this stuff here and I am super stoked to revamp the old Vesco bike I created a few weeks ago, but this time I want to trick the frame out before Custom painting it in metal Flake, so here is my Blog as to where I am at with this old 500 pounder Honda Four Machine.

The frame has over 40 years of paint, scratches and holes in it, so need to weld up the holes and of course the new quick release tubes on the frame and get this ready to strip to bare metal, a long Process but I will stick with it, unfortunately we have a few days heavy rain, so I am restricted with what i can do until it warms up.

Made sure that I protected the Bearing races as these are for New Tapered Roller Bearings for smoother steering, the poor old frame was pretty beat up and will need a lot of TLC but I shall get there for sure.

A lot of re-welding needed to be completed and then it was time to start to clean this frame up, this will look so cool in Metalflake paint.

The quick release kit is all welded in and this will be so much easier to fit the motor and to get to to service etc at a later date and am glad that I went this route.

That’s a lot better and now time to get all the paint off of the chassis to see what I have and then can begin to get this to a better standard and looking more Custom too. Video below is just using my Iphone, so not good quality, but you get the idea of what I am doing though.

So, plenty more to do but, as the clouds keep opening, I have to stop what ever I am doing, we had 3 inches of rain today, not good for a bead blasted chassis but I wont give up at all.

Look at the chassis now, way better and now can see where I have to work on and get this bang on, this is almost ready for sealer, then primer, then bondo welds over, then base coat, then flake, then clear coat, so a super long way to go.

The frame rails came out well and am happy at the end result, makes it so much easier to get to the Cylinder head now if I need to work on the top end at a later date.

With over Four decades of paint and stuff plastered all over this frame, this is now so refreshing to see and the skeleton is all set to have some cool plastic surgery.

Now then, I really am stoked to have gone in this direction, I mean, the bike would of gone to the Junk yard and lost for ever, so at least i saved it from there, its not a restoration and not a super rare year either, I really wanted to make this machine stand out from many of the others as it belonged to the Vesco family who are world known for racing and getting world records etc. I am super stoked I decided to make the side of the frame removable and, having steel tubes inside the hollow tubes, makes this frame more stronger than stock.

This will be a cool look, many people will not even notice the Custom fabrication of this inline four but thats OK with me.

So, a little more grinding and then ready for applying sealer and then paint, its all systems go from now on.

Few more little repairs but this will sure look Custm once all the paint and flake grabs the metal and I hope you are enjoying the journey this machine is taking with me?


Re-Creating My Vesco HONDA CB750 Brat bike for the OG show in March

I am not and never have been a fan of dead lines, but right now I do have one in hand, March 23rd, thats when the OG show Custom Show is on and somehow I have to strip the Brat bike I built and hopefully finish it in time for the show.  No easy task when you consider that I have other jobs to do and of course, I have to tear the bike down to the bare frame and then make a start all over again.

So, the bike is ready to begin the strip, the bike will have a few tricks to the frame as I shall first remove the upper rails and then add my Custom Removable adapter kit to the top, this makes removing the engine so simple or just the cylinder head if you want to work on the bike with the motor still in between the chassis rails.

As you can see, I have used painters tape to mark where I want to make a cut in the frame to remove the rails, I use a sawzall for this job and will be using my steel inserts to replace what I am taking out of this 500 pound Honda CB750K machine.

As you can see I am making the first cut, when the kit is back in place, the integrity of the chassis will not be compromised, it will be rigid as hell, done many like this and of course YOSHIMURA did this to many race bikes and sold a Kit back in the day.


Once this is out, I shall clean the frame up using an air grinder with a Fiber wheel, this will clean the area up and then I can start to make the replacement frame.

As you can see, the inline Four Motor is ready to come out, and at 230 pounds, I want to lift this as quick as I can and not have to go too high, I have always used a storage moving Dolly to rest the motor on or put it on a milk crate as they are the same size, but Milk crates are getting hard to find these days, so a Dolly it is.

So, I straddle the bike and then with one quick lift, the motor pops up and I rest it on the frame, then walk to the right and plop it on the dolly and its out as easy as that.

So, the inline four mill is now out of the bike and I can push the engine into the garage where I shall work on that later, we have storms and rain forecast tomorrow for 4-5 days, so need to get this done and the frame to be stripped bare by the end of the day.

Right, now I can see what I have to work with as I plan and making the top kit first and thought I would share this as many people have purchased my kit and are happy how it works out for them and, saves them so much time when they need to remove the cylinder head or complete Motor.

Below is a little Video I took with my phone, you may have to hit the x on the lower right to hear what I am saying but explains what I am about to do to the bike.

Hopefully you could hear me mumbling about what I was doing and hit the enlarge button too if you want, look blow and you will see I have fitted the top rail kit and will weld it in tomorrow.

Below- I have now taped the area off here I need to make my next too cuts, as on this Custom build a I really want to be able to fit the engine easier without scratching the Metalflake paint that will be on the frame, this will be a very cool set up and the chassis will be strong as ever.

You can see the tape edges and that indicates where I will cut the side rail, this is something I have wanted to attempt for the longest of time and now is the time to do it.

Well, it is done now and there you go, I shall weld in the bungs tomorrow but have to make sure all fits will and make any adjustments before I completely strip the frame.

If you look closely you will see what I have done, once its welded and then the frame painted it sire will look pretty trick and make refitting the Motor so much more easier.

Make sure that you leave enough room for a strong bead of weld to secure the bungs and keep the frame rigid, but also make sure that you allow for any shrinkage.

Also, make sure that you Vee Groove a nice valley for a stronger weld, I also drill a hold halfway though in a couple of places, just for extra spot weld strength.

Here is the frame now that the adapters have been test fitted and I am happy about the way they look, not many would even notice until they see the inserts.

So Tomorrow and the next will be welding day, this old Honda frame has holes all over the place, so a good time to address them issues and make sure all is good.

I fitted some Tapered Races in the neck for smoother steering and looking forward to stripping all the old paint off this old girl and get into some fresh color that will turn heads.

Thanks for following what I am doing, I have a long way to go and hope that I can make such a short deadline, but appreciate all the emails of encouragement from you, it is going to be a great looking Custom when completed thats for certain, and already has quite a following.


Shop Tour of the East Coast company 1945 Speed and Custom

Well, we see many shops in Southern California, but its good to see what being built in other states and of course, all over the globe, today we look at a company way over there on the other side of the East coast, known as 1945 Speed and Custom. They are also in the Oilers Club, an original Hot Rod club that is still strong in their Vintage lifestyle as it is down here in California, I saw some of them Racing at TROG in NJ and it sure did draw a lot of spectators. So below is just a little blog on this great company on the East side of the country, if you over that way, drop in and see them.

Formula Drift Champion Chris Forsberg takes us on a tour of garages around the country, from professional outfits to grassroots backyard garages. In this episode we visit 1945 Speed And Custom in Troy, New York. Owner Jeremy Baye shares his love for building some of the coolest custom hot rods in the world. Baye is a master designer and fabricator creating classics reminiscent of a bygone era with a focus on high-quality metalwork, his 10,000 square-foot shop is in a renovated car dealership along the river. Baye tours us through finished works including a custom Rail Dragster, a late 40s Big Car, a 1927 Ford Model T, and Baye’s own ’51 Ford Flathead V8 Truck. After a tour through the garage checking out some works in progress, Forsberg heads out for a drive in the 1927 Ford Model T.

Located on River St in NY, this shop has been around a few years now and know their way round Vintage, Custom and race cars, they are a hands on fabrication shop and can go from a small modification to a turn key head spinning Hot Rod.

Custom Work

Taking a piece of history and transforming it into something entirely new is the ultimate form of innovative self-expression. 1945 has the ability to take that idea in your head and make it a reality. Our expertise in hot rodding and resto-modding automobiles from all eras is unmatched across the Northeast. Anywhere from period correct American hot rods, to Modern Day Imports, we have all the resources to make your custom work possible. “Customization” may range from simply adding power brakes to a car for better drivability, to completely innovating how a car looks, drives, and sounds.

Restoration Work

There are times when an automobile or bike is so neat or rare that a restoration is the best route to take. This is no simple process; it takes expertise and skill to complete a restoration to top quality. 

1945 has the abilities to authentically restore your automobile or motorcycle from any era. We are dedicated to doing work that stands out from the rest, work that makes our clients confident in their project’s development, and highly satisfies them with the outcome. The most important advice we can give is don’t bring your project to an auto-body shop who does restorations on the side. Choose an experienced and full service shop like 1945 for unparalleled craftsmanship in fine automobile restoration.

Refinishing

1945 Speed and Custom holds itself to the highest standards when it comes to refinishing automotive classics and masterpieces. With some of the best talent in the world on our team, our abilities in the refinishing sector of automotive work is unmatched in terms of quality and aesthetics. Anything from authentic looking paint jobs, to custom metal flaking, to flawless pinstriping, 1945 can turn your project into a true masterpiece. Visit our portfolio to see some of the wild paint jobs we have completed in the past.

MECHANICAL

Whether you are looking for a “juice” brake upgrade on your ’31 Model A or a full LS swap in your ’68 Camaro, 1945 has the abilities and skill to execute and complete any mechanically oriented task with ease and perfection. Anything from engines, transmissions, front and rear axles, suspension, and steering, to simple dashboard components and wiring,  1945 has the expertise to restore or customize your automobile or bike of any era to a flawless finished product.

We are sure there is no part of a vehicle’s mechanics that we can’t repair, restore, or customize – from any era or make.

©2017 by 1945 Speed And Custom.

1945 SPEED & CUSTOM

Love what I do, best job in the world.

I have always enjoyed being my own boss, Yes there is never any wages, yes everyday can be a Monday, yes you can burn the candle at both ends, the the rewards of creating something with your own hands, far out weighs the negative sides to being self employed.

Happy Hump-day Everyone.