The Milwaukee Special CB750F HONDA SOHC

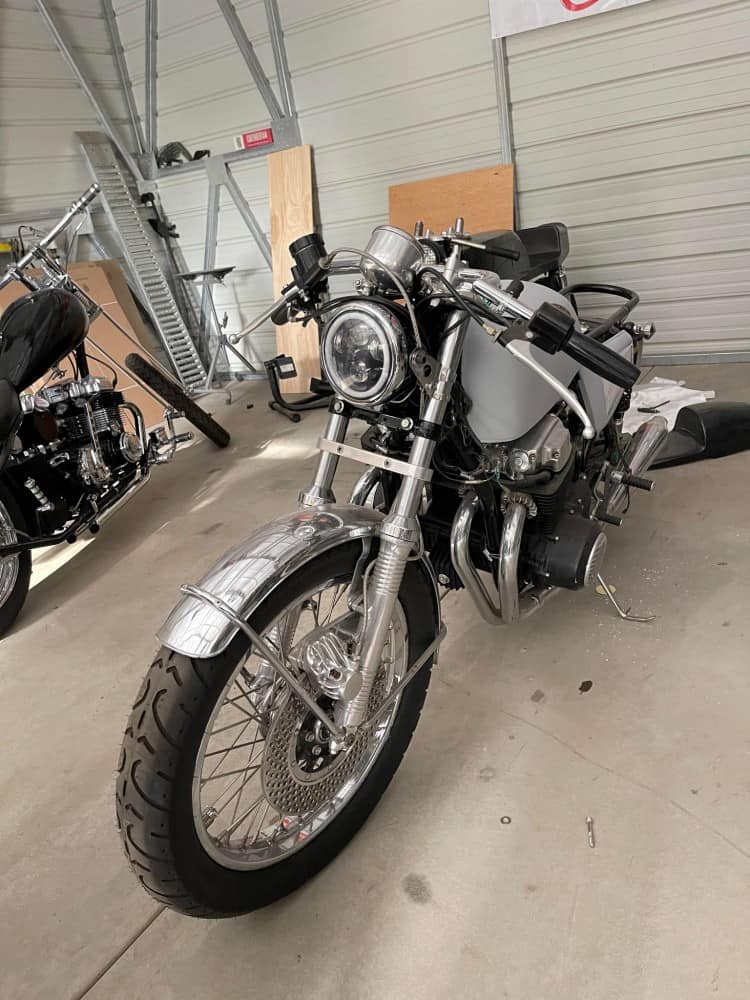
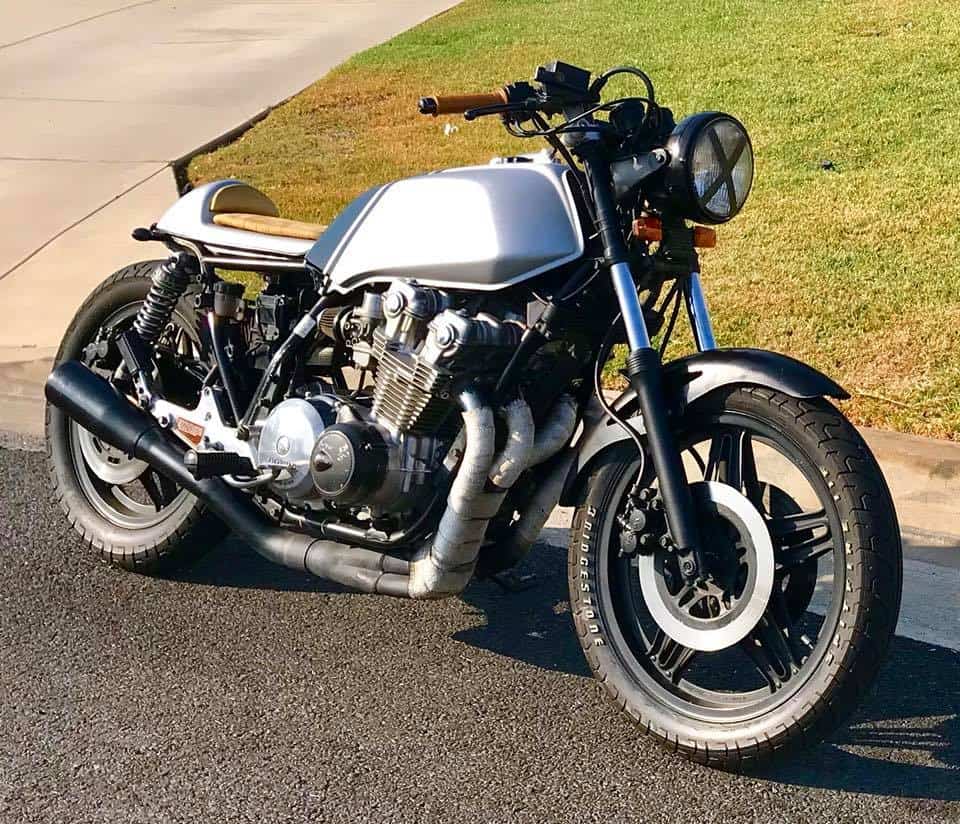
Well, here we go with another Model, this time a CB750F model, yes, the old Super Sport, I like the 750F models mainly because of their Disc rear brake, as the K model has a Drum rear, and this machine has some good lines to it, this was a basket case sometime ago and I plod along adding then taking away as I am not happy until the penny drops.

The Penny may not of dropped far but I think I am almost there with the design and the over look is quite sleek and streamlined, The Motor is rebuilt as well as the carburetors, but I have been to and from on the seat set up and after 6 or 7 different set ups, I came to the conclusion to keep it simple and will be fitting one of my Own Rocket Four seat assemblies to this bike and hopefully get it painted soon.

I think I am going to go with Smooth side covers, these were something I was experimenting with as one side had a hole in it, but I prefer at this time a smooth side cover and will paint a graphic or something on the side once I have come up with a good scheme.

Always something going on in the shop but need to get this completed and painted etc. then get some miles on it and then offer it up for sale for someone to enjoy, but a ways to go with this machine , am enjoying the way it is going at the moment. New rims, pretty much New everything, so this will be a fun and reliable Motorcycle when it is completed and on the tarmac, stay tuned……….


A Friend and CMRA Hall Of Famer Passes away in a Motorcycle Accident

It is always hard to write about friends that pass away but even more so when its a Motorcycle Crash.

I wanted to share this as Ronnie and I became really good friends about 10 years ago, he commissioned me to build him a Cafe Bike to his specs and he was over the moon with the end result and when I heard he passed away In January, it was a very sad day indeed as Ronnie Loved to ride.

Ronnie was the Owner of Northwest Honda-Ducati and motorcycles were his passion and life.

So I thought I would post some pics of the bike I created for him and he rode a lot, a great friend who I will always be honored to have become a part of his Motorcycle fraternity.

RIP Ronnie.

Just after 1:30 p.m.on Monday, January 17, 2022, Ronnie Lunsford, 63, of The Woodlands, was traveling northbound on FM 149 at Stone Creek.

According to DPS Lunsford was riding a Honda CBR1000RR when he struck a Honda CRV SUV that was stopped behind a Saab 93T sedan which was stopped and attempting to make a left turn onto Stone Creek.

Lunsford was transported by MCHD to Memorial Hermann in The Woodlands where he passed. There were no other injuries. Lunsford is a very experienced rider and a long-time member of the motorcycle racing community.

He mentored two-time Superbike World Champion Colin Edwards II.

He spent years road racing with CMRA, WERA, and CRRC as well as racing flat track and motocross. Over the years he won 28 CMRA Sprint Championships and 18 CMRA Endurance Championships.

In 2004 he was inducted into the CMRA Hall of Fame.

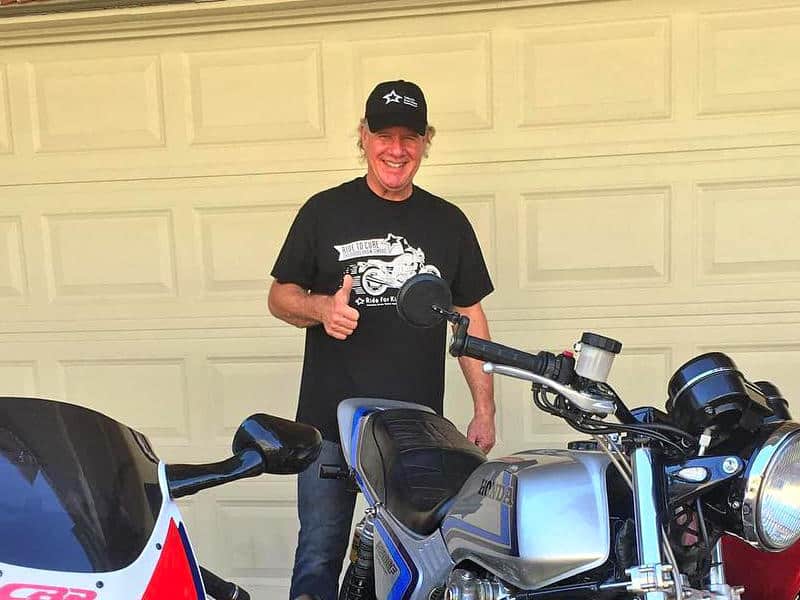
In 1986 Lunsford bought the Northwest Honda Ducati dealership on I-45 from his father. He recently retired from there and sold the dealership so that he could spend time with his wife Janet his two daughters Leigh and Lauren and his two grandchildren. While the owner of Northwest Honda Lunsford organized the Honda sponsored Houston Ride For Kids-a a fundraiser for the Pediatric Brain Tumor Foundation.

The first ride was in 1993. Over the years the ride has raised millions.

The 2021 ride raised $1.1 million.

A great rider and Motorcycle enthusiast and I am so honored to have Created the Lunsford Honda for him.

From the Very start, Ronnie was really specific on the set up, the stance, the performance and the handling that he required for this special build.

He wanted a certain Red too, so a lot of time was spent getting the bike to exactly how he wanted it and we spent many a good time having a chat about the creation as I began the build of this Cafe Bike.

A thing of Beauty and when this was completed, it sure pulled hard and handled super well in the corners, using a set of CB400-4 Bars and cables for a More comfortable ride.

Custom Gauges and a cool hand made display console for the Oil light and of course Neutral and High Beam, these were a nice touch to this Classic Machine.

This is my hand made Fiberglass front fender thats Bobbed to 22 inches and fits nice and tight on the forks, hugging the wheel like a new glove.

Looks nice with the hand pin line and then plenty of clear coat, this is exactly how Ronnie wanted the bike to look, so many New Parts used to.

The Gas tank was one of my very own, made from my own mold and incorporates a Monza style flip filler cap and has aluminum plating molded inside to allow for petcock and brackets to bolt to.

Here is the way it came out of the paint booth and it is quite stunning to be honest and was really stoked at the finish this has for Ronnie.

I built a Boxed rear swing arm thats 23 inches in length, a slightly longer wheel base than stock and gave the Geometry a kick in the shins but worked great in the corners.

Ronnie wanted 18″ Rims and this set up was perfect for his height and weight, I spent a lot of time getting this right and was super stoked to get it rolling and off the table.

Every nut and bolt is either stainless steel or chromed, this is virtually a Brand New Motorcycle and no issues at all with this set up.

Ready for the Built Motor to be fitted into the chassis, a scary time sometimes as you have to wrap all the frame to hopefully not scratch that show paint.

All together and so much detail here, I am sure you will miss a lot of things done to this build, but boy, what a Machine this turned out to be.

So glad that I was able to create something that reminded Ronnie of the race days gone by and I know that he was super excited to receive it from here in California.

Thanks for reading this and I hope that you liked what I created for Ronnie Lunsford, RIP Ronnie.

Never tire of wrenching on 2 or 4 wheels

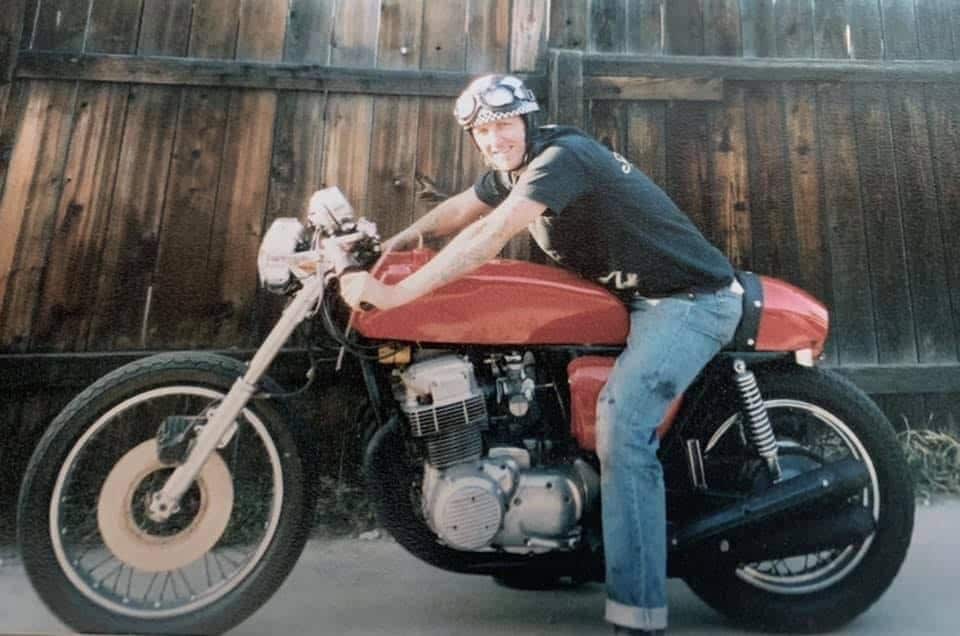
With all this Crazy Mayhem with the virus and wear a mask etc., its nice for me to be able to just do my own thing out in the sticks and away from the craziness that has really changed the Globe right now, but I came across this photo of me many years ago when I created my own style of CR750 Honda and they were care free days that we still need to have . Below is how Life is today with just some of my very own rides and am blessed to live the lifestyle that I do.

I have a variety of machines to complete and am looking forward to new parts I will be making available to you all to help you with your own creation, half the fun is building and the other half is riding them.

I have built many styles of bikes and always scratching my Nogging to think of what to do next, but when the New Barn is completed, I shall be looking into completing some creations and more Blogs and videos to show you what I get up to out here.

If I can help steer you in the right direction , I surely will, this is like a big family to me and always feels good when a Customer informs me their ride is now on the road for the first time.

Get creative and you may have to strip that bike 3 or 4 times to get where you wanted, this bike above I built 3 times but in the end it came out just as I had envisioned it and was worth the blood sweat and tears.

Always fun doing things with Motorcycles and Hot Rods

I have always been interested in Motorcycles and Hot Rods, I had a 3 window Coupe in the UK back in the 1980’s and loved anything that was related to Post WW2 ie Planes, Wooden Chris Craft Boats or Fighter planes of the day etc.

So Motorcycles and Hot Rods go together like Peanut Butter and Jelly Sandwiches or Tea and Biscuits, but I have been so blessed to have been invited to many shows and events and have been a part of quite a few TV Commercials and interviews etc.  It is a fun time for me and I enjoy it all.

Thank you all for supporting me over these 19 years. its always a wild ride and who knows were it will take me next, I shall always be myself no matter what.


Weekend is here already, working on a New braided brake line set up, and a Custom Headlight Assembly.

Well, Saturday soon came around, I have been pretty busy as of late at the shop here in La Mirada, it is always a busy time of year as many people need pars for their bikes and I help all that I can to make sure they can complete their Motorcycle in time for some great riding.

Now, I am bringing out many more new products that will be available for you to use on your machines and I do all the prototype work to make sure it not only fits easier, but that it performs better than what you have right now.

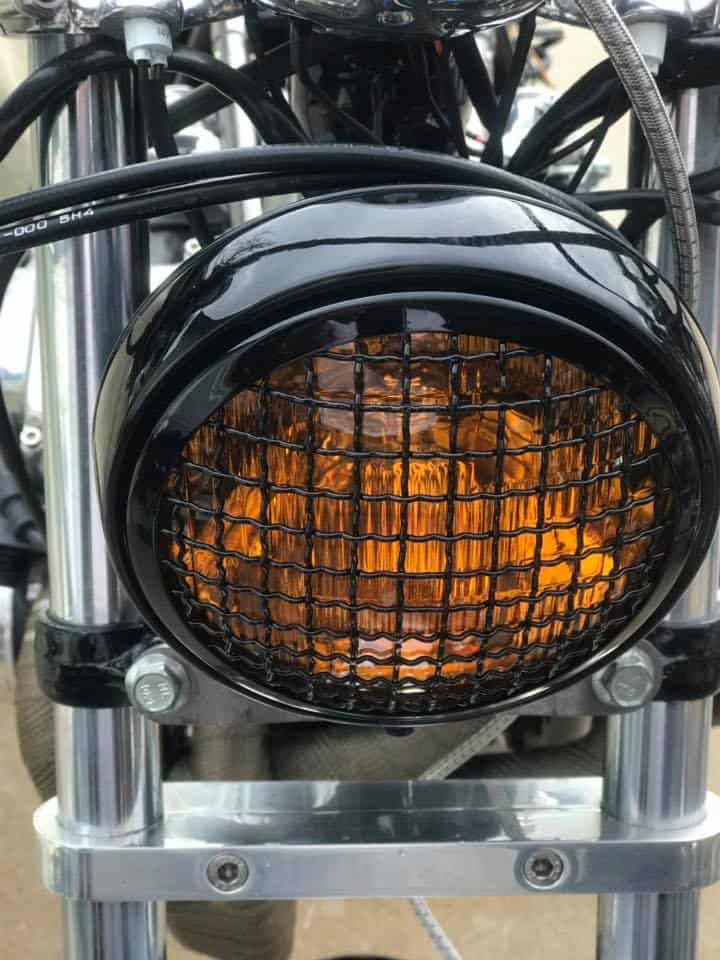
The 2 parts I want to feature today are my Custom European headlight, which is a really Custom look and comes with a Stone guard and a Yellow Lens, to get you noticed.

So right now, today I have been working on a Project motorcycle, a CB750 F Super Sport and the stock brake line set up just wasn’t cutting it, so I removed that and used my brand new Braided hose stainless brake line that has Stainless Steel adapters and is so easy to fit to your machine too.

So, above you can see the Braided hose, this is Top Quality all the way, even the Formula One Race cars you see use this brand of hose, so you know these are a great deal.


These Braided hoses will fit the CB750K and the CB750f but- this is for removing your front brake switch, I dont like them and remove them from the triple tree and fit a single one piece brake hose, and this will give you 40% more braking and so easy to fit too, but- if you want to have your brake switch, I offer a 2 piece brake line kit on the website, so check that out at your leisure.

I use a straight fitting that simply screws into the caliper, then you use the crush washer I supply, then route the braided line down to the caliper, going behind the lower triple tree and then into the caliper, simply screw the adapter in place, undo the bleeder, fill the reservoir on your mater cylinder and bleed it into a bottle with a clear pipe so you can see the air bubbles exiting the bleeder.

These are such great quality and gives your brake more power but also a more Custom look as well.

You will find this so easy to bleed and the brake will feel way more positive when you grab the lever and thats a good thing.

This literally took me 5 minutes to fit and bleed and now functions so well and gives me more confidence in stopping when i am out on the tarmac next and now available to you lot.


The Brake hose is fitted and now I have fitted the Euro style headlight and made a special bracket to house it, this allows you to use the stock location of the lower triple tree bolts, i will chrome the bracket when completed and that too will be available on the website .

The Stone Guard will protect your lens from any stones or projectiles that are sometimes left on the highway or byways when you are riding to an event or a job etc.

Also, the strong Yellow lens, gives it a European style but will grab more attention from drivers but with out blinding them, look how cool this front end is now.

So, I am off to the garage to do a wee bit more but wanted to show you what i got up to today, have fun with your Motorcycle and thanks for checking my Blog and my parts out, I am here to help, call or text 714-598-8392 and I will do my best to get you sorted out.

I love my job and love to promote Custom parts too.

The OG Moto Show was a Blast this weekend.

Well, finally I managed to get the old girl put together in time for the OG Moto show in LA this weekend and only by the skin of my teeth, but it was all worth it in the end.

The Bike came out really well and I received so many congratulations from people that saw the bike, it was fun showing it and many people taking photos etc and made for a fun weekend thats for sure.

Plenty of cool machines there this year and the weather could not of been better, although for three weeks before this, it rained all the bloody time, no idea how I managed to bang this out in less than a month but I pushed hard and got there in the end.

There were so many details on my machine, I am sure not many people even took note, but one thing they loved was the color set up and the way it all flowed and of course sparkled, due to all that metalflake paint.

I am super Stoked at the way the bike turned out and happy to of got the bike to the show, as a lot of people wanted to come and check it out and it sure has a lot going for it.

She sits well on the Lester Rims and I made my own Handle bars and chromed them and they are so comfortable, nothing like your own Custom Handlebars.

The Bike looks great in the Sun and I am glad that I came up with this Classic 70’s styled Flake, it just needed to be like this and it is pleasing to me to look at.

Still ant to do a little more to the bike but it turned out as I imagined it would and it will be a lot of fun to ride around Orange County, this is a strong Motor and will run great.

The 40 year Old Rims look good with New brakes and tires etc and, these are Genuine Lesters off a CR750 that I purchased a few decades ago now and I knew that eventually I would get to use them on a build, very strong rims and gives that 70’s era the right look on this machine.

I went ahead and did the quick realse system on the frame rails on the side and the top, that way, if I need to work on the top end I can keep the motor in the frame, Or if I need to remove the whole engine, getting to it is a whole lot easier with the side rail off.

The Exhaust is Stainless and the bends are right on the money for the exit, a crisp look that you dont often see these days and am pleased at how this turned out.

Well, you cannot get much wilder than the paint and I wanted it to scream Flared pants and wide Collar shirt and it sure does, I cut the old gas cap and neck off and welded a harley version for a more crisp look to the petrol tank and am happy that I went this route in the end.

The Matching helmet i thought would be a good effect and many people commented on the skid lid which is a British 1950’s style Davida piss pot.

Of course, I really wanted to make a statement on the bike here and went the whole hog by creating some machined forks and uppers for the Vesco bike and machined a piece of 6061 Billet to make the finned bucket to house the GPS speedometer, the finned headlight came out pretty cool too.

I wanted a Stainless 4 into 2 into 1 system this time, let the Old Girl breathe and a unique look that you really dont see these days, its a nice free flowing stepped set up that will work very well all the way through the curve of power and will sound pretty unique too.

Having the right stance was important to me and she sits really well on the tarmac, I have a 110X19 on the front and a 140 by 18 on the rear nd they fill the rim out nicely .

Available soon: My Bobbed front fender all made right here, I wanted something that would really hug the tire and this sure does and does not rub at all.

The Polished rear Hub was drilled by me, I don’t make the pattern up on a template, I just go with the flow and they always turn out really cool, they get rid of heat and any brake dust too.

This Vesco Honda started off as a non running bike and I knew that I would get this thing back on the Tarmac, its a great feeling to get to that stage as many of you have and will understand the Euphoria that goes through you when you hit first gear and let that clutch lever out.

This really sits well and I am glad that I had a go at a full Custom machine for this show, it is a fun motorcycle that really does turn a lot of heads.

I fitted slightly over-sized tires to this bike as I wanted the Custom Brat to have some thickness all over and it really does give that effect, plus for me, more Rubber on the Tarmac, better the grip right?

The weather was great for a Motorcycle show too and LA is a really great place to put on such an event, so glad that I got invited to this again.

Thanks for following this build, it was a tough one as I had a month to do this but we got there, even with 3 weeks of rain, it was a task I really didn’t think that I would finis in time for the show but, persistence paid off this time and cannot thank you all enough for the encouraging words you gave me to keep going forward and not give up.

The 4 into 2 into 1 Stainless Steel Exhaust system came out just how I wanted it and a nice aggressive kick out with a Chromed Baffle, the Chrome Swing arm sets it all off too.

I have had built a lot of these bikes over the 19 years here but this one was a challenge and sure hope that you like what i have done to the bike and it is a different look but I like some things that are Unique and believe that this was the style it should end up as, fresh look with a lively Metalflake Uniform, makes this stand out for sure.

So, what next? hard to say to be honest, next year is my 20th Anniversary of creating these machines, I have no idea what to do yet, so my mind is racing away, LOL!

This has so many cool touches to it and where ever you look I have tried to change things up, surprise myself sometimes and this makes me smile every-time I look at it.

If you need parts, service or a complete build, I am here to help you, feel free to call or even Text me on 714-598-8392 and I shall do my best to help you out.

Thank you for everyone that spoke to me or emailed me, letting me know they like what I have done, Motorcycle building should be fun, this is a great industry and everyone’s bike is different in some way- The bike you ride is an extension of your Character and I look forward to seeing progress photos of your machines as you go along this build.


New Ceramic Coating Colors for the exhausts now available

Wow- hard to believe that I have been selling these systems for over 18 years now and still going strong, so this time I thought that I would offer a new Ceramic Coating Color, as many people ask me about these things.

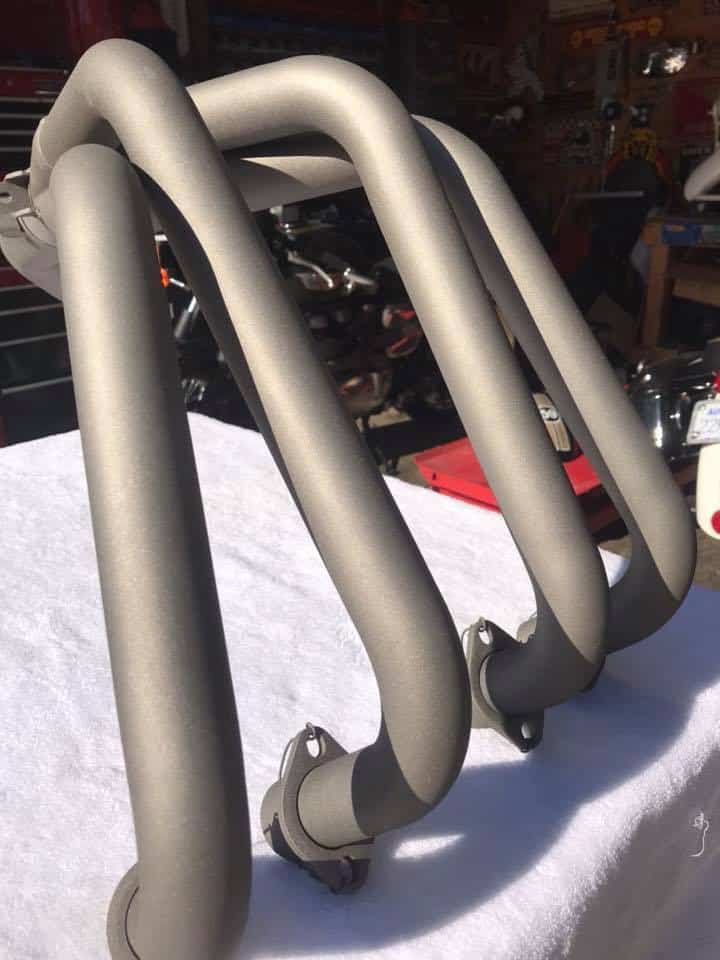
So what I now offer is the New Titanium Coating and it looks really cool, its a Gray but a metallic gray and really covers well.

Here’s how they work—Ceramic Coatings and Exhaust Wraps help contain the gaseous heat within your exhaust pipes. This causes the gasses to heat up and expand. Since the exhaust gas is trapped within the system, it expands the only direction it can—out of the tailpipe. As a result, exhaust flow is boosted, allowing a rush of fresh air to enter the engine’s cylinders, increasing horsepower. Both ceramic coated headers and  Exhaust Wraps improve horsepower, so let’s go over their pros and cons and see which one is best for you.

Ceramic Coated Exhaust Parts

This is a spray-on finish that’s infused with heat-insulating ceramics. It is not a DIY solution, these exhaust parts are coated at the factory, or sent to a facility with the proper equipment.

Pros

The New Titanium which is what you see here.

This is a great look and changes the look of your machine instantly than just the Black you see. But I also offer these colors too.

Black- Silver- Burnt Bronze, with more options coming soon.

Wanted to show the New Titanium as this is a old school look and I really like the way these came out to be honest.

Just go on the exhaust page and on the drop down box, simply choose the color that you would prefer for your system, its as easy as that.

If I can help you with any of these options you can simply email me at carpy@carpyscaferacers.com or drop a Dime in the slot at 714-598-8392 and if you need answers fast, then Text them to 714-598-8392 and I will get right back to you.

The B.B. Cafe

I have lost count of the Motorcycles that I have created here over the 18 years in business, some I have been lucky enough to take some photos of but many I have not, but I try and take pics where ever I can as many people ask about projects that I am creating.

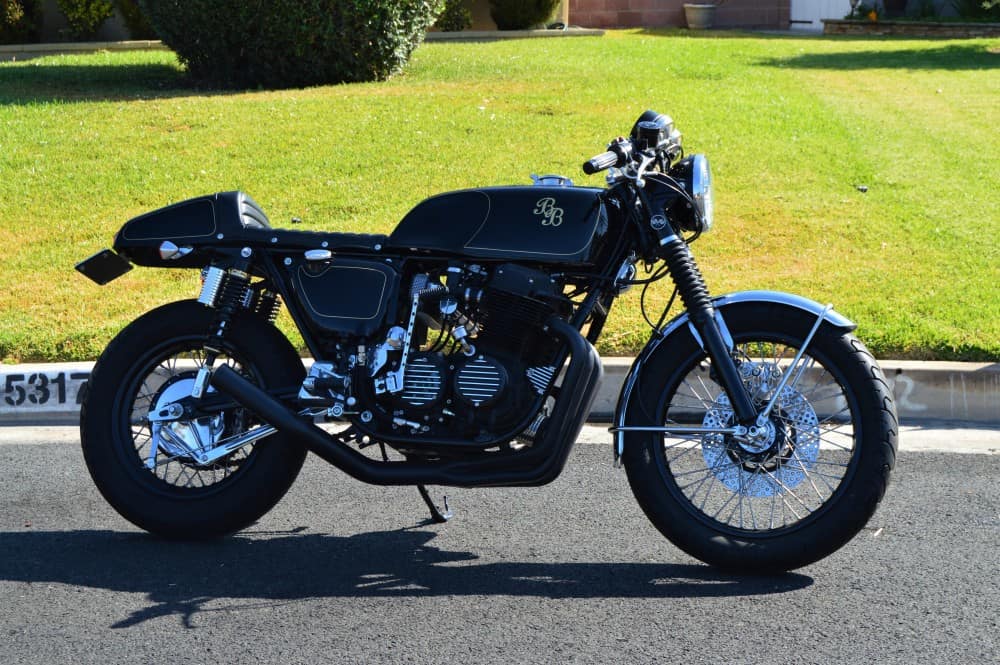
I enjoy building bikes out of old rusty hunks of steel and this one is no exception, it was a non running machine and I am glad that I have resurrected this Classic 1974 Honda CB750K, as you can see, it had an old custom seat and a beaten up old Kerker exhaust, the desert does take a toll on any machine thats been parked up for a long time, but- iy can all be fixed and this was the start of the BB cafe project for my Customer in Australia.

It was a solid old machine but had had a hard time over the 40 years of its life and these get neglected when stored out of the way, so- a perfect opportunity to turn this old girl into a Thoroughbred once more.

I had a Customer fly in from Down Under as he wanted to discuss commissioning me to create a Cafe style Motorcycle to his requirements and then once built here, I will ship it off to Australia thats about 7,194.45 mi  from our house to his.

So this is how she came out, I have built this just as he wanted and I am stoked with the way she looks, a Thoroughbred of a machine and ready to open up on the Tarmac.

Plenty to look at but I shall try and explain some of the things that I did here at www.carpyscaferacers.com so you will be clear on the parts used to create this great machine you see.

I used many of My own parts that I have designed over the years and of course offer on my website, the headlight with the built in LED turn signals that Glow up Amber when used is a great addition to any machine, I was the First to ever go this route many years ago, have sold over 1000 of these units and still going strong, also has a Halogen bulb to help you at night.

I painted the bucket, Gas tanks, side Covers and the seat and fork ears a Gloss Black, as well as the head light Bucket, the Rims and some parts of the wheel hubs too. You can also see I removed the Original side reflectors that came from the factory and made my own screw in badge embelishers. New gators and Holders too, no expense spared on this build.

New cables as well and the whole frame was stripped, cleaned and coated with high Gloss Powder coating.

Motor was pulled apart and rebuilt, stock but new guides and internal cam chain etc, I then painted the engine in my own mix of High temp Engine paint and I too offer this product on the website, I put together with Stainless Steel Allen bolts to give a nice offset to the black. Made up my Custom Oil lines as well.

I have always loved the finned speed equipment as I am a Hot Rodder too, so machines a Finned cap for the oil Dip stick, I think it sets the bike off from the many out there.

Keeping with the Classic era, Brand New gauges added and my Custom Alloy Mount, I also added a neutral light in the middle of the steering stem nut and fitted my polished aluminum Bar clamps to hold my own set of Clubman handlebars, with new cables, adjuster and master cylinder.

A lot of attention to detail as you can see, I fitted Tarozzi rear sets, I sell them on my website too, I always fit one of my Custom Oil Pressure Gauges on the motor, that way you can see if you are getting good oil pressure all the time, finned covers and of course, my 4 into 1 Exhaust system that I have been selling for over 17 years now. The rear brake was rebuilt using non Asbestos EBC brake shoes and new springs with a polished outer hub, looks great as an offset to the black rims.

Rebuilt front forks and painted lowers, with New tires and front mudguard, this really has that Classic look of Cafe bikes back in the day when I rode them in the UK as a teenager, tearing up the streets with all my mates on various brand machines.

Totally rebuilt and tuned carburetors were fitted and these are fully detailed to match the motorcycle, then used Steel Dragons set up for Airbox and this runs great and smooth.

For show only, this kick starter was drilled and chromed, the rear sets prevent you from a full kick but this has an electric starter and I supplied another solid kick starter if he needs it, but this was for show and it does look very cool indeed, you can also see I fitted a breather filter to the bike with the chrome cap that runs from the valve cover.

I hand letter the tank, B.B. is for Black Beauty as thats what the Customer named it and I pin Lined around an old SS gas tank, I removed the original gas tank flat and filler and then used one of my Stainless Steel Aircraft gas caps for better styling, the tank was hammered by me and smoothed before adding the Gloss Black enamel paint.

Custom rear shocks that are also raised 2 inches with Finned Piggy backs help the bumps and my Clubman seat assembly that I make and offer is sat upon the frame that hides the battery etc, I used snaps on the Tuck n Roll cover, that way you can easily get to the battery and of course you can put your insurance card under the foam for easy access if needed.

Hand pounded tank and New wire harness, handlebar controls and new cables through out make sure that this bike is always on point in its life on the road in Australia.

Drilled front brake Rotor, rebuilt and polished front Caliper, custom parts all over the bike makes this a great head turner and the Customer is stoked to finally see the finish of the dream.

It turned out really well and runs true and strong, looking forward to showing some photos later when it is in Australia in a few weeks time, as I am getting ready to take this motorcycle to the shippers and let it get loaded up on the boat to take across the waters to the other side of the world.

Thank you for all your kind words and encouragement, means a lot and once again, another old bike is saved from the junk yard.

If I can help with a build or just parts for your inline four, just drop me a line carpy@carpyscaferacers.com or a dime or even a text at 714-598-8392 and I will do my very best to get you what you need.


Service today on 1981 DOHC HONDA CB750F

Well the weekend is almost here, people want to sling their leg over their steed and head out on the tarmac and enjoy the Summer weather, so I have had plenty of Service work to do as of late, this morning I had this DOHC Brat turn up needing a little help.

It needs a New exhaust system and something I can help him with later on but right now it just needs the fluids changed, New plugs and Filters, Cables Lubed and chain oiled and set as well as checking tire pressures etc.

These bike is not fun when trying to just remove the spark plugs as the 2 center plugs are sat in low and the Gas tank and sat have to be removed to be able to gain access to that area.

It does to be a task sometimes, as on Custom builds, the stock hangers are not there, it may take a little time to figure out how to take Custom seats off, and in 100 degree heat, you want to do it in a timely fashion as it gets so hot in this part of the State that you sweat buckets simply by walking to the tool box.

Anyway, managed to get the seat and big arsed Gas tank off the bike and place out of the way, now I can get to the plugs with no problems at all and see whats going on if there is anything else showing signs of wear and tear etc.

She is running Rich too and has the incorrect heat range plugs for this model, but no worries as I have the correct spark plugs in stock and the new ones are gapped and set ready to fit back into the cylinder head once more.

I always have used Anti Seize on any spark plug as these can get stuck in the head pretty easy over time and you either end up stripping a thread or snapping a plug trying to get it undone.

The only pain in the ass on this one is that as the bike has an oil cooler, the Oil Filter sits out more and this guy has Exhaust wrap on his headers and if I left the exhaust headers on the bike and attempted to remove the oil filter, oil would drip all over the collector and then the bike would smoke for days, didn’t want that, so the best option was to remove the exhaust system.

As you can see, I had to remove the crush gaskets, something you should do anytime you remove the exhaust, and the ones I removed were after market version and were an utter pig to get out, but after removal I cleaned the ports out and fitted Genuine Honda Copper crush gaskets before I refitted exhaust system after fitting New Oil Filter and O-Rings.

All seems good, I replaced the old oil with Castrol High Mileage 10-40 and have used this Viscosity oil for these bikes for decades.

So everything is back together and took it for a test run, just to make sure oil level was fine and the bike ran good, adjusted chain and lubed etc.

So, another Motorcycle serviced and he is back on the road a very happy chappy, and I am glad to see another Motorcycle on the road once more.

Thanks for watching my Blog today and if I can help you with Service, parts or complete creations, just let me know. carpy@carpyscaferacers.com

I added a video I did with my phone but you will need to turn the sound up as its super quiet for some reason.

Have a Great weekend and hope that you get time to work on your machine.

1978 Honda CB750F Super Sport Snotter- Revamped

Well, here we go with a Customers bike that has been sat outside by a river for about 8 years, the Customers asked if I could help him out and well, you know me, I said OK.

The say that a Picture paints a thousand words, well, this aint no oil painting and there is not enough words in the the English Language that came to mind when they dropped the bike off at my place.

There it was, 500 pounds of old cold, rusty and Muddy Honda, looking to have a new lease of life, some how I think I have scrapped the bottom of the Barrel, then another rolls in, but I am a man of my word and help out I shall indeed.

This was a complete mess, I mean it had been rained on from every corner of the bike, then wind blew the tarp off and rotted everything that was rubber or plastic, then to rub salt in the proverbial wound, it got wet again and covered in mud.

The bike has had a tough hard life, there was Oil everywhere, of which probably saved a lot of the bike from rusting to be honest, but everywhere I looked, this Motorcycle needed help, it was a sad state to see and I knew that I could some how get this running again, the only issue was the poor chap was on a limited budget, and I know how that feels, been there many times.

But there is a point where I must stop and say No, but the Leo in me tells me to have a go and help this bloke out, so, with a shaky handshake and sweat coming off my brow from pushing the thing up the driveway, I sat there and took in the whole sorry life that this inline four must of endured to get into the condition it is now in.

1a

Even the handlebar grips were so thrashed from the elements that half of the grip glues itself to my hand, not even lacquer thinner would remove that tar like substance from my fingers and was marked for life I think, but this is just the start of something that I really should of said, no thanks mate I cannot help you. Story of my life with things I guess but I have always pushed the envelope and this needed a Caterpillar truck to move it. The rear chain was rustier than the Titanic’s Crapper door, I shall be changing this Big 630 chain and sprocket system to a 530 set up.

5


The tires were torn up, and would hold air for about 2 hours then go as flat as a pancake, my Compressor got plenty of overtime keeping these things up for sure, but the amount of dirt, grime and Spiders nests was just unbelievable. I really have my work cut out here and as everything is knackered, I have to clean stuff before I start replacing parts etc.

2

I was never a fan of the Comstar rims to be honest but this bike has some sentimental value to him and I will do the best that I can, to bring this old bird back up to speed once more.

4

Not only was the seat all torn up, the foam had hardened and was starting to fall apart as soon as I moved anything, and as the Customer wants a Hoop welded to frame and a flat seat set up, this thing can get 86’d into the bin.

7

As you may know, the 77 and 78 Models had these Keyhole carbs, and when they have been left for such a long time, these buggers are so hard to get back to running nicely again, they have an accelerator pump that plays up all the time, the choke is on a cable and up on top of the triple tree and the sun dried the knob, of which it breaks as soon as you touch it, lastly, this bloody things are a royal pain to work on.  Just to change the jest, you have to remove the rack from the bike, as the float bowls do not have clips on like the earlier SOHC models.  So what I do is if these carbs are goosed, I inform the customer they would be way better off if I fitted earlier carbs, as you can change the jest with the carbs still on the bike and, it has a choke lever on the left sode of the carb body and way easy to use.

8

The sprocket cover tells a tale right there, covered in oil and road grime, as well as spiders webs, this is going to be scary when I remove the 2 Phillips screws in a minute, so stand back!!!!!!!!!!!!

22

Holy Moly, just look at this, the bloody sprocket doesn’t even have a securing Bolt and washer on it, there is nothing to keep this sprocket from literally, falling of the drive shaft, now the 77 and 78 sprocket set ups are different, the earlier versions have a little clip with two holes for bolts that sit in the recess in the drive shaft. Where am I going to find a CB750F Bolt and washer ????

23


I looked in my parts drawers in the garage and bugger me, will you look at that, still in the sealed packet and, I had even written in sharpie CB750F Sprocket, what were the chances?

25

Think its a fair assumption that this chain is Royaly Fecked, so I shall be glad to cut this 630 version off, but there is so much Oil and grime all over this bike, things are going to be messy for a while.

12


There seems to be oil all over this bike, and I mean everywhere, I need to see whats occurring here as thats an insane amount of Oil deposit and the guy said the bike used to run before he parked it, I checked the tach hole in the Valve cover but thats OK, the Valve cover seems OK as well as the  Cylinder head, which I think could be one of the oil lines, but what a mess this is going to make, just to take that apart.

26

That looks like the issue, Oh yeah- I will just put electrical tape around the leaking oil line, that will fix it-Not! So I now have to make a new oil line, but at least I have found out where the majority of excess oil must of been leaking from to get all over the bike like that.

29

All fixed and I cleaned the other hose up and oil tank and I feel a lot better about putting this back on the Super Sport once more and hopefully no more issues in that department.

19

Well, its at this point you think to yourself. “Why am I doing this”?  But its a challenge, the customer is on a low budget and this motorcycle is of sentimental value, so a no brainer but there are so many things wrong and not working on this bike, this will take me some time to get dialed in.

20

Time to remove the carbs and boots and clean the frame up, I shall then fit New intake manifolds from a 1975 CB750K model, rebuild some early Carbs and fit new cables too.

36

I cleaned and painted up the motor with High Temp Wrinkle from PPG I get made up in cans, and that helped big time. I then fitted the earlier intake manifolds and, using a flat edge, made sure that the intakes were all even and flat, this makes fitting carbs back on the bike so much easier than trying to force a rack on when the intakes are off slightly.

37

I have always used New Stainless Steel, Rolled edged Hose clamps, as these will not dig in and cut your hoses with traditional clamps and of course, being stainless, they will not rust or corrode.

41

Well, I pulled an old set of inline four 1975 CB750K Round tops out of my pile and these need to be gone through but when they are completed, and then synchronized, these run like a top.

104

All clean and ready to go straight on the bike and, these will fire right up no worries at all, these are cleaner than a cats arse and will make a huge change in this motorcycles life.

46

These are now all in place and have fitted New Genuine Honda Boot covers over the linkages to keep crap out, many do not do this, but I want these to stand out as they look and function so well, plus you can change main jets is minutes with the carbs still on the motor.

30

I try and use as much of the original parts as I can, but these coils were losing voltage and not repairable, unfortunately these are not cheap to replace, I had no choice but to use Brand New ones but, so glad that I did, these new ones I will be fitting will last many years.

31

All bolted in, this bike will have a new life for sure, but it just goes to show by leaving a bike for 6 years with no cover and let mother nature belt the hell out of it, is not a very good idea at all.

39

The old cables were all torn up anyway, but, on the earlier carbs you must use the earlier cables, but thats a good thing as you know everything is new and will function real nice.

40

New cables going in, now we are starting to make some very good progress, make sure that you use WD40 and lube these cables as they will keep these operating smoothly.

49

The aluminum hangers were oily and needed a bit of a revamp, so I removed these and began to clean them up, think I shall polish these to make a difference on the bike.

50

Now that is way better and I feel a lot better putting something clean back on, this motorcycle will sure look different and for the better.

52

New cables through out, the clutch cable was actually seized up, so a new one was purchased, I always use New adjusters too .

57

The points cover looked like it had been in a bad way for a long time , but- it wasnt too banged up to be honest, so, using my special Formula High grade restoration Polish, I jumped into action as I love polishing old stuff, it took me about 90 minutes but it was well worth it and looks as good as new now.

58

Now that is a lot better and used New stainless Allen head bolts to give this Points cover a New lease of life, it sure looks great on the motor now.

59

The Clutch cover was in the same shape as the Points cover, so, back to the polisher, some more secret sauce and a polishing mop and then I will refit to the engine.

60

Now this looks a whole lot better once polished to a super high luster I used Allen head bolts which are all New, as is the clutch cable too, so a smooth clutch at long last.

44

Look how bad the muffler is, its had bad gas welding, then an old screw held this together, sort of, I will keep the stock header and will make a new up-swept tail pipe for this bike.

47

Getting to it with a piece of 2.5 tubing, as I want this to look cool and sound pretty strong too, this will be a fun part of the process on the Super Sport Bike.

63

There is the tail pipe, complete with a Removable baffle, this is way better than what was on there, the old muffler even had a mouse nest in it, so glad to change this set up.

64

Next up, the Customer wants a flat frame with a hoop, so what I am going to do is cut the rear frame horns off about the middle of where the old cross brace is.

66

I have cut the frame rails off to where the customer wanted, this will then have my frame inserts put in and I will cut one of my special frame hoops to fit to the bike and give it a new look.

67


Now- I use a de-burrer to remove any inner tubing, I want to make sure that the inside is hollow and smooth so the inserts will slide in tightly, that way there will be no issues.

68

The inserts are in and they are really snug, I go in about an inch and half both sides, it is double walled on this part of the frame, so the hogging out does take a while and may annoy your neighbors if you have to use an air compressor and a die grinder to open this up.

69

As you can see, I have laid the hoop on top of the frame, this way I can figure out how much I want the hoop to be placed at, I then mark the hoop by the end of the chassis, as this is where it will butt up against so you can then weld it.

70


Once you make the cut, you simply cut the other side, take any burrs off the inside and then you are ready to attach this to your bikes frame and this will change the look of you machine right away.

72

As you can see, I fit the hoop into the inserts and then I simply just tap the end of the hoop with a Rubber mallet, until the ends are almost touching the frame, as I want just a tiny gap to allow for good penetration of the Mig welder to secure this to the frame.

So the little Video above shows you how I first attach the hoop to the frame, I then mig weld the ends all around and you can drill into the frame and insert and spot weld there too if you want a more secure weld too.

78

I have Mig welded this in place and am happy with the end result, next up is I have to make a seat base for this, you do see some on the market already made but many times you want to make the length of your frame to your dimension, so- I always make mine for each frame and its pretty easy.

83

Use what you have around you to make a template, I had a packing box handy, so traced the outline of the frame and cut it out, a little trim and I am ready to now make a seat base.

84

I may have gone a little over the top on thickness as this is 18 gauge but I had a sheet in the garage and may as well use it, its strong as Hercules but obviously the down fall is its harder to cut and shape, but this will work fine and be a great sturdy base for the seat I am going to make.

85

There you go, its done, now to check on the frame, grind any adjustments that need doing and drill some holes for the bolts to be able to fix to the frame, as I shall upholster over the bolts so the studs are the only thing sticking out underneath.

86

There you go, I am happy with that now, simply need to use high density memory foam and choose the material and stitching and that will be upholstered and look so different.

96

Still a long way to go on this Super Sport but- It is finally taking shape and looking way better than it did when it was dragged into my place looking very sorry for itself.

88

The Gauges were shot, one of the needle drives was not working and I wanted to clean this area up quite a bit, so came to the conclusion that this can look a lot better with all this clutter removed and different bars fitted too, as well as removing the upper triple tree and polishing it to a chrome like luster.

89

The stock fork ears have to go and the turn signal housing as they were rusted out and looked pretty ugly, customer wanted a Brat style bike and these tend to be removed, I shall also add one of my custom headlights that have internal LED turn signals inside the light, so there is nothing protruding.

91

Removed the handle bars and gauges, as well as the ignition switch as the plastic connector and dried and crumbled up, due to being sat out in the California Sun for 8 years.

92

Now, that is a lot better, as you can see, I removed the old paint from the triple tree and polished it, I also removed the stock fork ears and fitted some Custom alloy versions in Black.

93

New ignition switch also added as the stock one was worn out and now all new once more and of course, functioning too.

94

Had to make up a new pig tail for the lights as the old harness had dried out, but this will work great and, reduce the amount of wiring thats inside the headlight.

99

As ypu can see, what a transformation, my LED turn signal headlight set up is the way to go, Halogen bulb and the LED signals actually do light up Amber, a neat custom touch.

100

Starting to get some where, still have to foam and upholster seat, as well as pulling front wheel out and fitting new tire and sorting the brakes out and these are all seized up.

105

I removed the rear wheel, I need to clean all this up and thought that i would take a photo and, below I have done a quick video on my phone, to show you how I undo stubborn nuts or bolts when they have been on many years and have seized up and you cant for the life of you get them undone with just your wrench.

I try and show videos where I can, as many of you ask me on the phone everyday, so thats why I do things like this and hope that it helps some of you out that may be out in the sticks and nowhere to ask.

Hell yeah, this is slowly getting better everytime I work on the bike, the Customer came and visited and loves the way the machine is now looking, but I tell ya, it has even tested my patience on more than one occasion, just take a step back and do something else, but- as you can see, I have now upholstered the seat, and did it in the Nostalgic Diamond stitch and added silver trim to break the seat up.

I kicked the front a little to try and hide the arch in the stock gas tank, usually I weld up that area, but this customer is on a budget so this was a good way of over coming this issue, I used High Density memory foam and I tell ya, it is super comfortable.

The seat will be Bolted down so it sits nice and tight onto the frame, I still have to smooth the chassis and paint Gloss Black, but also as you will notice, I have fitted an LED strip at the back, this will function as a Running and Stop light in Bright RED.

The Turn Signals are Chrome and LED too, so this will be sure to get a drivers attention and inform them as to what they are doing ahead of them.

The New 2.5 Gauges that I sell on my website were just the thing needed to tidy the top of this machine up, I vapor blasted the master cylinder but its beyond repair, so shall be fitting a New version tomorrow.

The old 630 was totally rusted and, falling apart, so opted to change this set up for a 530 chain and sprockets, this was so messy, I was glad to change all this and have it look at least a little cleaner, thats why I prefer to usually strip the bike to the frame and do it right, but sometimes that is just not in the Customers budget, so do the best I can for them.

Looks so much better and I am glad I went this route, plus the Customer was over the moon with the look, so a double whammy there. Now onto the Exhaust system.


As you can see above, the exhaust is so so but underneath its a mess, the rear muffler was so badly welded, they needed to fit a screw into it to keep them together, so i thought that it was time to set up the good old Heat wrap, I like that Hot Rod look and so does the Customer.

There you go, all wrapped and ready to go back on the Motorcycle, remember to replace your Copper crush Gaskets too when you re-fit an exhaust system.

Looks so much neater now and I like the way that the Honda is slowly taking shape, I mean, a few weeks ago this was in a terrible state from all angles, so right now I am quite stoked.

Right, now onto the rear brake Caliper, as it is seized up beyond belief, what I normally do is remove the caliper and stick a towel in a bucket and simply put an airline into the caliper and leave the bleeder in, that usually pushes the piston out pretty fast, hence having a bucket as there is 150 PSI from the airline going into that small cavity.  But this time the Piston refused to exit, so that tells me there is a small rust ring around the piston.So what I do in this situation is go back to old school ways of getting things resolved.

So, now I have the piston out, using an old set of handlebars and a master cylinder to bleed it out, I can now get onto rebuilding the caliper, the O-Ring seal usually gets nasty and this one had too, but the Piston was rusted in and lucky for me I had a New Piston and rebuild kit at the ready. Below, Old and New, always replaces seals, especially in Brakes.

I use a pick to pull the Seal out, and then I was glad I had a New piston as the original one I removed from the Caliper Body was seized in and pitted up quite badly.

So, before I fit the Piston, I need to clean up the old caliper, as it has a lot of Oxidization in the body, as the carcass is a cast aluminum, so what I do is use a Rubber wheel to clean the body up, I sell these kits on the website, whats coo is that it does not hurt the caliper at all , although it will remove the oxidization pretty easily.

This is what I do t clean the body up, been doing this over 18 years here and always makes the brakes work really well and smoothly, I sell the kit on my website.

So, thats now clean, all blown out with an airline, a little brake fluid in the Caliper body to make sure all is smooth, Seal is in and Piston slides right inside nicely.

So, all rebuilt and ready to fit back onto the Super Sport, Bleed through and hopefully we shall have a brake now as before- this was seized solid from years of inactivity and parked outside for 8 years.

The rear brake is now a success and functions very well on the pedal, a lot of work but worth it in the end, as this brake caliper was seized up solid, am happy now.

I also didn’t like the strip light set up that I fitted to the frame, so removed that and fitted an LED stop – tail light and fitted the License plate to it and looks so much better I think.

I removed the Red LED turn signals as they were not functioning bright enough, so replaced them with some Classic Alloy 12 volt Bulb versions and tested, worked really well.

The front fender was a mess, but I wanted to still use as the front end needs bracing, so I though what I would do was cut it down and remove 11 inches off each end to make wheel look bigger.


I then elongated the mounting holes in the brace, that way the fender will hug the tire, not touch it , but give that appearance that it was.

The Customer will paint it Black when he gets the Gas tank and side covers painted, but this sits nice and tight and stiffens the front forks up and stops crap flying in your face.

Next up is to clean the rear frame up and paint it Black, tidy the wiring, fill the gas tank, add new fuel line and see how this bike runs.

OK, I have managed to do all that and can now take this for a shake down run around the Block, the petcock bloody leaks, so have ordered a new one and will change that when it arrives.

Did a good run around the block and wanted to make sure that all is well, I knew that the headers would smoke for a few rides until they have cured, so no worries there, but the top end of this old Super Sport is rattly as hell and all adjusted, these can stay like that for a long time and thats how it is going to stay for a while.

OK, so now the Customer changed his mind about a few things, so I have changed the rear tail light and made a License plate mount to sit off the bottom of the shock and used a Ford Model A LED rear Tail light.

The Bike now runs, all the gears work, Turn Signals function as does the rear Brake light and Running light, I have put a lot of time into getting this thing running again.

Virtually a different Motorcycle now, it runs well, albeit the top end rattles like some old nails in a can but they will go on like that for a long time and the customer can do that later, it pulls hard to be honest and the exhaust of mine is just Killer sounding.

I am not going to paint it, I sealed the gas tank but he can paint it as the Customer is on a budget, so when he takes it next week, he can get a painter to do their thing to her.

So there you go, pretty much done, this bike had not run in 8 years, all the brakes were seized and needed so much cleaning before I could even work on it, it is amazing it runs to be honest.

The Customer can add mirrors if he so wishes, thats just cosmetics, but at least I got this to run and drive, many would of given up and, I wouldnt of blamed them, but I continued and won through.

I am going to play with My Hot Rod thats in the back ground and look forward to this leaving my garage during the week, thanks for watching this build, hope you liked what I have done?