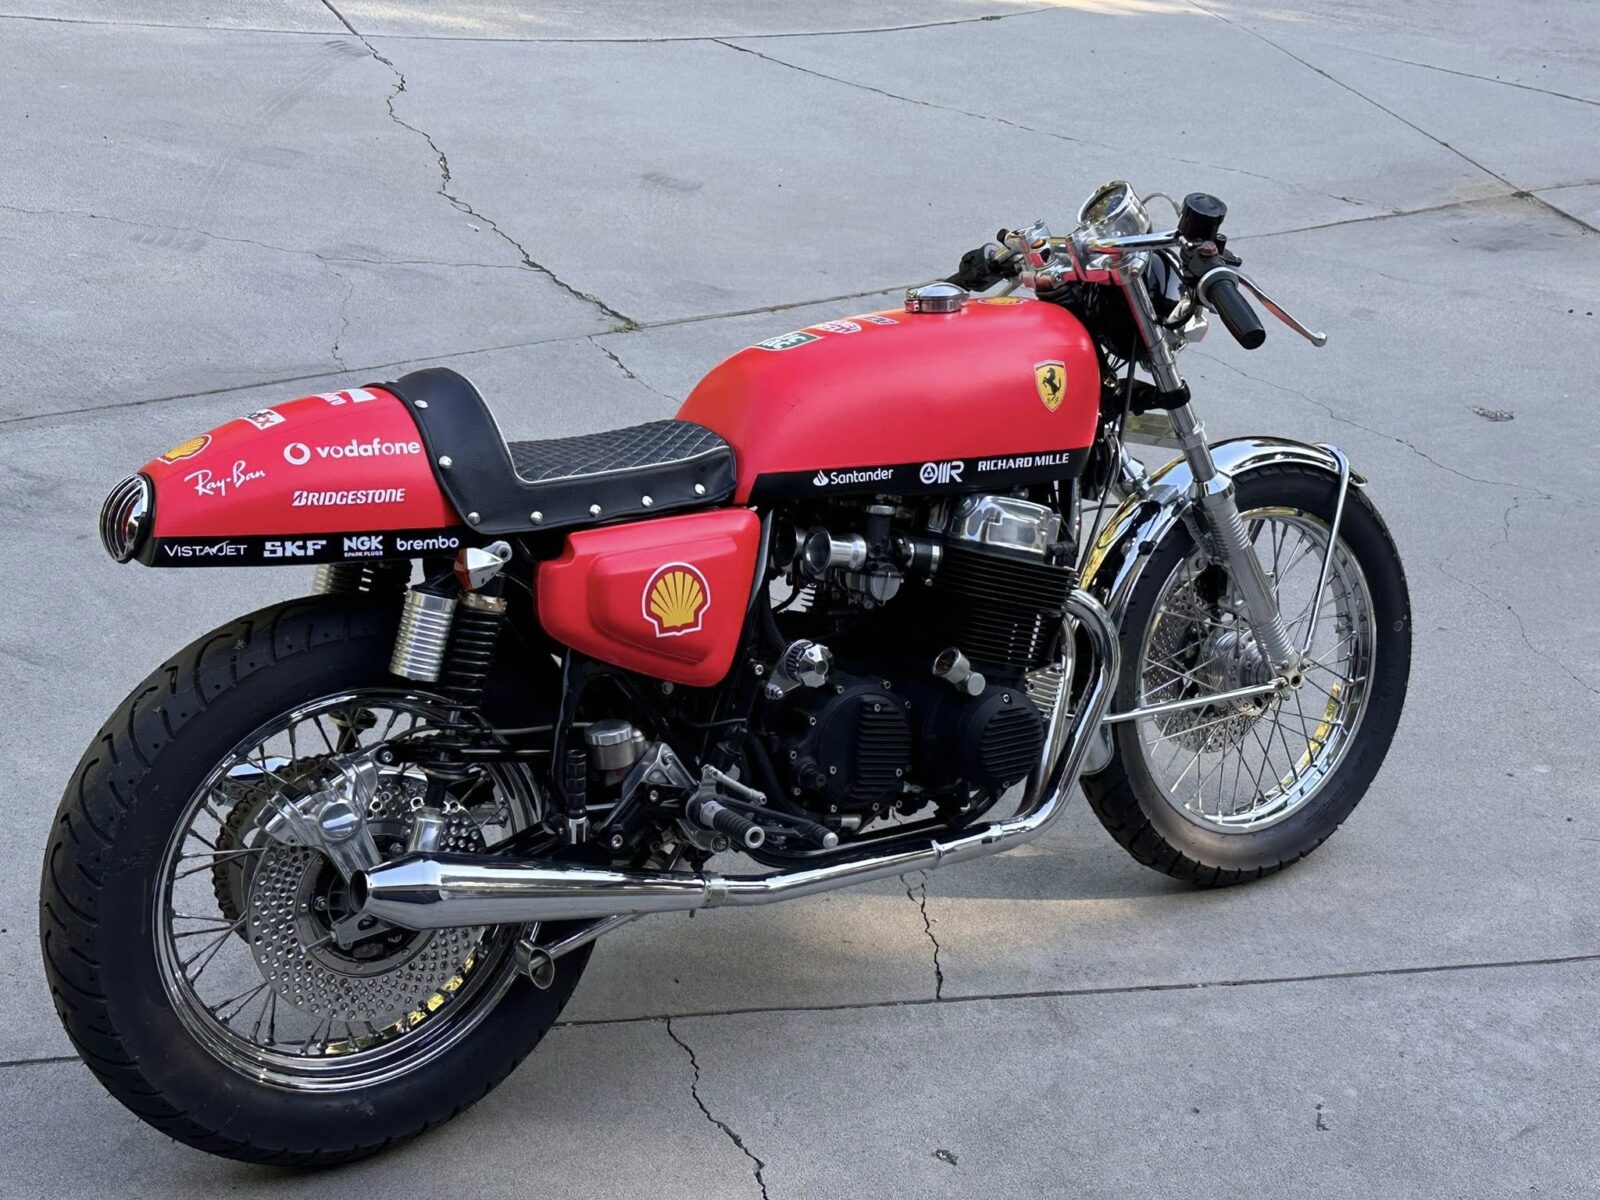
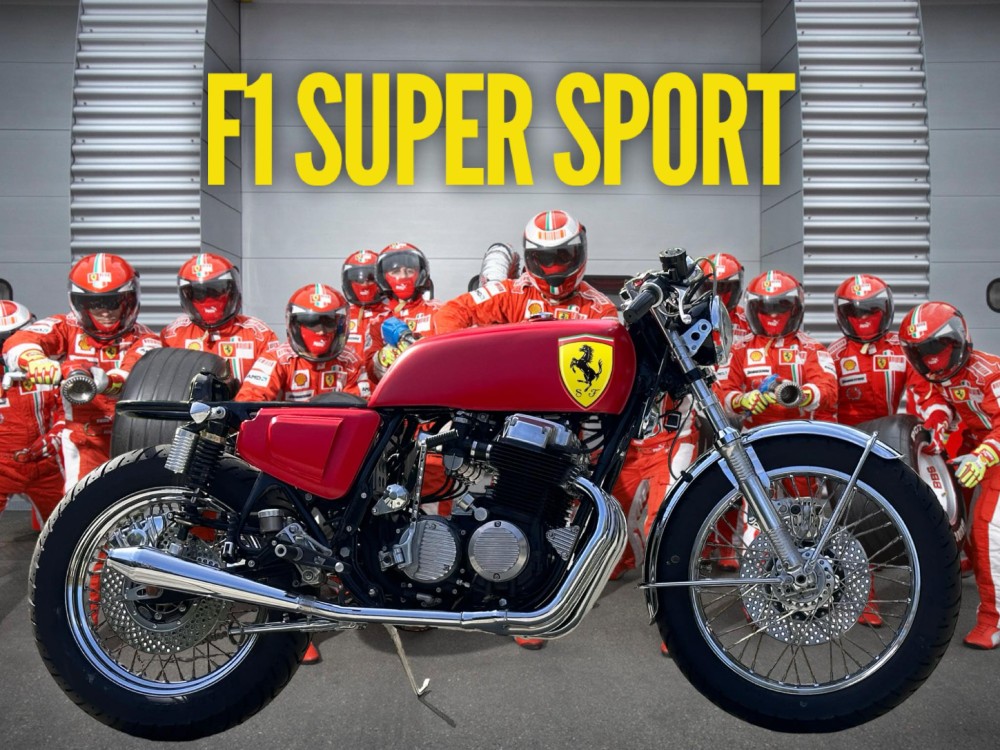
Scuderia Ferrari F1 styled CB750 Creation

I have been a fan of F1 Formula race cars since I was a teenager, regularly watching the races on our 3 channel television, I loved watching these guys in the JPS Renault Lotus and my First Motorcycle that adorned the Motorcycle world was based on Emerson Fittipaldi’s Black and Gold F1.

Now, over half a Century later, not only did I create a fun Cafe bike representing the JPS styling, I am now going to create another F1 livery Motorcycle for my Brother, but this time in the Ferrari F1 colors.  This will not be a replica of that machine but will have the accents of the Italian Stallion beast that runs the circuits today.

I still have a long way to go but as long as I get the look, I shall be more than happy, this has lots of work to be done still like seat set up and some accessories as well as the color scheme but this time I shall not be painting the bodywork as ferrari and all F1 race cars are wrapped, so this will get a new skin and hope I can pull that look off?

I am incorporating Airduct’s into the side covers and will make a custom seat and this time will have removable Pannier bags that hang onto the outside of the machine to give it a wider look from the rear.

The other thing is i like to mix old with New, so I shall have a Satellite GPS speedometer with a digital Tach built inside, set inside an old Vintage Race Car Alloy Cup that was attached to the steering column many years ago and had a Tach inside it.

I am making stuff up as I go along, some I shall keep and some I shall redesign most probably, but want this to be a cool ride that I will personally ride upo where I live as its a winding set of roads with many turns and off cambered switch backs.

This will have a new exhaust system as I hope to make in stainless and am using BSA silencers to give a little British feel and sound to the machine, that’s the cool thing with Custom machines, the sky is the limit and you can change to what ever you feel is to your personal liking.

As you can see, to keep with the Italian feel, I am using Tarozzi rear sets that came directly from Italy and will make this so much more comfortable to ride and change gear quickly.

Still a long way yo go right now but its taking shape and quite excited at the form that she is making right this minute and wanted to share with you guys and gals, I shall keep you updated on this creation and hopefully not too far away I shall be cranking gears in my area and grinning from ear to ear.  Stay tuned……………………..

A day of filming for TV with Larry, Jay Leno etc was a Blast

Hey Everyone, well its the weekend, I have been a bit ill in health recently and have not been on the website as much as I would like to but I am back on my feet, few health issues to try and figure with the Human Technician but I am sure I will get that all dialled in.

Anyway, its a Saturday so I thought that I would add a great video on here, my Buddy Larry Romestant builds Beemers and they are works of art, we have become good friends over the years and thought today I would share the tv show that had him showing him creating his bike, like you lot I am sure you have had many ups and downs when it comes to creating your ride and Larry does indeed too, which means its the real deal.

Jay Leno,  and James Maund get a feature in this show and I was happy to oblige in a segment too, great to watch on your PC or Big screen and hope you like it?


The trials, tribulations and triumphs of being a custom bike builder come to life as Larry and Carol Romestant design and build a one-of-a-kind BMW Special K cafe racer. Featuring Jay Leno, Steve ‘Carpy’ Carpenter and James Maund with some of the most scenic riding sequences ever seen.


http://specialks.net

Homepage

The Festive Countdown begins, Perfect time to buy parts as Gifts

Boy the weather is changing here and its getting a little cold in the Mornings, but I still sling my leg over my steed and ride off to work, but I actually put bubblewrap inside my jacket to keep the cold air out of my chest, an old Motorcycle Courier trick in London that I still continue to do for some reason.

I have had many orders for Christmas gifts but I only have a few days for the post to get to you in time, so order fast, I am running to the post office everyday to get your parts out to you.

Thank you for your continues support in what I do, it really does mean a lot, also love to be able to help you get that 2 wheeled machine on the road faster.

If you need help with questions about parts etc, drop a dime at 714-598-8392 or text for a faster reply.

Thank you once again for your orders.


To get your evening away better here is an amazing clip of how Sprockets are made in India, no safety shoes, glasses, gloves or even guards on machines, Brave people.

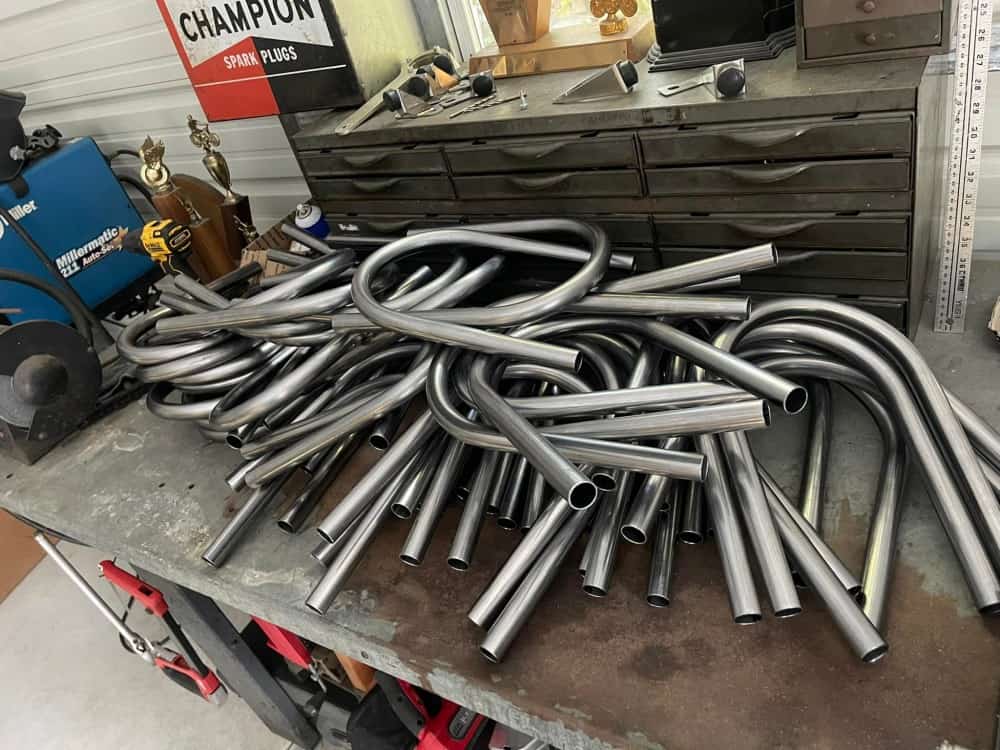
New set of frame Hoops made and banging out other parts too.

Well, time and tide wait for no man, woman or child for that matter, I have been flat out as of late and will be busy for some time to come for sure, albeit in the Barn designing a few different exhausts and parts etc.  Fun times ahead and I hope to try a few different brands of machines as well, a kaleidoscope of colors in parts and a good sprinkling of new tools to help you work on your ride easier.

Many people email all the time carpy@carpyscaferacers.com or at carpysgarage@aol.com with questions on their build and what they can do to get the motorcycle running a little better.  I try and help the best way that I can, I have been doing this for more years than I can remember but we are all a big combustion engine family and, if I can help, I feel great for making someone’s day.

So, today I made a bunch of round steel Flat Frame Hoops, I have sold over 500 of these and needed to make a load more once more as I was almost out of stock, these are all mandrel bent and I make them long, that way you can cut and get the look you require easier.

Tomorrow I shall continue to bang out some of these frame hoops, but this time I shall be bending the versions that have the 22 degree kick up, as I only have 3 of them left in my inventory, so I will be quite busy for some time and hope to be offering a few more parts on the website to help you get your creation on the road.

So stay tuned as there may be a part you are looking for and I make these right here, not in China, not in India and Not in Taiwan, all made in California USA.

I Always want to thank you for ordering from me, I have been running my business here in SoCal for 22 years and it just get more enjoyable every year, I get people come up to me where ever we are in the world and say, hey! Arnt you that guy who builds the bikes in California? I am always blown away by that.  So thank you from the bottom of my heart for sticking with me and my products, it means a lot.

Peace N grease

Carp


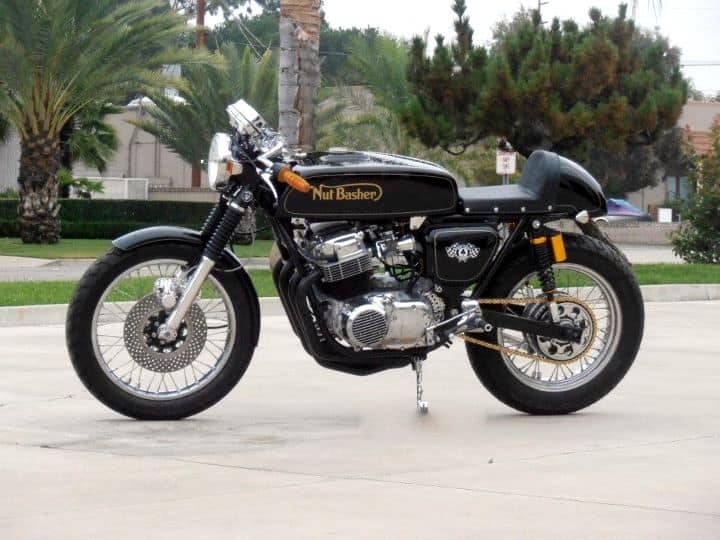
A HONDA CB750K I Aptly Named The NUT BASHER

I forget to add pics of Motorcycles that I have built over the years and some times I kick my self for not posting anything, but today I will overcome my forgetfulness and add some photos of a fun creation I built using parts that I had around the shop.


I wanted to build something that was a cool reference to Cafe Racer styled Motorcycles back in the day but, of course using a later motorcycle but, still early enough to be classes a classic and I started off with a 1971 CB750 Honda four that was just basically a frame, I had a bunch of boxes with parts in them and over time, I started to put a few things together.

I had an old Fiberglass Racing Gas tank that I thought would be just the job, I fitted it to the frame and sat on the bike, immediately crushing my nuts, that’s when the Penny dropped and I thought what an apt name for the bike and thought if I did it in the style of the Norton Logo, this would look pretty Classic.

I chose to go the traditional deep Black Color and then pin line around it in Gold, as that would really give it the 1950’s era British Motorcycle look that went along with Norton, BSA, Triumph and Matchless, as well as the Vincent of course.


Now the Gas tank has a Ton Of clear sprayed on it, I had to test fit it to the frame, as I had powder coated the frame Gloss Black and Built the Motor to an 836cc and wedged her back in the chassis, the bike was looking really good and I was happy about this, but now I had to come up with a Classic styled seat unit for the Nut Basher, so I went the whole hog and built one from scratch.

I tried all sorts of ideas until something clicked, but had to thing of a cool way of mounting a tail light and I wanted to have the light incorporated into the seat hump.  I chose to French the rear Led tail light into the cowl, and although it took a full day, it came out really well indeed and was super stoked that I had gone this route on the NutBasher Machine.

It sat on the frame just right and I attached snaps to the sides of the until so I could pull the cover off and get to any documents I need, or remove the seat if I ever needed to quickly, I also made sure there was a ton of clear coat applied just incase I scratched it and could buff it out on final fit etc.

I was super happy with the way the seat unit fitted and the tail light assembly was Classic looking but in fact was an Led stop light that was as bright as Einstein.

I wanted to put a lot of detail into this creation as I knew it would turn many heads where ever it ended up, this Fuel tank held 5.5 Gallons and that made for some great riding, without worrying about running out of squirt, but it sure was bloody heavy once the tank was filled up to the top.

She was a Long and thin Motorcycle that screamed out Nostalgia, it ran hard as nails and breathed really well as it has a hand made 4 into 1 Racing exhaust that was built in less than 3 hours by a Indy Racing mechanic, this would really exit the gases well and have never heard something so mean in all my life.

This was created by a top Indy exhaust builder and designer and he didnt even need the bike to make it, just an upside down engine, it was so cool to see him knock this out.

A sheer work of art and it fitted like a glove too, this was made in Inconel and a one off like this, nobody in the world will have one like this. The material is as I said Inconel  that refers to a family of trademarked high strength austenitic nickel-chromium-iron alloys that have exceptional anti-corrosion and heat-resistance properties. … Burns Stainless recommends Inconel 625 alloy for exhaust systems due to its excellent strength, corrosion resistance and fabricability. And it sure stood up to my fire breathing 836 motor no problems at all.

This is such a nice system, shame to coat it Black but I want the bike to have a lot of Black parts on it, so ceramic coated it will get and I am sure it will look great.

This Motorcycle will not just look fast, it will haul so much arse, it will leave people scratching their heads as it goes by, and the roar from the exhaust will stay with them for a lifetime I should think.

Another thing that I do and nobody ever did back then was, make my own gauge faces, I have created many over the years and this Ton Up machine needed a great set of gauge faces to give the top end of the bike some class too.  So I went with a Roaring Tiger, Synonymous with the 1950’s Triumphs and colorful to say the least.

These are really easy to apply and give your tired old gauges a brand new lease of life, also very unique and personal to your bike, something that I have been very proud of.

I even repaint the needles and add a longer Red line to the end, so you can clearly see where the needle is pointing at speed, also if you look, I have readjusted the configuration of the gauge faces and they digits start at a different position than the stock factory versions.

Not sure that you will notice but, I also changed the 100 to the word TON, which of course means the magic 100 MPH and a milestone in Café Racers back in the day to reach that Golden triple digit. I also added my own Oil Light warning  display of which has a High Beam and Neutral light, just to keep you informed as to what’s going on up top.

The Motor was totally rebuilt, the head was Ported and polished and has an 836 Yoshi kit inside the jugs, this pulled like a steam train and of course, stainless Allen head bolts throughout the whole engine. I also drilled the starter Motor cover and fitted bronze mesh for a cool Look.

Rear Hub got my Custom drilling and Polishing detail, as well as rear brake arm, I sure loved creating this Motorcycle and always enjoy doing my own thing to it.

I machined my own Motor mount to follow the fins of the engine and on ALL motors, I have always run an Alcohol filled Oil Pressure gauge, to give me a true reading of actual engine oil pressure, through the oil galley.

Cerakoted exhaust system looks great against the Silver and Polished Aluminum of the inline four engine, I used Italian rear sets to give this bike a wee bit more aggressive stance when you are sat upon it. I sell many pairs of these and dead easy to fit, they function so well and smooth, I try and use these on the majority of my creations.

All clean and new, this bike ran so well, it was like a new wrist watch to be honest and sure do miss this Beast of a Motorcycle, but enjoyed every minute building it.

Rear sets look pretty darn cool, I drilled and polished the sprocket cover too, for that Racy look and give it a little more Bling, personal choice but I have fun doing that.

The Grips you may find to be from somewhere else, and you would be right, I used Original 1970’s Schwinn Bicycle grips, put them in Boiling water and then pushed them onto the handlebars, they fitted snug as a bug when they cooled down and look great and flow with the piggy back shock reservoir’s.


A tall drink of water for sure, running on 18 inch rims and Bridgestone tires, a Combination I have used many many times, these have great grip in all weather but of course, have a nice Classic tread pattern too.

I have always been a fan of how this bike has sat, she looks ready to race off down the road from any angle, I also made sure that the front fender sat tightly to the tire.

I also removed the fender stays to clean the look up at front and I think that it works well, I hand drilled the front rotor and you can see much polishing of Aluminum was done to give this bike some class.

There really is a lot of detail that you will not notice at first but hope you like what I have done, we are all different and have many styles we like, but I get a lot of emails about this build and thought that it was time that I shared it with you lot.

I should of made a mold of the gas tank as I really liked that shape, even with the Chin Divot at the front of the tank, that goes back to the early TT days and stream lining.

Everything redone, even machines the Oil Filter Housing to give it some fins, a thoroughly pleasing to the eye motorbike that I am quite proud of creating.

Thanks for looking at The Nut Basher, I hope you liked what I have done to this old inline Four Honda and I continue to build and make parts for these 500 pounders.

Thank you for reading about this bike, if I can help you with Parts, Service or just if you are stuck, you can email or text me. carpy@carpyscaferacers.com carpysgarage@aol.com or TEXT 714-598-8392

The Old Koppa Kafe was a fun Custom to create in my Garage.

No idea where the time has gone to be honest, but I always loved creating this machine, just because it has so many great Original parts on it that really did make people turn heads.

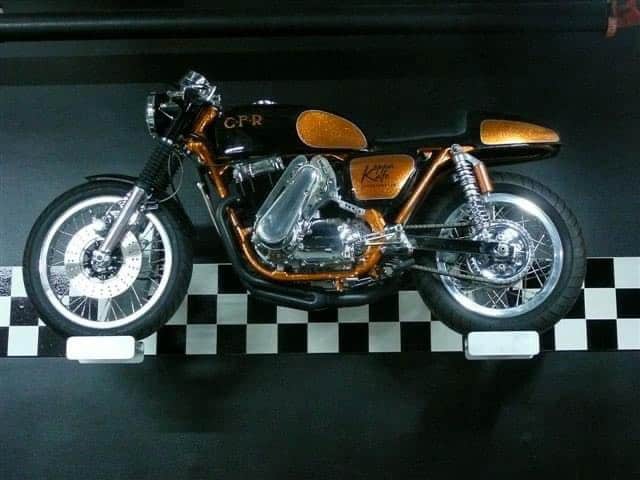
So I started off with a bunch of parts and already had the idea of how I wanted this, as the KOPPA KART was a famous Barris Kustom Truck that I had loved as a teenager and wanted to have some Copper Influence on this Motorcycle, but I had to do a ton of preparation to the Honda Duplex cradle frame to make sure all looks good when painted.


There was a lot of hand sanding and grinding of old Factory welds to try and make this Chassis as smooth as I possibly could, but also, I cut the neck and added a couple more degree’s to the rake, not too noticeable but I didn’t want it too aggressive, and I think this came out perfect for what I was looking for.

Also made up a Hoop and welded that to the frame, nobody was doing this back then and wanted it to finish of the seat that I was going to fit to it, and welded a bracket at the rear so I could attach the seat cowl and make it sturdy. But the most work that really needed some attentions was how was I going to extend the stock gas tank 5 inches, as I wanted a much longer fuel tank and thought that I may as well use some of my old spare gas tanks to cut up and make the change.

This is no easy task but, I was fortunate to have a bunch of K series Petrol tanks laying about in my garage rafters and thought the best way was to keep the front end and extend the tank backwards using sections from a couple of old gas tanks.

You can see the section cut and of course had the gas tank media blasted to get all the paint off so at least there was clean metal to work with, this will also have hammered knee inserts to give it that touch of Nostalgia of TT racing days and I was glad that I did go this route in the end.

You may not notice the stretch but its way past the original mounting bracket on the frame, you may also notice that I cut the rear exhaust and passenger peg supports down, this was to clean the lines up and allow for the lower part to become a bracket that my Italian rear Sets could attach too, I also braces gusseted the frame under where the gas tank sits just to give the frame a little more rigidity.

Here is the cross bracing that I did and used the pieces I cut off the bike, so it all got re used into this creation and I had not seen anyone do this before too so another added attraction I guess?


Putting this machine together in the garage was pure fun, I really did love the way the old girl was being revamped and as you can see, I did a lot of detail as at the end of the day, I was building bikes for a living now and this would be a great business card bike. many cool Parts and I used a pair of 18 inch Aluminum rims that were for a CB750 Automatic, of course I used to rear rims and then polished them to a chrome finish to give it a little more Bling.

So many hours were put into this and it became quite a challenge at times, but kept pushing on, I had to retap most of the thread holes as metalflake gets everywhere when you paint it and not use a booth, but I kept being persistent and it paid off, I used stainless Allen head Bolts through out the bike too, not cheap at almost a dollar per piece but makes the bike for sure.

Hand polished all the Aluminum and it took me forever to find an intake Plenum, I had one but it just would not fit, found out it was a Suzuki one, so thought to my self, ” Where the hell am I going to locate one of these Plenums for a SOHC?”  Then I got an email from a guy in Sweden who had a Suzuki and was Supercharging his but, his Plenum didnt fit and he thought his may be for a Honda.  So we traded and sure enough, when I tried to fit the Swedish one, it fitted like a glove. What were the chances of finding another eh?

What a piece of art it is too, so happy to be able to fit this to the machine and another tick off the list of things that needed to be accomplished to get the bike to the standard that I was after.

Just look how cool this Copper Metalflake looks, we used 3 pounds of the stuff to get the required depth that i was thinking of and a ton of clear coat was used to smooth it all out, but that Polished Aluminum offsets the Copper really well , what do you think?

I really was happy at the way the bike sat and looked and bit by bit I would get things accomplished, then I would push it onto the driveway to see how it looked in natural light.

I had Machined the front Lower forks and rebuilt them with New uppers, springs and this was a neat and unusual look as I had never seen anyone machine lower forks on a 750 before.

When I had these on the bike at Shows, people would ask about the forks and send me theirs to rebuild and give it that Custom look, it sure added some Custom touches as I painted the grooves Copper to go with the rest of the bike.

Finding someone to drill the correct hole on the stator cover, turned out to be a pain in the arse, I had one so called shop in another state have a go and messed it all up, so I did it my self and under cut the hole then used a drum sander to keep adjusting until the oil seal fitted tightly, and there you go, job done.

I had an Old Drouin Supercharger that was once going to go in an old chopper/drag bike and after I got all the parts I knew what bike I was going to build.  Now, the Motor I had was a fully Blue Printed motor, costing 7000 Dollars many years ago and this was perfect for the bike and thats how this came about.

I had a local company water Jet a bracket out of 7075 Aluminum and gave them a paper template, this worked out and treat and bolted right up to the SOHC motor with exact clearances, I simply Polished the bracket once everything was test fitted and you can see the Crank Pulley at the bottom fitted perfectly too.

All fitted and this Mechanical Washing machine looked Bloody awesome all hanging out of the engine on the Left hand side, it is Belt driven too so pretty quiet to be honest with a neat Polished Aluminum Belt cover for added coolness.

Yeah, it was an intricate bit of Kit to begin with but loved looking at this Motorcycle I looked at it as a piece of art and used as many pieces from a 1969-1978 Honda as possible.

I hand Hammered the knee Inserts using a Tear Drop Hammer from Eastwood Supply and this came out so nice with the Copper paint and boy did it shine when the Sun hit it too.

There is a lot of work here and those who have tried to Polish their Hubs will know what I am talking about, I also added a Double Chain and Sprocket set up as there was a lot of Torque here in that engine, I couldn’t locate one for the longest, but Azusa Chain helped me as this was for an Old Lathe and converted it to the bike and worked really well, ran a slightly wider sprocket carrier for the offset to be right.

I also fitted an Old Lockart Oil Cooler to the bike as it will run 15% cooler with that fitted and as the Oil Filter Housing has some broken fins, I cut them off and polished the body and it looked pretty good to be honest. I ran Braided Aircraft lines to the cooler too some Dash 12’s.

That’s an Original Lockhart Cooling Radiator too, I made a thick Aluminum Bracket to mount it to the Horn bracket and then polished it to look like chrome, it worked really well too.

That tank turned out so well, I used Por15 to seal it before painting and then pressure tested it at a Radiator shop, C.F.R was for Cafe Racer but in the style of the old H.R.D Motorcycles of years gone by.

This was My first attempt at making a Fiberglass front fender, since then I have sold over 500 of these to Customers all over the world, its 22 inches and has a bead all the way around it.

Cant get enough at looking at that, even today, it was a tough Motorcycle with loads of interesting parts and so Glad that I jumped in and had a go at creating this machine, there wasn’t many Café bikes at all about, so many people used to comment on what sort of bike it was and I think i was lucky enough to inspire a few people to have a go their selves and create their own unique ride.


My First attempt at a Custom Gauge, using an original one, I wanted to put BOOM at 140 MPH, got many comments on that and it was a great discussion point at shows etc.

I fitted an Original Series One Yoshimura exhaust of which was the pattern for all the systems I make today, I used a CB750 Connecting Rod for the license Plate holder, I later swapped the plate to the other side as the exhaust gases would tarnish the chrome lol. They are New Old Stock FOX shocks too and they really did give the ride height that I wanted on 18 Inch rims.


Allen bolts all through out the build and I did my drilling style on the sprocket cover just the break up some of the glow of the polishing, I have made many of these covers and sold to customers too over the years.

Rear Hub gets the same treatment and that’s an Original Dresda Boxed Swing arm that I chromed and boy does it look sharp on the bike, it really does accent that rear end.

I used Cow Hyde to upholster the Custom seat and used Gel foam for a comfortable ride and its a nice riding position with that 5 inch stretched gas tank.

Everything I feel on this Motorcycle Flows well, its such a warm color too, I hope that you liked just some of it as I know that you understand how much effort goes into creating a machine such as this.

Time has moved on and this bike now resides somewhere in Australia and hope the owner is having fun with that Custom built CB750 HONDA.

I took this bike to many shows all over the USA and had many great conversations with like minded people.

I think this was Seattle show but ALL the shows were super fun and made so many friends and acquittances etc. it’s a healthy industry now and I am still making many parts for these super fun inline four motorcycles.

I used a headlight from an Old DeSoto Automobile as I think it fitted in between the fork ears really well, I hand drilled the front Rotor using my drill press, I even made the bike stand.

One of the last photos before the bike made her way to the other side of the world but am proud to say I created that Monolith of a Café Racer.

As you can see, on the Right side of the bike, I fitted an old 1974 ARD Magneto, that too is Belt driven and gave the bike its Status Quo, she sure does sit well on the Tarmac too.

I used a Pontiac Taillight for the rear on My Custom Rocket Four seat assembly and I still sell them to this day and send all over the Globe.

Thank you for reading my Blog today, I just wanted to show you a bike that I really did have fun creating and love seeing what you lot are putting together. Below is a before and after shot.

Have fun with what ever you are creating and if I can help, you can call, email or even text me, I am always here to advise Thanks again and keep on building and Riding.

.

Corona Diaries- The year of the Mask

Well, here we are, the weekend is almost upon us, things are still bad when it comes to Covid-19, this is a crazy time for us all, but- We have to live life and try and work the best that we can with what we have these days, and I hear from many Customers of their way to get through some of the lockdown and boredom, by working on their own projects in their Garage, barn, Shed or back yard.

I must admit, working with a mask on is hard, but lucky for me, I dont have people coming to my workshop to ask about parts, most will call, text or email about the issues they have with their ride.

I sure hope we find an antidote for this as I do miss riding with people and having a chinwag in person about pretty much anything two wheel related these days, but I shall continue to write a few blogs as I go along in life and share what I get up to in the garage.

I receive many orders in the day time and night, I think people sometimes believe that I work 24-7, and if I could, then I would, but I need my rest too, but, I do try my best at getting your parts to you as fast as I can but- due to this Virus, many places that I use are either closed or part time, so that holds me up in ceramic coating or steel supply etc.

So, if you can bare with me until this gets a little more manageable, I will en-devour to get your parts out of the door in a somewhat timely manner.

Be safe out there and hopefully we can get this Virus beat and all go riding like we love to, so- stay safe, stay positive and stay in the garage Wrenching.

Thank you so much for supporting me in this tough times we are experiencing in life.

Peace and Grease

Carpy


For all your Motorcycle needs

Happy Tuesday Everyone

Rice Boiler


Fast approaching the 18 year Milestone here at Carpy’s Cafe Racers and have always enjoyed what I do here in Sunny California, and today is another great day and seeing as its Blog Tuesday, just wanted to than you all for purchasing from me and all the great emails and phone calls that I receive from you.

book


Trying to make New parts as well as sell the Classic ones too, I listen and if I get enough interest then I try and make the parts happen and so far it has worked out well.

Queen

So if you need Handle bars, to seats, to great Exhaust systems, I am here for you and once again thank everyone for all your support I really appreciate it.

Have a Great day and look forward to maybe one day meeting you at some of the shows we shall e attending this year, off to New Jersey in March, should be a Blast.

banner1a


HONDA CB500 “The Bikini” Built by Kyril Dambuleff

Some times there is a Cool Motorcycle that has been redesigned and contoured into something of beauty, and if seen, would make you stop in your tracks, I have seen many creations made here and over sea’s and when I saw this CB500, you had no choice but stop and admire the countless hours of perpetration and grazed knuckles to get something as aesthetic as this Machine named- The Bikini. By Kyril Dambuleff of New Jersey.

Today I wanted to feature this ride as being a Motorcycle builder myself, I can see the hours put into this and it sure turned out really well, no way you cannot appreciate the time and effort that has gone into this ride, the amount of scraps of paper with ideas on, the Sharpie idea’s scribbled on the work bench when Inspiration suddenly dawns upon you- the array of coffee cups – crushed beer and soda cans that kept you going where others gave up- the snippets of electrical wire and heat shrink for those frustrating electrical issues- And finally – An empty space on your Motorcycle Table!!

Kudos Kyril, so impressed with what you have created on the East Coast mate. So enough of me rambling on about this bike, here is all the details and photos Below that explains this mans creativity and craftsmanship. Enjoy…………

This motorcycle is the antithesis of the LOTUS C-01.  Conceptually, of course. When looking at Daniel Simon’s design, there isn’t much you could see other than the motorcycle’s gorgeous overall shape.  Most of the components are completely hidden from view.  Here, on this motorcycle, just about everything is in full view.  Like a “skeleton watch”.  Those bare-bones timepieces in which the watchmaker has left only what is essential and revealed as much as possible of what makes a watch tick.  Since I’m not too crazy about skeletonized watches, I prefer a different analogy: a tall, skinny, platinum-blond fashion model scantily clad in sky-blue bikini.  Where everything is in full view except the little that is hidden and subject to the imagination.  Hence the bike’s name: BIKINI.

2

Kyril Dambuleff has no barrow to push. He doesn’t run a workshop or sell parts or posters or scarves or t-shirts. He only builds motorcycles to keep himself happy and make the rest of us plonkers look bad. And he’s doing an admirable job of it with this exceptional 1972 Honda CB500 he’s dubbed ‘Bikini’. Photos by Kyril Dambuleff 

3

The rivet counting brigade will be quick to point out that while the frame is from 1972 the engine itself comes from a 1976 CB550. And that’s how the bike started, with just an engine that had been rebuilt by Kyril from the ground up. ‘It sat on my workbench for months, taking up much needed space,’ he says. ‘I thought about displaying it somehow, perhaps in my office. But what could be better than an original frame?’

4

Well, not much. Unless it’s nestled in a bike trimmed to perfection like this beauty. So Kyril went about accumulating all the parts over the coming months – the frame, wheels, exhaust pipes, forks and tyres and all the other sundries that come from assembling a ground-up bike. But the focus was to remain the powerplant.

5

‘The idea was to showcase the engine and have all of it in complete and unobstructed view with nothing hidden,’ he explains. ‘Everything else had to conform accordingly. Hence the asymmetrical tank and all the other exposed components which shows what makes a motorcycle tick. It’s like one of those skeleton watches in which the maker has left only what’s essential and tried to reveal as much of what makes the watch tick as possible’

6

It’s a little like that, but Kyril has an alternate slant on the bike. ‘But I prefer to think of the bike as a tall, skinny, platinum blonde fashion model scantily clad in a sky blue bikini. Where everything is in full view except the little that is hidden and subject to the imagination. That’s where I got the name from.’ As much as I prefer the name ‘Blue Balls’ I’ll grant him that ‘Bikini’ has a much classier ring to it.

7

Kyril fabricated the aluminum tank himself, which slopes up hard on the right hand side to expose the spark plug leads and the coil. On the left it retains something close to the original lines but that completely asymmetrical design is certainly something I haven’t seen before.

11

It’s also interesting to note the finish used on the exhaust headers. It’s not polished stainless steel but Cerakote applied with a mirror finish. Cerakote is actually a polymer-ceramic coating that’s usually applied to firearms – often in camouflage or flat earthen colors. It’s a neat process that’s very heat and distortion resistant and should ensure a mirror-like finish for years.

8

Those headers were fitted to the rebuilt CB550 engine – and unlike the frame, and maybe like it’s bikini-model namesake, many of it’s best features aren’t visible. While the engine was blasted and polished the cylinder was bored out to 59mm and new Wiseco pistons installed. Compression was taken up to 10:1 and displacement is now 553cc’s.

9

And then it was time to fit it to the frame, which Kyril found to be the only part of the build frustrating. ‘Modifying the original tail section was easy,’ he says, ‘but grinding, filling and smoothing the original welds took a lot of time and effort and, in some cases, required tools that one would expect to find in a dentist’s office.’

10

All told the bike is an incredible twist on the traditional cafe racer – and like an original caff this one is considerably lighter than stock. Kyril’s target weight was 350 pounds (158kg) and with the antigravity battery, aluminum parts and tricky things like the adjustable foot peg positioner he nearly managed to hit that with the bike weighing in at 357lbs. ‘I think I could have hit 350,’ he explains, ‘but I had to replace the front single disc with a twin disc setup that was irresistible’.


More from the Builder.  Kyril Dambuleff New Jerseys Finest Motorcycle Builder.

It all started with a HONDA CB550 engine, which I’d bought a year earlier and which I’d rebuilt completely from the ground up with the idea of keeping it as a spare for the BLACKSQUARE bike.

Then, the rebuilt and detailed engine sat on my workbench for months taking up much needed space.  I thought I’d display it somewhere somehow, perhaps in my office, and what could be a better “cradle” for it than an original frame?  So, I bought a frame.  And then, I bought a set of carburetors.  And then… it occurred to me that one way to display an engine is to build a whole motorcycle around it.


One thing led to another.  The principal idea to showcase the engine itself called for everything else to conform accordingly.  So, by extension, almost everything else had to be fully exposed too, perfect as I can make it and as simple as possible.

Ultimate simplicity leads to purity.

This succinct phrase by the Japanese food critic Masuhiro Yamamoto had been stuck in my head for some time and I thought it was appropriate enough as the motto for the build.   I printed it in poster size and nailed it to the wall in the workshop.  As much as I felt I knew what Yamamoto-san meant, I wasn’t sure I could fully comprehend this piece of wisdom.    So, I “translated” it for myself in layman’s jargon and printed another poster:

Nothing half-assed!


I personally benefit from having a “guiding principle” when working on a project.  It makes life easier as it eliminates “what-if’s” and “should I or shouldn’t I”.  So, when the concept of showing what makes a motorcycle tick dictated shaving off the majority of the right side of the tank, off that portion went.  It didn’t bother me that, consequently, the tank became fully asymmetrical and that seemingly people just don’t do that (motorcycle tanks are always fully symmetrical).  It had to be done and so it was done.

A lot of the rest of the bike is, of course, conventional. It is a motorcycle after all.  And it is a fully functional, street-legal and registered bike. You could take it anywhere.Another interesting and relatively rare feature is the 3-position rearset bracket.  It allows the rearsets to be positioned up and down as well as forward and back to suit the rider’s size and preferred riding style.

The most difficult part of the project was, completely unexpectedly, the frame.  Modifying the tail section was easy, but grinding, filling and smoothing the original welds took a lot of time and effort and, in some cases, required tools that one would expect to find in a dentist’s office.  Next was the question about color.  The first choice of color was totally inappropriate, but I could only see what a big mistake that was after the bike was fully assembled.  So, everything had to come apart again.  The frame was stripped, re-blasted, re-powder-coated, and clear-coated.  And then everything had to be put together for the second time.  Luckily, the sky-blue color came out alright.

In addition to the main concept of exposing as much as possible of what makes a motorcycle “tick”, another objective was to lighten the bike as much as prudence and safety would allow.

Yet a third objective was to avoid the use of plastic components as much as possible.  There is hardly any plastic on the bike.  Other than the battery casing, the fuse box and the tail light’s rubber-like elastomer, I can hardly think of any.

COMPONENTS:

ENGINE, FUEL SYSTEM, IGNITION & EXHAUST

ENGINE: 1976 HONDA CB550.  Bead-blasted, completely rebuilt from the bottom up, bored +0.5 mm to 59 mm (the original cylinder bore is 58.5 mm) and fitted with WISECO pistons (kit model number 40059M05900).  Compression increased to 10:1 from the original 9:1 and displacement increased from the original 544 cc to 553 cc. Cylinder boring and valve job by TSI Competition Engines.

CARBURETORS: original KEIHIN, model 087A, completely rebuilt.

VELOCITY STACKS: one-off custom design, by STEEL DRAGON PERFORMANCE.

TANK: asymmetric, one-off, in-house design, all aluminum, custom-built and polished by BCR DESIGN, capacity = 2.0 US gallons

PETCOCK: by PINGEL, 6000 series

EXHAUST: modified original headers, ceramic-coated with CERAKOTE High Temperature Glacier Series coat.  (When polished, the appearance is that of polished aluminum.)

IGNITION COILS: Dynatek Dyna Coils 5-ohm Dual Output DC8-1; Black DW-200 Wires

POINTS: new, original HONDA

FRAME & SUSPENSION :

FRAME: 1972 HONDA CB500, modified tail section, all original welds ground smooth.  Powder-coated in sky blue and then clear-coated by TRICKED OUT CYCLES.

FRONT SUSPENSION: original HONDA, rebuild with new tubes and springs.

REAR SUSPENSION: custom-built by WORKS PERFORMANCE gas shocks, 13.5″-long, Dual-Rate Springs.  (The question about correcting the length of the kickstand when custom suspension is installed comes up a lot, so, in anticipation that it would come up here again, the answer is yes.  The kickstand was lengthened by 1″. It was then polished and chromed.)

13

WHEELS, TIRES & BRAKES

RIMS AND SPOKES:  by Buchanan’ Spoke & Rim Inc.  “Sun” rims in polished aluminum, stainless steel spokes.

TIRES: MICHELIN Pilot Activ.  Front 3.25 – 19.  Rear 4.00 – 18.

FRONT BRAKE: dual-disc, drilled rotors, original HONDA calipers, stainless steel lines, banjo fittings and 3-way splitter by GOODRIDGE

REAR BRAKE: original HONDA

14

CONTROLS & INSTRUMENTS

CLIP-ONS: Vortex, 35 mm, 7-degrees, all aluminum

THROTTLE TUBE: G2 Ergonomics Quick Turn Throttle Tube 50-150D, all aluminum

GRIPS: by ARIETE, model 02631-ALL, Alu-Rub Grips (polished in-house)

HAND CONTROLS: by Eurocomponents, model: De Luxe Retro, all aluminum

15

REARSETS: by JOKER MACHINE, model 09-800S, all aluminum, fully adjustable in all imaginable positions.

3-POSITION REARSET BRACKET: in-house design, allows 3 different positions for the rearsets depending on rider’s size and riding style preference.  CNC-machined from 6061 aluminum. The brackets are approximately 12″ x 5″ x 2″ overall (roughly 300 x 120 x 50 mm). There are two curvatures which offset the mounting points by about 1/2″ (12 mm) and the three circular foot peg positions are themselves some 3/4″ (20 mm thick) allowing the brake pedal and clutch lever to clear the exhaust pipes.  It took a big chunk of aluminum to CNC-machine these.

16

CLUTCH AND THROTTLE CABLES: custom-made by BARNETT

TACHOMETER: SMITHS Digital Chronometric CHR-R10; 0-10,000 RPM

17

ELECTRICAL:

HEADLIGHT: restored antique spot light (the bucket was chromed, the reflector was nickel-plated) fitted with a STANLEY lens.

HEADLIGHT RELAY: common latch relay incorporated in the headlight’s bucket.

TAIL/STOP LIGHT: 30-LED TruFLEX by Custom Dynamics.

BATTERY: 8-cell 240CA Lithium battery by Antigravity

REGULATOR/RECTIFIER: by RICK’S MOTORSPORT ELECTRICS, model # 10-100

HARNESS: custom 3-part harness terminating in aluminum aviation plugs; all bullet-socket connectors by VINTAGE CONNECTIONS

PUSH-ON MOMENTARY MINI SWITCHES for the headlight and starter button.

18

SEAT, SIDE COVERS & FENDERS:

SIDE COVERS: perforated aluminum, designed and built in-house.

SEAT: designed and built in-house, aluminum pan, 1-inch foam, marine-grade semi-perforated black vinyl.

EMBLEM: in-house design, 3M epoxy domed decal on black background with chromed letters, custom-made by CHROMED HOG

19

OTHER:

All laser cutting by Keith Gayman.

All spacers and other specialty parts were machined by “uberacer” Gene at S&S General Services LLC

All welding by master welder Tim at Classic Cycles

20

SPECIFICATIONS:

OVERALL LENGTH = 80.5 inches (2,045 mm)

OVERALL WIDTH = 28.5 inches (724 mm)

OVERALL HEIGHT = 39 inches (991 mm)

SEAT HEIGHT = 29.75 inches (756 mm)

FOOT PEG HEIGHT: Position 1 = 12.25 inches (311 mm), Position 2 = 13.00 inches (330 mm), Position 3 = 13.75 inches (349 mm)

DRY WEIGHT = 357 lbs. (162 kg)

NOTE: The listed dry weight of an original 1976 HONDA CB550 is 423 lbs. (192 kg).

21


My Thruxton with a New Look !


001

Here we are with a brand new look to my 2013 Thruxton, as I had drawn this up a long time ago and wanted the old style look with a new ride.


002

I was so fortunate to be honored as the President of the 59 Club for Orange County, California and that was back in March 2014 and sure am stoked to have that bestowed upon me and I do my utmost to promote this famous club to the best of my ability.

003

I have made numerous changes to my Thruxton and am still making improvements as and when time and money is available.

004

As you may notice, I have made my own front bikini fairing, similar to the Thruxton but extended two inches on the top – and of course I have the ears extended back to give it a slight Rickman styling, also I added my 7 inch LED headlight that really sets the front end off on my machine.

005

I am from the UK and as a teenager I grew up loving motorcycles and immersed myself in what ever I could, I loved all the classics and my first ever Caff racer was back in 1978 when we got our provisional License and had a 50cc Suzuki that I put Clubman bars on, cut down seat and fitted a fairing and from then on I was hooked into the scene.

006

I used to go to all the Rocker Reunions to watch the Gene Vincent styled bands play, from Joe Brown and His Brothers to The Rapiers, who still gig today.

007

If you look on the tank I have painted Ton Up and ask any Rocker what that means, it means to go over 100 miles an hour and back in 1959 that was quite a feat to accomplish. This has nothing to do with the TON UP clubs that are all over the place, I had this logo many years ago as we were Ton Up Boys back then and this term was coined back home in the 1950’s by the 59 Club members. I wanted to use a Triumph Style font and love the look.


008

I made the tail cowl too and my seat has the compartment inside the cowl so that I can store all sorts of stuff for my ride. You will also notice the awesome polished finned Primary Cover that I received from Speed Merchant and boy does that look trick now.

009

I have Speed Merchant covers and love the look, fit and style of these castings etc, and get many good positive comments on the set up I have.

010

My stainless steel Monarch Megaphones bark like a scolded dog and actually improve performance, hope to get a dyno chart on them soon.

011


I also make the side covers too and have an air intake style grill that really helps the bike and as I now have pod filters, these breathes well.


I012

Right now I am working on making brand new stainless steel headers for the Thruxton and the Bonneville, so stay tuned on my website for that.


013

I have the big wide 5.5 T.T. rear wheel set up with Wave rotors too on a stock swing arm and it handles very well but soon I will have new alloy rear swing arms that will be available for all to purchase for your rides.


014

I have TEC shocks right now with my covers I machined on them to give that racy look and am happy with that set up until I can afford some Works Performance piggy backs.

015

The bike sits well and I have Wave rotors front and rear, it corners so well and have such fun with this bike.

016

Just have a look at the gorgeous SM Finned Clutch Cover, it really is a piece of art and a happy I went this route as its kinda Hot Roddy!


017

From the right side you can see that I have my own oil pressure gauge set up on the bike and I love to know I have good oil pressure.

018

I changed the Front sprocket to a 19 and love the performance and fuel millage on it and now will be fitting a nickel DID chain to compliment it.

019

To break 100 MPH in Great Britain back in the day was a major effort and the 59 Club were the first Rockers organized motorcycle club and that where you started to hear TON UP, doing the Ton, Ton up Boys, Ton Up Pirate, Ton up kid. To break ‘the ton’ was a huge achievement back in the day and gave you some bragging rights.


Back in the day my dad would point if we were in the car going somewhere and would say look, “Ton Up Boys”

Ton Up Boys

My first Ton Up experience was putting my brother on the back of an RD200 and tapping him on the shoulder so he could look at my speedometer needle bouncing at the 101 MPH, it was an awesome experience and a sense of accomplishment back then, albeit it highly illegal, as it still is today!

The real badges I have from back home.


020

The FIRST organized motorcycle club in Great Britain and when Britain was really great was the club I am now president of here (the Orange County, California chapter) some 55 years later.

021

I wanted to fit my fairing on the bike and give it a slightly nostalgic look that I grew up with, having a fairing back then was not just cool it made you more aerodynamic, which meant you could go faster, I also used to be able to tuck stuff in the fairing like tools, maps and spark plugs, etc., and on occasion, as my throttle would stick, keep the throttle wide open on cold mornings on the freeway and put my cold hands in the fairing to warm up a bit.


022

This is the rear of the bike with my own made cowl with old style metal-flake gold paint and of course the famous 59 Club insignia I am so proud of.


023

My peanut style tank looks great in the new livery as green was just too common and I have had many green bikes over the years but always loved black and gold. you can see my old style European Fog light and oil pressure gauge to the right of the bike.


024

My ram air system style side covers not only looks cool they are cool and function very well transporting cool air to my pod filters.

025


This has House of Kolor Aztec Gold flake and it sure looks good when the sun is out.

026

So, here she is outside my shop and has so many of my parts on her, the Oil Pan Bash Plate, the fog light, the fairing, the exhaust, the rear cowl and seat, the side covers and the front alloy fender, all designed by me and available to you, too.

027

I have so much fun with my Thruxton and we have many rides to great places, check out meetup.com under Carpy’s Cafe Racer Meet Ups and come on a ride with us all, you will love it.

028

I still have more to do to my bike as I will be making a 3/4 Dunstall style fairing for her to give that early 60’s styling and something I really like.

029

I thank you for looking at my Cafe and love to hear from you, carpy@carpyscaferacers.com if you want to drop me a line or two?

030


Look forward to seeing some of you on the road, as we have many rides and start to go to more places too.

031


Stay tuned for more stuff like parts and apparel, etc., as I love what I do and enjoy meeting like minded people.

Just some history below back in 64.

1964 Rockers from Hong Kong Rockers on Vimeo.

1964 Rockers footage
Edit by H.K.R.C. (Hong Kong Rockers Club)

Here is me on my Thruxton a few months ago taking Big Bear Area in, I loved how the bike handled with the new rims on.