Honda CB750 Super Sport Classic Cafe

I recently came across some old CD’s that I had tucked away in a drawer, glad I took some pics of some of the motorcycles that I have created, they say if you put them on the internet, it’s there forever, but that’s incorrect as I had quite a few bikes on there and cannot find them anywhere, so I was stoked to at least find a couple I had created and thought that I would share with you.

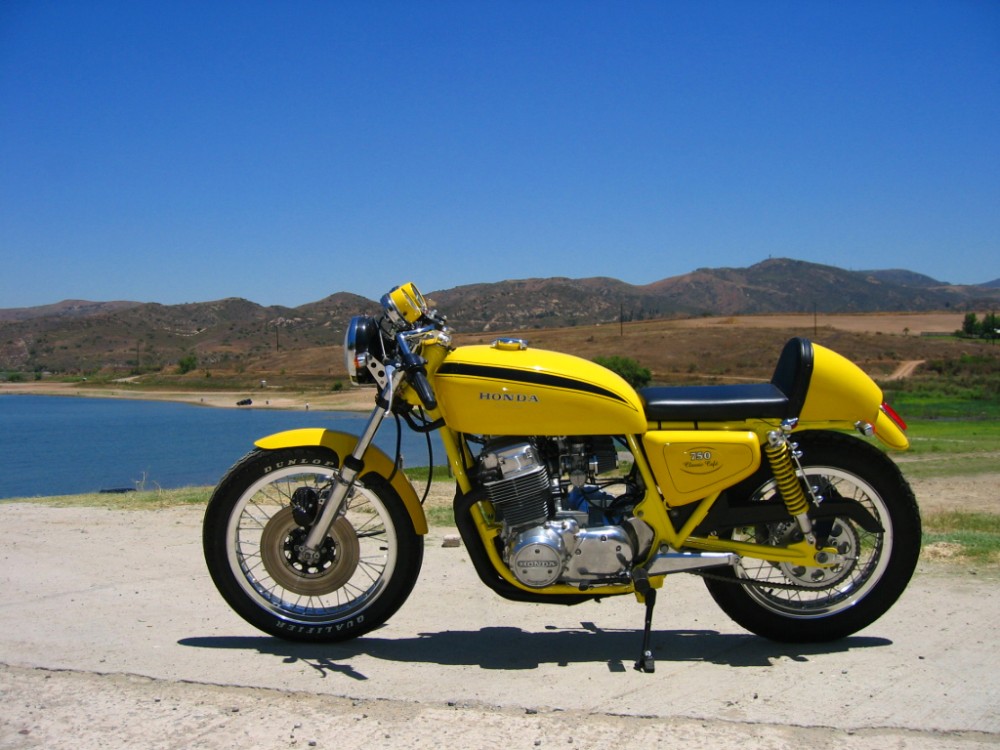
The bike started out as a stock 1978 machine that had seen better days and been neglected for a few decades, this was a good platform to use as I knew the Motor would at least kick over but not fire, so, with that in mind I set about pulling the bike apart and going a little out there with the color, the reasoning for this? Well I loved the old Yellow on the 400 -4 Super Sports ad thought I would go with that color ad it would stand out in the California Sun.

Taking apart in my old garage, where space was not infinite.

The Bike belonged to a Customer and he wanted me to go way out there and make this a head turning machine, if I remember correctly he was a Rocket Scientist, so I had to come up with something that would Blast Off!!!

Everything apart and now its time to see what to do, I started with the frame first, as that needed to be cleaned up then stripped before I could get it ready for any sort of paint.

Happy with this now, I have to media blast the frame to remove old paint and of course any rust etc, file any bad welds and spot weld back to good again, then it will be time to take to Powder coater and get some Sunrise Yellow on this to make a big statement in chassis color.

As you can see, this really is a bold statement- I really wanted this to turn a few heads for my Client and he has let me go ahead with what I ever i feel this machine may need to give it a wow factor, remember, this was about 2006.

Motor stripped and rebuilt with New cam Chains, belt slider and clutch etc, this will be like a New Machine when all back together, but- A long way to go as yet.

Like a Jewel now and ready to go back in the frame when I have completed it to a rolling chassis.

So, the Motor is now all painted and polished and awaits me to lift this 230 pounds of aluminum and throw it into the Duplex Cradle frame of the SOHC, but I still have to get that frame rolling, what I need to do is finish the chassis so its a roller, then I can get this lump back in the place it originally was placed in 1978.

OLYMPUS DIGITAL CAMERA

I rebuilt the rear shocks with all new stainless steel hardware as I don’t want this to rust like it had done previously, and will take my time getting this together on my own.

I went another route this time as the 1978 Forks were in really bad shape, so I used a 1976 CB750F front fork set up, polished the lowers and fitted new tubes and completely revamped these with Progressive springs etc, this is a nice set up and very clean compared to what was on there.

Frame is back together, using an old 1976 front wheel to make it a roller as I shall be building new wheels for this bike, I also put pipe insulation on the frame so I don’t scratch the paint when I am fitting the motor.

She is now a rolling chassis, with this I got the bike off the bench and onto the floor then into the driveway, I used a 1976 rear wheel to fit in the back until I have made new rims up, but now is the time to see if I can fit this engine and that’s the last of the heavy lifting.

The Motor is now in, with the help from my trusty cat, I also fitted vintage speed equipment parts on the bike for that added bling, as well as new switches on the Ace bars and GT grips for that Nostalgic look and feel.

Fuel tank was a different matter, this time I wanted to fit an earlier K series fuel tank, so used 2 gas tank and sectioned them as I wanted a 5″ stretch for a long road race style petrol tank of back in the day, took a long time but sure looked great when completed.

It took quite a few weeks to get it right and I had another supersport frame I could use for a mock up so I didnt scratch the paint on the chassis.

Once that was all sorted I had to do the body work right here at home still as I worked in my garage all the time, lucky my neighbors are out all day so can bang, grind and sand with no interruptions at all.

Final fit of the gas tank and i like the stretch, not too much but just enough and an extra 2 gallons capacity is always good right?


I do not like 1977-1978 carbs and wanted to fit earlier versions, I only had old snotty ones in boxes that I had picked up at swap meets and yard sales, so a full rebuild was needed to get these to how I wanted them.

All cleaned up and synchronized and looking forward to fitting these to the motor and way easier and faster to tune than the flat tops.

I polished the original wheel hubs and used stainless spokes and attached them to CB750 Automatic rims as they are aluminum, bunged on some classic tread rubber and these look like they were from the factory.

This time I went with my CR style seat base and added a rear fender, fitted a Yoshimura exhaust of mine to give this machine more bark.

The bike is sitting well on those Automatic rims and glad that I made the choice to change to that as I have never like the 4 spoke set up that came on the 77 and 78 models, the Comstars as they were called were tin looking and I think, very weak.

Making parts fit that were not available for this bike always takes time and of course many failures, but I persisted and got the bike to where I wanted it so everything flowed.

I had an original Dunstall front fender that used to be hanging on the wall, I wanted to use it as it was from back home and very fitting it looks to.

I used the old Honda Super Sport gas tank decals from an old 400-4 as thats the color I chose for it and very cool it looks too, the bike was a hoot to ride with tons of low end torque.

It was a learning curve and I enjoyed the challenge on this bike, this was many years ago and I would change a few things now but this was a fun creation that was fun to ride.

You cannot lose sight of this in a parking lot, the color is loud and proud and the Customer loved it, a great stance to the bike too with that big long tank too its just smooth.

It may not be your style but I was super stoked to have a go at changing the sad tired original bike and give it a brand new life as well as a brand new look too.

I just wanted to share a few pics of this bike as I had lost them many moons ago and glad that I could load them up on my website for you to have a look at.

Thanks for taking your time to read my Blog on this Super Sport, of course I still make and sell parts and build Motorcycles, I always will as its a passion still for me.

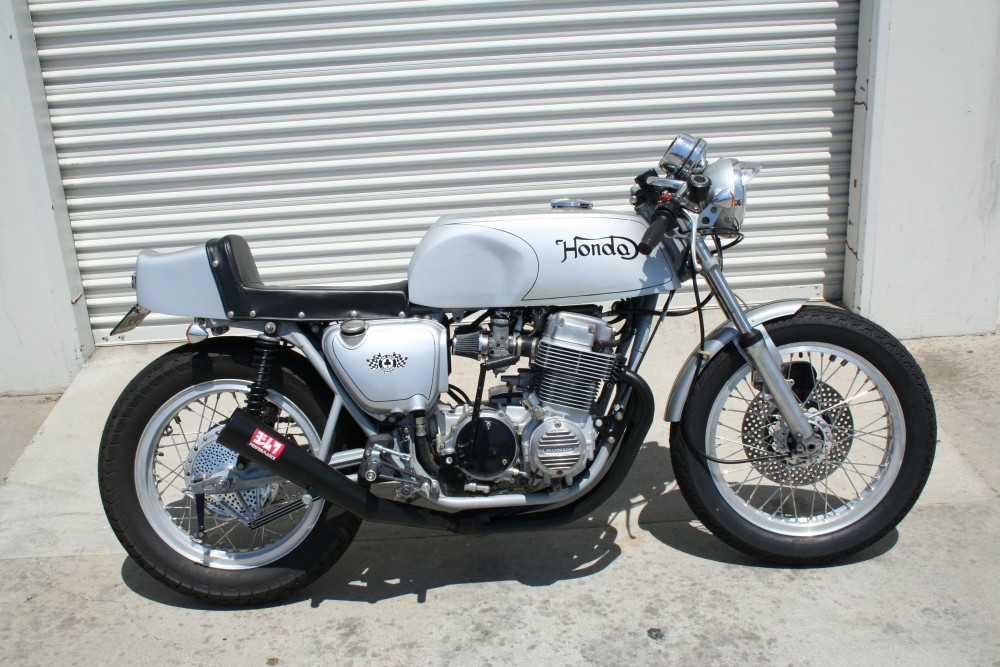
CB750 Silver Cafe Bike The Silver Manx

I have built so many Motorcycles over the years and its hard to keep track as to what I have turned out over these 24 years here in Southern California, but every now and again I will be reminded of a unique machine that I created and today is no different.

I created this machines from a bunch of parts that I had in my garage and I purchased about 15 bikes up in the desert 20 years ago and sored them in my garage, back garden and next doors garden, as the deal came up and I had to jump on it, so always had a few platform frames to use for future creations and this is just one of them that I came across on an old CD that I had discovered in the drawer of an old cupboard.

So, this was a conglomerate of parts ranginging from 1971 to 1976 and I just went ahead and built this as a fun homage to the Isle of man machines that I grew up watching and reading about as a teenager, this was something I wanted to be like my Black bike but a different color and exhaust etc, so with a head full of crazy ideas and a box full of old parts, I began my creation.

I had a New Old stock Paul Dunstall Fuel tank, in fact I did have 4 of them to be honest, I had already used one on my Black machine and I used one for the greenday bike and I wanted to use one on this creation to keep in that guise that had started to become popular a few years later.

I wanted to have this machine in a style very reminiscent of the Nortons of the day, hence me designing the Honda logo in a Norton font, but I was happy how this looked and so glad that I went with that idea, some 20 years later I am still selling that logo design, over 500 of them I have sold in numerous colors.

This bike had a lot of mixed up years parts and I knew this would be a fun machines to ride, it was big and bulky and fitted the Motor well as that inline four powerhouse always looked great hanging out of the frame, this was a Muscle style Motorcycle that would turn heads where ever it stood.

A fun bike to ride and plenty of zip, I did fit a lightened fly wheel to this so the motor would spin over faster and this would really pull hard through the gears as i used a set of old Kerker headers that had been sat in the rafters for a long time and I had picked up at a swap meet in Pomona many moons ago, I mated that to an old Action four megaphone muffler and kicked it up 20 degree’s for a more aggressive look and boy did it growl when you got on it.

This sat well on a set of 18 inch Vintage Borrani rims of which a I had 4 of and wanted to use them up, so re-laced to Honda Hubs and threw on some Bridgestone tires and these filled the chassis out nicely. I rebuilt and painted the Caliper and drilled the front rotor and painted middle and used stainless Hoses to make sure this machine would stop quickly when you needed to.

I also ditched the stock factory footpegs as I had Ace Bars on and wanted my feet further back, and chose some Tarozzi rear sets to give me the leg room that I needed for that leaning forward stance.

I used a Kawasaki H2 Race seat that I actually made a mold from my first one and that was then upholstered in Black Naugahyde and snaps fitted for that vintage look and, I could keep all my documents underneath that.

I also wanted to use some Vintage parts up I had and I had a few sets of Original Koni rear shocks, so cleaned them up and fitted them to the rear to give it that road race look of the day, and also polished and drilled the rear brake cover to dissipate heat and get rid of brake dust, you can see the rear brake stabilizer that I machined out of 6061 and suits the bike well.

A really fun bike that I enjoyed creating, I took some old original 1974 gauges apart and revamped them with new custom faces, painted the needles, re-chromed the lowers and tops.

This was a tall bike and even I was tippy toe and im 5’11 but I liked it that way as you got to respect the bike for what it was, it was not for the faint hearted that’s for sure and gave that late 60’s look even though its a 70’s bike.

Motor Cycle News from back home in the UK sent a journalist over to come and see the bike and test ride it and they did a smashing write up on what I do out here, to me that was so cool as I have read that Newspaper since 1973 and to have made it in there a few times was just a head spinning time for myself.

A professional stunt rider too, he did not hang about on that bike and was quite amazed at the powerband compared to most of the Modern machines he usually rides and was smiling all the time whilst perched high upon the pegs.

It was quite a responsive engine and soon got up to the magic ton with no problems at all and way more there but we kept running out of road lol, we both raced up and down Miraloma road where people like Robbie Gordon would thrash his Nascar rides or Baja trucks by my shop, so only fitting that we gave it some beans here too.

All in all I was super stoked at the way the bike turned out and glad to have found some old photos of it to show on the website.

I have no idea where it is now or who owns it but just another machine in my style that I really loved to create and enjoy, it may not be your cup of tea but you may appreciate the time and effort creating motorcycles just out of parts laying about?

Thanks for reading.


Refurbishing the 1976 CB750K Honda Four

Here we are with another episode of tweaking that old 1976 CB750K Model Honda, she has been sat for so many years, I was initially just going to get her running and sell her, but I have grown attached to this machine and its my best year personally, so thought I would remove worn out parts and fit brand new ones. Still a ways to go and I shall blog as I go along but – Eventually this will start to look like it did when it came out from the factory. Except the paint as that’s a really expensive process these days but I may even have a go at that later who knows, so stay tuned….

I didnt like the patina on the footpegs, even though this particular machine only has 17,000 Original miles on her, she has sat many decades in a Back yard and the eliments have taken a toll on any of the parts and brightwork, you can actually see that the foot peg rubber has no wear at all, which is more validation of the low milage, but I wanted to fit some OEM parts and here is a set of New pegs that I will fit to the bike.

The same thing goes for the rear brake, it had heavy rust pits that even I could not be able to polish out, so I thought I would buy an OEM genuine Honda one and that will help clean up that area that does get neglected over the years on these machines.  Not cheap but rechroming would of been even more expensive, so this was the lesser of two evils.


The Original Kick starter also has pitting, so I managed to track down an original New Old Stock one and later on I shall probably get the original one stripped and chromed again but not right now.

The Honda should start to look like it originally did when it rolled out the door all them years ago and I am enjoying the time and effort to get this to where it really needs to be.

I removed the old clutch lever and thought I may as well address that issue with a New version and that will clean up the handlebar area somewhat as many people leave that part of the bike and I always notice that.

Now that looks a million times better and with NOS grips too I am more than happy to get on with another part of the bike now, I am in no rush at all with this k6 and when completed will offer it up for sale.

The poor headstock always gets left out, the steering stem nut and washer was begging to be replaced as well as the steering pinch bolt, I could not leave the bike with these parts like that.

I try to use as much Genuine Honda stuff as I can lay my hands on and this is the case right here, it is fantastic quality and you know not only will it fit, it will last many years too.

So, another job done and if I find anything I feel that needs sorting out I shall of course do it as I am on a roll now, although this is by means no restoration, just a revamp of tired parts.

The starter motor covers always rust as they are easily open to the elements, so I ordered a new one as this has seen better days, what do you think?

A big improvement and I could go on forever on the bike, just a few of the fundamentals needed to be addressed but I still need to rebuild a rear wheel as the original one is just too rusty to strip and re-use as its too dangerous to mess with stuff like that.  Next up is to fit the footpegs, a New old stock brake pedal and kickstarter to at least clean that side of the bike up and look more original now.

Looking very much like the bike it was originally at the factory and am pleased I went this route on this one, although still many more things I have to replace to get it to the standard I will be happy with, but each week that goes by I give this a nod of approval.

So, I will be working on removing the center stand and painting it as its looking a little weather beaten, its a big heavy part but I want to get that looking good, I may Powder coat it for long lasting life in all honesty, so stay tuned……


Formula 1 Livery CB750 SS Honda Project

Well, I have been playing about with the F1 project and have decided to fit the good old Rocket 4 seat assembly and then upholster the seat with traditional style snaps, just to show the times of yesteryear and the old school seat set ups of the day.

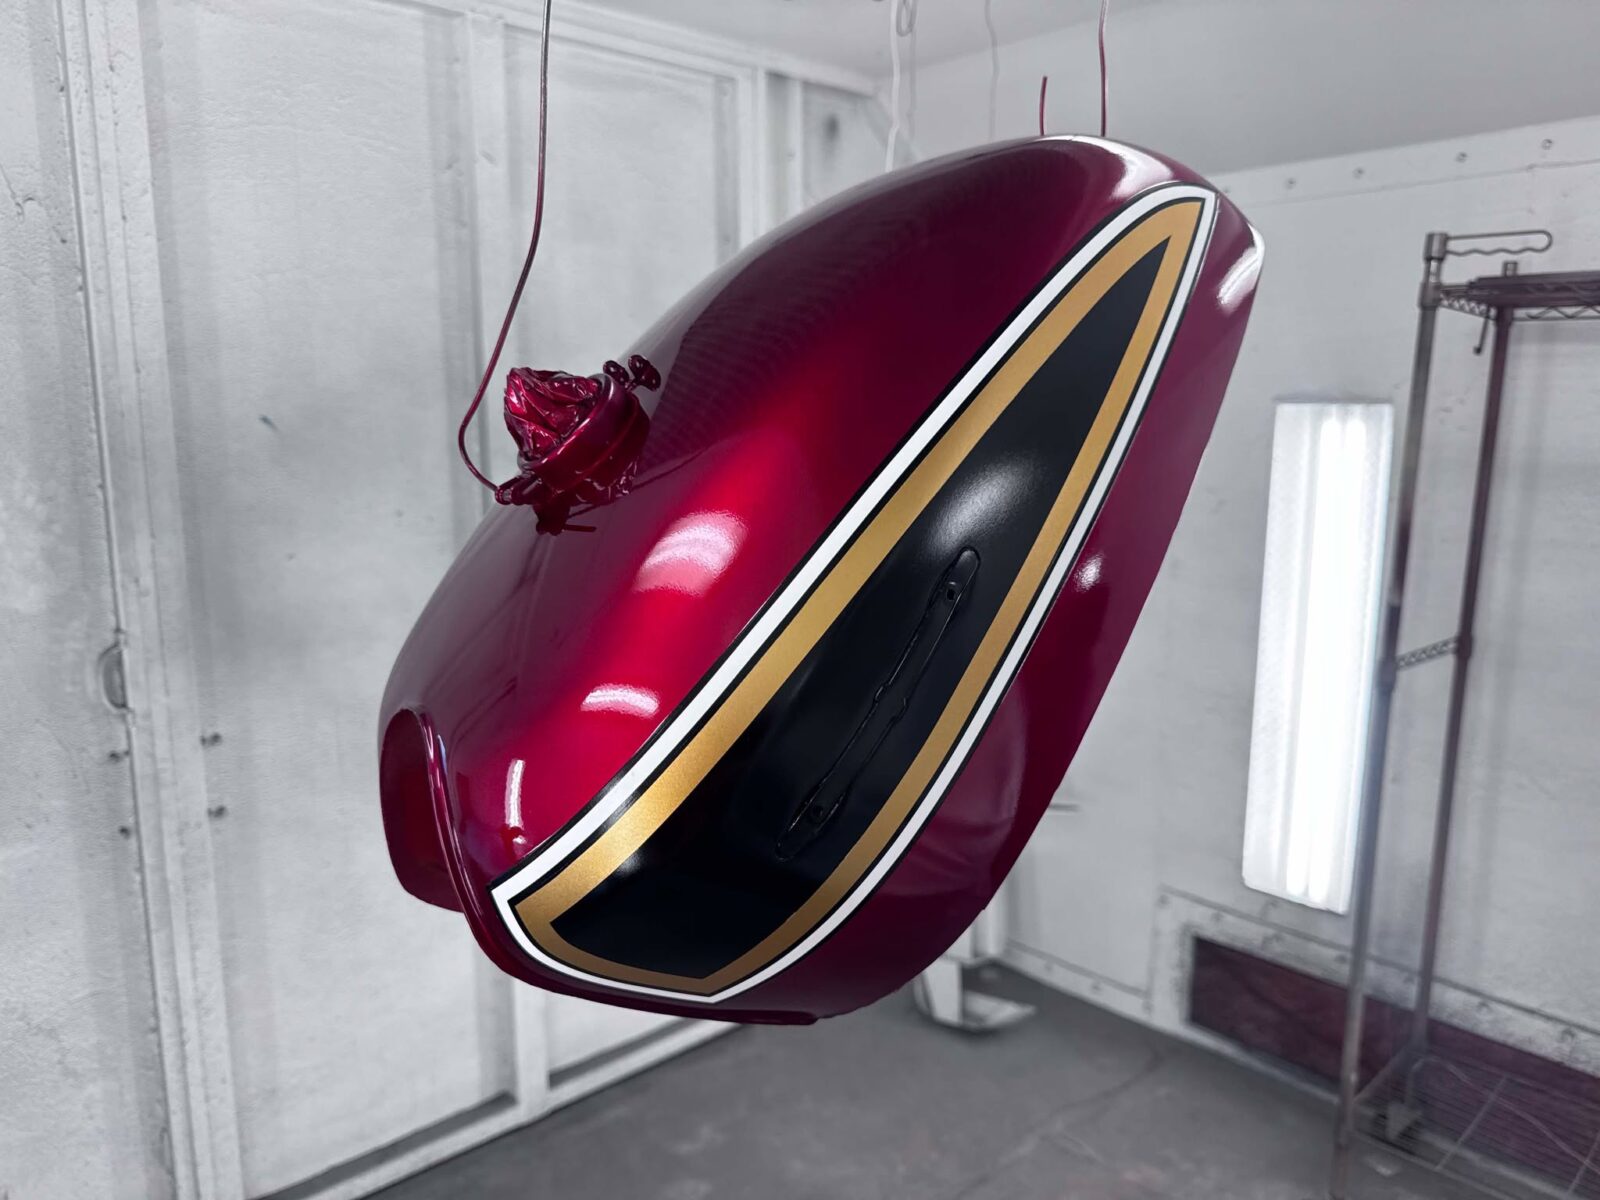
I am happy with the way it looks and it feels super comfy.plus your legs do not foul the air induction side scoops of which I really like now and want to try and represent some of the Ferrari’s styling, I still need to get all the body work wrapped but locating a company that knows what I am on about is not easy, my guy I use has flaked so its off to find someone who wants my money.

I will be looking forward to firing this old girl up and taking her for a spin about where I live as it was made for Motorcycles as we have miles of winding roads with off cambered corners and chicanes etc, this will be a blast to ride.

I went with a 17 LED stop tail light to give people lots of warning that this machine is there and again, give an old look with modern internals and this really does suit the bike, I still have to fashion a license plate bracket under it but thats later on.

Starting to look like a Classic Motorbike again and got plenty of hand waves and beeps from people driving by over the weekend, so that’s something positive eh?

I’m getting closer each time I do something and I believe the only hang up will be down to the graphic company, if I can’t find one that can do the job them I will have to paint it and letter it by hand and thats a time consuming job but we shall see.

Just thought I would do a little blog to let you know what I have been doing lately and hope you are enjoying the build????

Few More Exhaust systems available for your CB500, CB550 and CB750 SOHC

Well, the old year is almost up, a New year just around the corner and to be honest, I am looking forward to it, new challenges but new idea’s and New parts to be offered for a number of machines, something that I do like to do and offer to everybody.

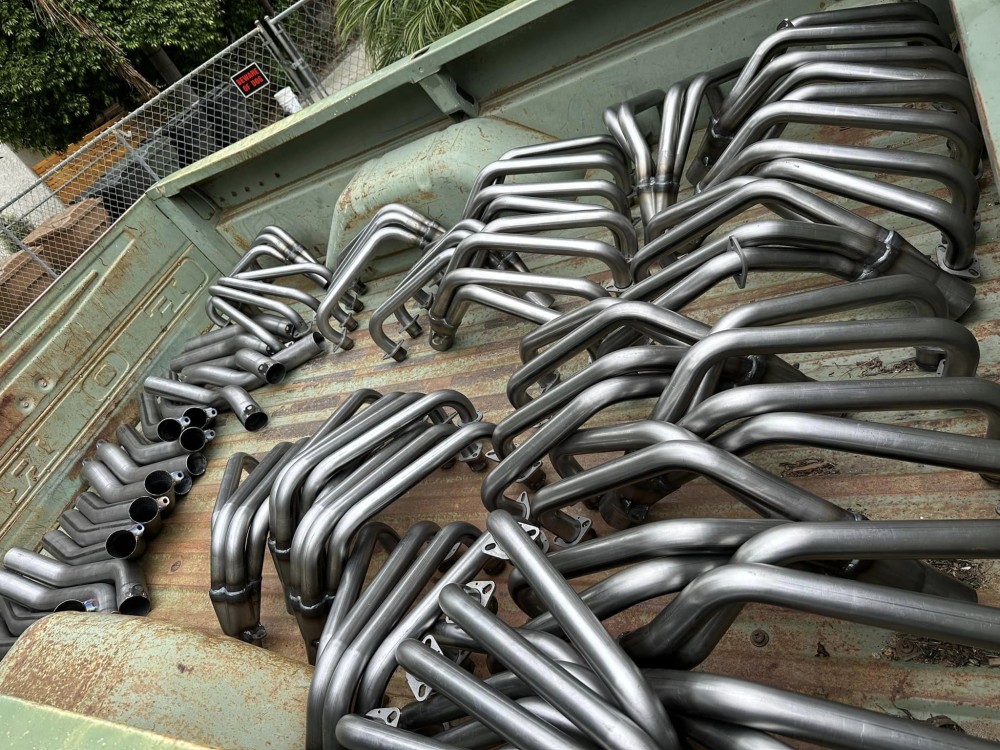
So, literally a Truckload of exhaust systems finished and some will be Ceramic coated and some will be Raw steel, as many like to paint or wrap them for them selves.

I ship all over the world and continue to help my Customers, I of course build the Motorcycles too, I make sure they fit and these do not leave my place until I am happy with them.

These systems are made right here in good old CALIFORNIA and I have been offering these for 23 years, affordable and work and sound awesome, a tried and tested formula that I have had many repeat customers.


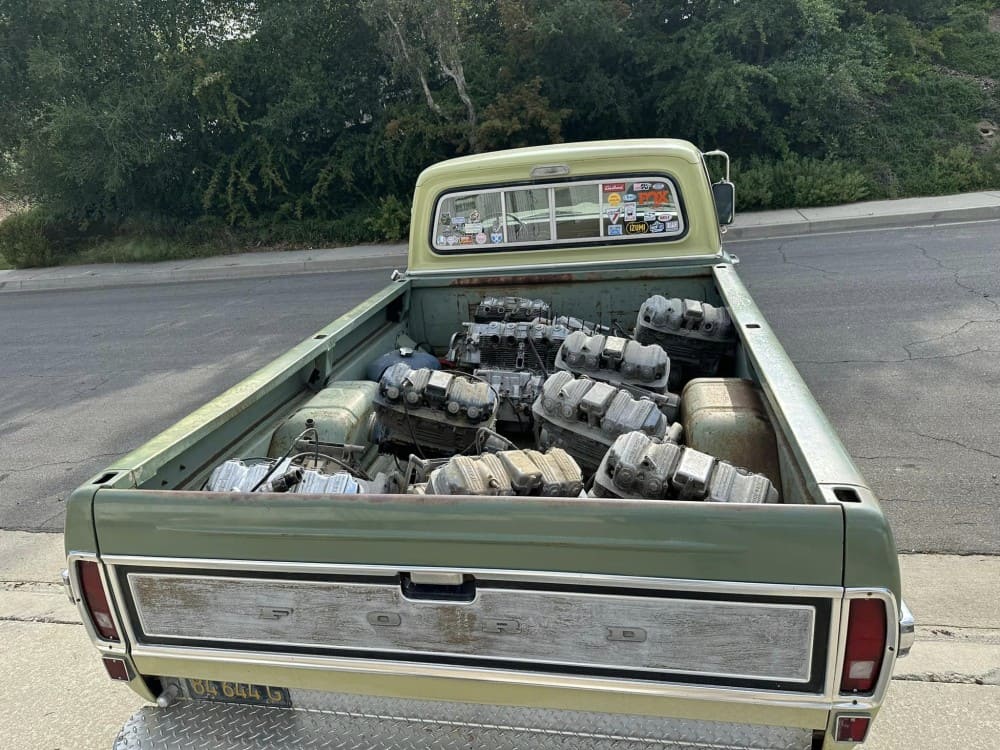
I went out for a Pint of milk, Came back with 10 CB750 Engines

It’s a funny old world, I mean, I initially went out to get a pint of milk and on the way there I came across a stash of SOHC Motors that a buddy of mine needed to off load as he was clearing his place out for renovations etc, what better way of getting rid of them then to let me have them.  And, as I have a Long bed Pick up truck, I thought to myself I should be able to get all 10 engines in the back of the F250.

Lucky for me, it’s only 4 miles from my place, and as my old beast only does 6 Miles to the Gallon, it was well worth taking the turck to go and get these SOHC in line Four Motors, they had been sat outside in the Californian sun for many many years but I can use some of the parts even if some of the motors are locked up etc.

It was no easy task carrying 10 CB750 Motors from a back yard and loading them onto my truck, at 230 pounds each, every one became heavier and heavier, by the time I had dragged the 10th Engine out and up and onto my bed of the F250, i was feeling as weak as watered down beer. But I got them all on and then thought about it, man- That’s just over One Ton of Engines, and the F250 is a 3/4 Ton.

I know I will have use for these, even for parts alone, I have a small collection now that for now I shall place in my barn and wait until later on when I have some free time to see what is what.

These towed home no problem in my pick up and that hardest part was unloading a Ton of engines, as it was only 3 miles from my place and I was already tired from throwing tem up onto the pick up bed, but, not as far to move to the barn.  I sure felt it afterwards as thats 2 ton moved in less than 2 hours.

I have stored them away now in the Barn, but I am still working on New doors for the outside, so will just have to tip toe around for a bit until I am ready to hang the doors up.

Glad to have got them and I know I will be turning to a few when I create some more machines for the tarmac, nice to have spares at your finger tips though.

I have another Motor in a frame you can see and one more on a dolly in the shop that I need to move over, always something to do at my New location, it will take a little time to get it how I want but then it will be icing on the cake as working from Home is always the easiest and more enjoyable way of working i think.

I have a lot of work to try and catch up on since our European visit but refreshed and ready to take on another chapter in the life of Custom Motorcycle creation, I have a few ideas for more exhausts, Handle bars and other parts, so stay tuned to the site if you can.

Oil leaks whilst i was away need to be cleaned and gaskets fitted, Doors painted and hung, and then organise the bikes and where the parts will go is something that is not to be rushed but everyday there is something to mess about with and I enjoy so much.

Thanks for reading my posts, I like to share what I have been up to and its great hearing from you too and seeing what you are building at home, if I can help I always will be it via email carpy@carpyscaferacers.com or call / text at 714-598-8392 as its a pleasure having a chin wag where ever you are in the globe.


Honda Santee Chopper, replacing worn out engine covers

As you may know, I picked up an old Santee framed Honda Chopper in a Local Garage a while back, progress has been slow as I am making parts for it to offer to the Chopper builders that are all around the globe, but i noticed that the engine case covers were looking bad.

The covers had been chromed, and as these are aluminum, the material gets hot and then cold and sweats, causing the chrome to bubble as it can’t expand like aluminum does, so it had bubbled, peeled and then started to corrode the aluminum, so I thought I would try and repurpose some old spare covers I had by polishing them to a chrome finish . As you can see from the photo above, the transmission cover was removed and the old gasket was toast, so luckily I had a New one in my cupboard as well as other parts needed to refurbish this area of the bike.

I removed the stator cover, but it took me a while to get this sorted as that round dark blue plate that is on the starter collar, fell off and hid behind the crank sprocket, took me a bit to fish that puppy out but never lost hope and now it’s time to remove the coil winding and the infield coil that are screwed into the case, I also leant the bike over and placed a blue tarp on the floor, as I did not want to drain the New oil that’s in the bike that I put in when I got the bike running for the first time, I knew I would lose a little bit of oil, so placed a catch tray under the chassis to save any catastrophes that could occur on jobs like this.

Make sure that when you remove any Factory Phillips shaped screws on your Honda- That the screwdrivers are JIS models. ( Japanese Industrial Standard) as regular Phillips screwdrivers will most like round the screw heads off.

What is the difference between JIS and Phillips?
JIS, or Japanese Industry Standard screws are just different enough in shape that Phillips drivers will not fit well and slip/strip them. The difference is in the leading angle of the point of the driver. Phillips bits have a larger angle and therefore don’t bottom out in the JIS screws, causing slippage.
Also, make sure that you use OEM Factory Gaskets, as the aftermarket versions not only fit badly, usually the holes do not all line up and the gasket seems to be inconsistent in thickness, I did learn the hard way, thinking I would save a few bucks on the cheaper brand, only to find I had to take the case all apart and fit OEM ones to stop the leaks.
Glad that I managed to get some time to work on this old girl today, she was left in an old garage in La Mirada for many years, sat on a pile of dirt and then covered with years of hoarding, so I will be happy to have it running and use it for a bit, before I put her up for sale, its a good looking rig now and I am sure when I have the New Stainless exhaust system on, it will find a new home ok.
I have lost count of how many SOHC motorcycles I have built, let alone worked on but in the hundreds for sure and always something different to find on some, I love what I do and continue to offer service for customers all over the world.These inline four Motors are fantastic machines and have given me many miles of smiles once they are tuned right.
Covers are on now on this side of the bike, still got to add a finned cover on the stator and fit another gear shifter as the old one is a horrible welded thing that I do not want to use, then I need to turn the bike around and remove the clutch cover and give that the same treatment.
On closer inspection of the front drive sprocket, I see a couple of issues here, the offset is out a little as the sprocket is wearing against the side of the chain and secondly, the sprocket that is fitted is an earlier version 530 and 77 and 78 Motors had 650 chains, I will fit a 540 but will address the issue here and have a sprocket on the way as I do not want any dramas of the chain breaking and destroying the cases.  Also, Chops have super long chains so need to count the links so that I can buy a custom one to replace this tired version.
The Old girl was looking tired, dirty and in need of a good clean up before any polishing can take place on this part, I always like to vapor hone these, that way the material is super clean and ready for some serious polishing, using some good old Jewelers Rouge.
Time to change the look of this 40 year old girl and turn it into something fresh and clean and to be honest, look like a brand New factory part, now I could refit the part in its OEM look but want to polish the piece to a chrome finish seeing this is a Chopper and not a restoration bike.
Now you can see how different that the Clutch cover looks after a process of vapor cleaning and now this part is ready for another transformation and get it polished up for that Custom styling that is so popular.
I am going to try and vapor many parts before I polish, as it makes everything so much easier to buff with no oil residue or grime in the way when I begin the Polishing stage, I am sure that you agree that this way is way better than the old school way? Now, the stator cover that’s on the bike is chromed and all peeling off, I want to use a spare old Stator cover I have and will vapor hone it to make it clean before trying to polish it.
This  spare old stator cover was just as tired as the other parts on the inline Four, and I am sure that yours looks in the same way too???? This Chopper will not be a show winning machine but a traditional Custom bike that was created back in the day and want to try and show what was in the magazines in the 70’s and 80’s when these were seen all over the place.
There is a bunch of old dings and scratches in the stator cover but many will buff out luckily and then it will have an old Finned cover going on the outside to embellish the engine as I have other finned covers on the bike, also these parts are getting harder to locate and finding some parts in my boxes of old stash came in handy but of course, still needed a lot of work, but the other one on the bike had been chromed and was peeling off and oxidizing badly, so this is the better way to replace it i think?
There is still a ton of stuff to do on the bike but wanted to share this with you today as it’s almost the weekend. Here are a couple of little videos that I took with my phone to show you what I am doing as the weather was raining outside, hope you enjoy?

The REVOLVER CB750 HONDA Custom Cafe Motorcycle I created and now resides in Australia

Every Motorcycle that I have built from the ground up is always tough to let it go, but- that’s what I do, create and build motorcycles as well as parts etc, this was fun creation that I put together for a Girl out in Australia, she wanted it gold flake and I did my very best to give her a Creation that had all the bells and whistles too.


It took me a while to get this machine to how I wanted it and I really enjoyed completing this project for the customer, using an old rusted out drag bike that I had sitting in the yard for years, it was so nice to recreate something and for the owner to be super stoked about it to.

I put my heart and soul into this build and I still supply these parts to my Customers today, a very cool head turning machine that not only looks great, it has a built motor and of course my Performance 4 into 1 exhaust system on it too.

So much Metalflake was used and Gallons of clear to give it that depth, braided cables throughout and am super proud of this build.

I hope that you like the way the bike sits and of course looks, more tricks than a Magicians coat to be honest and it was a blast to put together for Jess.

Custom Gauges, Display lights and a Ton of other Modifications throughout this bike made this one of my favorite rides of all time it sure was a piece of art.

I have sold hundreds of these 4 into 1 exhaust systems of mine, they sound and perform so well and have that 1970’s superbike reverb when you get on it.

Just thought I would share a fun memory that was so enjoyable to create and it resides on the other side of the Globe.

Here it is in Australia with the Owner, a one off machine that came out the way that she wanted it to look , thanks for having a look today.


HONDA Super Sport Comes to shop to get running again

I never know what may turn up at the workshop these days and this time I was surprised to unload a pretty clean 1975 Honda CB750F Super Sport , this has only 8000 miles on the odometer and is a one owner machine that a Customer just purchased locally and then bought it along to me to see if I can get the motorcycle to run and ride once more.

This Honda SS had been sored away for a while so the normal things will need to be addressed to be able to get the old girl to function once more and give the new owner miles of smiles.

The bike is pretty much as stock as a rock, the only thing missing is the big Cannon tailpipe and the side covers, I make the side covers so that will not be a problem but the tail pipe may be another story, but the bike has a tiny battery that is dead, I will need to order a New one for her to be able to get this girl cranking over, but I shall take one off one of my own projects to see if I can get the old girl to fire up again after a long slumber.

It really is in good condition for its age, remember , she is now 47 years old, and I expect her to be a little stiff in places and get stuck from standing in a garage all that time.

On inspection the Gas Petcock had a lot of Brown sticky old fuel around the lever, so knew that the carburetor would be in dire need of stripping and completely overhauling to give her a brand new life once more, as the gas in California is awful, and in less a month, fuel will start to go bad and tarnish the carburetors and also the gas tank inside, causing blockages inside the fuel journals and then I have to vapor blast them to get it all clean and look like a factory finish.

I had quite a task of pushing the inline four into the workshop, as the front brake was sticking like an egg in a pan with no oil, so to free the piston in the front caliper, you have to tap it with a rubber mallet, it tells me right away that the piston has rust spots from years of sitting in hot and cold temperatures and this stops the piston from letting the brake pads fully release.

So a full strip and rebuild will be necessary to get the old girl to move freely once more, I have no worries fixing this as its a common issue due to the caliper body being an aluminum composite and the Piston is made of polished steel, the piston gets small rust deposits on the outer part and catches the O Ring and wont retract unless you bang the caliper body with a Rubber Mallet, so all New parts soon and I can get that all taken care of.

The Carbs will be pulled but may try to run the old girl using a Lawnmower gas tank I rig up and run Fresh fuel through the tank of the the auxiliary jig I made and right through the carbs, as I fear the petrol tank has some rust in it and will need to clean that out too, but I will run the bike through the auxiliary just to make sure that the engine is running ok and no issues with gearbox, clutch and maybe check for any oil leaks from the cases or cylinder head etc.

Once I remove the carburetors, I can take apart, vapor hone, Polish and synchronize to get this inline four 500 pounder purring once more, these are great engines.

The airbox is always a royal pain to remove and refit but I have done it many times, just have to be patient to be honest and plenty of WD40 at hand to ease the parts out.

Eight Thousand Miles on the bike, that’s super low, just was not ridden much by the original owner and a great find to the new person that found it by chance, stoked for them, the display cluster is in really good condition and gauges are not broken or scratched either.


The year 1975 saw the introduction of three F models, the 400F, the 550F and the 750F. That 400F was truly trick, with mildly set-back footpegs, a flat handlebar and a lovely megaphone-styled exhaust. However, the company decided to go the conservative route with the 750, apparently more concerned with bringing four-piper types into the sporting world than with luring crossover owners from the Ducati realm.

This is partially a retelling of the making of the most significant motorcycle of the last 50 years, but it is a story worth hearing again. There was nothing new about disc brakes, electric starters and overhead camshaft, transverse-mounted, four-cylinder engines in 1969—just that Soichiro Honda had made them cheap and reliable. The CB750K was a winner from when it left the starting gate, but everybody knew that winners get old.

Which is when the styling artists got their orders. The K was OK, and would remain the mainstay of the lineup, but something snappier needed to be on the showroom floor. Not too snappy, mind you, not like a Laverda 750SF nor an MV Agusta 750S, but something to provide at least the image of snappiness.

Call down to the muffler department and tell them to make a four-into-one exhaust system. Have the sheet-metal guys stretch that gas tank out a little, not much, just a smidge to give it a slightly elongated, racy appearance; and hide the gas cap. Then tell the seat people to make a little fiberglass extension to fit the back of the saddle, sort of a faux bum-stop that some single-seaters had. The fast look was born.

Of course the frame and engine departments were given their chores. The chassis mathematicians figured that Super Sport riders would go a little faster than those on the standard K, so they gave the fork an extra degree of rake, to 28 degrees. Along with 3⁄4-inch more trail. And left those ugly gaiters off. Built a slightly longer swingarm, which added up to a 57.9-inch wheelbase, 6⁄10-inch longer than on the K. This meant that when the F rider was trickling along U.S. 2 in North Dakota at a modest 100 mph, the bike was reasonably steady.

Power was another matter. Honda did not necessarily like to advertise horsepower ratings, but dynamometers don’t lie—unless they are hopelessly miscalibrated, in which case it is not lying. The F put out a good 10 percent more ponies than the K, and while some of those 58 horsepower, at 8,000 rpm, could be attributed to the freer flowing qualities of the four-into-one exhaust, the rest came from a slight boost in compression ratio, using domed pistons, up from 9:1 to 9.2:1. And the timing specs on the valves had been altered to adjust to the new exhaust. Also the carburetion was cleaned up a tad, in those halcyon days before the EPA, with the best of intentions, made a botch of things.

The F, with a full 4.8 gallons of high test in the tank, registered slightly over 535 pounds on the scale. Which was 10 pounds heavier than a K, although the F had three less mufflers. Possibly a little extra metal had been included in order to strengthen the double-cradle frame, with triple tubes, a main and two auxiliaries, running under the tank.

Put the leg over the saddle, and the rider sat pretty high at 32 inches. Pull the choke on those four 28mm Keihins, turn the key, and choose between pushing the button or kicking the starter; 999 times out of a thousand, the button won. Vrooom! The muffler had a mellow, unobtrusive sound, the engine warmed quickly, and the rider was away.

Twenty miles down the road, the Bridgestone Super Speeds were heated appropriately, and the twisties began. Tire technology was still pretty basic 40 years ago, but the 18-inch rear and 19-inch front spoked wheels each had a disc. Hit that first sharp left hander at a rapid speed, and the F felt really good. However, coming back at the same speed, the corner now a right hander, there would be a Grounch! as the collector box located beneath the right footpeg touched down. A little help could be had by getting out the toolkit and maximizing the preload on the shocks, but even then, a 200-pound rider was going to mar the chrome. The owner of this CB750F has changed the shocks to S&W, a distinct improvement.

Other than that minor drawback, the F did live up to its sporty intent. It probably was the best-handling of the Japanese 750-plus fours of the time. And got better.


Another Build in Mock up stage, the CB750 Street Tracker

Well, I have a few old frames and parts laying about and pulled some stuff out of my storage and decided it was time to build another bike, as of course, thats what I like doing.

So, this time I want to build a street tracker style machine, just something tough looking but functional as well, I grew up with Motorcycles as a kid with my brother and we had old Dirt bikes and road bikes we turned into dirt bikes and this takes me back to that very time we rode around and around the back garden, just having time in the saddle when we were teenagers.

This old Honda is a Bone shaking Rusty 1978 K model that had been sat for over 30 years in the desert, so what better way to resurrect something and at the same time make something fun, as well as a part of my life back in Great Britain when my brother Mick and I would go out in any weather and I mean any weather, we even rode in deep cold snow with just jeans and a jumper but loved it.

So, there is this old carcass that I shall be using to try and at least make something that will at least turn the corners of my mouth up and have fun again, no idea what I am doing exactly for now but we shall see how this old inline Four progresses as and when I put time into it, its not a paying job, so will be just spare time here and there and a test of patience and money to see where this goes.

First off, I will get it running first, hasn’t run in decades and has seen a sorry life sat out in Palmdale out in the Desert with Sun, Wind, Rain and Frost invading its chassis , so I feel I must do something with this old Girl and she will run once more, I can promise you that.

This Machine is a Big heavy Lump, the 78K was the last of the SOHC models, along with the Super Sports and boy were they heavy, with a bigger exhaust, bigger Gas tank and seat, these were mammoths of their time, so all the old stuff like tank and seat were rotted away, I managed to mock the bike up to how I hope to have it later on, albeit I am sure things will change but I shall be keeping the Old School Lester Rims.

I got these off an old CR750 Race Bike about 17 years ago and have kept them in storage until now, so I will of course change the tires for Knobby versions to give that European Tracker look and see where we go.

Quite exciting really as it will be a look back at Yesteryear and something I and my Brother Mick will look at and remember the struggles we had as kids with bikes when all your mates had new stuff, we had Motorbikes that either were not wanted or left by the way side, but – Makes you a better person for it I feel.

This bike will rip along quite well and I am sure will be fun to take anywhere to be honest, as they have plenty of grunt and no worries green laneing, if you have good Enduro tires, then I see no real issues on here, so thats the style that I am going with and want it to look a little 1960’s.

Sp the adventure of building and recreating something begins, I had an old Alloy Gas tank and hope to use this as well as a Alloy Seat , they look kinda cool together and like that Sammy Miller set up, so hope that I can use these as it will be great to use up some old parts that were just sat on a shelf for Donkeys years collecting dust.

Will make the exhaust system up as I go along and it could change a few times, but we shall see, I do like the way it is going now though and I have some frame chopping and changing to do.

I will most probably run a Disc Rotor up the front too, not a fan of bikes with only half a braking system to be honest, it may look cool but not so cool when you got to stop at 70 Miles an hour with no front Anchor eh?

Parked up next to my old 1928 Model A Ford Roadster, 2 Classic bits of iron on the driveway.

So, there it is, in the garage, on my table and when I get spare time and a bit of loot, I shall begin trying a few things out to see what I can do to first of all, get this old girl to run again.

Once that is done, I can then go about and get the proportions right and start to create a fun Street tracker, Better get some liquid refreshment to get me in the mood with this 70’s Classic.